background image

13

English

Using the Cassette Deck 

(Recording)

VOLUME

CLOCK

TIMER/

SNOOZE

REC

AHB PRO

REV.MODE

SLEEP

REMOTE CONTROL RM-RXUV3

DIMMER

SLEEP

DISPLAY

FM MODE

MD/AUX

AHB PRO

AUTO

PRESET

CD

PROGRAM RANDOM

REPEAT

BASS

TREBLE

CANCEL

UP

SET

DOWN

TUNER

BAND

TAPE

VOLUME

CD

7

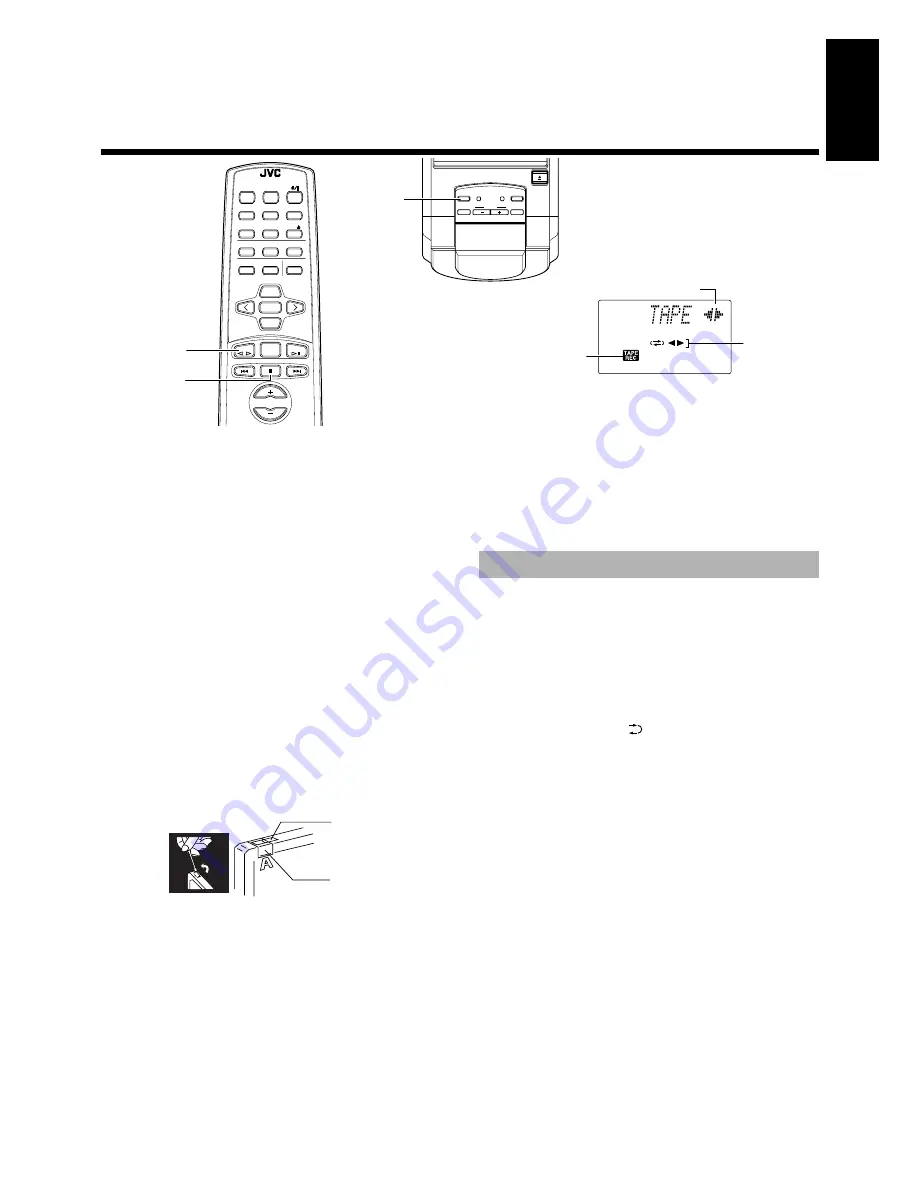
TAPE REC indicator

REC

When the System is in use, the display shows other items as well.
For simplicity, we show here only the items described in this section.

TAPE 

@


#

Tape Direction indicator

Reverse Mode 
indicator

Recording onto a tape from any of the sound sources is simple. Just
place a tape in the Cassette Deck, have the source ready, make one
or two settings, and you're ready to record. For each source the pro-
cedure is a little bit different so we explain each separately. But first,
here are a few things to make your recordings better.

Things To Know Before You Start 
Recording —————————————

It may be unlawful to record or play back copyrighted 
material without the consent of the copyright owner.

When you want to record onto both sides of a tape, you can set 
Reverse mode to do so. Recording automatically stops after re-
cording in the 

2

 direction. Therefore, make sure that the tape di-

rection is 

3

 when recording with Reverse mode on.

The recording level, which is the volume at which the new tape 
is being made, is automatically set correctly, so it is not affected 
by the VOLUME control on the System. Nor is it affected by 
adjusting the sound effects. Thus, during recording you can ad-
just the sound you are actually listening to without affecting the 
recording level.

Two small tabs on the back of the cassette tape, one for side A 
and one for side B, can be removed to prevent accidental erasure 
or recording.

To record on a cassette with the tabs removed, you must cover 
the holes with adhesive tape first. However, when a type II tape 
is used, only cover part of the hole as shown, since the other part 
of the hole (Type II detection slot) is used to detect the tape 
type.

Type I and Type II tapes can be used for recording.

Note:

At the start and end of cassette tapes, there is leader tape 

which cannot be recorded onto. Thus, when recording CDs or radio 
broadcasts, wind on the leader tape first to ensure getting the begin-
ning of the recording.

CAUTION: If a recording you make has excessive 
noise or static, the Unit may have been too close 
to a TV which was on during the recording. Either 
turn off the TV or increase the distance between 
the TV and the System.

You can record any sound source to tape as follows:

1. Insert a blank or erasable tape into the 

Cassette Deck and wind past the tape 
leader.

2. Press the REV. MODE button on the Unit if 

you want to record on both sides of the 
tape.

Press the button until the

indicator is lit.

When using Reverse mode, insert the tape so that it will be 
recorded in the forwards 

3

 direction.

3. Check the recording direction for the 

tape.

Make sure that the Tape Direction indicator is the same as that 
for the tape in the Cassette Deck. If the directions are different, 
press the TAPE 

@ #

 button to correct the tape direction and 

then press the 

e

 button to stop the tape.

4. Prepare the source, by, for example, tuning 

in a radio station or turning on connected 
auxiliary equipment.

Note:

For CD recording, refer to “CD Direct Recording” men-
tioned below.

5. Press the REC button on the Unit.

The “TAPE REC” indicator lights up and the System begins re-
cording.

If the tab of the cassette tape is removed to prevent erasure 
or recording, “NO REC” will appear on the display.

Type II detection
slot

Adhesive tape

Standard Recording

Summary of Contents for UX-V3

Page 1: ... which are located either on the rear bot tom or side of the cabinet Retain this information for future reference Model No Serial No INSTRUCTIONS BEDIENUNGSANLEITUNG MANUEL D INSTRUCTIONS GEBRUIKSAANWIJZING MANUAL DE INSTRUCCIONES ISTRUZIONI LVT0215 001A E MICRO COMPONENT SYSTEM MIKRO KOMPONENTEN SYSTEM SYSTEME DE MICROCOMPOSANTS MIKRO KOMPONENTEN SYSTEEM SISTEMAS DE MICROCOMPONENTES SISTEMA A MIC...

Page 2: ...er controlada remotamente Attenzione L interruttore Disinserire la spina del cavo di alimentazione dalla presa della rete elettrica per staccare completamente l alimentazione L interruttore in nessuna posizione stacca la linea di alimentazione elettrica princi pale È possibile il controllo remoto dell alimentazione Per l Italia Si dichiara che il questo prodotto di marca JVC è conforme alle prescr...

Page 3: ...oorkant Geen belemmeringen en voldoende ruimte 2 Zijkanten boven onderkant Geen belemmeringen plaatsen in de hieronder aangegeven zones 3 Onderkant Op vlakke ondergrond plaatsen Voldoende ventilatieruimte voorz ien door het toestel op een onderstel met een hoogte van 10 cm of meer te plaatsen Precaucion ventilación correcta Para evitar el riesgo de descargas eléctricas e incendio y prevenir posibl...

Page 4: ... oder beschädigter Spre Direkten Kontakt mit dem Strahl vermeiden 3 ACHTUNG Das Gehäuse nicht öffnen Das Gerät enthält keiner lei Teile die vom Benutzer gewartet werden können Überlassen Sie Wartungsarbeiten bitte qualifizierten Kundendienst Fachleu ten 1 PRODUIT LASER CLASSE 1 2 ATTENTION Radiation laser invisible quand l appareil est ouvert ou que le verrouillage est en panne ou désactivé Eviter...

Page 5: ...er each function The names of buttons controls and display messages are written in all capital letters e g TUNER BAND NO DISC System functions are written with an initial capital letter only e g Normal Play Use the table of contents to look up specific information you require We ve enjoyed making this manual for you and hope it serves you in enjoying the many features built into your System 1 Inst...

Page 6: ...rly To avoid battery leakage or explosion Remove batteries when the Remote Control will not be used for a long time When you need to replace the batteries replace both batteries at the same time with new ones Don t use an old battery with a new one Don t use different types of batteries together The Remote Control makes it easy to use many of the functions of the System from a distance of up to 7m...

Page 7: ...l lead the kind with a round wire going to an outside antenna disconnect the sup plied FM Wire Antenna CAUTION To avoid noise keep antennas away from the System the connecting cord and the AC power cord Connecting the FM Antenna L OPTICAL DIGITAL OUT L R R FM wire antenna supplied Coaxial cable FM outdoor antenna Not supplied Connecting the AM MW LW Antenna L OPTICAL DIGITAL OUT L R R Attach the A...

Page 8: ...lied between the System s LINE IN AUX LINE OUT terminals and the output input terminals of the external MD recorder tape deck etc You can then listen to the external source through the System or record the System s CD player cassette tape or tuner to the external unit Unplug the cap and connect an optical digital cord not supplied between the System s OPTICAL DIGITAL OUT terminal and the input ter...

Page 9: ...t function One Touch Operation turns the power on for you then starts the function you have specified If the System is not ready no CD in place the System still powers on so you can insert a CD How One Touch Operation works in each case is explained in the section dealing with that function The COMPU PLAY buttons are The System automatically turns on with the following operation When you press the...

Page 10: ...gh power is turned off called Standby Mode To switch off the System completely unplug the AC power cord from the wall outlet When you unplug the AC power cord the clock will be reset to 0 00 after about 20 minutes You can adjust the brightness of the backlighting for the display When the System is Turned On To make the brightness of the backlighting darker press the DIMMER button on the Remote Con...

Page 11: ... Control to adjust the bass level TREBLE Control You can adjust the treble level high frequency range level between 6 and 6 0 Flat 1 Press the TREBLE button on the Remote Control 2 Press the UP or DOWN button on the Remote Control to adjust the treble level In Standby mode the digital clock and analog clock appear on the display at the same time Meanwhile only the analog clock is dis played when a...

Page 12: ...he following methods Manual Tuning Press the 4 or button on the Unit or the Remote Control repeatedly to move from frequency to frequency until you find the station you want OR Auto Tuning If you press and hold the 4 or button on the Unit or the Remote Control for one second or more the frequency changes down or up automatically until a station is found OR Preset Tuning using the Remote Control Po...

Page 13: ...UTO PRESET button on the Remote Control for more than two sec onds 3 Repeat steps 1 2 for the other band If you want to change the preset stations carry out the Manual Presetting for the desired preset numbers CAUTION Even if the system is unplugged or if the power failure occurs the preset stations will be stored for about 24 hours However in case the preset stations are erased you will need to p...

Page 14: ... no CD is inserted NO DISC appears on the display and the CD Player remains in Stop mode 1 Press the CD OPEN CLOSE 0 button on the Unit or the CD 0 button on the Remote Control The CD cover opens 2 Place a CD with its label side out as shown below Press down on the CD s center until you hear a click 3 Press the CD OPEN CLOSE 0 button or CD 0 button again to close the CD cover To close the CD cover...

Page 15: ...yer is stopped each time press the 4 or button the tracks making up the program will successively be displayed in the programmed order To delete all the tracks in the program in stop mode press the 7 button Pressing the CD 0 button to open the CD cover will also clear the programmed tracks To exit the program mode once while the CD Player is stopped press the PROGRAM button to light off the CD PRO...

Page 16: ...he side you want to lis ten facing up If the cassette holder does not open turn the Unit off then back on and press the EJECT button again 3 Close the holder gently until it clicks 4 Press the TAPE button The tape is played in the direction shown by the Tape Direction indicator 5 If you need to change the playback direc tion press the TAPE again The opposite side Tape Direction indicator lights up...

Page 17: ...ure or recording To record on a cassette with the tabs removed you must cover the holes with adhesive tape first However when a type II tape is used only cover part of the hole as shown since the other part of the hole Type II detection slot is used to detect the tape type Type I and Type II tapes can be used for recording Note At the start and end of cassette tapes there is leader tape which cann...

Page 18: ...y left between selections If you do not want pauses between selections do the follow ing before proceeding to the next step Press the CD 8 button on the Unit or the Remote Control twice The CD player enters Pause mode 7 Press the REC button on the Unit The TAPE REC indicator lights up and the System begins re cording If you make a recording with Reverse mode on the Unit will record the last song a...

Page 19: ...s the AHB PRO button to reinforce the bass sound Press the BASS TREBLE button on the Remote Control to con trol the tone See Tone Control on page 7 To exit MD AUX mode you will automatically switch out of MD AUX mode when you select another source Note For operation of the external equipment refer to its Instruc tions You can record the System s source to external equipment which is connected to t...

Page 20: ...ks on the display and the clock must be reset Note The clock may gain or lose one to two minutes per month Once you have set the Daily Timer the timer will be activated at the same time every day It can be cancelled and re activate whenever you wish The Timer indicator on the display shows when the Daily Timer you have set is in effect Note Perform each setting within 30 seconds Otherwise setting ...

Page 21: ...the timer 5 Minute Snoozing When the timer turns on the music source you can if you wish ac tivate the 5 minute snoozing function to temporarily stop playback Press the TIMER SNOOZE button on the Unit The SNOOZE indicator lights up on the display and the power is turned off for five minutes for snoozing Use the Sleep Timer to turn the System off after a certain number of minutes when it is playing...

Page 22: ... shown Use a blower available from a camera store to blow dust off the lens If there are fingerprints etc on the lens gently wipe clean with a cotton swab Moisture Condensation Moisture may condense on the lens inside the System in the following cases After turning on heating in the room In a damp room If the System is brought directly from a cold to a warm place Should this occur the System may m...

Page 23: ...a is too close to the System The FM Wire Antenna is not properly extended and positioned Reconnect the antenna securely Change the position and direction of the AM Loop Antenna Extend FM Wire Antenna to the best reception position The CD skips The CD is dirty or scratched Clean or replace the CD The CD does not play The CD is upside down Put the CD in with the label side up Unable to operate the R...

Page 24: ...layer Signal To Noise Ratio 90 dB Wow And Flutter Unmeasurable Tuner FM Tuner Tuning Range 87 5 108 0 MHz AM Tuner TuningRange MW 522 1 629 kHz LW 144 288 kHz Speaker Specifications each unit Speakers 8 cm cone Impedance 4 ohms Dimensions 140 230 217 mm W H D Mass Approx 1 8 kg General Dimensions 438 232 310 5 mm W H D Mass Approx 7 2 kg Accessories Power Cord 1 AM Loop Antenna 1 Remote Control 1 ...

Page 25: ...VICTOR COMPANY OF JAPAN LIMITED EN GE FR NL SP IT 0299MNMCREJSC ...

Reviews: