background image

E-43

Image pickup device:

1/3 type IT CCD, 752 (H) 

×

 582 (V)

Synchronization method :

Internal, Line lock, Full Genlock

Scanning frequency:

(H) 15.625 kHz, (V) 50 Hz

Resolution:

480 TV lines (H)

VIDEO  OUT:

Composite video signal 1 V (p-p), 75 

 (BNC)

Y/C  OUT:

Y: 1.0 V (p–p), 75 

C: 0.3 V (p–p), 75 

Video S/N ratio:

50 dB (AGC OFF)

Minimum required illumination:

0.9 lx (50 %, F1.2, AGC 20 dB)
0.45 lx (50 %, F1.2, AGC 20 dB, LOLUX MODE)
0.45 lx (25 %, F1.2, AGC 20 dB)
0.23 lx (25 %, F1.2, AGC 20 dB, LOLUX MODE)
0.03 lx (50 %, F1.2, AGC 20 dB, B&W MODE)
0.015 lx (50 %, F1.2, AGC 20 dB, LOLUX MODE, B&W MODE)
0.015 lx (25 %, F1.2, AGC 20 dB, B&W MODE)
0.03 lx (50 %, F1.2, AGC 20 dB, SENSE UP 

× 

32)

0.014 lx (50 %, F1.2, AGC 20 dB, LOLUX MODE, SENSE UP 

× 

32)

Communication:

RS-422A or RS-485 (switchable)
9600 bit/s

Lens mount:

C/CS mount

Power supply and power consumption: AC 24 V 

`

 50 Hz/60 Hz, DC 12 V —

--- 530 mA

Ambient temperature:

–10 °C to 50 °C (operation)
0 °C to 40 °C (recommended)

Mass:

620 

˝

Accessory:

Instructions .................... 2 Ferrite core ..................... 1
4P plug .......................... 1

Specifications

Design and specifications are subject to change without notice.

OTHERS

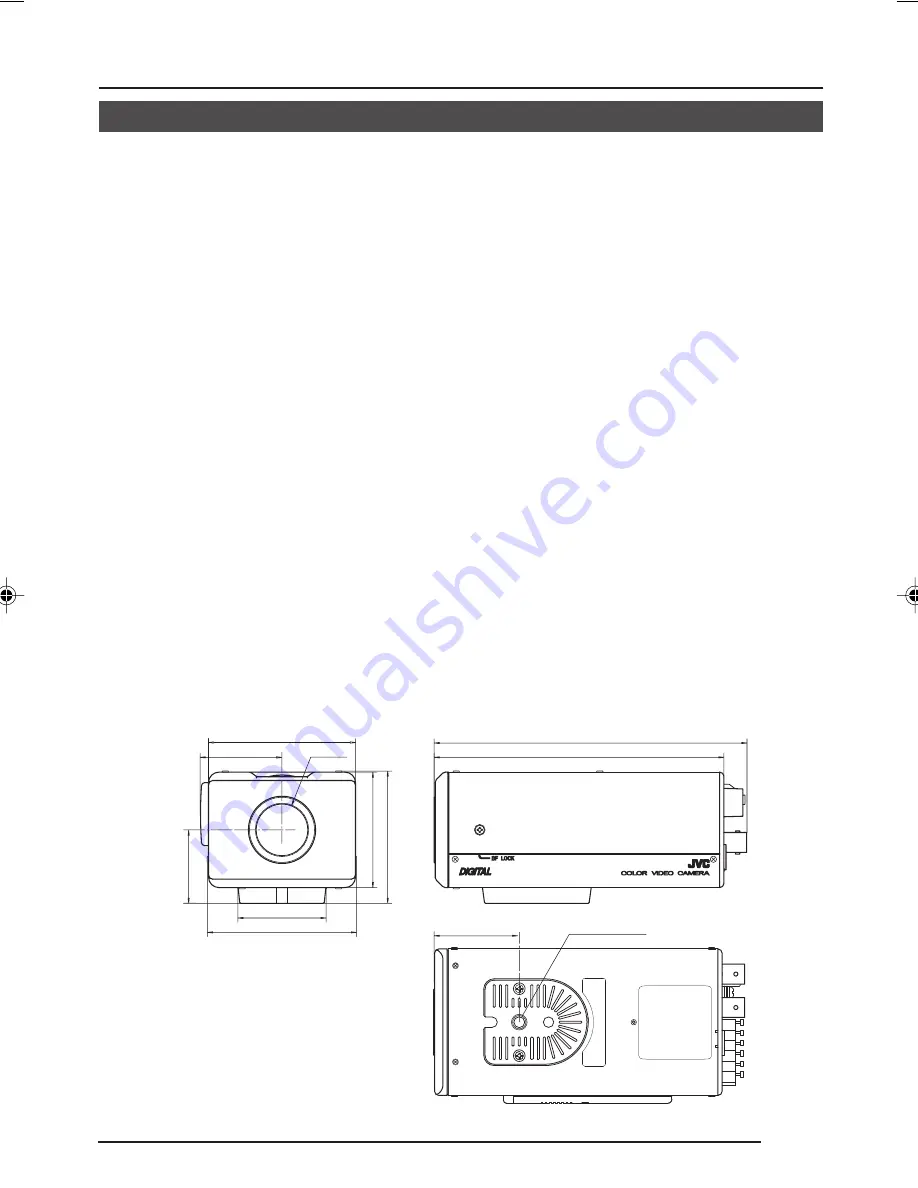
DIMENSIONS (Unit: mm)

71

70

55

63

42

138

138

149

41

U1-32

U1-32

39

35

1/4 – 20UNC

TK-C1430/23-44,E.65E

9/17/04, 5:38 PM

43

Summary of Contents for TK-C1430E

Page 1: ...E 1 TK C1430 INSTRUCTIONS COLOUR VIDEO CAMERA LWT0207 001B H BF LOOK COLOR VIDEO CAMERA DIGITAL ...

Page 2: ...le operation of the appliance and to protect it from overheating these openings must not be blocked or covered The openings should never be blocked by placing the appliance on a bed sofa rug or other similar surface This appliance should never be placed near or over a radiator or heat register This appli ance should not be placed in a built in installation such as a bookcase unless proper ventilat...

Page 3: ...pliance c If the appliance has been exposed to rain or water d If the appliance does not operate normally by following the operating instructions Ad just only those controls that are covered by the operating instructions as improper adjustment of other controls may result in damage and will often require extensive work by a qualified technician to restore the appliance to normal operation e If the...

Page 4: ...ANCETO RAIN OR MOISTURE Due to design modifications data given in this instruction book are subject to possible change without prior notice AVERTISSEMENT POUR EVITER LES RISQUES D INCENDIE OU D ELECTRO CUTION NE PAS EXPOSER L APPAREIL A L HUMIDITE OU A LA PLUIE Safety Precautions ...

Page 5: ...e back 16 Mounting the camera 18 Lens adjustment 20 Back focus adjustment 21 Auto white balance control adjustment 22 MENU SETTING Setting the menu 23 The flow of menu screen 24 SYNC ADJUST Screen 26 ALC SETTINGS Screen 26 VIDEO ADJUST Screen 31 MODE SELECT Screen 32 MOTION DETECT Screen 34 COMMUNICATION Screen 35 MAINTENANCE Screen 35 FACTORY SETTINGS Screen 35 BLC EDITTING Screen 36 Manual Adjus...

Page 6: ...ic zoom allows monitoring in far greater detail Features 䡲 Before starting an important recording be sure to perform a test recording in order to confirm that a normal recording is possible 䡲 We do not accept liability for the loss of a recording in the case of it becoming impossible to record due to a problem in the video camera VCR or video tape 䡲 We do not accept liability for any damage to the...

Page 7: ...object such as a lamp is shot the image on the screen may have vertical lines smear or blur blooming at its periphery This is a characteristic of the CCD and is not a defect Operating Precautions Observe the following when carrying out camera maintenance Turn the power OFF before proceeding to carry out maintenance If it is contaminated seriously clean the contaminated part with a cloth or a tissu...

Page 8: ...he bracket has been attached on the bottom of the camera before shipment It can also be attached on the top according to the circumstance To re attach the bracket use the threaded holes at the top with the camera mounting bracket fixing screws 7 5 Camera mounting screw hole 1 4 inch Use this hole when mounting the camera onto a fixer pan tilt unit and the like Use a screw shorter than 7 mm 6 Rotat...

Page 9: ... lens Page 15 11 MENU Menu Button When pressed a menu screen is brought up Page 23 ON SIMPLEX ON LL SET AWC MENU CAMERA SETUP EXTTERM OFF INT GL DUPLEX RXTERM OFF NOT USED VIDEO DC IRIS 12 SET AWC Set Auto White Control Button SET Press this button to display a sub menu Page 23 AWC If this button is kept pressed for more than 1 second a one push auto white balance function works and sets the white...

Page 10: ...ipment 16 DUPLEX SIMPLEX Selector Switch for Transmission System If the setting is changed be absolutely sure to switch on the power again DUPLEX This switch sets to DUPLEX when the transmission between the camera and a remote control unit is in a duplex system two way SIMPLEX This switch sets to SIMPLEX when the transmission between the camera and a remote control unit is in a simplex system one ...

Page 11: ... B W COLOUR switching using the control signal the signals are input through these terminals Page 30 B W make COLOUR break 22 Y C OUT Y C output connector This 4 pin connector outputs the luminance and chrominance signal Pin configuration of Y C OUT connector 23 VIDEO OUT Video signal output connector This BNC connector outputs a composite video signal Connect this to the video input connector of ...

Page 12: ... example showing camera ID as 05 When controlling with any system except the RM P2580 execute proper settings using switches and menu screens according to the systems used Page 14 P R O T O O L D U P L E X I D 0 5 C DUPLEX should be displayed The number shown in the part of ID should be correct MACHINE ID 1 Menu screen RX TERM OFF switch MACHINE ID 2 Menu screen RX TERM OFF switch MACHINE ID 8 Men...

Page 13: ...h to the DUPLEX If the setting is changed be absolutely sure to switch on the power again Set this switch to ON signal termination ON only on the camera placed at the end of the control signal cable Set to OFF on all other cameras Setting on the MENU screen Page 35 If the setting is changed escape from the menu screen once and definitely switch on the power again MACHINE ID setting switches Set th...

Page 14: ...tion installation according to the procedures described below Turn OFF the power supply to all equipment to be used before making carefully 1 Mounting the lens Page 15 4 Setting the switches Page 13 6 Back focus adjustment Page 21 5 Lens adjustment Page 20 7 Auto white balance control adjustment Page 22 3 Mounting the camera Page 18 To controlling systems such as RM P2580 To alarm terminals such a...

Page 15: ...lation and damage the inner part of the camera resulting in a malfunc tion The F mark indicates a focal point 2 Mount the lens on the camera by turning the lens clockwise Adjust its position 3 When using an auto iris lens with an EE amplifier turn the switch to the VIDEO side When no EE amplifier is equipped turn the switch to the DC side 4 If the lens has an auto iris mechanism connect the lens c...

Page 16: ...d Maximum extension reference Conductor diameter 100 m 260 m 410 m 500 m 1 0 mm 1 6 mm 2 0 mm 2 6 mm and more and more and more and more Connections on the back CONNECTION INSTALLATION Power supply DC 12V or AC 24V Installing the ferrite core To retain electromagnetic compatibility use the ferrite cores provided when connecting to the lens Ferrite core Video iris lens or galvanometnc iris lens VID...

Page 17: ...not possible with a signal con taining too much jitter such as a VCR or videodisc playback signal For details consult a JVC authorized dealer MEMO If thin cables are used i e with a high resistance a significant voltage drop will occur when the unit is at its maximum power consumption Either use a thick cable to restrict the voltage drop at the camera side to below 10 or place the power supply nea...

Page 18: ...improper installation Fall Prevention Exercise maximum caution when installing the unit to the wall or ceiling You should not engage in the installation work yourself Ask a professional to do the job since the fall of the unit can result in injuries and accidents When installing the unit on a fixer Pan Tilt unit etc make sure to install it firmly using a rotation preventing hole provided to preven...

Page 19: ...ixing unit or Pan Tilt unit Mounting from the top Remove the CAMERA MOUNTING BRACKET from the bottom of the camera by removing two fixing screws as shown w Attach the CAMERA MOUNTING BRACKET to the top then mount the camera on the Fixing Unit as shown e Make sure that two original screws are used when mounting the CAMERA MOUNTING BRACKET Be sure to use a 6 mm long locking screw for the camera moun...

Page 20: ...on Too bright Counterclockwise Toward L Too dark Clockwise Toward H MEMO If the sensitivity adjustment LEVEL is turned excessively to L the sensitivity in creases because of the AGC function of the camera and the image looks grainy If the video iris lens is set to too low a level malfunction such as the hunting phenom enon in which the iris opens or closes unintentionally may occur In such a case ...

Page 21: ...hten the back focus locking screw by turning it clockwise Back focus adjustment Be sure to make back focus adjustments when changing the lens mounting method or using a different lens If required adjust it as follows To make accurate back focus adjustments use the electronic shutter and the ND filter and carry out the following adjustments in a state where the lens iris is released The ND filter a...

Page 22: ... displayed 4 Error message display NG OBJECT Displayed when there is not enough white colour on an object or the colour temperature is not suitable By taking a shot of a white object to fill the screen adjust the white balance again ERROR LOW LIGHT Displayed when the light is low In crease the illumination then re adjust the white balance ERROR HIGH LIGHT Displayed when the light is too bright Dec...

Page 23: ...turns to the normal screen quitting the menu display When the setting is executed using the RM P2580 use a joy stick instead of the button L A C SE T T I NGS I I R S LE VEL NORMAL A E V RA E G PEAK 8 2 A C G MODE 2 dB 0 S UT H T ER E x D L UX R N RMAL O L O O F F P I O R R I T Y B C L O F F S NS E E UP O F F MODE B W COLOUR MODE L A C SE T T I NGS A E V RA E G PEAK 8 2 A C G MODE 2 dB 0 S UT H T E...

Page 24: ...DJ UST WH TE BAL E ATW NC A I CO OUR L E NORMAL EL V L E N ANCE LE NORMAL EL V H P E EST AL LE NORMAL EL V D AU O BL AC K OF F T L C T T I MO O N DE T EC T MO E OFF D L E E L NORMAL V AR A ED I E AL RM T I E M 1 0 s A DE ONSTRA T I N O M WH I T E BALANC E CONTROL AWC SE T R B M G g F ACTORY SET T I NGS T I N MA T ENANC E CC S P OT D D CC SPOT CA E L NC E X C TE U E h e a t u p 3 0 m i n i n a d v ...

Page 25: ...I DOUBLE AL ARM COLOUR WH I TE MM CO UN I CAT I ON S T LE P TO P Y MA H NE D I I C SHUT T ER SPEED SPEED 1 1 2 0 F AST L I M I T E D x E R E D x R L L EV M C AMER A T I T L E ÄÖ ÂÊ Î Ô ÛÇÑ ä ë ï ö ü â ê î ô Ü û á é í ó à è ì ò ù ç ñ ß ú 0 1 2 3 4 5 6 7 8 9 ABC DE K L MNO P FG H I J QRS T U VWX Y Z a b c d e k l mn o p f g h i j q r s t u v w x y z T D i s l a y i t l e AUX TERMINAL D Z00M MAX B W ...

Page 26: ...er adjusting H PHASE When it is not set to GL will appear disabling change the set value Set values 0 90 180 270 Fine adjustment of the SC phase in gen lock operation When it is not set to GL will appear disabling change the set value Set values 0 to 255 MENU SETTING SYNC ADJUST Screen This executes the setting regarding synchronization 0 0 0 128 ALC SETTINGS Screen Item Functions and set values I...

Page 27: ... illumination condition and so on During ExDR mode the item M ExDR SPEED on the SHUTTER ExDR screen sets the composing high shutter speed It is possible to set only when the items BLC and SENSE UP are OFF What s more the ExDR LEVEL sets the signal level of the composing high speed shutter A ExDR This is used when the subjects having different luminous flux densities are continuously used night and...

Page 28: ...nnot be set Set values 1 500 1 1000 1 2000 1 4000 1 10000 1 20000 This sets a maximum gain of the AGC Automatic Gain Control OFF When the AGC function is not used 10dB When luminous energy is insufficient 20dB When luminous energy is extremely insufficient SUPER When brightness is insufficient even when it is set to 20dB If the gain is increased the screen gets rough in a dark place If it is set t...

Page 29: ...e subject becomes dark SENSE UP sensitivity goes up functions with priority offering suitability that gives priority to image Sets the backlight compensation function Set when a bright light source etc is placed in the same direction as the subject If the item SHUTTER ExDR is set to the M ExDR or the A ExDR will appear and the BLC does not function OFF The backlight compensation function does not ...

Page 30: ...een conditions may make this impossible Moreover when you use infrared illumination if the subject excessively reflects a B W screen can switch to a color screen To make absolutely certain of B W COLOUR switching set to AUX and input the control signal to the AUX terminal If AUX is selected as the B W item theAUX TERMINAL item is automatically set to B W IN If this changes to anything other than A...

Page 31: ... black and white mode and any setting cannot be changed To adjust the contour enhancing level of the video signal To make the picture quality harder Increase the value To make the picture quality softer Decrease the value Set values 5 to NORMAL to 5 To adjust the pedestal level of the video signal To brighten picture Increase the value To darken picture Decrease the value Set values 5 to NORMAL to...

Page 32: ...ht of the image are reversed U D Up and down of the image are reversed ALL Up and down and left and right of the image are reversed The highlighted part of the image is made black to make the surroundings of the highlighted part better visible Set to HIGH when there are many highlighted parts Set values OFF LOW MIDDLE HIGH Set the size of the characters displayed in the case of alarms This sets th...

Page 33: ...is we recommend that you link in motion this unit and the infrared illuminator etc by control signals after setting to B W IN If the B W item is set to AUX the AUX TERMINAL item changes to B W IN and can not be changed This function sets the maximum zoom ratio of the electronic zooming Set values x1 x2 x4 x6 x8 x10 MEMO The electronic zoom function can only be used by the communication command of ...

Page 34: ...o function with large signal level change decrease the value To function with small signal level change increase the value Set values 5 to NORMAL to 5 This sets the range in which the motion detecting function works Page 39 This sets the output time of the alarm signal output of AUX terminal as well as ALARM display on the screen when motion is detected If the item MODE is set to OFF will appear a...

Page 35: ... individual cameras in a group No proper function can be realized if an ID number is repeated within a system A combined use with the RM P2580 necessitates the setting together with the video input number of the RM P2580 If the item STYLE is set to P TO P will appear and settings cannot be changed Item Functions and set values Initial value FACTORY SETTINGS Set values are returned to initial value...

Page 36: ...ING screen to EDIT1 2 Press the SET button The EDIT1 screen is brought up 3 Set the upper side and left side of the metering area using the button The sides having marks can be changed 4 Press the SET button The changeable sides of the metering area move to the right side and base side 5 Set the base and right side of the metering area using the button If the SET button is pressed once more the tw...

Page 37: ...BALANCE adjustment screen appears on the monitor Select AWC SET and press the SET button AWC white balance adjust ment is performed and the WHITE BALANCE CONTROL screen appears on the monitor 2 Select the hue to be adjusted R B or Mg G Press the or button 3 Adjust the hue Press the or button The ı indicator moves in accordance with the setting When a setting is changed the mark appears at the orig...

Page 38: ...ELECT Up to 24 characters can be selected as camera text for each camera The set characters are displayed at the bottom of the screen MENU SETTING CAMERA TITLE Setting CAMERA SETUP SET MENU AWC SET button MENU button MODE SELECT CAMERA T I T L E ED I T REV ERS E MODE OF F AL M T I TLE S Z E I DOUBLE AL ARM COLOUR WH I TE AUX TERMINAL B W IN D ZOOM MAX x2 MODE SELECT screen CAMERA TITLE screen C AM...

Page 39: ...SET button The area not subject to detection is set and it turns gray lights up To cancel the set area press the SET button again 5 Repeat items 3 and 4 above 6 Upon completion of setting press the MENU button The screen returns to the MOTION DETECT menu MEMO Indicated positions on the screen are rough guides Be sure to check and conform the positions on the actual screen It is possible to check a...

Page 40: ...UT 1 Select MODE SELECT on the MAIN MENU screen 2 Press the SET button The MODE SELECT screen appears 3 Press either the button or the button and select the AUX TERMINAL item 4 Press either the button or the button and set to B W OUT 5 Upon completion of setting press the MENU button twice Then the normal screen is brought back B W NORMAL AUTO B W COLOR MODE AUTO LEVEL CAMERA SETUP SET MENU AWC SE...

Page 41: ... screen is brought back L A C SE T T I NGS I I R S LE VEL NORMAL A E V RA E G PEAK 8 2 A C G MODE 2 dB 0 S UT H T ER E x DR N RMAL O P I O R R I T Y B C L ED S NS E E UP O F F B W COLOR MODE TION T 1 MO I L L U O X MODE O F F CAMERA SETUP SET MENU AWC SET button MENU button B W NORMAL AUTO B W COLOR MODE AUTO LEVEL B W Make signal COLOR Break signal TK C1430 Switching signal Infrared illumination ...

Page 42: ...ENANCE screen Confirm that the cursor is at the item CCD SPOT 3 Press the SET button The CCD SPOT screen will be dis played If you do not want to perform white spot compensation move the cursor to CANCEL and press the SET button 4 Move the cursor to EXECUTE 5 Press the SET button White spot compensation will operate SPOT SCAN OPERATION is dis played during operation 6 Confirm the display When whit...

Page 43: ...X MODE 0 03 lx 50 F1 2 AGC 20 dB B W MODE 0 015 lx 50 F1 2 AGC 20 dB LOLUX MODE B W MODE 0 015 lx 25 F1 2 AGC 20 dB B W MODE 0 03 lx 50 F1 2 AGC 20 dB SENSE UP 32 0 014 lx 50 F1 2 AGC 20 dB LOLUX MODE SENSE UP 32 Communication RS 422A or RS 485 switchable 9600 bit s Lens mount C CS mount Power supply and power consumption AC 24 V 50 Hz 60 Hz DC 12 V 530 mA Ambient temperature 10 C to 50 C operatio...

Page 44: ...ark owned by Victor Company of Japan Limited is a registered trademark in Japan the U S A the U K and many other countries 2004 Victor Company of Japan Limited TK C1430 COLOUR VIDEO CAMERA Printed in Thailand LWT0207 001B H ...

Reviews: