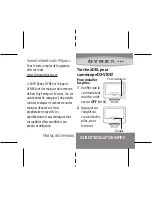
Installing Streamproducer
If your computer meets the minimum requirements discussed on
Page 5 of the Streamproducer Users Guide and does not have a
previous version of Streamproducer installed (if it does, follow the
directions on Page 7 of the Streamproducer Users Guide for
removing it) you can proceed with the automatic installation.
1.
Insert the Streamproducer CD ROM into your computers CD
drive. If Setup is not started automatically, click on ‘Start’ and
then ‘Run’. Run the file ‘Startup.exe’ from the CD-ROM.
2.
From the opening window, you choose whether to continue
with an English or Japanese installation. For this discussion,
English was selected.
3. The
next
window
enables you to
select what
portions to
install. Click
“Install
Streamproducer:
4. The
installation
will continue
automatically.
When asked, we
recommend installing the software into the default folder, as
shown below.
5.
You will be given an opportunity to select which models of
JVC cameras you will be connecting to. Even if you only
have one camera type, we recommend installing the
software for all camera types, as shown here:
6.
All files required for use are installed in a single step,
including the required CODECs and Streamcapture, the
plug-in for using Internet Explorer. When the installation
completes, you will have to reboot your computer, which can
be done automatically by selecting this option and clicking
“Finish”.
Connecting with Streamproducer
Connecting to the camera with JVC’s Streamproducer supports
the following features:
•
Real-time viewing of up to four cameras or .asf files,
with audio.
•
Remote control and setup of all connected cameras
and network packs.
•
Capturing (saving to PC disk drive) the output from any
connected camera.
•
Connections to multiple cameras using a single
instance of Streamproducer.
•
Instant switching between cameras and files when
streaming.
•
Publishing point for a media server.
•
Stream to up to 10 clients.
The following example shows how to connect to a single camera
using Streamproducer:
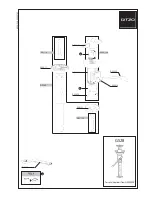
1. Open
Streamproducer.
2.
In and one of the viewable windows, click the ‘Camera’ icon.
3.
In the IP address window, enter the address of the desired
camera, as shown here, click ‘OK’.
4.
Enter the camera name. Although we recommend that it
does, this name
does not have to
match the name
assigned to the
camera in the
cameras menu.
The name entered
here is used to
create a folder on
the PC where captured scene files are stored.
5.
Click ‘OK’. The camera output will appear in the window in
about two seconds.
Please refer to the Streamproducer Users Guide for instructions
on streaming using Streamproducer
Connecting with a Web Browser
Connecting to the camera with A Web Browser supports the
following features:
•
Real-time viewing of camera output, with audio.
•
Remote control and setup of camera and network
pack.
•
Capturing (saving to PC disk drive) camera output
•
Connections to multiple cameras using multiple
instances of the Web browser (each instance can
connect to only one camera)
•
Publishing point for a media server.
•
Stream to a single client.
NOTE:
Installation of Streamproducer is required before a Web
Browser connection can be established.
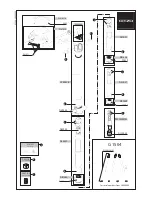
The following example shows how to connect
to the camera using
Microsoft Internet Explorer:
1. Open
Internet
Explorer
2.
Enter the cameras IP address in the address bar as shown
here
3.
Press ‘Enter’ or click ‘Go’
4.
If a valid connection between your computer and the GY-
DV300/KA-DV300 exists, you should see the camera login
screen, shown here.
Note that this screen
will
not
be shown if
you have previously
logged into the camera
and selected the
‘Remember my
Password’ option.
5.
Once a user name and
password have been
entered, the
NETWORK SETUP
screen, shown here,
will be visible.
6.
To view or cast the camera output, click ‘STREAM
CAPTURE’. The view window, shown at right, will open.
Please refer to the Streamproducer Users Guide for instructions
on streaming using Streamcapture
Determining the Casting URL
To determine the casting URL (the address that clients use to
view the stream)
when using
Streamproducer
,
click on the
‘CONNECTIONS’
tab. Any URL
shown is valid.
When connection, a
client must use both
the URL and port
as shown in the
window.
To determine the casting URL (the address that clients use to
view the stream) when using
Streamcapture with Internet
Explorer
, from the Streamcapture window, shown previously,
click ‘PROP’, then click ‘CAST’. Any URL listed is valid. When
connection, a client must use both the URL and port as shown
in the window.