background image

12

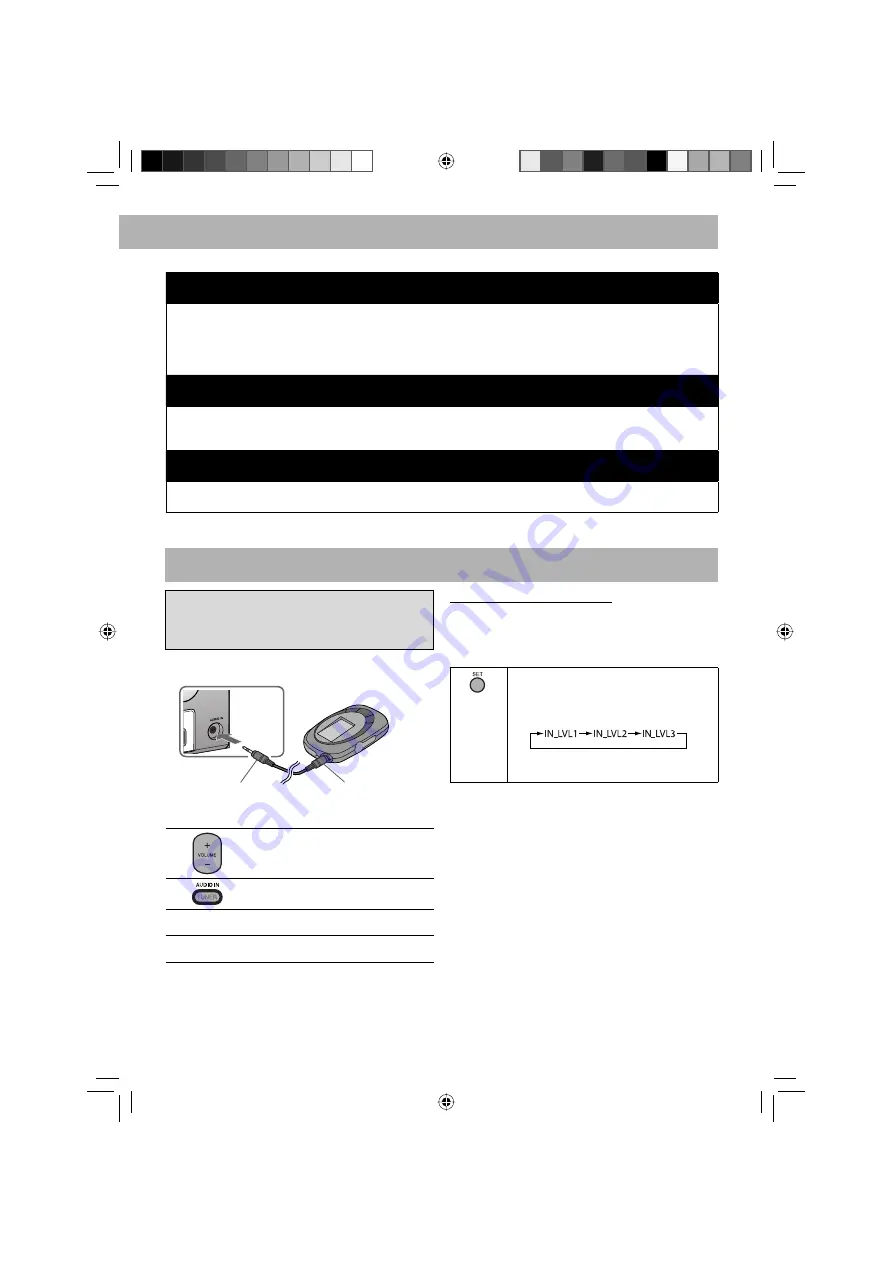
Listening to Digital Audio Player

Front view

1

Turn the volume to minimum.

2

Press repeatedly to select “AUDIO IN.”

3

Start playing the Digital Audio Player connected.

4

Adjust the volume.

Digital Audio Player

To audio output (or 
headphone out, etc.)

Stereo mini plug cord 
(not supplied)

The following operations are explained using 
the remote control, unless mentioned otherwise. 
However, if the System has the same or similar button 
names, they can also be used for the operations.

To Adjust the Audio Input Level

If the sound from the Digital Audio Player connected 
to the AUDIO IN jack is too loud or too quiet, you can 
change the audio input level through the AUDIO IN jack 
(without changing the volume level).

Press and hold for more than 2 seconds 
while “AUDIO IN” is selected as the source.
You can select one of three levels as 
follows:

As the number increases, the sound 
becomes louder.

How the Enhanced Other Networks function actually works:

Case 1

If no station/service is broadcasting the program of your choice

The System continues tuning in to the current station/service.

\

  When a station/service starts broadcasting the program of your choice, the System automatically switches to 

that station/service. The PTY code indicator starts flashing.

\

  When the program is over, the System goes back to the previously tuned station/service, but the function still 

remains active (the indicator stops flashing and remains lit).

Case 2

If a station/service is broadcasting the program of your choice

The System automatically switches to the station/service. The PTY code indicator starts flashing.

\

  When the program is over, the System goes back to the previously tuned station/service, but the function still 

remains active (the indicator stops flashing and remains lit).

Case 3

If the station/service currently tuned in is broadcasting the program of your choice

The PTY code indicator starts flashing.

\

  When the program is over, the indicator stops flashing (the function still remains active).

EN01-12_UX-G800D[B]3.indd   12

EN01-12_UX-G800D[B]3.indd   12

2/22/08   9:13:10 AM

2/22/08   9:13:10 AM

Summary of Contents for SP-UXG300

Page 1: ...MICRO COMPONENT SYSTEM UX G800D GVT0250 001A B Consists of CA UXG800D and SP UXG300 INSTRUCTIONS Cover_UX G800D B 3 indd 1 Cover_UX G800D B 3 indd 1 2 21 08 6 34 07 PM 2 21 08 6 34 07 PM ...

Page 2: ...k The wire which is coloured brown must be connected to the terminal which is marked with the letter L or coloured red IF IN DOUBT CONSULT A COMPETENT ELECTRICIAN CAUTION The button in any position does not disconnect the mains line Disconnect the mains plug to shut the power off completely the STANDBY lamp goes off The MAINS plug or an appliance coupler is used as the disconnect device the discon...

Page 3: ...ere you purchased the product Penalties may be applicable for incorrect disposal of this waste in accordance with national legislation Business users If you wish to dispose of this product please visit our web page www jvc europe com to obtain information about the take back of the product Other Countries outside the European Union If you wish to dispose of this product please do so in accordance ...

Page 4: ...Scanning Ensembles 10 Receiving FM Stations with Radio Data System 11 Changing the Radio Data System Information 11 Searching for Programs by PTY Codes PTY Search 11 Switching Temporarily to a Program of Your Choice Automatically 11 Listening to Digital Audio Player 12 Setting the Clock and Using Timers 13 Setting the Clock 13 Setting the Sleep Timer 13 Turning Off the System Automatically AUTO ST...

Page 5: ...electrical shock Getting Started Do not expose the System to direct sunlight or place it near a heating device Notes on installation Select a place which is level dry and neither too hot nor too cold between 5 C and 35 C Do not install the System in a place subject to vibrations Do not put heavy objects on the System To prevent malfunction or damage of the System Do not insert any metallic objects...

Page 6: ... of the speaker terminals red color to and black color to DO NOT connect more than one speaker to each terminal DO NOT allow the conductor of the speaker cords to be in touch with the metallic parts of the System To a wall outlet Plug the AC power cord only after all connections are complete Rear view To connect the DAB antenna supplied Extend it so that you can receive your desired ensembles For ...

Page 7: ...t until the best reception is obtained To connect the FM antenna supplied Extend it so that you can obtain the best reception For better FM reception To connect the AM loop antenna supplied To assemble the AM loop antenna To connect the speaker cords Press and hold Insert Release Red Black From left speaker From right speaker EN01 12_UX G800D B 3 indd 4 EN01 12_UX G800D B 3 indd 4 2 21 08 6 34 45 ...

Page 8: ...and or headphones when you turn on the System or start playback Using Headphones Be sure to turn down the volume before connecting or putting on the headphones Connecting the headphones will deactivate the speakers Sound adjustments also affect the sound through the headphones How to cancel the demonstration Press and hold DEMO button while on standby Refer to the attached Information about the de...

Page 9: ...function Press and hold until the AHB indicator lights up When Sound Turbo function is activated see above this function cannot be activated To cancel this function press and hold again when Sound Turbo function is deactivated Adjust the tone Bass Treble Press once for adjusting the bass level twice for treble level then press VOLUME Adjustable range 3 to 3 Change the display brightness Press when...

Page 10: ...ations Do not disconnect the USB mass storage class device when the System is turned on It may cause malfunction of both this System and the device Noise and static electricity may stop the USB mass storage class device sound In this case disconnect and connect the USB mass storage class device again after turning off the System Basic Disc USB Mass Storage Class Device Operations To play back the ...

Page 11: ...ess and hold CANCEL for about 2 seconds To exit from program play press MODE The stored program is kept Playing at Random Random Play 1 Press until the RND random indicator lights up before you start playback 2 or Playback starts in random order Random Play ends when all tracks are played back Operations for Random Play To skip a track press To go back to the beginning of the current track press 4...

Page 12: ...o select its preset number For presetting stations see the right column For DAB To select an ensemble or Press 4 while ENSEMBLE is displayed You can select from the ensembles found in the ensemble scanning To select a service either primary or secondary or While tuning in to a service press to change services When you reach the last first service of an ensemble and press 4 you skip to the next pre...

Page 13: ...set channel which has no signal is selected EMPTY instead of Service Label appears on the display Improving the DAB Reception With the supplied DAB antenna you may not be able to receive L Band ensembles You can improve the reception of both L Band and Band III ensembles by connecting an active antenna see page 3 To supply power to the active antenna After connecting an active antenna press and ho...

Page 14: ...se Receiving FM Stations with Radio Data System Radio Data System allows FM stations to send an additional signal along with their regular program signals With the System you can receive the following types of Radio Data System signals PS Program Service Shows commonly known station names PTY Program Type Shows types of broadcast programs RT Radio Text Shows text messages the station sends Enhance...

Page 15: ...orks Case 1 If no station service is broadcasting the program of your choice The System continues tuning in to the current station service When a station service starts broadcasting the program of your choice the System automatically switches to that station service The PTY code indicator starts flashing When the program is over the System goes back to the previously tuned station service but the ...

Page 16: ... mentioned otherwise However if the System has the same or similar button names they can also be used for the operations Setting the Sleep Timer When the System is on press repeatedly to specify the time in minutes as follows The SLEEP indicator lights up To check the remaining time until the System shuts off press once Turning Off the System Automatically AUTO STANDBY function only for Disc USB P...

Page 17: ... number For AUDIO IN Make the connected device ready for playback 5 Select the volume You can select the volume level VOLUME 0 VOL MIN to VOLUME 40 VOL MAX and VOLUME If you select VOLUME the volume is set to the last level when the System is turned off 3 Turn off the System on standby When the on time comes the System sets the volume gradually to the preset level To exit from the timer setting pr...

Page 18: ...u finish There is a time limit Repeat the procedure again Operations are disabled The built in microprocessor may malfunction due to external electrical interference Unplug the AC power cord and then plug it back in Unable to operate the System from the remote control The path between the remote control and the remote sensor on the System is blocked The battery is exhausted No sound is heard Speak...

Page 19: ...interchangeably used for MP3 WMA operations This System can show the Tag data Version 1 MP3 WMA discs are required a longer readout time than regular CDs It depends on the complexity of the group file configuration Some MP3 WMA files cannot be played back and will be skipped This result from their recording processes and conditions When making MP3 WMA discs use ISO 9660 Level 1 or Level 2 for the ...

Page 20: ... News AFFAIRS Topical program expanding or enlarging upon the news debate or analysis INFO Programs the purpose of which is to impart advice in the widest sense SPORT Programs concerned with any aspect of sports EDUCATE Educational programs DRAMA All radio plays and serials CULTURE Programs concerning any aspect of national or regional culture including language theater etc SCIENCE Programs about ...

Page 21: ... See page 13 r SLEEP indicator See page 13 t Timer mode indicators See page 14 Attaching the Core Filter Attach the provided core filter to the USB cable to reduce interference 1 Release the stopper of the core filter 2 Run the USB cable through the core filter leaving approx 2 cm between the unit side end of the USB cable and the core filter Firmly wind the USB cable once inside the cutout of the...

Page 22: ... mass storage class device while using this System Microsoft and Windows Media are either registered trademarks or trademarks of Microsoft Corporation in the United States and or other countries Maintenance To get the best performance of the System keep your discs and mechanism clean Handling discs Remove the disc from its case by holding it at the edge while pressing the center hole lightly Do no...

Page 23: ...ss it is specifically stated that it is designed for unattended operation or has a standby mode Switch off using the switch on the equipment and make sure that your family know how to do this Special arrangements may need to be made for infirm or handicapped people DON T use equipment such as personal stereos or radios so that you are distracted from the requirements of traffic safety It is illega...

Page 24: ...0408WMKMDWJMM EN 2008 Victor Company of Japan Limited MICRO COMPONENT SYSTEM UX G800D Rear_UX G800D B f indd 21 Rear_UX G800D B f indd 21 4 16 08 4 54 16 PM 4 16 08 4 54 16 PM ...

Reviews: