JVC SP-THA5 Instructions Manual Download Page 36

32

English

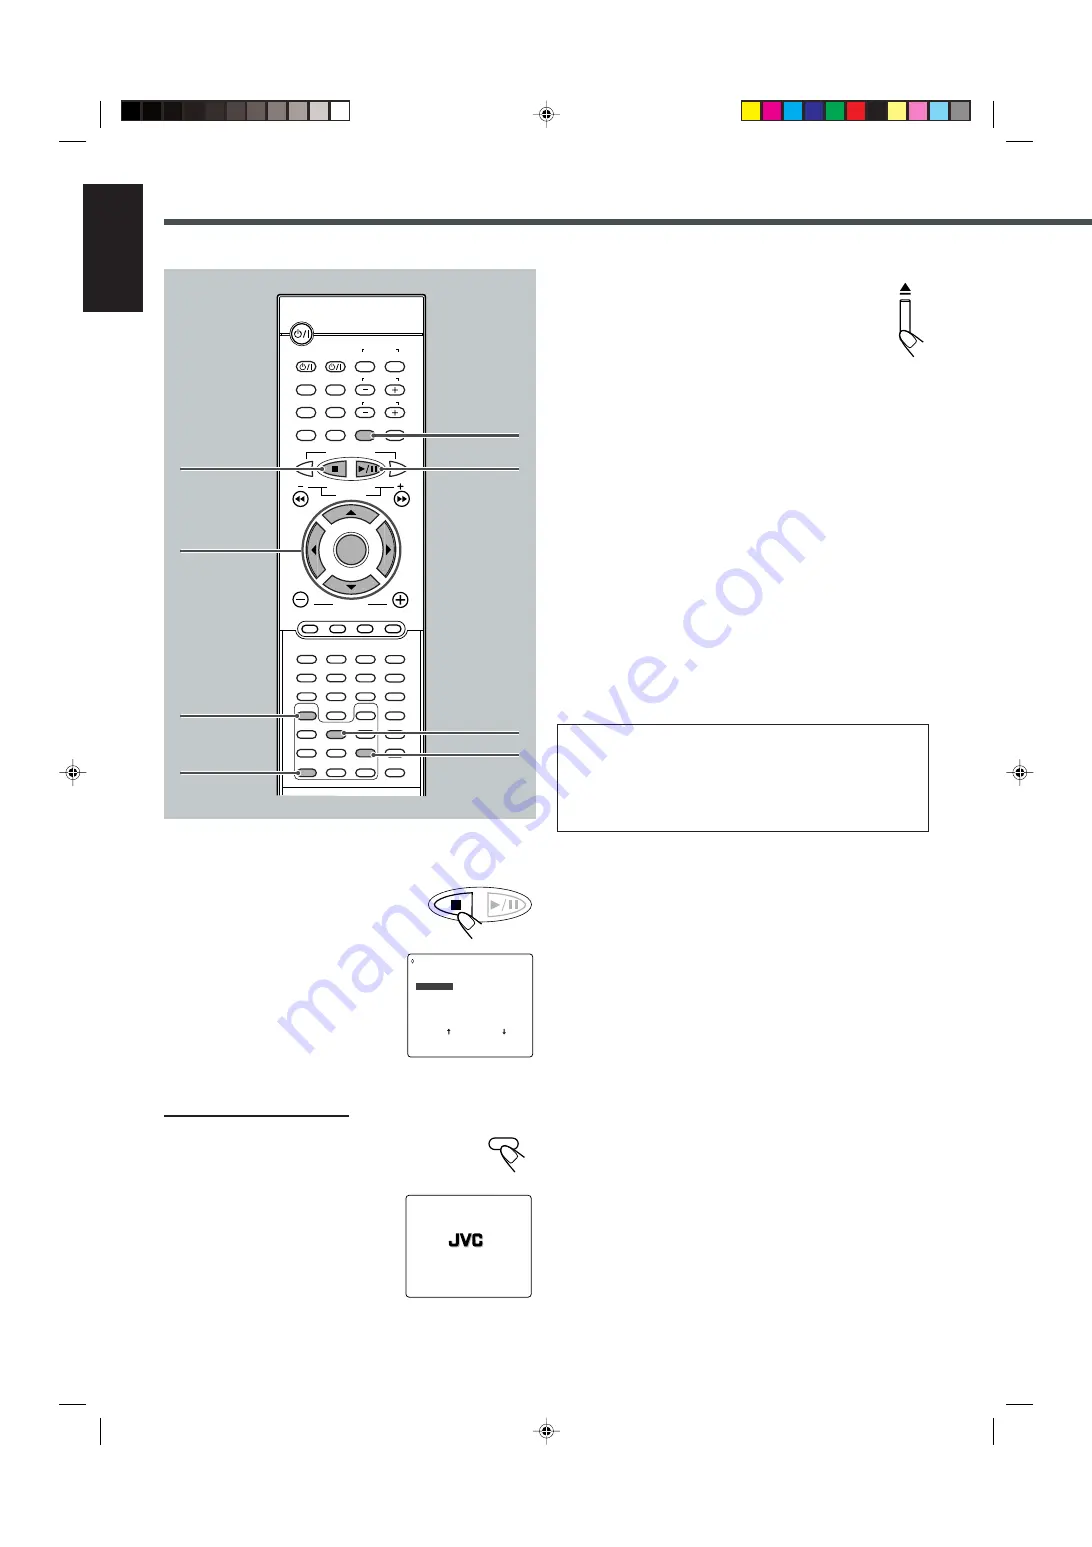
To stop during playback

Press 

7

 or PROGRAM on the remote

control.

The PROGRAM MENU screen appears on the
TV screen.
• If you press 

3

/

8

 while this screen is

shown, the unit starts program play.

To exit from program play

From the remote control ONLY:

Press PROGRAM.

The PROGRAM MENU screen goes off, and the
opening screen appears. (The program you made is still
kept in memory.)
• If you press 

3

/

8

 while this screen is

shown, the unit starts normal playback.

DVD Playback

To erase the stored program

Press 

0

 to eject the disc.

• If you turn off the system or change the source, the

program is also erased.

To check the program contents

You can check the program contents by pressing PROGRAM.
The PROGRAM MENU screen appears on the TV screen.
• If you press the button during playback, the program play will

stop.

To modify the program

You can modify the program while the PROGRAM MENU screen is
shown on the TV screen.

To erase a step:

 Press 

 (or 

5

) to select (highlight) an unwanted

program step, then press CLEAR.

To modify a step:

 Press 

 (or 

5

) to select (highlight) a program

step you want to modify, then perform steps 

3

 to 

5

 on page 31.

(Before entering a new number, press CLEAR repeatedly until
“– –” appears on the number entry position.)

To add a step:

 Press 

 (or 

5

) to select (highlight) an empty

program step, then perform steps 

3

 to 

5

 on page 31.

• To move program step 11 to program step 10, press 

5

 when

program step 11 is selected (highlighted) so that
“PREVIOUS 

»

”  is selected (highlighted). Then, press ENTER.

• To move program step 10 to program step 11, press 

 when

program step 10 is selected (highlighted) so that “NEXT 

«

 ” is

selected (highlighted). Then, press ENTER.

SELECT: ENTER


T I T L E     CHAPT


1     2         8

  2     1         5
  3     1        1 7
  4     3         6
  5     4         2

  PREVIOUS


T I T L E     CHAPT

  6     2         2
  7     2        1 2
  8     1         9
  9    – –        – –
10    – –        – –
  
      NEXT


FINISH: PROGRAM

   PROGRAM   MENU

PLAY: 

3

DVD/Video CD/CD PLAYER 

TUNER PRESET

PROGRAM

3

/

2

/

5

/

ENTER

CLEAR

ZOOM

7

3

/

8

PROGRAM

DISPLAY

B.SEARCH

DOWN

REW

UP

FF

F.SEARCH

RETURN

STEP

TV/VIDEO

TV VOLUME

TV CHANNEL

SUBTITLE

TOP MENU

TV

STANDBY/ON

AUDIO

VCR

OFF

ON

VCR 

CONTROL

TUNER PRESET

ENTER

VOLUME

AUDIO/

FM MODE

VCR CHANNEL

TUNING

DVD

FM/AM

AUX

MUTING

REMAIN

PROGRAM

D.R.C

SETUP

CLEAR

REPEAT

ANGLE

SLOW

SEARCH

A-B REPEAT

NTSC/PAL

ZOOM

SLEEP

EFFECT

DSP MODE

TEST

PRO LOGIC

SETTING

SOUND

1

2

3

4

5

6

7

8

9

0

MENU

STEP

SLOW

EN25-33TH-A5[U]f.pm6

01.11.27, 10:29

32

Summary of Contents for SP-THA5

Page 1: ... XV THA5 and SP THA5 D I G I T A L S U R R O U N D D I G I T A L COMPACT DIGITAL VIDEO STANDBY AUDIO FM MODE DSP VOLUME SOURCE DVD DIGITAL CINEMA SYSTEM TH A5 STANDBY ON DISPLAY TV VIDEO TOP MENU AUDIO ON TUNER PRESET ENTER VCR CHANNEL TUNING DVD FM AM AUX MUTING STANDBY ON VCR VCR CONTROL MENU TV AUDIO FM MODE SUBTITLE RETURN STEP OFF TV VOLUME TV CHANNEL VOLUME B SEARCH F SEARCH DOWN UP REW FF R...

Page 2: ...ion openings or holes If the ventilation openings or holes are blocked by a newspaper or cloth etc the heat may not be able to get out Do not place any naked flame sources such as lighted candles on the apparatus When discarding batteries environmental problems must be considered and local rules or laws governing the disposal of these batteries must be followed strictly Do not expose this apparatu...

Page 3: ...No obstructions in 10 cm from the sides Top No obstructions in 10 cm from the top Back No obstructions in 15 cm from the back Bottom No obstructions place on the level surface In addition maintain the best possible air circulation as illustrated Stand height 15 cm or more XV THA5 Spacing 15 cm or more Wall or obstructions Front Floor TH A5 US safety_f pm6 01 11 27 17 15 2 ...

Page 4: ...user serviceable parts inside the unit leave all servicing to qualified service personnel IMPORTANT FOR LASER PRODUCTS 1 CLASSIFICATION LABEL PLACED ON EXTERIOR SURFACE REPRODUCTION OF LABELS 2 WARNING LABEL PLACED INSIDE THE UNIT CLASS 1 LASER PRODUCT KLASSE 1 LASER PRODUKT LUOKAN 1 LASER LAITE KLASS 1 LASER APPARAT PRODUCTO LASER CLASE 1 G 3 TH A5 US safety_f pm6 01 11 27 17 15 3 ...

Page 5: ... DVD Playback 27 Changing the Color System 27 Showing the On Screen Bar 27 Selecting the Subtitles 28 Selecting the Audio Languages 28 Selecting the Multi Angle Views 28 Checking the Remaining Time 29 Disc Menu Driven Playback 29 Moving to a Particular Portion Directly 29 Searching for a Particular Point 30 Repeating Playback 30 7 Repeat Play 30 7 A B Repeat 30 Programming the Playing Order of the...

Page 6: ...uttons 4 and 7 4 Disc tray 10 12 5 0 open close button 10 13 32 37 41 Pressing this button also turns on the power and changes the source to the DVD player 6 Display window 7 Remote sensor 8 3 8 play pause button 10 12 26 41 Pressing this button also turns on the power and changes the source to the DVD player 9 DSP button 11 13 23 p VOLUME and buttons 10 12 14 q SOURCE button 14 15 44 45 w Illumin...

Page 7: ...U TE EN TE R CLEA R CLEA R GO GO TO RE MA IN RE MA IN SLEE P SLEE P EFFECT EFFECT PROG RAM PROG RAM RE PE A RE PE AT RE PE A RE PE AT AN GL E AN GL E NT SC P NT SC PA L AL DIG ES T DIG ES T DSP DSPMO DE MO DE SE T SE T UP UP TEST TEST TONE ON E PROLOGIC PROLOGIC SPKMO DE SPKMO DE SO UN DEDIT SO UN DEDIT SLOW SLOW 1 2 3 4 5 6 7 8 9 10 10 ZO OM ZO OM A B B RM STHA5U DVD CIN EMA SYSTEM DISPLAY TV VID...

Page 8: ...damage the center unit Handling the center unit DO NOT touch the power cord with wet hands DO NOT pull on the power cord to unplug the cord When unplugging the cord always grasp the plug so as not to damage the cord Keep the power cord away from the connecting cords and the antenna The power cord may cause noise or screen interference It is recommended to use a coaxial cable for antenna connection...

Page 9: ...he FM 75 Ω COAXIAL terminal as temporary measure Extend the supplied FM antenna horizontally If reception is poor connect an outdoor antenna Before attaching a 75 Ω coaxial cable with a standard type connector disconnect the supplied FM antenna Center unit About the cooling fan A cooling fan is mounted on the rear panel of the center unit to prevent abnormal temperature inside the center unit thus...

Page 10: ...ker To left rear speaker To right rear speaker To subwoofer Left front speaker D I G I T A L S U R R O U N D D I G I T A L COMPACT DIGITAL VIDEO STANDBY AUDIO FM MODE DSP VOLUME SOURCE DVD DIGITAL THEATER SYSTEM TH A5 STANDBY ON Center unit Center speaker MIN MIN MIN MIN CONPONENT OUT Y CB CR Speaker Layout Diagram EN01 09TH A5 U f pm6 01 11 27 10 27 6 ...

Page 11: ...d is non directional you can place a subwoofer wherever you like Normally place it in front of you Left front speaker Right front speaker Right rear speaker Subwoofer Left rear speaker Center speaker If your speakers cannot be placed at the same distance from the listening position You can adjust the delay time of the center speaker and rear speakers For in depth information about adjusting the de...

Page 12: ...ce component and the center unit the sound output through this system may be distorted Connecting Audio Video Component Turn the power off to all components before connections Connect the other component to the center unit with the audio cord Use the cord supplied with the other component or purchase it at an electric appliance store Audio cord not supplied DBS Tuner Center unit MD Recorder Casset...

Page 13: ...ith this system Use the cords supplied with the other component or purchase them at an electric appliance store You can select one of three connection types A B and C If your TV has S video Y C separation and or component video Y CR CB jacks connect them using an S video cord not supplied B and or component video cord not supplied C By using these jacks you can get a better picture quality in the ...

Page 14: ... LOADING appears for a while You can also start playback by closing the disc tray using 0 on the front panel 4 Adjust the Volume To increase the volume press and hold VOLUME To decrease the volume press and hold VOLUME CAUTION Always set the volume to the minimum before starting any source If the volume is set at its high level the sudden blast of sound energy can permanently damage your hearing a...

Page 15: ...te Before activating the realistic sound field adjust the speaker setting to bring out the best performance from this system For in depth information about adjusting the speaker setting see Speaker Settings on pages 16 and 17 6 Stop Playback Press 7 twice Playback stops completely and DVD appears on the display The DVD player goes on working for 3 minutes after playback stops This system can memor...

Page 16: ...he disc tray using 0 on the front panel 4 Adjust the Volume To increase the volume press and hold VOLUME To decrease the volume press and hold VOLUME CAUTION Always set the volume to the minimum before starting any source If the volume is set at its high level the sudden blast of sound energy can permanently damage your hearing and or ruin your speakers Notes By pressing VOLUME or repeatedly you c...

Page 17: ...display The DVD player goes on working for 3 minutes after playback stops This system can memorize the end point even when you press 7 once When you start playback again by pressing 3 8 playback begins from where it has been stopped Resume play To remove the loaded disc Press 0 OPEN appears on the display and the disc tray comes out To close the disc tray press 0 again If you do not press the butt...

Page 18: ...usly on the display The system starts searching for a station On the front panel 1 Press 7 so that MANUAL appears on the display 2 Press and hold or 4 until the station frequency starts changing continuously on the display The system starts searching for a station Notes When a station of sufficient signal strength is tuned in the system stops searching and the indicator lights up on the display Wh...

Page 19: ...p on the display For in depth information about Pro Logic modes see Creating Realistic Sound Fields on pages 18 and 22 DVD player AUX IN FM AM DVD FM AM AUX MUTE SOURCE Turning Off the Power with the Timer You can fall asleep while listening to music Sleep Timer From the remote control ONLY Press SLEEP Each time you press the button the shut off time changes as follows When the shut off time comes...

Page 20: ... or 2 repeatedly to select the appropriate speaker information Each time you press the button the speaker information changes as follows SMALL Normally select this NONE Select this when you do not want to use the corresponding speaker 3 Repeat steps 1 and 2 to select the appropriate information for the other speaker F SP SW SP C SP R SP R DEL C DEL Normal indication canceled SETTING ENTER SMALL NO...

Page 21: ... of delay time indications with the current setting appears on the display Each time you press the button the indication in the main display changes as follows C DEL Center delay To register delay time for center speaker from 0 msec to 5 msec not selectable for Dolby Pro Logic R DEL Rear delay To register delay time for rear speakers from 0 msec to 15 msec for Dolby Digital and DTS Digital Surroun...

Page 22: ...fore called 5 1 channel Since each channel is completely independent from the other channel signals to avoid interference you can obtain much better sound quality with much stereo and surround effects In addition Dolby Digital enables stereo rear sounds and sets the cutoff frequency of the rear treble at 20 kHz compared to 7 kHz for Dolby Pro Logic These facts enhance the sound movement and being ...

Page 23: ...ng of a live music club with a low ceiling These DSP modes can be used to add the acoustic surround effects while reproducing stereo analog software or Linear PCM digital software and can give you a real being there feeling When one of the DSP modes is selected the DSP indicator lights up on the display To check the speaker connections and settings using the test tone 1 Select and play a DVD encod...

Page 24: ...he output balance for the front speakers go to the next step To adjust the output level for the subwoofer go to step 4 00 F 00 00 R 00 CEN Normal indication canceled SW REAR 00 F 00 00 R 00 CEN Normal indication canceled SW REAR 3 To adjust the output balance for the front speakers 1 Press SOUND repeatedly until the adjustment indication for the front speakers appears on the display Each time you ...

Page 25: ...l setting the output balances are at the center position If you have already changed the setting another value will appear 00 F 00 00 R 00 CEN Normal indication canceled SW REAR SOUND 2 Press 3 or 2 to adjust the output balance 3 Decreases the left speaker output or restores the right speaker output 2 Decreases the right speaker output or restores the left speaker output Each output balance change...

Page 26: ...ady to start adjustments To adjust the output balance for the front speakers and the rear speakers go to the next step To adjust the output level for the center speaker the rear speakers and the subwoofer go to step 5 4 To adjust the output balance for the front speakers and the rear speakers 1 Press SOUND repeatedly until one of the following adjustment indications appears on the display Each tim...

Page 27: ...ere is a time limit in doing the following steps If the setting is canceled before you finish start from step 2 again 00 F 00 00 R 00 CEN Normal indication canceled SW REAR SOUND ENTER HALL PAVILION THEATER Normal indication canceled LIVE CLUB DANCE CLUB 00 F 00 00 R 00 REAR Normal indication canceled ROOM LIVE REVERB DSP MODE SOUND 1 Select and play any source except Dolby Digital or DTS Digital ...

Page 28: ...r DSP sound parameters Note Pressing EFFECT to adjust overall level of DSP effect will change your fine adjustments to the fixed level DSP MODE SOUND B SEARCH REW FF F SEARCH ENTER VOLUME VCR CHANNEL TUNING DVD FM AM AUX MUTING 1 2 3 4 5 6 7 8 9 0 REMAIN PROGRAM D R C SETUP SLEEP EFFECT DSP MODE TEST PRO LOGIC SETTING SOUND CLEAR REPEAT ANGLE SLOW SEARCH A B REPEAT NTSC PAL ZOOM 2 3 SOUND DSP MODE...

Page 29: ... CD R and CD RW This system can also play back MP3 files recorded on CD Rs and CD RWs For in depth information about what MP3 is see MP3 Introduction on page 40 Discs you can play Example 1 DVD disc Example 2 Video CD Audio CD Examples Disc structure DVD Video CD VCD and Audio CD CD A DVD disc consists of Titles and each title may be divided into some Chapters See Example 1 For example if a DVD di...

Page 30: ... DVD or track only possible on a CD and VCD directly using the number buttons Pressing the number buttons before or during play allows you to start playing the title track number you want If your TV is turned on the on screen bar is pulled down automatically on the TV screen To select number 1 to 9 press the corresponding number button then press ENTER or wait for 5 seconds To select number 15 pre...

Page 31: ...ou can select these elements recorded on the DVD Subtitles are recorded on the disc The number inside the mark indicates the total number of the recorded subtitles Several audio languages are recorded on the disc The number inside the mark indicates the total number of the recorded audio languages Multi angle views are recorded on the disc The number inside the mark indicates the total number of t...

Page 32: ...D Playback Ex When the disc has 3 selections English French and Spanish Selecting the Subtitles While playing back a DVD containing subtitles in different languages you can select the subtitle to be displayed on the TV screen You can set your favorite subtitle language as the initial language shown on the screen See page 46 From the remote control ONLY Press SUBTITLE The on screen bar appears on t...

Page 33: ...maining Time While playing back a DVD you can check the remaining time to be played back From the remote control ONLY Press REMAIN The on screen bar and the current play time indication appear on the TV screen for a while Each time you press the button the following indication appears on the screen REMAIN TIME TITLE Select this to show the remaining time of the current title CHAPTER TIME Select th...

Page 34: ...er will be repeated REPEAT TITLE Current title will be repeated REPEAT OFF Repeat play is canceled Normal play is resumed Cannot be selected during program play Note When the on screen bar is shown on the TV screen repeat mode indication also changes as follows 7 A B Repeat While playing you can also select a portion you want to repeat A B repeat is not performed between different titles An interv...

Page 35: ...RAM The PROGRAM MENU screen appears on the TV screen PROGRAM appears on the display and the PROGRAM indicator also lights up 3 Press ENTER 4 Press 3 or 2 to select a title number then ENTER 3 Increases the number 2 Decreases the number You can also select a title number using the number buttons 5 Press 3 or 2 to select a chapter number then ENTER 3 Increases the number 2 Decreases the number You c...

Page 36: ...hlight a program step you want to modify then perform steps 3 to 5 on page 31 Before entering a new number press CLEAR repeatedly until appears on the number entry position To add a step Press or 5 to select highlight an empty program step then perform steps 3 to 5 on page 31 To move program step 11 to program step 10 press 5 when program step 11 is selected highlighted so that PREVIOUS is selecte...

Page 37: ...ayback You can enjoy slow motion playback while playing a DVD From the remote control ONLY Press SLOW repeatedly during playback or pause Each time you press the button slow motion speed changes as follows 7 Zoom You can zoom in on the picture while playing back a DVD From the remote control ONLY 1 Press ZOOM to zoom in Each time you press the button the picture is enlarged as follows 2 Press 3 2 ...

Page 38: ...nge the color system see Changing the Color System on page 27 Checking the Remaining Time While playing back a VCD or CD you can check the remaining time From the remote control ONLY Press REMAIN The on screen bar appears on the TV screen for a while Each time you press the button the play time indication changes as follows REMAIN TIME TRACK Select this to show the remaining time of the current tr...

Page 39: ...IME TIME Moving to a Particular Portion Directly You can move to a particular portion scene on the track directly PBC function is canceled when you use this function From the remote control ONLY 1 Press SEARCH during playback or pause Each time you press the button the following indication appears on the TV screen 1 2 3 4 5 6 7 8 9 0 Disc Menu Driven Playback Only for VCD The Play Back Control fun...

Page 40: ...s the button repeat mode changes as follows REPEAT ONE Current track will be repeated REPEAT DISC All the tracks will be repeated REPEAT OFF Repeat play is canceled Normal play is resumed Note When the on screen bar is shown on the screen Repeat mode indication also changes as follows 7 A B Repeat While playing you can also select a portion you want to repeat An interval of more than 5 seconds is ...

Page 41: ...o stop during play Press 7 or PROGRAM on the remote control The PROGRAM MENU screen appears on the TV screen If you press 3 8 while this screen is shown the system starts program play To exit from program play From the remote control ONLY Press PROGRAM The PROGRAM MENU screen goes off and the opening screen appears The program you made is still kept in memory If you press 3 8 while this screen is ...

Page 42: ...To modify a step press or 5 to select highlight an program step you want to modify then perform steps 3 and 4 Before entering a new number press CLEAR repeatedly until appears on number entry position To add a step press or 5 to select highlight an empty program step then perform steps 3 and 4 To move program step 11 to program step 10 press 5 when program step 11 is selected highlighted so that P...

Page 43: ...n Playback You can enjoy slow motion playback while playing a VCD From the remote control ONLY Press SLOW repeatedly during playback or pause Each time you press the button slow motion speed changes as follows 7 Zoom You can zoom in on the picture while playing a VCD From the remote control ONLY 1 Press ZOOM to zoom in Each time you press the button the picture is enlarged as follows 2 Press 3 2 5...

Page 44: ...can be recorded in directories or folders in PC terminology During recording the files and directories can be arranged in a way similar to arranging files and folder directories of computer data Root is similar to the root of a tree Every file and directory can be linked to the root In compliance with ISO 9660 the maximum allowable depth of nested directories so called hierarchy is eight inclusive...

Page 45: ... close the disc tray press 0 again 1 Disc type DVD VCD CD MP3 2 Current track file and total number of the tracks on the disc Ex 1st track is playing out of 35 tracks recorded 3 Bit rate Ex Bit rate used for recording the loaded disc is 128 Kbps See the previous page 4 Repeat mode indicator Ex When repeat mode is turned off See page 43 for more details 5 Elapsed playing time and the total playing ...

Page 46: ...P SLEEP EFFECT DSP MODE TEST PRO LOGIC SETTING SOUND CLEAR REPEAT ANGLE SLOW SEARCH A B REPEAT NTSC PAL 1 2 3 4 5 6 7 8 9 0 ZOOM REPEAT 3 8 Button ENTER 3 8 To do Start playback or go into a directory Select a track or directory 5 ENTER or 3 8 5 5 and ENTER 5 5 5 5 SPRING SPRING1 MP3 SPRING2 MP3 SPRING3 MP3 SPRING4 MP3 SPRING5 MP3 SPRING SPRING1 MP3 SPRING2 MP3 SPRING3 MP3 SPRING4 MP3 SPRING5 MP3 ...

Page 47: ...n on the TV screen repeat mode indication also changes as follows REPEAT RANDOM REPEAT ONE REPEAT DIR REPEAT DISC REPEAT OFF Moving to a Particular Track Directly You can move to a particular track on the disc directly From the remote control ONLY 1 Press SEARCH during playback or pause TRACK appears on the TV screen 2 Press the number buttons to select a track number you want The system starts pl...

Page 48: ... the display The last received station of the selected band is tuned in Each time you press the button the source changes as follows WAIT appears on the display 2 Press 7 so that MANUAL appears on the display Each time you press the button the operation mode of and 4 buttons alternates between PRESET and MANUAL PRESET Select this for using and 4 as the buttons to select the preset station MANUAL S...

Page 49: ...preset number TUNER PRESET DOWN Decreases the preset number On the front panel 1 Press SOURCE repeatedly until the desired band appears on the display 2 Press 7 so that PRESET appears on the display Each time you press the button the operation mode of and 4 buttons alternates between PRESET and MANUAL PRESET Select this for using and 4 as the buttons to select the preset station MANUAL Select this...

Page 50: ...menu You can select the following languages separately for each listed item on the menu For OSD LANGUAGE English Chinese Spanish French German Japanese and Korean For AUDIO SUBTITLE and MENU LANGUAGE English Chinese French German Japanese Russian Spanish Portuguese Korean and Original Available only for AUDIO and SUBTITLE When you want to operate the disc or enjoy its playback in the originally re...

Page 51: ...the DVD Preference System You can set the DVD preference to match it to your usage and operating circumstances On the system setting menu you can set the following TV SCREEN Select the TV screen size for playing back a DVD recorded with 16 9 wide screen video signal 4 3 LB Select 4 3 LB Letter Box when the aspect ratio of your TV is 4 3 While viewing a wide screen picture the black bars appear on ...

Page 52: ...ratio this setting does not take effect The pictures are displayed with full 4 3 aspect ratio or with 4 3 Letter Box To erase the Setup menu Press SETUP indicates the current setting SYSTEM LANGUAGES TV SCREEN RATING LEVEL DIGITAL OUTPUT 4 3 LB OFF Move Setup Exit 4 3 LB 4 3 PS 16 9 SETUP SYSTEM LANGUAGES TV SCREEN RATING LEVEL DIGITAL OUTPUT 4 3 LB OFF BITSTREAM Move Setup Exit SYSTEM LANGUAGES T...

Page 53: ...EAM Move Setup Exit SYSTEM LANGUAGES TV SCREEN ENTER PASSWORD DIGITAL OUTPUT 4 3 LB BITSTREAM Move Setup Exit 6 Press or 5 to select highlight the level you want then press ENTER To erase the Setup menu Press SETUP again To change the password Be sure to note down the new password you have made 1 Repeat steps 1 to 5 of Setting the Parental Rating Level procedure 2 Press or 5 to select highlight NE...

Page 54: ...SC PAL 1 2 3 4 5 6 7 8 9 0 ZOOM You can perform the following operations on the TV TV Turn on or off the TV TV VOLUME Adjust the volume TV VIDEO Set the input mode either TV or VIDEO TV CHANNEL Change the channels After pressing VCR CONTROL ON on the remote control you can perform the following operations on the VCR VCR Turn on or off the VCR VCR CHANNEL Change the channels 1 9 0 Select TV channel...

Page 55: ...JVC 01 Hitachi 10 Magnavox 04 Mitsubishi 13 Panasonic 12 24 RCA 07 29 Samsung 11 Sanyo 05 20 Sharp 02 16 22 Sony 03 Toshiba 09 Zenith 17 Manufacturers codes for TV Operating Other Manufacturers TV You can use the remote control to operate other manufactures TV Refer also to the manuals supplied for the other products To operate the other products aim the remote control directly at the remote senso...

Page 56: ...t temperature extremes and moisture To clean the disc Wipe the disc with a soft cloth in a straight line from center to edge Maintenance Cleaning the unit Stains on the unit Should be wiped off with a soft cloth If the unit is heavily stained wipe it with a cloth soaked in water diluted neutral detergent and wrung well then wipe clean with a dry cloth Since the unit may deteriorate in quality beco...

Page 57: ...too weak The station is too far away The antenna is not connected correctly Lightning or electronic noise interferes with operation of the microcomputer Immediately after beginning to heat the room the unit was moved to a cold location causing condensation to form inside The remote control is not set for VCR operations The VCR is not a JVC s product SOLUTION Insert the plug into the socket Come cl...

Page 58: ...ensitivity FM 8 0 dBf 0 9 µV 75 Ω AM loop antenna 650 µV m General Power Requirements AC 110 V 127 V 220 V 240 V adjustable with the voltage selector 50 Hz 60 Hz Power Consumption 120 W at operation 2 W in standby mode Dimensions W H D 350 mm 80 mm 300 mm Mass 6 3 kg Subwoofer SP WA5 Speaker 20 cm Bass reflex Magnetically Shielded Power Handling Capacity 60 W Impedance 3 Ω Frequency Range 25 Hz to...

Page 59: ...N CONPONENT OUT Y CB CR CAUTION for mains AC line BEFORE PLUGGING IN do check that your mains AC line voltage corresponds with the position of the voltage selector switch provided on the outside of this equipment and if different reset the voltage selector switch to prevent from a damage or risk of fire electric shock TH A5 U cover_f pm6 01 11 27 10 27 2 ...

Page 60: ...TH A5 Consists of XV THA5 and SP THA5 Consta de XV THA5 y SP THA5 Consiste em XV THA5 e SP THA5 D I G I T A L S U R R O U N D D I G I T A L COMPACT DIGITAL VIDEO STANDBY AUDIO FM MODE DSP VOLUME SOURCE DVD DIGITAL CINEMA SYSTEM TH A5 STANDBY ON DISPLAY TV VIDEO TOP MENU AUDIO ON TUNER PRESET ENTER VCR CHANNEL TUNING DVD FM AM AUX MUTING STANDBY ON VCR VCR CONTROL MENU TV AUDIO FM MODE SUBTITLE RET...

Page 61: ...pletamente cortada A alimentação pode ser controlada remotamente ATENÇÃO Para reduzir riscos de choques eléctricos incêndio etc 1 Não retire parafusos nem desmonte as tampas ou o gabinete 2 Não exponha este aparelho à chuva nem à umidade PRECAUCIÓN Para reducir riesgos de choques eléctricos incendio etc 1 No extraiga los tornillos los cubiertas ni la caja 2 No exponga este aparato a la lluvia o a ...

Page 62: ...incendio y para proteger el aparato contra daños Ubique el aparato de la siguiente manera Frente Espacio abierto sin obstrucciones Lados 10 cm sin obstrucciones a los lados Parte superior 10 cm sin obstrucciones en la parte superior Parte trasera 15 cm sin obstrucciones en la parte trasera Fondo Sin obstrucciones colóquelo sobre una superficie nivelada Además mantenga la mejor circulación de aire ...

Page 63: ...and inter lock failed or defeated Avoid direct exposure to beam 3 CAUTION Do not open the top cover There are no user serviceable parts inside the Unit leave all servicing to qualified service personnel 1 PRODUCTO LÁSER CLASE 1 2 PELIGRO En el interior hay radiación láser invisible Evite el contacto directo con el haz 3 PRECAUCIÓN No abra la tapa superior En el interior de la unidad no existen pie...

Page 64: ... DVD Playback 27 Changing the Color System 27 Showing the On Screen Bar 27 Selecting the Subtitles 28 Selecting the Audio Languages 28 Selecting the Multi Angle Views 28 Checking the Remaining Time 29 Disc Menu Driven Playback 29 Moving to a Particular Portion Directly 29 Searching for a Particular Point 30 Repeating Playback 30 7 Repeat Play 30 7 A B Repeat 30 Programming the Playing Order of the...

Page 65: ...uttons 4 and 7 4 Disc tray 10 12 5 0 open close button 10 13 32 37 41 Pressing this button also turns on the power and changes the source to the DVD player 6 Display window 7 Remote sensor 8 3 8 play pause button 10 12 26 41 Pressing this button also turns on the power and changes the source to the DVD player 9 DSP button 11 13 23 p VOLUME and buttons 10 12 14 q SOURCE button 14 15 44 45 w Illumin...

Page 66: ...U TE EN TE R CLEA R CLEA R GO GO TO RE MA IN RE MA IN SLEE P SLEE P EFFECT EFFECT PROG RAM PROG RAM RE PE A RE PE AT RE PE A RE PE AT AN GL E AN GL E NT SC P NT SC PA L AL DIG ES T DIG ES T DSP DSPMO DE MO DE SE T SE T UP UP TEST TEST TONE ON E PROLOGIC PROLOGIC SPKMO DE SPKMO DE SO UN DEDIT SO UN DEDIT SLOW SLOW 1 2 3 4 5 6 7 8 9 10 10 ZO OM ZO OM A B B RM STHA5U DVD CIN EMA SYSTEM DISPLAY TV VID...

Page 67: ...damage the center unit Handling the center unit DO NOT touch the power cord with wet hands DO NOT pull on the power cord to unplug the cord When unplugging the cord always grasp the plug so as not to damage the cord Keep the power cord away from the connecting cords and the antenna The power cord may cause noise or screen interference It is recommended to use a coaxial cable for antenna connection...

Page 68: ...e FM 75 Ω COAXIAL terminal as temporary measure Extend the supplied FM antenna horizontally If reception is poor connect an outdoor antenna Before attaching a 75 Ω coaxial cable with a standard type connector disconnect the supplied FM antenna Center unit About the cooling fan A cooling fan is mounted on the rear panel of the center unit to prevent abnormal temperature inside the center unit thus ...

Page 69: ...er To left rear speaker To right rear speaker To subwoofer Left front speaker D I G I T A L S U R R O U N D D I G I T A L COMPACT DIGITAL VIDEO STANDBY AUDIO FM MODE DSP VOLUME SOURCE DVD DIGITAL THEATER SYSTEM TH A5 STANDBY ON Center unit Center speaker MIN MIN MIN MIN COMPONENT OUT Y PB PR Speaker Layout Diagram EN01 09TH A5 UW f pm6 01 12 24 17 29 6 ...

Page 70: ... is non directional you can place a subwoofer wherever you like Normally place it in front of you Left front speaker Right front speaker Right rear speaker Subwoofer Left rear speaker Center speaker If your speakers cannot be placed at the same distance from the listening position You can adjust the delay time of the center speaker and rear speakers For in depth information about adjusting the del...

Page 71: ...e component and the center unit the sound output through this system may be distorted Connecting Audio Video Component Turn the power off to all components before connections Connect the other component to the center unit with the audio cord Use the cord supplied with the other component or purchase it at an electric appliance store Audio cord not supplied DBS Tuner Center unit MD Recorder Cassett...

Page 72: ...d with this system Use the cords supplied with the other component or purchase them at an electric appliance store You can select one of three connection types A B and C If your TV has S video Y C separation and or component video Y PR PB jacks connect them using an S video cord not supplied B and or component video cord not supplied C By using these jacks you can get a better picture quality in t...

Page 73: ...LOADING appears for a while You can also start playback by closing the disc tray using 0 on the front panel 4 Adjust the Volume To increase the volume press and hold VOLUME To decrease the volume press and hold VOLUME CAUTION Always set the volume to the minimum before starting any source If the volume is set at its high level the sudden blast of sound energy can permanently damage your hearing an...

Page 74: ...te Before activating the realistic sound field adjust the speaker setting to bring out the best performance from this system For in depth information about adjusting the speaker setting see Speaker Settings on pages 16 and 17 6 Stop Playback Press 7 twice Playback stops completely and DVD appears on the display The DVD player goes on working for 3 minutes after playback stops This system can memor...

Page 75: ...he disc tray using 0 on the front panel 4 Adjust the Volume To increase the volume press and hold VOLUME To decrease the volume press and hold VOLUME CAUTION Always set the volume to the minimum before starting any source If the volume is set at its high level the sudden blast of sound energy can permanently damage your hearing and or ruin your speakers Notes By pressing VOLUME or repeatedly you c...

Page 76: ...isplay The DVD player goes on working for 3 minutes after playback stops This system can memorize the end point even when you press 7 once When you start playback again by pressing 3 8 playback begins from where it has been stopped Resume play To remove the loaded disc Press 0 OPEN appears on the display and the disc tray comes out To close the disc tray press 0 again If you do not press the butto...

Page 77: ...ly on the display The system starts searching for a station On the front panel 1 Press 7 so that MANUAL appears on the display 2 Press and hold or 4 until the station frequency starts changing continuously on the display The system starts searching for a station Notes When a station of sufficient signal strength is tuned in the system stops searching and the indicator lights up on the display When...

Page 78: ... on the display For in depth information about Pro Logic modes see Creating Realistic Sound Fields on pages 18 and 22 DVD player AUX IN FM AM DVD FM AM AUX MUTE SOURCE Turning Off the Power with the Timer You can fall asleep while listening to music Sleep Timer From the remote control ONLY Press SLEEP Each time you press the button the shut off time changes as follows When the shut off time comes ...

Page 79: ...or 2 repeatedly to select the appropriate speaker information Each time you press the button the speaker information changes as follows SMALL Normally select this NONE Select this when you do not want to use the corresponding speaker 3 Repeat steps 1 and 2 to select the appropriate information for the other speaker F SP SW SP C SP R SP R DEL C DEL Normal indication canceled SETTING ENTER SMALL NON...

Page 80: ...f delay time indications with the current setting appears on the display Each time you press the button the indication in the main display changes as follows C DEL Center delay To register delay time for center speaker from 0 msec to 5 msec not selectable for Dolby Pro Logic R DEL Rear delay To register delay time for rear speakers from 0 msec to 15 msec for Dolby Digital and DTS Digital Surround ...

Page 81: ...ore called 5 1 channel Since each channel is completely independent from the other channel signals to avoid interference you can obtain much better sound quality with much stereo and surround effects In addition Dolby Digital enables stereo rear sounds and sets the cutoff frequency of the rear treble at 20 kHz compared to 7 kHz for Dolby Pro Logic These facts enhance the sound movement and being t...

Page 82: ...g of a live music club with a low ceiling These DSP modes can be used to add the acoustic surround effects while reproducing stereo analog software or Linear PCM digital software and can give you a real being there feeling When one of the DSP modes is selected the DSP indicator lights up on the display To check the speaker connections and settings using the test tone 1 Select and play a DVD encode...

Page 83: ...he output balance for the front speakers go to the next step To adjust the output level for the subwoofer go to step 4 00 F 00 00 R 00 CEN Normal indication canceled SW REAR 00 F 00 00 R 00 CEN Normal indication canceled SW REAR 3 To adjust the output balance for the front speakers 1 Press SOUND repeatedly until the adjustment indication for the front speakers appears on the display Each time you ...

Page 84: ...l setting the output balances are at the center position If you have already changed the setting another value will appear 00 F 00 00 R 00 CEN Normal indication canceled SW REAR SOUND 2 Press 3 or 2 to adjust the output balance 3 Decreases the left speaker output or restores the right speaker output 2 Decreases the right speaker output or restores the left speaker output Each output balance change...

Page 85: ...ady to start adjustments To adjust the output balance for the front speakers and the rear speakers go to the next step To adjust the output level for the center speaker the rear speakers and the subwoofer go to step 5 4 To adjust the output balance for the front speakers and the rear speakers 1 Press SOUND repeatedly until one of the following adjustment indications appears on the display Each tim...

Page 86: ...re is a time limit in doing the following steps If the setting is canceled before you finish start from step 2 again 00 F 00 00 R 00 CEN Normal indication canceled SW REAR SOUND ENTER HALL PAVILION THEATER Normal indication canceled LIVE CLUB DANCE CLUB 00 F 00 00 R 00 REAR Normal indication canceled ROOM LIVE REVERB DSP MODE SOUND 1 Select and play any source except Dolby Digital or DTS Digital S...

Page 87: ... DSP sound parameters Note Pressing EFFECT to adjust overall level of DSP effect will change your fine adjustments to the fixed level DSP MODE SOUND B SEARCH REW FF F SEARCH ENTER VOLUME VCR CHANNEL TUNING DVD FM AM AUX MUTING 1 2 3 4 5 6 7 8 9 0 REMAIN PROGRAM D R C SETUP SLEEP EFFECT DSP MODE TEST PRO LOGIC SETTING SOUND CLEAR REPEAT ANGLE SLOW SEARCH A B REPEAT NTSC PAL ZOOM 2 3 SOUND DSP MODE ...

Page 88: ... CD R and CD RW This system can also play back MP3 files recorded on CD Rs and CD RWs For in depth information about what MP3 is see MP3 Introduction on page 40 Discs you can play Example 1 DVD disc Example 2 Video CD Audio CD Examples Disc structure DVD Video CD VCD and Audio CD CD A DVD disc consists of Titles and each title may be divided into some Chapters See Example 1 For example if a DVD di...

Page 89: ...DVD or track only possible on a CD and VCD directly using the number buttons Pressing the number buttons before or during play allows you to start playing the title track number you want If your TV is turned on the on screen bar is pulled down automatically on the TV screen To select number 1 to 9 press the corresponding number button then press ENTER or wait for 5 seconds To select number 15 pres...

Page 90: ...ou can select these elements recorded on the DVD Subtitles are recorded on the disc The number inside the mark indicates the total number of the recorded subtitles Several audio languages are recorded on the disc The number inside the mark indicates the total number of the recorded audio languages Multi angle views are recorded on the disc The number inside the mark indicates the total number of t...

Page 91: ...D Playback Ex When the disc has 3 selections English French and Spanish Selecting the Subtitles While playing back a DVD containing subtitles in different languages you can select the subtitle to be displayed on the TV screen You can set your favorite subtitle language as the initial language shown on the screen See page 46 From the remote control ONLY Press SUBTITLE The on screen bar appears on t...

Page 92: ...maining Time While playing back a DVD you can check the remaining time to be played back From the remote control ONLY Press REMAIN The on screen bar and the current play time indication appear on the TV screen for a while Each time you press the button the following indication appears on the screen REMAIN TIME TITLE Select this to show the remaining time of the current title CHAPTER TIME Select th...

Page 93: ...er will be repeated REPEAT TITLE Current title will be repeated REPEAT OFF Repeat play is canceled Normal play is resumed Cannot be selected during program play Note When the on screen bar is shown on the TV screen repeat mode indication also changes as follows 7 A B Repeat While playing you can also select a portion you want to repeat A B repeat is not performed between different titles An interv...

Page 94: ...AM The PROGRAM MENU screen appears on the TV screen PROGRAM appears on the display and the PROGRAM indicator also lights up 3 Press ENTER 4 Press 3 or 2 to select a title number then ENTER 3 Increases the number 2 Decreases the number You can also select a title number using the number buttons 5 Press 3 or 2 to select a chapter number then ENTER 3 Increases the number 2 Decreases the number You ca...

Page 95: ...light a program step you want to modify then perform steps 3 to 5 on page 31 Before entering a new number press CLEAR repeatedly until appears on the number entry position To add a step Press or 5 to select highlight an empty program step then perform steps 3 to 5 on page 31 To move program step 11 to program step 10 press 5 when program step 11 is selected highlighted so that PREVIOUS is selected...

Page 96: ...yback You can enjoy slow motion playback while playing a DVD From the remote control ONLY Press SLOW repeatedly during playback or pause Each time you press the button slow motion speed changes as follows 7 Zoom You can zoom in on the picture while playing back a DVD From the remote control ONLY 1 Press ZOOM to zoom in Each time you press the button the picture is enlarged as follows 2 Press 3 2 5...

Page 97: ...ge the color system see Changing the Color System on page 27 Checking the Remaining Time While playing back a VCD or CD you can check the remaining time From the remote control ONLY Press REMAIN The on screen bar appears on the TV screen for a while Each time you press the button the play time indication changes as follows REMAIN TIME TRACK Select this to show the remaining time of the current tra...

Page 98: ...ME TIME Moving to a Particular Portion Directly You can move to a particular portion scene on the track directly PBC function is canceled when you use this function From the remote control ONLY 1 Press SEARCH during playback or pause Each time you press the button the following indication appears on the TV screen 1 2 3 4 5 6 7 8 9 0 Disc Menu Driven Playback Only for VCD The Play Back Control func...

Page 99: ...s the button repeat mode changes as follows REPEAT ONE Current track will be repeated REPEAT DISC All the tracks will be repeated REPEAT OFF Repeat play is canceled Normal play is resumed Note When the on screen bar is shown on the screen Repeat mode indication also changes as follows 7 A B Repeat While playing you can also select a portion you want to repeat An interval of more than 5 seconds is ...

Page 100: ...o stop during play Press 7 or PROGRAM on the remote control The PROGRAM MENU screen appears on the TV screen If you press 3 8 while this screen is shown the system starts program play To exit from program play From the remote control ONLY Press PROGRAM The PROGRAM MENU screen goes off and the opening screen appears The program you made is still kept in memory If you press 3 8 while this screen is ...

Page 101: ...To modify a step press or 5 to select highlight an program step you want to modify then perform steps 3 and 4 Before entering a new number press CLEAR repeatedly until appears on number entry position To add a step press or 5 to select highlight an empty program step then perform steps 3 and 4 To move program step 11 to program step 10 press 5 when program step 11 is selected highlighted so that P...

Page 102: ...n Playback You can enjoy slow motion playback while playing a VCD From the remote control ONLY Press SLOW repeatedly during playback or pause Each time you press the button slow motion speed changes as follows 7 Zoom You can zoom in on the picture while playing a VCD From the remote control ONLY 1 Press ZOOM to zoom in Each time you press the button the picture is enlarged as follows 2 Press 3 2 5...

Page 103: ...can be recorded in directories or folders in PC terminology During recording the files and directories can be arranged in a way similar to arranging files and folder directories of computer data Root is similar to the root of a tree Every file and directory can be linked to the root In compliance with ISO 9660 the maximum allowable depth of nested directories so called hierarchy is eight inclusive...

Page 104: ... close the disc tray press 0 again 1 Disc type DVD VCD CD MP3 2 Current track file and total number of the tracks on the disc Ex 1st track is playing out of 35 tracks recorded 3 Bit rate Ex Bit rate used for recording the loaded disc is 128 Kbps See the previous page 4 Repeat mode indicator Ex When repeat mode is turned off See page 43 for more details 5 Elapsed playing time and the total playing ...

Page 105: ... SLEEP EFFECT DSP MODE TEST PRO LOGIC SETTING SOUND CLEAR REPEAT ANGLE SLOW SEARCH A B REPEAT NTSC PAL 1 2 3 4 5 6 7 8 9 0 ZOOM REPEAT 3 8 Button ENTER 3 8 To do Start playback or go into a directory Select a track or directory 5 ENTER or 3 8 5 5 and ENTER 5 5 5 5 SPRING SPRING1 MP3 SPRING2 MP3 SPRING3 MP3 SPRING4 MP3 SPRING5 MP3 SPRING SPRING1 MP3 SPRING2 MP3 SPRING3 MP3 SPRING4 MP3 SPRING5 MP3 S...

Page 106: ... on the TV screen repeat mode indication also changes as follows REPEAT RANDOM REPEAT ONE REPEAT DIR REPEAT DISC REPEAT OFF Moving to a Particular Track Directly You can move to a particular track on the disc directly From the remote control ONLY 1 Press SEARCH during playback or pause TRACK appears on the TV screen 2 Press the number buttons to select a track number you want The system starts pla...

Page 107: ...the display The last received station of the selected band is tuned in Each time you press the button the source changes as follows WAIT appears on the display 2 Press 7 so that MANUAL appears on the display Each time you press the button the operation mode of and 4 buttons alternates between PRESET and MANUAL PRESET Select this for using and 4 as the buttons to select the preset station MANUAL Se...

Page 108: ...reset number TUNER PRESET DOWN Decreases the preset number On the front panel 1 Press SOURCE repeatedly until the desired band appears on the display 2 Press 7 so that PRESET appears on the display Each time you press the button the operation mode of and 4 buttons alternates between PRESET and MANUAL PRESET Select this for using and 4 as the buttons to select the preset station MANUAL Select this ...

Page 109: ...enu You can select the following languages separately for each listed item on the menu For OSD LANGUAGE English Chinese Spanish French German Japanese and Korean For AUDIO SUBTITLE and MENU LANGUAGE English Chinese French German Japanese Russian Spanish Portuguese Korean and Original Available only for AUDIO and SUBTITLE When you want to operate the disc or enjoy its playback in the originally rec...

Page 110: ...he DVD Preference System You can set the DVD preference to match it to your usage and operating circumstances On the system setting menu you can set the following TV SCREEN Select the TV screen size for playing back a DVD recorded with 16 9 wide screen video signal 4 3 LB Select 4 3 LB Letter Box when the aspect ratio of your TV is 4 3 While viewing a wide screen picture the black bars appear on t...

Page 111: ...ratio this setting does not take effect The pictures are displayed with full 4 3 aspect ratio or with 4 3 Letter Box To erase the Setup menu Press SETUP indicates the current setting SYSTEM LANGUAGES TV SCREEN RATING LEVEL DIGITAL OUTPUT 4 3 LB OFF Move Setup Exit 4 3 LB 4 3 PS 16 9 SETUP SYSTEM LANGUAGES TV SCREEN RATING LEVEL DIGITAL OUTPUT 4 3 LB OFF BITSTREAM Move Setup Exit SYSTEM LANGUAGES T...

Page 112: ... LB OFF BITSTREAM Move Setup Exit SYSTEM LANGUAGES TV SCREEN ENTER PASSWORD DIGITAL OUTPUT 4 3 LB BITSTREAM Move Setup Exit 6 Press or 5 to select highlight the level you want then press ENTER To erase the Setup menu Press SETUP again To change the password Be sure to note down the new password you have made 1 Repeat steps 1 to 5 of Setting the Parental Rating Level procedure 2 Press or 5 to selec...

Page 113: ...SC PAL 1 2 3 4 5 6 7 8 9 0 ZOOM You can perform the following operations on the TV TV Turn on or off the TV TV VOLUME Adjust the volume TV VIDEO Set the input mode either TV or VIDEO TV CHANNEL Change the channels After pressing VCR CONTROL ON on the remote control you can perform the following operations on the VCR VCR Turn on or off the VCR VCR CHANNEL Change the channels 1 9 0 Select TV channel...

Page 114: ...VC 01 Hitachi 10 Magnavox 04 Mitsubishi 13 Panasonic 12 24 RCA 07 29 Samsung 11 Sanyo 05 20 Sharp 02 16 22 Sony 03 Toshiba 09 Zenith 17 Manufacturers codes for TV Operating Other Manufacturers TV You can use the remote control to operate other manufactures TV Refer also to the manuals supplied for the other products To operate the other products aim the remote control directly at the remote sensor...

Page 115: ...t temperature extremes and moisture To clean the disc Wipe the disc with a soft cloth in a straight line from center to edge Maintenance Cleaning the unit Stains on the unit Should be wiped off with a soft cloth If the unit is heavily stained wipe it with a cloth soaked in water diluted neutral detergent and wrung well then wipe clean with a dry cloth Since the unit may deteriorate in quality beco...

Page 116: ...too weak The station is too far away The antenna is not connected correctly Lightning or electronic noise interferes with operation of the microcomputer Immediately after beginning to heat the room the unit was moved to a cold location causing condensation to form inside The remote control is not set for VCR operations The VCR is not a JVC s product SOLUTION Insert the plug into the socket Come cl...

Page 117: ...nsitivity FM 8 0 dBf 0 9 µV 75 Ω AM loop antenna 650 µV m General Power Requirements AC 110 V 127 V 220 V 240 V adjustable with the voltage selector 50 Hz 60 Hz Power Consumption 120 W at operation 2 W in standby mode Dimensions W H D 350 mm 80 mm 300 mm Mass 6 3 kg Subwoofer SP WA5 Speaker 20 cm Bass reflex Magnetically Shielded Power Handling Capacity 60 W Impedance 3 Ω Frequency Range 25 Hz to ...

Page 118: ...ent and if different reset the voltage selector switch to prevent from a damage or risk of fire electric shock PRECAUCIÓN para la línea de la red CA ANTES DE ENCHUFAR EL EQUIPO compruebe si la tensión de la línea de la red CA corresponde con la posición del selector de tensión situado en la parte exterior del equipo y si es diferente reajuste el selector de tensión para evitar el riesgo de incendi...

Page 119: ...XV THA5 and SP THA5 D I G I T A L S U R R O U N D D I G I T A L COMPACT DIGITAL VIDEO STANDBY AUDIO FM MODE DSP VOLUME SOURCE DVD DIGITAL CINEMA SYSTEM TH A5 STANDBY ON DISPLAY TV VIDEO TOP MENU AUDIO ON TUNER PRESET ENTER VCR CHANNEL TUNING DVD FM AM AUX MUTING STANDBY ON VCR VCR CONTROL MENU TV AUDIO FM MODE SUBTITLE RETURN STEP OFF TV VOLUME TV CHANNEL VOLUME B SEARCH F SEARCH DOWN UP REW FF RM...

Page 120: ...ms must be considered and local rules or laws governing the disposal of these batteries must be followed strictly Do not expose this apparatus to rain moisture dripping or splashing and that no objects filled with liquids such as vases shall be placed on the apparatus Warnings Cautions and Others Caution Proper Ventilation To avoid risk of electric shock and fire and to protect from damage Locate ...

Page 121: ...user serviceable parts inside the unit leave all servicing to qualified service personnel IMPORTANT FOR LASER PRODUCTS 1 CLASSIFICATION LABEL PLACED ON EXTERIOR SURFACE REPRODUCTION OF LABELS 2 WARNING LABEL PLACED INSIDE THE UNIT CLASS 1 LASER PRODUCT KLASSE 1 LASER PRODUKT LUOKAN 1 LASER LAITE KLASS 1 LASER APPARAT PRODUCTO LASER CLASE 1 G 2 TH A5 UJ safety_f pm6 01 12 25 13 36 2 ...

Page 122: ...erations 26 DVD Playback 27 Showing the On Screen Bar 27 Selecting the Subtitles 28 Selecting the Audio Languages 28 Selecting the Multi Angle Views 28 Checking the Remaining Time 29 Disc Menu Driven Playback 29 Moving to a Particular Portion Directly 29 Searching for a Particular Point 30 Repeating Playback 30 7 Repeat Play 30 7 A B Repeat 30 Programming the Playing Order of the Chapters Program ...

Page 123: ...ns 4 and 7 4 Disc tray 10 12 5 0 open close button 10 13 32 37 41 Pressing this button also turns on the power and changes the source to the DVD player 6 Display window 7 Remote sensor 8 3 8 play pause button 10 12 26 41 Pressing this button also turns on the power and changes the source to the DVD player 9 DSP button 11 13 23 p VOLUME and buttons 10 12 14 q SOURCE button 14 15 44 45 w Illuminatio...

Page 124: ...U TE EN TE R CLEA R CLEA R GO GO TO RE MA IN RE MA IN SLEE P SLEE P EFFECT EFFECT PROG RAM PROG RAM RE PE A RE PE AT RE PE A RE PE AT AN GL E AN GL E NT SC P NT SC PA L AL DIG ES T DIG ES T DSP DSPMO DE MO DE SE T SE T UP UP TEST TEST TONE ON E PROLOGIC PROLOGIC SPKMO DE SPKMO DE SO UN DEDIT SO UN DEDIT SLOW SLOW 1 2 3 4 5 6 7 8 9 10 10 ZO OM ZO OM A B B RM STHA5J DVD THEATER SYSTEM DISPLAY TV VID...

Page 125: ...ge the center unit Handling the center unit DO NOT touch the power cord with wet hands DO NOT pull on the power cord to unplug the cord When unplugging the cord always grasp the plug so as not to damage the cord Keep the power cord away from the connecting cords and the antenna The power cord may cause noise or screen interference It is recommended to use a coaxial cable for antenna connection sin...

Page 126: ... 75 Ω COAXIAL terminal as temporary measure Extend the supplied FM antenna horizontally If reception is poor connect an outdoor antenna Before attaching a 75 Ω coaxial cable with a standard type connector disconnect the supplied FM antenna Center unit About the cooling fan A cooling fan is mounted on the rear panel of the center unit to prevent abnormal temperature inside the center unit thus assu...

Page 127: ...o left rear speaker To right rear speaker To subwoofer Left front speaker D I G I T A L S U R R O U N D D I G I T A L COMPACT DIGITAL VIDEO STANDBY AUDIO FM MODE DSP VOLUME SOURCE DVD DIGITAL THEATER SYSTEM TH A5 STANDBY ON Center unit Center speaker MIN MIN MIN MIN COMPONENT OUT Y PB PR Speaker Layout Diagram EN01 09TH A5 UJ f pm6 01 12 25 13 34 6 ...

Page 128: ...non directional you can place a subwoofer wherever you like Normally place it in front of you Left front speaker Right front speaker Right rear speaker Subwoofer Left rear speaker Center speaker If your speakers cannot be placed at the same distance from the listening position You can adjust the delay time of the center speaker and rear speakers For in depth information about adjusting the delay t...

Page 129: ...mponent and the center unit the sound output through this system may be distorted Connecting Audio Video Component Turn the power off to all components before connections Connect the other component to the center unit with the audio cord Use the cord supplied with the other component or purchase it at an electric appliance store Audio cord not supplied DBS Tuner Center unit MD Recorder Cassette De...

Page 130: ...th this system Use the cords supplied with the other component or purchase them at an electric appliance store You can select one of three connection types A B and C If your TV has S video Y C separation and or component video Y PR PB jacks connect them using an S video cord not supplied B and or component video cord not supplied C By using these jacks you can get a better picture quality in the o...

Page 131: ... LOADING appears for a while You can also start playback by closing the disc tray using 0 on the front panel 4 Adjust the Volume To increase the volume press and hold VOLUME To decrease the volume press and hold VOLUME CAUTION Always set the volume to the minimum before starting any source If the volume is set at its high level the sudden blast of sound energy can permanently damage your hearing a...

Page 132: ...efore activating the realistic sound field adjust the speaker setting to bring out the best performance from this system For in depth information about adjusting the speaker setting see Speaker Settings on pages 16 and 17 6 Stop Playback Press 7 twice Playback stops completely and DVD appears on the display The DVD player goes on working for 3 minutes after playback stops This system can memorize ...

Page 133: ...he disc tray using 0 on the front panel 4 Adjust the Volume To increase the volume press and hold VOLUME To decrease the volume press and hold VOLUME CAUTION Always set the volume to the minimum before starting any source If the volume is set at its high level the sudden blast of sound energy can permanently damage your hearing and or ruin your speakers Notes By pressing VOLUME or repeatedly you c...

Page 134: ...ay The DVD player goes on working for 3 minutes after playback stops This system can memorize the end point even when you press 7 once When you start playback again by pressing 3 8 playback begins from where it has been stopped Resume play To remove the loaded disc Press 0 OPEN appears on the display and the disc tray comes out To close the disc tray press 0 again If you do not press the button th...

Page 135: ...n the display The system starts searching for a station On the front panel 1 Press 7 so that MANUAL appears on the display 2 Press and hold or 4 until the station frequency starts changing continuously on the display The system starts searching for a station Notes When a station of sufficient signal strength is tuned in the system stops searching and the indicator lights up on the display When an ...

Page 136: ...p on the display For in depth information about Pro Logic modes see Creating Realistic Sound Fields on pages 18 and 22 DVD player AUX IN FM AM DVD FM AM AUX MUTE SOURCE Turning Off the Power with the Timer You can fall asleep while listening to music Sleep Timer From the remote control ONLY Press SLEEP Each time you press the button the shut off time changes as follows When the shut off time comes...

Page 137: ... or 2 repeatedly to select the appropriate speaker information Each time you press the button the speaker information changes as follows SMALL Normally select this NONE Select this when you do not want to use the corresponding speaker 3 Repeat steps 1 and 2 to select the appropriate information for the other speaker F SP SW SP C SP R SP R DEL C DEL Normal indication canceled SETTING ENTER SMALL NO...

Page 138: ...lay time indications with the current setting appears on the display Each time you press the button the indication in the main display changes as follows C DEL Center delay To register delay time for center speaker from 0 msec to 5 msec not selectable for Dolby Pro Logic R DEL Rear delay To register delay time for rear speakers from 0 msec to 15 msec for Dolby Digital and DTS Digital Surround and ...

Page 139: ...called 5 1 channel Since each channel is completely independent from the other channel signals to avoid interference you can obtain much better sound quality with much stereo and surround effects In addition Dolby Digital enables stereo rear sounds and sets the cutoff frequency of the rear treble at 20 kHz compared to 7 kHz for Dolby Pro Logic These facts enhance the sound movement and being there...

Page 140: ... a live music club with a low ceiling These DSP modes can be used to add the acoustic surround effects while reproducing stereo analog software or Linear PCM digital software and can give you a real being there feeling When one of the DSP modes is selected the DSP indicator lights up on the display To check the speaker connections and settings using the test tone 1 Select and play a DVD encoded wi...

Page 141: ... balance for the front speakers go to the next step To adjust the output level for the subwoofer go to step 4 00 F 00 00 R 00 CEN Normal indication canceled SW REAR 00 F 00 00 R 00 CEN Normal indication canceled SW REAR 3 To adjust the output balance for the front speakers 1 Press SOUND repeatedly until the adjustment indication for the front speakers appears on the display Each time you press the...

Page 142: ...tting the output balances are at the center position If you have already changed the setting another value will appear 00 F 00 00 R 00 CEN Normal indication canceled SW REAR SOUND 2 Press 3 or 2 to adjust the output balance 3 Decreases the left speaker output or restores the right speaker output 2 Decreases the right speaker output or restores the left speaker output Each output balance changes fr...

Page 143: ...ady to start adjustments To adjust the output balance for the front speakers and the rear speakers go to the next step To adjust the output level for the center speaker the rear speakers and the subwoofer go to step 5 4 To adjust the output balance for the front speakers and the rear speakers 1 Press SOUND repeatedly until one of the following adjustment indications appears on the display Each tim...

Page 144: ...s a time limit in doing the following steps If the setting is canceled before you finish start from step 2 again 00 F 00 00 R 00 CEN Normal indication canceled SW REAR SOUND ENTER HALL PAVILION THEATER Normal indication canceled LIVE CLUB DANCE CLUB 00 F 00 00 R 00 REAR Normal indication canceled ROOM LIVE REVERB DSP MODE SOUND 1 Select and play any source except Dolby Digital or DTS Digital Surro...

Page 145: ...r DSP sound parameters Note Pressing EFFECT to adjust overall level of DSP effect will change your fine adjustments to the fixed level DSP MODE SOUND B SEARCH REW FF F SEARCH ENTER VOLUME VCR CHANNEL TUNING DVD FM AM AUX MUTING 1 2 3 4 5 6 7 8 9 0 REMAIN PROGRAM D R C SETUP SLEEP EFFECT DSP MODE TEST PRO LOGIC SETTING SOUND CLEAR REPEAT ANGLE SLOW SEARCH A B REPEAT ZOOM 2 3 SOUND DSP MODE 00 F 00 ...

Page 146: ...CD RW This system can also play back MP3 files recorded on CD Rs and CD RWs For in depth information about what MP3 is see MP3 Introduction on page 40 Discs you can play Example 1 DVD disc Example 2 Video CD Audio CD Examples Disc structure DVD Video CD VCD and Audio CD CD A DVD disc consists of Titles and each title may be divided into some Chapters See Example 1 For example if a DVD disc contain...

Page 147: ...or track only possible on a CD and VCD directly using the number buttons Pressing the number buttons before or during play allows you to start playing the title track number you want If your TV is turned on the on screen bar is pulled down automatically on the TV screen To select number 1 to 9 press the corresponding number button then press ENTER or wait for 5 seconds To select number 15 press 1 ...

Page 148: ...for more details Some DVDs contain several audio languages subtitles and multi angle views When you find the following marks on the DVD or its package you can select these elements recorded on the DVD Subtitles are recorded on the disc The number inside the mark indicates the total number of the recorded subtitles Several audio languages are recorded on the disc The number inside the mark indicate...

Page 149: ...D Playback Ex When the disc has 3 selections English French and Spanish Selecting the Subtitles While playing back a DVD containing subtitles in different languages you can select the subtitle to be displayed on the TV screen You can set your favorite subtitle language as the initial language shown on the screen See page 46 From the remote control ONLY Press SUBTITLE The on screen bar appears on t...

Page 150: ...ing Time While playing back a DVD you can check the remaining time to be played back From the remote control ONLY Press REMAIN The on screen bar and the current play time indication appear on the TV screen for a while Each time you press the button the following indication appears on the screen REMAIN TIME TITLE Select this to show the remaining time of the current title CHAPTER TIME Select this t...

Page 151: ...er will be repeated REPEAT TITLE Current title will be repeated REPEAT OFF Repeat play is canceled Normal play is resumed Cannot be selected during program play Note When the on screen bar is shown on the TV screen repeat mode indication also changes as follows 7 A B Repeat While playing you can also select a portion you want to repeat A B repeat is not performed between different titles An interv...

Page 152: ...he PROGRAM MENU screen appears on the TV screen PROGRAM appears on the display and the PROGRAM indicator also lights up 3 Press ENTER 4 Press 3 or 2 to select a title number then ENTER 3 Increases the number 2 Decreases the number You can also select a title number using the number buttons 5 Press 3 or 2 to select a chapter number then ENTER 3 Increases the number 2 Decreases the number You can al...

Page 153: ...hlight a program step you want to modify then perform steps 3 to 5 on page 31 Before entering a new number press CLEAR repeatedly until appears on the number entry position To add a step Press or 5 to select highlight an empty program step then perform steps 3 to 5 on page 31 To move program step 11 to program step 10 press 5 when program step 11 is selected highlighted so that PREVIOUS is selecte...

Page 154: ...n Playback You can enjoy slow motion playback while playing a DVD From the remote control ONLY Press SLOW repeatedly during playback or pause Each time you press the button slow motion speed changes as follows 7 Zoom You can zoom in on the picture while playing back a DVD From the remote control ONLY 1 Press ZOOM to zoom in Each time you press the button the picture is enlarged as follows 2 Press ...

Page 155: ... Disc Operations on page 26 Checking the Remaining Time While playing back a VCD or CD you can check the remaining time From the remote control ONLY Press REMAIN The on screen bar appears on the TV screen for a while Each time you press the button the play time indication changes as follows REMAIN TIME TRACK Select this to show the remaining time of the current track DISC TIME Select this to show ...

Page 156: ...IME Moving to a Particular Portion Directly You can move to a particular portion scene on the track directly PBC function is canceled when you use this function From the remote control ONLY 1 Press SEARCH during playback or pause Each time you press the button the following indication appears on the TV screen 1 2 3 4 5 6 7 8 9 0 Disc Menu Driven Playback Only for VCD The Play Back Control function...

Page 157: ...s the button repeat mode changes as follows REPEAT ONE Current track will be repeated REPEAT DISC All the tracks will be repeated REPEAT OFF Repeat play is canceled Normal play is resumed Note When the on screen bar is shown on the screen Repeat mode indication also changes as follows 7 A B Repeat While playing you can also select a portion you want to repeat An interval of more than 5 seconds is ...

Page 158: ...op during play Press 7 or PROGRAM on the remote control The PROGRAM MENU screen appears on the TV screen If you press 3 8 while this screen is shown the system starts program play To exit from program play From the remote control ONLY Press PROGRAM The PROGRAM MENU screen goes off and the opening screen appears The program you made is still kept in memory If you press 3 8 while this screen is show...

Page 159: ...To modify a step press or 5 to select highlight an program step you want to modify then perform steps 3 and 4 Before entering a new number press CLEAR repeatedly until appears on number entry position To add a step press or 5 to select highlight an empty program step then perform steps 3 and 4 To move program step 11 to program step 10 press 5 when program step 11 is selected highlighted so that P...

Page 160: ...Motion Playback You can enjoy slow motion playback while playing a VCD From the remote control ONLY Press SLOW repeatedly during playback or pause Each time you press the button slow motion speed changes as follows 7 Zoom You can zoom in on the picture while playing a VCD From the remote control ONLY 1 Press ZOOM to zoom in Each time you press the button the picture is enlarged as follows 2 Press ...

Page 161: ... and played back MP3 files tracks can be recorded in directories or folders in PC terminology During recording the files and directories can be arranged in a way similar to arranging files and folder directories of computer data Root is similar to the root of a tree Every file and directory can be linked to the root In compliance with ISO 9660 the maximum allowable depth of nested directories so c...

Page 162: ...se the disc tray press 0 again 1 Disc type DVD VCD CD MP3 2 Current track file and total number of the tracks on the disc Ex 1st track is playing out of 35 tracks recorded 3 Bit rate Ex Bit rate used for recording the loaded disc is 128 Kbps See the previous page 4 Repeat mode indicator Ex When repeat mode is turned off See page 43 for more details 5 Elapsed playing time and the total playing time...

Page 163: ...P SLEEP EFFECT DSP MODE TEST PRO LOGIC SETTING SOUND CLEAR REPEAT ANGLE SLOW SEARCH A B REPEAT ZOOM 1 2 3 4 5 6 7 8 9 0 REPEAT 3 8 Button ENTER 3 8 To do Start playback or go into a directory Select a track or directory 5 ENTER or 3 8 5 5 and ENTER 5 5 5 5 SPRING SPRING1 MP3 SPRING2 MP3 SPRING3 MP3 SPRING4 MP3 SPRING5 MP3 SPRING SPRING1 MP3 SPRING2 MP3 SPRING3 MP3 SPRING4 MP3 SPRING5 MP3 SPRING SP...

Page 164: ...the TV screen repeat mode indication also changes as follows REPEAT RANDOM REPEAT ONE REPEAT DIR REPEAT DISC REPEAT OFF Moving to a Particular Track Directly You can move to a particular track on the disc directly From the remote control ONLY 1 Press SEARCH during playback or pause TRACK appears on the TV screen 2 Press the number buttons to select a track number you want The system starts playbac...

Page 165: ...lay The last received station of the selected band is tuned in Each time you press the button the source changes as follows WAIT appears on the display 2 Press 7 so that MANUAL appears on the display Each time you press the button the operation mode of and 4 buttons alternates between PRESET and MANUAL PRESET Select this for using and 4 as the buttons to select the preset station MANUAL Select thi...

Page 166: ...t number TUNER PRESET DOWN Decreases the preset number On the front panel 1 Press SOURCE repeatedly until the desired band appears on the display 2 Press 7 so that PRESET appears on the display Each time you press the button the operation mode of and 4 buttons alternates between PRESET and MANUAL PRESET Select this for using and 4 as the buttons to select the preset station MANUAL Select this for ...

Page 167: ...menu You can select the following languages separately for each listed item on the menu For OSD LANGUAGE English Chinese Spanish French German Japanese and Korean For AUDIO SUBTITLE and MENU LANGUAGE English Chinese French German Japanese Russian Spanish Portuguese Korean and Original Available only for AUDIO and SUBTITLE When you want to operate the disc or enjoy its playback in the originally re...

Page 168: ...VD Preference System You can set the DVD preference to match it to your usage and operating circumstances On the system setting menu you can set the following TV SCREEN Select the TV screen size for playing back a DVD recorded with 16 9 wide screen video signal 4 3 LB Select 4 3 LB Letter Box when the aspect ratio of your TV is 4 3 While viewing a wide screen picture the black bars appear on the t...

Page 169: ...ratio this setting does not take effect The pictures are displayed with full 4 3 aspect ratio or with 4 3 Letter Box To erase the Setup menu Press SETUP indicates the current setting SYSTEM LANGUAGES TV SCREEN RATING LEVEL DIGITAL OUTPUT 4 3 LB OFF Move Setup Exit 4 3 LB 4 3 PS 16 9 SETUP SYSTEM LANGUAGES TV SCREEN RATING LEVEL DIGITAL OUTPUT 4 3 LB OFF BITSTREAM Move Setup Exit SYSTEM LANGUAGES T...

Page 170: ...OFF BITSTREAM Move Setup Exit SYSTEM LANGUAGES TV SCREEN ENTER PASSWORD DIGITAL OUTPUT 4 3 LB BITSTREAM Move Setup Exit 6 Press or 5 to select highlight the level you want then press ENTER To erase the Setup menu Press SETUP again To change the password Be sure to note down the new password you have made 1 Repeat steps 1 to 5 of Setting the Parental Rating Level procedure 2 Press or 5 to select hi...

Page 171: ...OM 1 2 3 4 5 6 7 8 9 0 You can perform the following operations on the TV TV Turn on or off the TV TV VOLUME Adjust the volume TV VIDEO Set the input mode either TV or VIDEO TV CHANNEL Change the channels After pressing VCR CONTROL ON on the remote control you can perform the following operations on the VCR VCR Turn on or off the VCR VCR CHANNEL Change the channels 1 9 0 Select TV channel on the V...

Page 172: ...JVC 01 Hitachi 10 Magnavox 04 Mitsubishi 13 Panasonic 12 24 RCA 07 29 Samsung 11 Sanyo 05 20 Sharp 02 16 22 Sony 03 Toshiba 09 Zenith 17 Manufacturers codes for TV Operating Other Manufacturers TV You can use the remote control to operate other manufactures TV Refer also to the manuals supplied for the other products To operate the other products aim the remote control directly at the remote senso...

Page 173: ...mperature extremes and moisture To clean the disc Wipe the disc with a soft cloth in a straight line from center to edge Maintenance Cleaning the unit Stains on the unit Should be wiped off with a soft cloth If the unit is heavily stained wipe it with a cloth soaked in water diluted neutral detergent and wrung well then wipe clean with a dry cloth Since the unit may deteriorate in quality become d...

Page 174: ...weak The station is too far away The antenna is not connected correctly Lightning or electronic noise interferes with operation of the microcomputer Immediately after beginning to heat the room the unit was moved to a cold location causing condensation to form inside The remote control is not set for VCR operations The VCR is not a JVC s product SOLUTION Insert the plug into the socket Come close ...

Page 175: ...ity FM 8 0 dBf 0 9 µV 75 Ω AM loop antenna 650 µV m General Power Requirements AC 110 V 127 V 220 V 240 V adjustable with the voltage selector 50 Hz 60 Hz Power Consumption 120 W at operation 2 W in standby mode Dimensions W H D 350 mm 80 mm 300 mm Mass 6 3 kg Subwoofer SP WA5 Speaker 20 cm Bass reflex Magnetically Shielded Power Handling Capacity 60 W Impedance 3 Ω Frequency Range 25 Hz to 200 Hz...

Page 176: ...COMPONENT OUT Y PB PR CAUTION for mains AC line BEFORE PLUGGING IN do check that your mains AC line voltage corresponds with the position of the voltage selector switch provided on the outside of this equipment and if different reset the voltage selector switch to prevent from a damage or risk of fire electric shock TH A5 UJ cover_f pm6 01 12 25 13 36 2 ...

Reviews: