JVC RX-8022PSL Instructions Manual Download Page 6

3

Parts Identification

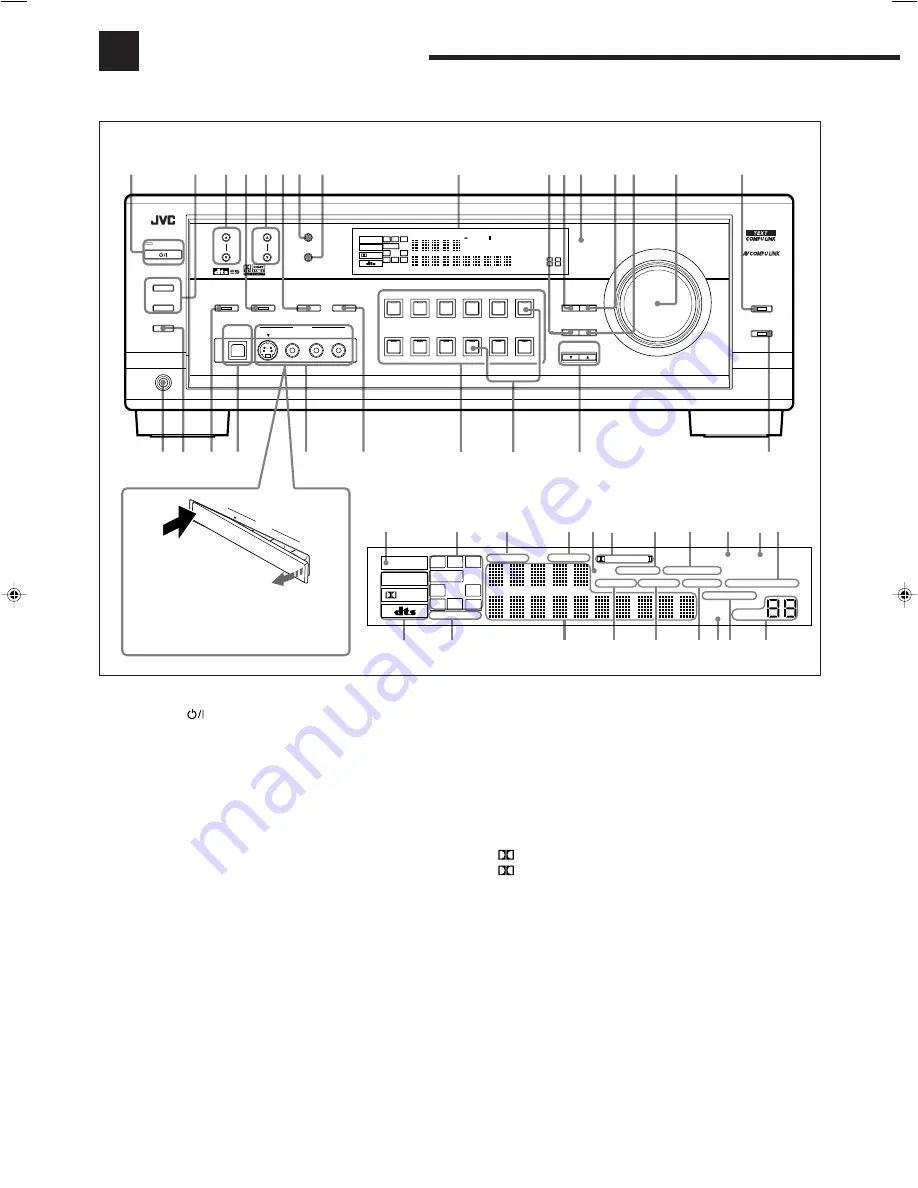
Become familiar with the buttons and controls on the receiver before use.
Refer to the pages in parentheses for details.

ANALOG

DIGITAL EQ

INPUT ATT

SLEEP VOLUME

ONE TOUCH OPERATION

3D - PHONIC MIDNIGHT MODE

AUTO MUTING

TUNED STEREO

LINEAR PCM

DIGITAL

L

SUBWFR

LS

RS

C

R

S

LFE

DGTL AUTO

DVD

MULTI

PRO LOGIC

DSP

HEADPHONE

SB

1 2

1

SPEAKERS

2

3

4 5 6

7

8

9

0 -

=

~

!

@

#

$ %^

&

Front Panel

Display Window

When using the VIDEO input terminals
and/or USB AUDIO terminal on the front
panel, detach the terminal cover.

f

SOURCE NAME buttons (17)

g

CONTROL UP 

5

/DOWN 

 buttons (21, 41, 42)

h

BASS BOOST button and lamp (31)

Display Window

1

ANALOG indicator (19)

2

Speaker indicators and signal indicators (17)

3

DGTL (digital) AUTO indicator (19)

4

DVD MULTI indicator (37)

5

DSP indicator (18, 34)

6

 PRO LOGIC indicator (33)

 PRO LOGIC II indicator (32)

7

3D-PHONIC indicator (33, 34)

8

MIDNIGHT MODE indicator (24)

9

TUNED indicator (27)

0

STEREO indicator (27, 28)

-

ONE TOUCH OPERATION indicator (26)

=

Digital signal format indicators (19)

~

SPEAKERS 1/2 indicators (18)

!

Main Display

@

HEADPHONE indicator (18, 34)

#

DIGITAL EQ (equalization) indicator (39)

$

INPUT ATT (attenuator)  indicator (30)

%

SLEEP indicator (20)

^

AUTO MUTING indicator (28)

&

VOLUME level indicator (16, 20)

Front Panel

1

STANBY/ON 

 button and STANDBY lamp (16)

2

• SPEAKERS ON/OFF 1 button (18)
• SPEAKERS ON/OFF 2 button (18)

3

FM/AM TUNING 

5

 / 

 buttons (27)

4

DSP button and lamp (36)

5

FM/AM PRESET 

5

 / 

 buttons (27, 28)

6

SURROUND/DSP OFF button (36)

7

FM MODE button (28)

8

MEMORY button (27)

9

Display window (16)

p

EFFECT button (42)

q

DIGITAL EQ (equalization) button (39)

w

Remote sensor (15)

e

LEVEL ADJUST button (41)

r

SETTING button (21)

t

MASTER VOLUME control (18)

y

ANALOG DIRECT button and lamp (30)

u

PHONES jack (18)

i

SUBWOOFER OUT ON/OFF button (31)

o

SURROUND button and lamp (36)

;

USB AUDIO terminal (14)

a

VIDEO input jacks (10)

s

• INPUT ANALOG/DIGITAL button  (19)
• INPUT ATT button (30)

d

Source selecting buttons and lamps (16, 17, 19, 27, 28, 37)
DVD MULTI, DVD, VCR 1, VCR 2, VIDEO, TV SOUND/DBS, PHONO,
CD, CDR, TAPE/MD, USB AUDIO,  FM/AM

a

;

o

u

2

1

3 4 5

7 8

w

9

q

y

i

s

d

6

h

p

r

t

g

f

e

ANALOG

DIGITAL EQ

INPUT ATT

SLEEP VOLUME

ONE TOUCH OPERATION

3D - PHONIC MIDNIGHT MODE

AUTO MUTING

TUNED STEREO

LINEAR PCM

DIGITAL

L

SUBWFR

LS

RS

C

R

S

SPEAKERS

LFE

DGTL AUTO

DVD

MULTI

PRO LOGIC

DSP

HEADPHONE

SB

1 2

CONTROL

DOWN

UP

EFFECT SETTING

DIGITAL

EQ 

TV SOUND/DBS

VIDEO

VCR 2

VCR 1

DVD

DVD MULTI

DSP

S-VIDEO

VIDEO

VIDEO

L—AUDIO—R

SURROUND

SUBWOOFER OUT ON/OFF

SPEAKERS ON/OFF

FM/AM TUNING

FM/AM PRESET

FM MODE

MEMORY

PHONES

STANDBY

USB AUDIO

SURROUND/DSP

OFF

FM / AM

USB AUDIO

TAPE / MD

CDR

CD

PHONO

LEVEL

ADJUST

RX-8020V

AUDIO/VIDEO CONTROL RECEIVER

ANALOG DIRECT

BASS BOOST

MASTER VOLUME

1

SOURCE NAME

SOURCE NAME

STANDBY/ON

INPUT

ANALOG/DIGITAL

INPUT ATT

S-VIDEO

VIDEO

VIDE

O

L—

AUDIO—R

US

B A

UD

IO

PUSH OPEN

EN01-15.RX-8020V[J]_f

02.3.20, 11:30 AM

3

Summary of Contents for RX-8022PSL

Page 1: ...E SET RETURN FMMODE 100 CONTROL RM SRX8020J REMOTE CONTROL CATV DBS VCR1 TV AUDIO DSP OFF DVD MULTI DVD USB CD CDR TAPE MD TV DBS VIDEO PHONO FM AM VCR1 VCR 2 SURROUND SURR DSP ANALOG DIGITAL A V CONTROL RECEIVER INPUT DIRECT ANALOG TEXT DISPLAY SOUND CONTROL DOWN UP EFFECT SETTING DIGITAL EQ TV SOUND DBS VIDEO VCR 2 VCR 1 DVD DVD MULTI INPUT ANALOG DIGITAL DSP S VIDEO VIDEO VIDEO L AUDIO R SURROU...

Page 2: ...onditions suivantes 1 Cet appareil ne peut pas causer d interférences nuisibles et 2 cet appareil doit accepter toute interférence reçue comprenant des interférences qui peuvent causer un mauvais fonctionnement Note to CATV system installer This reminder is provided to call the CATV system installer s attention to Section 820 40 of the NEC which provides guidelines for proper grounding and in part...

Page 3: ...or more Dégagement de 15 cm ou plus RX 8020VBK Wall or obstructions Mur ou obstruction Front Avant Stand height 15 cm or more Hauteur du socle 15 cm ou plus Floor Plancher This equipment has been tested and found to comply with the limits for a Class B digital device pursuant to part 15 of the FCC Rules These limits are designed to provide reasonable protection against harmful interference in a re...

Page 4: ...ideo Equipment 54 Troubleshooting 57 Specifications 59 Introduction 2 Features 2 Precautions 2 Parts Identification 3 Getting Started 5 Before Installation 5 Checking the Supplied Accessories 5 Connecting the FM and AM Antennas 5 Connecting the Speakers 6 Connecting Audio Video Components 8 7 Analog Connections 8 7 Digital Connections 13 7 USB Connection 14 Connecting the Power Cord 15 Putting Bat...

Page 5: ...round sound 3D HEADPHONE The built in headphone virtual surround system is compatible with Multi channel software like Dolby Digital DTS Surround etc Thanks to the new signal processing algorithms used by the high performance DSP you can enjoy a natural surround sound through the headphones COMPU LINK TEXT COMPU LINK AV COMPU LINK remote control systems These COMPU LINK remote control systems allo...

Page 6: ...F 1 button 18 SPEAKERS ON OFF 2 button 18 3 FM AM TUNING 5 buttons 27 4 DSP button and lamp 36 5 FM AM PRESET 5 buttons 27 28 6 SURROUND DSP OFF button 36 7 FM MODE button 28 8 MEMORY button 27 9 Display window 16 p EFFECT button 42 q DIGITAL EQ equalization button 39 w Remote sensor 15 e LEVEL ADJUST button 41 r SETTING button 21 t MASTER VOLUME control 18 y ANALOG DIRECT button and lamp 30 u PHO...

Page 7: ... 42 45 47 d TUNING UP DOWN buttons 27 On screen operating buttons 21 29 31 38 40 42 45 48 Operating buttons for audio video components 51 53 55 56 f CONTROL button 51 53 Remote Control 7 8 9 o i u y t r w q 4 3 d a s 2 5 6 p e 1 MENU 2 3 1 5 6 4 8 9 7 P 0 10 10 BOOST FRONT L MENU ENTER FRONT R BASS TEST CENTER SUBWFR DIMMER DIGITALEQ SBACK L SBACK R SURR L SURR R MUTING CH LEVEL TV VOL PLAY STOP R...

Page 8: ...Accessories Check to be sure you have all of the following items which are supplied with the receiver The number in the parentheses indicates quantity of the pieces supplied Remote Control 1 Batteries 2 AM Loop Antenna 1 FM Antenna 1 If anything is missing contact your dealer immediately ANTENNA AM EXT AM LOOP FM 75 COAXIAL AM LOOP ANTENNA AM EXT FM 75 COAXIAL AM LOOP ANTENNA AM EXT FM 75 COAXIAL ...

Page 9: ... speakers to enjoy the surround effect One surround back speaker or one pair of surround back speakers to enjoy 6 1 channel sound reproduction One center speaker to produce more effective surround effect to emphasize human voices One subwoofer to enhance the bass IMPORTANT After connecting the speakers listed above set the speaker setting information properly to obtain the best possible Surround a...

Page 10: ...he receiver has the SPEAKER LOAD SELECTOR which has to be set as follows Set it to HIGH when the impedance of the front speakers connected is within the range of 8 Ω to 16 Ω Set it to LOW when the impedance of the front speakers connected is within the range of 4 Ω to 6 Ω Front speakers 2 Right Left Front speakers 1 Right Left Surround speakers Right Left Center speaker RIGHT LEFT 8 16 CAUTION SPE...

Page 11: ...RR REAR To audio output Turntable If a ground cable is provided for your turntable connect the cable to the screw marked H on the rear panel Note This connection is for the turntable with an MM moving magnet type cartridge Any turntables incorporating a small output cartridge such as an MC moving coil type must be connected to this receiver through a commercial head amplifier or step up transforme...

Page 12: ...UT REC IN PLAY IN PLAY OUT REC RIGHT LEFT PHONO TAPE MD CDR CD AUDIO DVD SUB WOOFER CENTER SURR REAR To audio output CD recorder OUT REC IN PLAY IN PLAY OUT REC RIGHT LEFT PHONO TAPE MD CDR CD AUDIO DVD SUB WOOFER CENTER SURR REAR To audio input OUT REC IN PLAY IN PLAY OUT REC RIGHT LEFT SURR REAR PHONO TAPE MD CDR CD AUDIO DVD SUB WOOFER CENTER If your audio components have a COMPU LINK or TEXT C...

Page 13: ...ideo output To composite video output When removing the cover When attaching the cover The VIDEO input jacks on the front panel are convenient when connecting and disconnecting the equipment frequently When you do not use the jacks on the front panel attach the supplied front terminal cover to protect them from dust Video camera S VIDEO VIDEO VIDEO L AUDIO R USB AUDIO S VIDE O VIDE O VIDEO L AU DI...

Page 14: ...UT REC IN PLAY VCR2 MONITOR OUT S VIDEO VIDEO COMPONENT VIDEO MONITOR OUT DBS DVD Y PB CB PR CR AUDIO A D B C DBS Å To audio output ı To S video output Ç To component video output Î To composite video output Notes When connecting a DBS tuner to the TV SOUND DBS jacks change the source name to DBS which will be shown on the display when it is selected as the source See page 17 for details When conn...

Page 15: ... PLAY OUT REC RIGHT LEFT PHONO TAPE MD CDR CD AUDIO DVD SUB WOOFER CENTER C B A D F G E DVD SURR REAR When you connect a DVD player with its analog discrete output 5 1 channel reproduction jacks Å To rear left right audio output ı To center audio output Ç To subwoofer output Î To front left right audio output To composite video output Ï To S video output Ì To component video output Note When conne...

Page 16: ...arget component also as described in Analog Connections see page 9 When you want to operate a DVD player using the AV COMPU LINK remote control system see page 49 connect the DVD player also as described in Analog Connections see page 12 Note The digital signal format output through the DIGITAL OUT terminal is the same as that of the input signal This means that when the DTS Digital Surround signa...

Page 17: ...B cable is connected between the receiver and your PC The sound may not be played back correctly interrupted or degraded due to your PC settings and PC specifications When you do not use the jacks on the front panel attach the supplied front terminal cover to protect them from dust USB Connection This receiver is equipped with a USB terminal on the front panel You can connect your PC to this termi...

Page 18: ...g so as not to damage the cord Putting Batteries in the Remote Control Before using the remote control put two supplied batteries first When using the remote control aim the remote control directly at the remote sensor on the receiver If the range or effectiveness of the remote control decreases replace the batteries Use two R6P SUM 3 AA 15F type dry cell batteries Note After replacing the batteri...

Page 19: ... equipment connected to the receiver the remote control operation mode selected appears on the display see pages 51 and 54 A V CONTROL RECEIVER Turning On the Power On the front panel Press STANDBY ON The STANDBY lamp goes off The name of the current source and Surround DSP mode appear on the display To turn off the power into standby mode press STANDBY ON again The STANDBY lamp lights up From the...

Page 20: ...selected a video source pictures of the selected source are sent to the TV until you select another video source Speaker and signal indicators on the display By checking the following indicators you can easily confirm which speakers you are activating and which signals are coming into this receiver from the source The speaker indicators light up When the corresponding speakers are set to LARGE or ...

Page 21: ...ur hearing Before turning on speakers again as its high volume may output from the speakers VOLUME SPEAKERS ON OFF 1 2 Adjusting the Volume On the front panel To increase the volume turn MASTER VOLUME clockwise To decrease the volume turn it counterclockwise From the remote control To increase the volume press VOLUME To decrease the volume press VOLUME CAUTION Always set the volume to the minimum ...

Page 22: ...off the power or select another source DGTL D D and DGTL DTS settings are canceled and the digital input mode is automatically reset to DGTL AUTO VOLUME DIGITAL L R SPEAKERS DGTL AUTO 1 DGTL AUTO DGTL D D DGTL DTS Digital Dolby Digital Digital Digital Selecting the Analog or Digital Input Mode When you have connected digital source components using the digital terminals see page 13 you need to cha...

Page 23: ...ecorder connected to the TAPE MD jacks the VCRs connected to the VCR 1 and VCR 2 jacks and the CD recorder connected to the CDR jacks at the same time For digital to digital recording You can record the currently selected digital input source through the receiver to a digital recording device connected to the DIGITAL OUT terminal Notes Analog to digital and digital to analog recordings are not pos...

Page 24: ...ress 2 or 3 SETTING 1 menu showing setting items appears on the TV The item pointed by is also shown on the display on the unit 3 Press 5 or to move to SUBWOOFER To go to the next screen press continuously To go back to the previous screen press 5 continuously For details about each setting item 1 to 9 see pages 22 to 26 4 Press 2 or 3 to select a setting you want to use In this example the subwoo...

Page 25: ...ted SMALL for the front speakers you cannot select LARGE for the center surround and surround back speakers If you have selected SMALL for the surround speakers you cannot select LARGE for the surround back speakers If you have selected NONE for the surround speakers the surround back speakers are fixed to NONE 7 Surround back speakers quantity S BACK SBACK OUT On screen display Front panel Select...

Page 26: ...channel software DTS NEO 6 activates using the surround back speaker s Surround back channels are reproduced using digital matrix processing OFF Select this to activate 5 1 channel reproduction without using the surround back speaker s When playing back Dolby Digital EX software bearing the mark or DTS ES software bearing the mark the surround back signals are output from the surround speakers mix...

Page 27: ...requency is not valid for the DVD MULTI playback All Channel Stereo and 3D HEADPHONE mode 7 Low frequency effect attenuator LFE ATT On screen display Front panel If the bass sound is distorted while playing back software encoded with Dolby Digital or DTS Surround set the LFE level to eliminate distortion Select one of the following 0dB Normally select this 10dB Select this when the bass sound is d...

Page 28: ...posite video or S video input jacks Note If you have not selected appropriate video input jacks the AV COMPU LINK remote control system cannot operate properly See page 49 6 Setting the Digital Input DIGITAL IN Terminals On screen display Front panel When you use the digital input terminals you have to register which components you have connected to the digital input terminals 7 Digital coaxial te...

Page 29: ...th the ONE TOUCH OPERATION indicator lit the volume level for the currently selected source is recalled when the source is selected To cancel the One Touch Operation Set One Touch Operation to OFF so that the ONE TOUCH OPERATION indicator goes off 9 Showing the Text Information on the Display FL DISPLAY DISP On screen display Front panel When you have connected an MD recorder or CD player equipped...

Page 30: ...uned in You can preset up to 30 FM and 15 AM stations To store the preset stations Before you start remember There is a time limit in doing the following steps If the setting is canceled before you finish start from step 2 again On the front panel ONLY 1 Tune in the station you want to preset see Tuning into Stations Manually on the left If you want to store the FM reception mode for this station ...

Page 31: ...FM AM PRESET On the front panel From the remote control FM MODE 0 SBACK L FMMODE FM AM ANALOG VOLUME TUNED STEREO L R SPEAKERS 1 AUTO MUTING ANALOG VOLUME TUNED L R SPEAKERS 1 2 3 1 5 6 4 8 9 7 P 0 10 10 BOOST FRONT L MENU ENTER FRONT R BASS TEST CENTER SUBWFR DIGITALEQ SBACK L SBACK R SURR L SURR R RETURN FMMODE 100 Selecting the FM Reception Mode When an FM stereo broadcast is hard to receive or...

Page 32: ...IT repeatedly until the menu disappears from the TV Operating the Tuner Using the On Screen Display You can also operate the tuner using the on screen display The on screen display will disappear if no operation is done for about 1 minute 7 Operating the tuner 1 Press MENU The MENU screen appears on the TV 2 Press 5 or to move to TUNER CONTROL then press 2 or 3 The TUNER CONTROL menu appears 3 Pre...

Page 33: ... When you finish press EXIT repeatedly until the menu disappears from the TV Notes When digital input mode is in use Analog Direct is not available Turning on Surround or DSP mode cancels Analog Direct and previously selected sound adjustments are recalled If Analog Direct is in use Midnight Mode is temporarily canceled even though adjustable DIRECT ANALOG ANALOG DIRECT On the front panel From the...

Page 34: ...MALL for the front speakers you cannot select OFF for the subwoofer even if it is set to YES see page 22 Reinforcing the Bass You can boost the bass level Once you have made adjustment it is memorized for each source On the front panel Press BASS BOOST to turn on Bass Boost function The BASS BOOST lamp on the front panel button lights up Each time you press the button Bass Boost activates BOOST ON...

Page 35: ...lly compresses the left front channel right front channel center channel left surround channel right surround channel and LFE channel signals total 6 channels but LFE channel is counted as 0 1 channel therefore called 5 1 channel Since each channel is completely independent from the other channel signals to avoid interference you can obtain a much better sound quality with better stereo and surrou...

Page 36: ...cords the left front channel right front channel center channel and surround channel signals total 4 channels into 2 channels The Dolby Pro Logic decoder built in this receiver decodes these 2 channel signals into original 4 channel signals matrix based multi channel reproduction and allows you to enjoy a realistic surround sound in your listening room When Dolby Pro Logic is activated the PRO LOG...

Page 37: ...delayed by the distances of the ceiling and walls see the diagram below These indirect sounds are the most important elements of the acoustic surround effects The DAP mode can reproduce a realistic sound field by adding these indirect sounds You can use the following DAP modes in order to reproduce a more acoustic sound field in your listening room HALL 1 Gives clear vocal and the feeling of a lar...

Page 38: ...ilable DSP modes Note You can select these modes by setting EX ES to AUTO initial setting when the surround back speakers are set to LARGE or SMALL see pages 22 and 23 You can select these modes by setting EX ES to ON when the surround back speakers are set to LARGE or SMALL see pages 22 and 23 Front speaker TV Center speaker Front speaker Surround back speaker Surround speaker Surround speaker Su...

Page 39: ...TS 䡬 䡬 䡬 䡬 䡬 ES Matrix 6 1 channel 䡬 DTS ES MATRIX DTS 䡬 䡬 䡬 䡬 䡬 5 1 channel 䡬 DTS DTS NEO 6 䡬 䡬 䡬 䡬 䡬 Linear PCM 䡬 PL II MOVIE PL II MUSIC PRO LOGIC 䡬 䡬 䡬 䡬 䡬 NEO 6CINMA NEO 6MUSIC Analog 䡬 PL II MOVIE PL II MUSIC PRO LOGIC 䡬 䡬 䡬 䡬 䡬 NEO 6CINMA NEO 6MUSIC You can select these modes by setting EX ES to ON when the surround back speakers are set to LARGE or SMALL see pages 22 and 23 Available Surro...

Page 40: ...t up Note When you select DVD MULTI as the source to play the Surround and DSP modes are canceled and the SURROUND and DSP buttons do not work Å To rear left right channel audio output ı To center channel audio output Ç To subwoofer output Î To front left right channel audio output To composite video output Ï To S video output Ì To component video output On the front panel DVD MULTI From the remot...

Page 41: ...ove items shown on the on screen display are initial values when shipped from the factory Some of the items cannot be shown or cannot be adjusted For details see the respective explanation in this section Using the on screen display through the remote control 1 Press MENU The MENU screen appears on the TV 2 Press 5 or to move to SOUND CONTROL then press 2 or 3 The SOUND CONTROL menu appears 3 Pres...

Page 42: ...igital equalization patterns cannot be adjusted The digital equalization patterns affect the front speaker sounds only SOUND 10 DIGITALEQ RETURN EQ 63Hz EQ250Hz EQ 1kHz EQ 4kHz EQ16kHZ and its level and its level and its level and its level and its level CH LEVEL Adjusting the Equalization Patterns DIGITAL EQ You can adjust the equalization patterns to your preference Once you have made adjustment...

Page 43: ...ers when selecting DVD MULTI 7 Adjustable speakers You can adjust the following speakers output levels within the range of 10 dB to 10 dB 0 dB is the initial setting Note If you have selected 1SPK for the surround back speaker see page 22 S BACK appears instead of S BACK SBK L and S BACK SBK R No test tone outputs from the right surround back speaker If you have selected NO or NONE for a speaker s...

Page 44: ... you finish start from step 2 again Adjustment is also possible without outputting the test tone In this case you can skip steps 2 and 6 below 1 Press SOUND SOUND appears on the remote control display window The 10 keys are activated for sound adjustments 2 Press TEST to check if you can hear the sounds through all the speakers at equal level A test tone comes out of the speakers only if the speak...

Page 45: ...are not adjustable for the currently selected Surround and DSP modes are skipped 2 Press CONTROL UP 5 or DOWN to adjust the sound parameter 3 Repeat steps 1 and 2 to adjust the other parameters Adjusting the Sound Parameters for the Surround and DSP Modes EFFECT ADJUST You can adjust the Surround and DSP sound parameters to your preference Once you have made adjustment it is memorized for each sou...

Page 46: ...s play starts the cassette deck or MD recorder starts recording When the play ends the cassette deck or MD recorder enters recording pause and stops about 4 seconds later Notes During synchronized recording the selected source cannot be changed If the power of any component is shut off during synchronized recording the COMPU LINK remote control system may not operate properly In this case you must...

Page 47: ...T COMPU LINK jack connect it so that it is the last item in the series of components For example the CD player in the diagram in the left column TEXT COMPULINK SOURCE NOT CONNECTED appears on the display in the following cases When the connections explained in the left column are not correctly done When you try to use the TEXT COMPULINK function a few seconds after you turn on the connected equipm...

Page 48: ...m the Disc information screen Press EXIT Notes The on screen display will disappear in the following cases if no operation is done for about 10 minutes if you do any operation other than explained in this section To control an MD recorder using the TEXT COMPU LINK remote control system you have to change the source name shown on the display from TAPE to MD See page 17 Some special characters and m...

Page 49: ...cs are listed as a result of the search Press 5 or until they appear Going back to the PERFORMER SEARCH screen Press EXIT Search for a disc by its disc title 1 Press TEXT DISPLAY while CD is selected as the source The Disc Information screen appears on the TV 2 Press 5 or to move to SEARCH then press SET The DISC SEARCH screen appears 3 Press 5 or to move to DISC TITLE then press SET The DISC TITL...

Page 50: ...cter If the current CD is a CD Text go to step 5 without entering the performer To use the lower case letters press 5 2 3 to move to then press SET To use the upper case letters again press 5 2 3 to move to then press SET Search for a disc by its genre 1 Press TEXT DISPLAY while CD is selected as the source The Disc Information screen appears on the TV 2 Press 5 or to move to SEARCH then press SET...

Page 51: ...u can enter a song title for the song currently selected 5 Enter the song title referring to steps 3 and 4 of For the CD Player with the disc memory function You can enter up to 32 characters for the song title 6 Press 5 2 3 to move to the song title you have just entered then press SET The song title is stored into the memory and the Disc Information screen appears again 4 Repeat step 3 until you...

Page 52: ...mode see page 50 When connecting only the VCR 1 or DVD player to this receiver connect it directly to the receiver using cables with the monaural mini plugs To Video Input 1 TV RX 8020VBK S video cable S video cable Source Equipment To Video Input 2 Composite TV RX 8020VBK Composite video cable Source Equipment Composite video cable CASE 1 When connecting the source equipment to the receiver throu...

Page 53: ...ically If the previously selected source is VIDEO VCR 2 TV or DBS only the TV will turn on automatically When you turn off the receiver the TV VCR 1 and the DVD player will turn off Note If you turn off the receiver while recording on the VCR 1 the VCR 1 will not turn off but continue recording 1 If you have already plugged your VCR 1 VCR connected to the VCR 1 jacks DVD player TV and this receive...

Page 54: ...RR R then LEVEL Adjust the right surround speaker output level SURRR appears on the display SBACK L then LEVEL Adjust the left surround back speaker output level SBKL appears on the display SBACK R then LEVEL Adjust the right surround back speaker output level SBKR appears on the display SUBWFR then LEVEL Adjust the subwoofer output level S WFR appears on the display DIGITAL EQ then LEVEL Select t...

Page 55: ...umber 5 press 5 For track number 15 press 10 then 5 For track number 20 press 10 then 10 For track number 30 press 10 10 then 10 REC PAUSE Enter recording pause by pressing this button To start recording again press this button then 3 PLAY Note You can use either CDR or CONTROL to activate the buttons listed above If you press CDR the playing source also changes On the other hand if you press CONT...

Page 56: ...ce does not change DVD player After pressing DVD or DVD MULTI you can perform the following operations on a DVD player 3 PLAY Start playing 4 Return to the beginning of the current or previous chapter Skip to the beginning of the next chapter 7 STOP Stop playing 8 PAUSE Pause playing To resume press 3 PLAY After pressing DVD or DVD MULTI these buttons can be used for the DVD menu operations Note F...

Page 57: ... FM AM VCR1 VCR2 SURROUND SURR DSP ANALOG DIGITAL A V CONTROL RECEIVER INPUT DIRECT ANALOG TEXT DISPLAY SOUND Note When you press one of the source selecting buttons the operation mode appears on the display window For example the above illustration shows the remote control now works for TV operation This remote control supplied with the receiver can transmit control signals for other manufacturer...

Page 58: ...u cannot preset the signals for both the CATV converter and DBS tuner at the same time To change the transmittable signals for operating another manufacturer s VCR 1 Press and hold VCR1 2 Press VCR1 CALL appears on the remote control display window 3 Enter manufacturer s code using buttons 1 9 and 0 See the list on the next page to find the code 4 Release VCR1 The following buttons can be used for...

Page 59: ...ons If there are more than one code listed for your brand of DVD try each one until the correct one is entered Manufacturer Codes JVC 00 26 27 28 29 58 AIWA 01 02 BELL HOWELL 03 BLAUPUNKT 04 05 CGM 06 07 EMERSON 08 10 11 12 64 65 FISHER 03 14 15 16 17 FUNAI 01 GE 18 19 20 GOLDSTAR 07 GOODMANS 13 21 GRUNDIG 06 22 HITACHI 18 23 24 25 66 LOEWE 07 21 MAGNAVOX 04 19 24 MITSUBISHI 30 31 32 33 34 35 NEC ...

Page 60: ...30 Play back software bearing the mark or Set EX ES setting to AUTO See page 23 POSSIBLE CAUSE The power cord is not plugged in Speaker signal cables are not connected The SPEAKERS ON OFF 1 and SPEAKERS ON OFF 2 buttons are not set correctly An incorrect source is selected Muting is activated An incorrect input mode analog or digital is selected Connections are incorrect Speaker signal cables are ...

Page 61: ...ler Remove the obstruction Replace batteries See page 15 Select the correct remote control operation mode See pages 51 to 53 PROBLEM OVERLOAD starts flashing on the display The STANDBY lamp lights up after turning on the power and soon the receiver turns off again into standby mode Remote control does not work Remote control does not work intendedly POSSIBLE CAUSE Speakers are overloaded because o...

Page 62: ...quency 32 kHz 44 1 kHz 48 kHz Audio Output Level PRE OUT 1 0 V Recording Output Level VCR 1 VCR 2 CDR TAPE MD 200 mV Digital output Optical DIGITAL OUTPUT Signal wave length 660 nm Output level 21 dBm to 15 dBm Signal to Noise Ratio 66 IHF 78 IHF PHONO 70 dB 78 dB at REC OUT DVD VCR 1 VCR 2 VIDEO TV SOUND DBS CD CDR TAPE MD 92 dB 80 dB Frequency Response 8 Ω PHONO 20 Hz to 20 kHz 1 dB DVD VCR 1 VC...

Page 63: ...t 1 kHz Stereo Separation at REC OUT 35 dB at 1 kHz Alternate Channel Selectivity 45 dB 400 kHz Frequency Response 30 Hz to 15 kHz 0 5 dB 3 dB AM tuner Tuning Range 530 kHz to 1 710 kHz Usable Sensitivity Loop antenna 400 µV m Signal to Noise Ratio 50 dB 100 mV m General Power Requirements AC 120V 60 Hz Power Consumption 320 W 440 VA at operation 2 W in standby mode Dimensions W x H x D 435 mm x 1...

Page 64: ...rized servicer or visit our website at www JVC com Remember to retain your Bill of Sale for Warranty Service Do not service the television yourself Caution To prevent electrical shock do not open the cabinet There are no user serviceable parts inside Please refer to qualified service personnel for repairs Accessories To purchase accessories for your JVC product please call toll free 1 800 882 2345...

Page 65: ...cleaning 4 Damage that occurs in shipment due to act of God and cosmetic damage 5 Signal reception problems and failures due to line power surge 6 Video Pick up Tubes CCD Image Sensor Cartridge Stylus Needle are covered for 90 days from the date of purchase 7 Batteries except that Rechargeable Batteries are covered for 90 days from the date of purchase There are no express warranties except as lis...

Page 66: ...VICTOR COMPANY OF JAPAN LIMITED EN 0302NHMMDWJEIN J VC ...

Page 67: ...R1 TV AUDIO DSP OFF DVD MULTI DVD USB CD CDR TAPE MD TV DBS VIDEO PHONO FM AM VCR1 VCR 2 SURROUND SURR DSP ANALOG DIGITAL A V CONTROL RECEIVER INPUT DIRECT ANALOG TEXT DISPLAY SOUND CONTROL DOWN UP EFFECT SETTING DIGITAL EQ TV SOUND DBS VIDEO VCR 2 VCR 1 DVD DVD MULTI INPUT ANALOG DIGITAL DSP S VIDEO VIDEO VIDEO L AUDIO R SURROUND SUBWOOFER OUT ON OFF SPEAKERS ON OFF FM AM TUNING FM AM PRESET FM M...

Page 68: ...onditions suivantes 1 Cet appareil ne peut pas causer d interférences nuisibles et 2 cet appareil doit accepter toute interférence reçue comprenant des interférences qui peuvent causer un mauvais fonctionnement Note to CATV system installer This reminder is provided to call the CATV system installer s attention to Section 820 40 of the NEC which provides guidelines for proper grounding and in part...

Page 69: ...or more Dégagement de 15 cm ou plus RX 8020VBK Wall or obstructions Mur ou obstruction Front Avant Stand height 15 cm or more Hauteur du socle 15 cm ou plus Floor Plancher This equipment has been tested and found to comply with the limits for a Class B digital device pursuant to part 15 of the FCC Rules These limits are designed to provide reasonable protection against harmful interference in a re...

Page 70: ...rs Video Equipment 54 Troubleshooting 57 Specifications 59 Introduction 2 Features 2 Precautions 2 Parts Identification 3 Getting Started 5 Before Installation 5 Checking the Supplied Accessories 5 Connecting the FM and AM Antennas 5 Connecting the Speakers 6 Connecting Audio Video Components 8 7 Analog Connections 8 7 Digital Connections 13 7 USB Connection 14 Connecting the Power Cord 15 Putting...

Page 71: ... surround sound 3D HEADPHONE The built in headphone virtual surround system is compatible with Multi channel software like Dolby Digital DTS Surround etc Thanks to the new signal processing algorithms used by the high performance DSP you can enjoy a natural surround sound through the headphones COMPU LINK TEXT COMPU LINK AV COMPU LINK remote control systems These COMPU LINK remote control systems ...

Page 72: ...ON OFF 1 button 18 SPEAKERS ON OFF 2 button 18 3 FM AM TUNING 5 buttons 27 4 DSP button and lamp 36 5 FM AM PRESET 5 buttons 27 28 6 SURROUND DSP OFF button 36 7 FM MODE button 28 8 MEMORY button 27 9 Display window 16 p EFFECT button 42 q DIGITAL EQ equalization button 39 w Remote sensor 15 e LEVEL ADJUST button 41 r SETTING button 21 t MASTER VOLUME control 18 y ANALOG DIRECT button and lamp 30 ...

Page 73: ...8 40 42 45 47 d TUNING UP DOWN buttons 27 On screen operating buttons 21 29 31 38 40 42 45 48 Operating buttons for audio video components 51 53 55 56 f CONTROL button 51 53 Remote Control 7 8 9 o i u y t r w q 4 3 d a s 2 5 6 p e 1 MENU 2 3 1 5 6 4 8 9 7 P 0 10 10 BOOST FRONT L MENU ENTER FRONT R BASS TEST CENTER SUBWFR DIMMER DIGITALEQ SBACK L SBACK R SURR L SURR R MUTING CH LEVEL TV VOL PLAY ST...

Page 74: ...ied Accessories Check to be sure you have all of the following items which are supplied with the receiver The number in the parentheses indicates quantity of the pieces supplied Remote Control 1 Batteries 2 AM Loop Antenna 1 FM Antenna 1 If anything is missing contact your dealer immediately ANTENNA AM EXT AM LOOP FM 75 COAXIAL AM LOOP ANTENNA AM EXT FM 75 COAXIAL AM LOOP ANTENNA AM EXT FM 75 COAX...

Page 75: ...peakers to enjoy the surround effect One surround back speaker or one pair of surround back speakers to enjoy 6 1 channel sound reproduction One center speaker to produce more effective surround effect to emphasize human voices One subwoofer to enhance the bass IMPORTANT After connecting the speakers listed above set the speaker setting information properly to obtain the best possible Surround and...

Page 76: ...ed the receiver has the SPEAKER LOAD SELECTOR which has to be set as follows Set it to HIGH when the impedance of the front speakers connected is within the range of 8 Ω to 16 Ω Set it to LOW when the impedance of the front speakers connected is within the range of 4 Ω to 6 Ω Front speakers 2 Right Left Front speakers 1 Right Left Surround speakers Right Left Center speaker RIGHT LEFT 8 16 CAUTION...

Page 77: ... REAR To audio output Turntable If a ground cable is provided for your turntable connect the cable to the screw marked H on the rear panel Note This connection is for the turntable with an MM moving magnet type cartridge Any turntables incorporating a small output cartridge such as an MC moving coil type must be connected to this receiver through a commercial head amplifier or step up transformer ...

Page 78: ...er OUT REC IN PLAY IN PLAY OUT REC RIGHT LEFT PHONO TAPE MD CDR CD AUDIO DVD SUB WOOFER CENTER SURR REAR To audio output CD recorder OUT REC IN PLAY IN PLAY OUT REC RIGHT LEFT PHONO TAPE MD CDR CD AUDIO DVD SUB WOOFER CENTER SURR REAR To audio input OUT REC IN PLAY IN PLAY OUT REC RIGHT LEFT SURR REAR PHONO TAPE MD CDR CD AUDIO DVD SUB WOOFER CENTER If your audio components have a COMPU LINK or TE...

Page 79: ... S video output To composite video output When removing the cover When attaching the cover The VIDEO input jacks on the front panel are convenient when connecting and disconnecting the equipment frequently When you do not use the jacks on the front panel attach the supplied front terminal cover to protect them from dust Video camera S VIDEO VIDEO VIDEO L AUDIO R USB AUDIO S VIDE O VIDE O VIDEO L A...

Page 80: ...R1 OUT REC IN PLAY VCR2 MONITOR OUT S VIDEO VIDEO COMPONENT VIDEO MONITOR OUT DBS DVD Y PB CB PR CR AUDIO A D B C DBS Å To audio output ı To S video output Ç To component video output Î To composite video output Notes When connecting a DBS tuner to the TV SOUND DBS jacks change the source name to DBS which will be shown on the display when it is selected as the source See page 17 for details When ...

Page 81: ...put Î To front left right audio output To composite video output Ï To S video output Ì To component video output Note When connecting a DVD player to the component video input jacks make the component video input setting correctly See pages 25 and 49 for details Å To front left right audio output ı To S video output Ç To component video output Î To composite video output VIDEO FRONT RIGHT LEFT DVD...

Page 82: ...he target component also as described in Analog Connections see page 9 When you want to operate a DVD player using the AV COMPU LINK remote control system see page 49 connect the DVD player also as described in Analog Connections see page 12 Note The digital signal format output through the DIGITAL OUT terminal is the same as that of the input signal This means that when the DTS Digital Surround s...

Page 83: ...able is connected between the receiver and your PC The sound may not be played back correctly interrupted or degraded due to your PC settings and PC specifications When you do not use the jacks on the front panel attach the supplied front terminal cover to protect them from dust USB Connection This receiver is equipped with a USB terminal on the front panel You can connect your PC to this terminal...

Page 84: ... plug so as not to damage the cord Putting Batteries in the Remote Control Before using the remote control put two supplied batteries first When using the remote control aim the remote control directly at the remote sensor on the receiver If the range or effectiveness of the remote control decreases replace the batteries Use two R6P SUM 3 AA 15F type dry cell batteries Note After replacing the bat...

Page 85: ...ideo equipment connected to the receiver the remote control operation mode selected appears on the display see pages 51 and 54 A V CONTROL RECEIVER Turning On the Power On the front panel Press STANDBY ON The STANDBY lamp goes off The name of the current source and Surround DSP mode appear on the display To turn off the power into standby mode press STANDBY ON again The STANDBY lamp lights up From...

Page 86: ...ave selected a video source pictures of the selected source are sent to the TV until you select another video source Speaker and signal indicators on the display By checking the following indicators you can easily confirm which speakers you are activating and which signals are coming into this receiver from the source The speaker indicators light up When the corresponding speakers are set to LARGE...

Page 87: ... your hearing Before turning on speakers again as its high volume may output from the speakers VOLUME SPEAKERS ON OFF 1 2 Adjusting the Volume On the front panel To increase the volume turn MASTER VOLUME clockwise To decrease the volume turn it counterclockwise From the remote control To increase the volume press VOLUME To decrease the volume press VOLUME CAUTION Always set the volume to the minim...

Page 88: ...urn off the power or select another source DGTL D D and DGTL DTS settings are canceled and the digital input mode is automatically reset to DGTL AUTO VOLUME DIGITAL L R SPEAKERS DGTL AUTO 1 DGTL AUTO DGTL D D DGTL DTS Digital Dolby Digital Digital Digital Selecting the Analog or Digital Input Mode When you have connected digital source components using the digital terminals see page 13 you need to...

Page 89: ...MD recorder connected to the TAPE MD jacks the VCRs connected to the VCR 1 and VCR 2 jacks and the CD recorder connected to the CDR jacks at the same time For digital to digital recording You can record the currently selected digital input source through the receiver to a digital recording device connected to the DIGITAL OUT terminal Notes Analog to digital and digital to analog recordings are not...

Page 90: ...en press 2 or 3 SETTING 1 menu showing setting items appears on the TV The item pointed by is also shown on the display on the unit 3 Press 5 or to move to SUBWOOFER To go to the next screen press continuously To go back to the previous screen press 5 continuously For details about each setting item 1 to 9 see pages 22 to 26 4 Press 2 or 3 to select a setting you want to use In this example the su...

Page 91: ...elected SMALL for the front speakers you cannot select LARGE for the center surround and surround back speakers If you have selected SMALL for the surround speakers you cannot select LARGE for the surround back speakers If you have selected NONE for the surround speakers the surround back speakers are fixed to NONE 7 Surround back speakers quantity S BACK SBACK OUT On screen display Front panel Se...

Page 92: ... channel software DTS NEO 6 activates using the surround back speaker s Surround back channels are reproduced using digital matrix processing OFF Select this to activate 5 1 channel reproduction without using the surround back speaker s When playing back Dolby Digital EX software bearing the mark or DTS ES software bearing the mark the surround back signals are output from the surround speakers mi...

Page 93: ...er frequency is not valid for the DVD MULTI playback All Channel Stereo and 3D HEADPHONE mode 7 Low frequency effect attenuator LFE ATT On screen display Front panel If the bass sound is distorted while playing back software encoded with Dolby Digital or DTS Surround set the LFE level to eliminate distortion Select one of the following 0dB Normally select this 10dB Select this when the bass sound ...

Page 94: ...video or S video input jacks Note If you have not selected appropriate video input jacks the AV COMPU LINK remote control system cannot operate properly See page 49 6 Setting the Digital Input DIGITAL IN Terminals On screen display Front panel When you use the digital input terminals you have to register which components you have connected to the digital input terminals 7 Digital coaxial terminal ...

Page 95: ...E TOUCH OPERATION indicator lits the volume level for the currently selected source is recalled when the source is selected To cancel the One Touch Operation Set One Touch Operation to OFF so that the ONE TOUCH OPERATION indicator goes off 9 Showing the Text Information on the Display FL DISPLAY DISP On screen display Front panel When you have connected an MD recorder or CD player equipped with TE...

Page 96: ...ly tuned in You can preset up to 30 FM and 15 AM stations To store the preset stations Before you start remember There is a time limit in doing the following steps If the setting is canceled before you finish start from step 2 again On the front panel ONLY 1 Tune in the station you want to preset see Tuning into Stations Manually on the left If you want to store the FM reception mode for this stat...

Page 97: ... AM FM AM PRESET On the front panel From the remote control FM MODE 0 SBACK L FMMODE FM AM ANALOG VOLUME TUNED STEREO L R SPEAKERS 1 AUTO MUTING ANALOG VOLUME TUNED L R SPEAKERS 1 2 3 1 5 6 4 8 9 7 P 0 10 10 BOOST FRONT L MENU ENTER FRONT R BASS TEST CENTER SUBWFR DIGITALEQ SBACK L SBACK R SURR L SURR R RETURN FMMODE 100 Selecting the FM Reception Mode When an FM stereo broadcast is hard to receiv...

Page 98: ...s EXIT repeatedly until the menu disappears from the TV Operating the Tuner Using the On Screen Display You can also operate the tuner using the on screen display The on screen display will disappear if no operation is done for about 1 minute 7 Operating the tuner 1 Press MENU The MENU screen appears on the TV 2 Press 5 or to move to TUNER CONTROL then press 2 or 3 The TUNER CONTROL menu appears 3...

Page 99: ...ay 5 When you finish press EXIT repeatedly until the menu disappears from the TV Notes When digital input mode is in use Analog Direct is not available Turning on Surround or DSP mode cancels Analog Direct and previously selected sound adjustments are recalled If Analog Direct is in use Midnight Mode is temporarily canceled even though adjustable DIRECT ANALOG ANALOG DIRECT On the front panel From...

Page 100: ...cted SMALL for the front speakers you cannot select OFF for the subwoofer even if it is set to YES see page 22 Reinforcing the Bass You can boost the bass level Once you have made adjustment it is memorized for each source On the front panel Press BASS BOOST to turn on Bass Boost function The BASS BOOST lamp on the front panel button lights up Each time you press the button Bass Boost activates BO...

Page 101: ...gitally compresses the left front channel right front channel center channel left surround channel right surround channel and LFE channel signals total 6 channels but LFE channel is counted as 0 1 channel therefore called 5 1 channel Since each channel is completely independent from the other channel signals to avoid interference you can obtain a much better sound quality with better stereo and su...

Page 102: ...the left front channel right front channel center channel and surround channel signals total 4 channels into 2 channels The Dolby Pro Logic decoder built in this receiver decodes these 2 channel signals into original 4 channel signals matrix based multi channel reproduction and allows you to enjoy a realistic surround sound in your listening room When Dolby Pro Logic is activated the PRO LOGIC ind...

Page 103: ...irect sounds are delayed by the distances of the ceiling and walls see the diagram below These indirect sounds are the most important elements of the acoustic surround effects The DAP mode can reproduce a realistic sound field by adding these indirect sounds You can use the following DAP modes in order to reproduce a more acoustic sound field in your listening room HALL 1 Gives clear vocal and the...

Page 104: ...Available DSP modes Notes You can select these modes by setting EX ES to AUTO initial setting when the surround back speakers are set to LARGE or SMALL see pages 22 and 23 You can select these modes by setting EX ES to ON when the surround back speakers are set to LARGE or SMALL see pages 22 and 23 Front speaker TV Center speaker Front speaker Surround back speaker Surround speaker Surround speake...

Page 105: ...RETE DTS 䡬 䡬 䡬 䡬 䡬 ES Matrix 6 1 channel 䡬 DTS ES MATRIX DTS 䡬 䡬 䡬 䡬 䡬 5 1 channel 䡬 DTS DTS NEO 6 䡬 䡬 䡬 䡬 䡬 Linear PCM 䡬 PL II MOVIE PL II MUSIC PRO LOGIC 䡬 䡬 䡬 䡬 䡬 NEO 6CINMA NEO 6MUSIC Analog 䡬 PL II MOVIE PL II MUSIC PRO LOGIC 䡬 䡬 䡬 䡬 䡬 NEO 6CINMA NEO 6MUSIC You can select these modes by setting EX ES to ON when the surround back speakers are set to LARGE or SMALL see pages 22 and 23 Available...

Page 106: ...ght up Note When you select DVD MULTI as the source to play the Surround and DSP modes are canceled and the SURROUND and DSP buttons do not work Å To surround left right channel audio output ı To center channel audio output Ç To subwoofer output Î To front left right channel audio output To composite video output Ï To S video output Ì To component video output On the front panel DVD MULTI From the...

Page 107: ...s Above items shown on the on screen display are initial values when shipped from the factory Some of the items cannot be shown or cannot be adjusted For details see the respective explanation in this section Using the on screen display through the remote control 1 Press MENU The MENU screen appears on the TV 2 Press 5 or to move to SOUND CONTROL then press 2 or 3 The SOUND CONTROL menu appears 3 ...

Page 108: ...he digital equalization patterns cannot be adjusted The digital equalization patterns affect the front speaker sounds only SOUND 10 DIGITALEQ RETURN EQ 63Hz EQ250Hz EQ 1kHz EQ 4kHz EQ16kHz and its level and its level and its level and its level and its level CH LEVEL Adjusting the Equalization Patterns DIGITAL EQ You can adjust the equalization patterns to your preference Once you have made adjust...

Page 109: ...h the speakers when selecting DVD MULTI 7 Adjustable speakers You can adjust the following speakers output levels within the range of 10 dB to 10 dB 0 dB is the initial setting Notes If you have selected 1SPK for the surround back speaker see page 22 S BACK appears instead of S BACK SBK L and S BACK SBK R No test tone outputs from the right surround back speaker If you have selected NO or NONE for...

Page 110: ...fore you finish start from step 2 again Adjustment is also possible without outputting the test tone In this case you can skip steps 2 and 6 below 1 Press SOUND SOUND appears on the remote control display window The 10 keys are activated for sound adjustments 2 Press TEST to check if you can hear the sounds through all the speakers at equal level A test tone comes out of the speakers only if the s...

Page 111: ...hat are not adjustable for the currently selected Surround and DSP modes are skipped 2 Press CONTROL UP 5 or DOWN to adjust the sound parameter 3 Repeat steps 1 and 2 to adjust the other parameters Adjusting the Sound Parameters for the Surround and DSP Modes EFFECT ADJUST You can adjust the Surround and DSP sound parameters to your preference Once you have made adjustment it is memorized for each...

Page 112: ...on as play starts the cassette deck or MD recorder starts recording When the play ends the cassette deck or MD recorder enters recording pause and stops about 4 seconds later Notes During synchronized recording the selected source cannot be changed If the power of any component is shut off during synchronized recording the COMPU LINK remote control system may not operate properly In this case you ...

Page 113: ... TEXT COMPU LINK jack connect it so that it is the last item in the series of components For example the CD player in the diagram in the left column TEXT COMPULINK SOURCE NOT CONNECTED appears on the display in the following cases When the connections explained in the left column are not correctly done When you try to use the TEXT COMPU LINK function a few seconds after you turn on the connected e...

Page 114: ... from the Disc information screen Press EXIT Notes The on screen display will disappear in the following cases if no operation is done for about 10 minutes if you do any operation other than explained in this section To control an MD recorder using the TEXT COMPU LINK remote control system you have to change the source name shown on the display from TAPE to MD See page 17 Some special characters a...

Page 115: ... discs are listed as a result of the search Press 5 or until they appear Going back to the PERFORMER SEARCH screen Press EXIT Search for a disc by its disc title 1 Press TEXT DISPLAY while CD is selected as the source The Disc Information screen appears on the TV 2 Press 5 or to move to SEARCH then press SET The DISC SEARCH screen appears 3 Press 5 or to move to DISC TITLE then press SET The DISC ...

Page 116: ...haracter If the current CD is a CD Text go to step 5 without entering the performer To use the lower case letters press 5 2 3 to move to then press SET To use the upper case letters again press 5 2 3 to move to then press SET Search for a disc by its genre 1 Press TEXT DISPLAY while CD is selected as the source The Disc Information screen appears on the TV 2 Press 5 or to move to SEARCH then press...

Page 117: ...s You can enter a song title for the song currently selected 5 Enter the song title referring to steps 3 and 4 of For the CD Player with the disc memory function You can enter up to 32 characters for the song title 6 Press 5 2 3 to move to the song title you have just entered then press SET The song title is stored into the memory and the Disc Information screen appears again 4 Repeat step 3 until...

Page 118: ...put mode see page 50 When connecting only the VCR 1 or DVD player to this receiver connect it directly to the receiver using cables with the monaural mini plugs To Video Input 1 TV RX 8020VBK S video cable S video cable Source Equipment To Video Input 2 Composite TV RX 8020VBK Composite video cable Source Equipment Composite video cable CASE 1 When connecting the source equipment to the receiver t...

Page 119: ...omatically If the previously selected source is VIDEO VCR 2 TV or DBS only the TV will turn on automatically When you turn off the receiver the TV VCR 1 and the DVD player will turn off Note If you turn off the receiver while recording on the VCR 1 the VCR 1 will not turn off but continue recording 1 If you have already plugged your VCR 1 VCR connected to the VCR 1 jacks DVD player TV and this rec...

Page 120: ... the display SURR R then LEVEL Adjust the right surround speaker output level SURRR appears on the display SBACK L then LEVEL Adjust the left surround back speaker output level SBKL appears on the display SBACK R then LEVEL Adjust the right surround back speaker output level SBKR appears on the display SUBWFR then LEVEL Adjust the subwoofer output level S WFR appears on the display DIGITAL EQ then...

Page 121: ...ck number 5 press 5 For track number 15 press 10 then 5 For track number 20 press 10 then 10 For track number 30 press 10 10 then 10 REC PAUSE Enter recording pause by pressing this button To start recording again press this button then 3 PLAY Note You can use either CDR or CONTROL to activate the buttons listed above If you press CDR the playing source also changes On the other hand if you press ...

Page 122: ... source does not change DVD player After pressing DVD or DVD MULTI you can perform the following operations on a DVD player 3 PLAY Start playing 4 Return to the beginning of the current or previous chapter Skip to the beginning of the next chapter 7 STOP Stop playing 8 PAUSE Pause playing To resume press 3 PLAY After pressing DVD or DVD MULTI these buttons can be used for the DVD menu operations N...

Page 123: ...HONO FM AM VCR1 VCR2 SURROUND SURR DSP ANALOG DIGITAL A V CONTROL RECEIVER INPUT DIRECT ANALOG TEXT DISPLAY SOUND Note When you press one of the source selecting buttons the operation mode appears on the display window For example the above illustration shows the remote control now works for TV operation This remote control supplied with the receiver can transmit control signals for other manufact...

Page 124: ...e You cannot preset the signals for both the CATV converter and DBS tuner at the same time To change the transmittable signals for operating another manufacturer s VCR 1 Press and hold VCR1 2 Press VCR1 CALL appears on the remote control display window 3 Enter manufacturer s code using buttons 1 9 and 0 See the list on the next page to find the code 4 Release VCR1 The following buttons can be used...

Page 125: ...buttons If there are more than one code listed for your brand of DVD try each one until the correct one is entered Manufacturer Codes JVC 00 26 27 28 29 58 AIWA 01 02 BELL HOWELL 03 BLAUPUNKT 04 05 CGM 06 07 EMERSON 08 10 11 12 64 65 FISHER 03 14 15 16 17 FUNAI 01 GE 18 19 20 GOLDSTAR 07 GOODMANS 13 21 GRUNDIG 06 22 HITACHI 18 23 24 25 66 LOEWE 07 21 MAGNAVOX 04 19 24 MITSUBISHI 30 31 32 33 34 35 ...

Page 126: ...age 30 Play back software bearing the mark or Set EX ES setting to AUTO See page 23 PROBLEM The display does not light up No sound from speakers Sound from one speaker only No sound from PC connected with a USB cable Noise while reproducing PC sound connected with a USB cable Sound from PC connected with a USB cable is intermittent Continuous hiss or buzzing during FM reception Occasional cracking...

Page 127: ...r dealer Remove the obstruction Replace batteries See page 15 Select the correct remote control operation mode See pages 51 to 53 PROBLEM OVERLOAD starts flashing on the display The STANDBY lamp lights up after turning on the power and soon the receiver turns off again into standby mode Remote control does not work Remote control does not work intendedly POSSIBLE CAUSE Speakers are overloaded beca...

Page 128: ... frequency 32 kHz 44 1 kHz 48 kHz Audio Output Level PRE OUT 1 0 V Recording Output Level VCR 1 VCR 2 CDR TAPE MD 200 mV Digital output Optical DIGITAL OUTPUT Signal wave length 660 nm Output level 21 dBm to 15 dBm Signal to Noise Ratio 66 IHF 78 IHF PHONO 70 dB 78 dB at REC OUT DVD VCR 1 VCR 2 VIDEO TV SOUND DBS CD CDR TAPE MD 92 dB 80 dB Frequency Response 8 Ω PHONO 20 Hz to 20 kHz 1 dB DVD VCR ...

Page 129: ... 6 at 1 kHz Stereo Separation at REC OUT 35 dB at 1 kHz Alternate Channel Selectivity 45 dB 400 kHz Frequency Response 30 Hz to 15 kHz 0 5 dB 3 dB AM tuner Tuning Range 530 kHz to 1 710 kHz Usable Sensitivity Loop antenna 400 µV m Signal to Noise Ratio 50 dB 100 mV m General Power Requirements AC 120V 60 Hz Power Consumption 320 W 440 VA at operation 2 W in standby mode Dimensions W x H x D 435 mm...

Page 130: ...VICTOR COMPANY OF JAPAN LIMITED EN FR 0402NHMMDWJEIN J VC ...

Reviews: