background image

15

Using the DSP Modes

The built-in Surround Processor provides three types of the DSP (Digital Signal Processor) mode — 3D-PHONIC mode,
DAP (Digital Acoustic Processor) mode and Surround mode (Dolby Pro Logic and JVC Theater Surround).

* Manufactured under license from Dolby Laboratories Licensing

Corporation. Additionally licensed under Canadian patent number
1,037,877. “Dolby,” the double-D symbol, and “Pro Logic” are
trademarks of Dolby Laboratories Licensing Corporation.

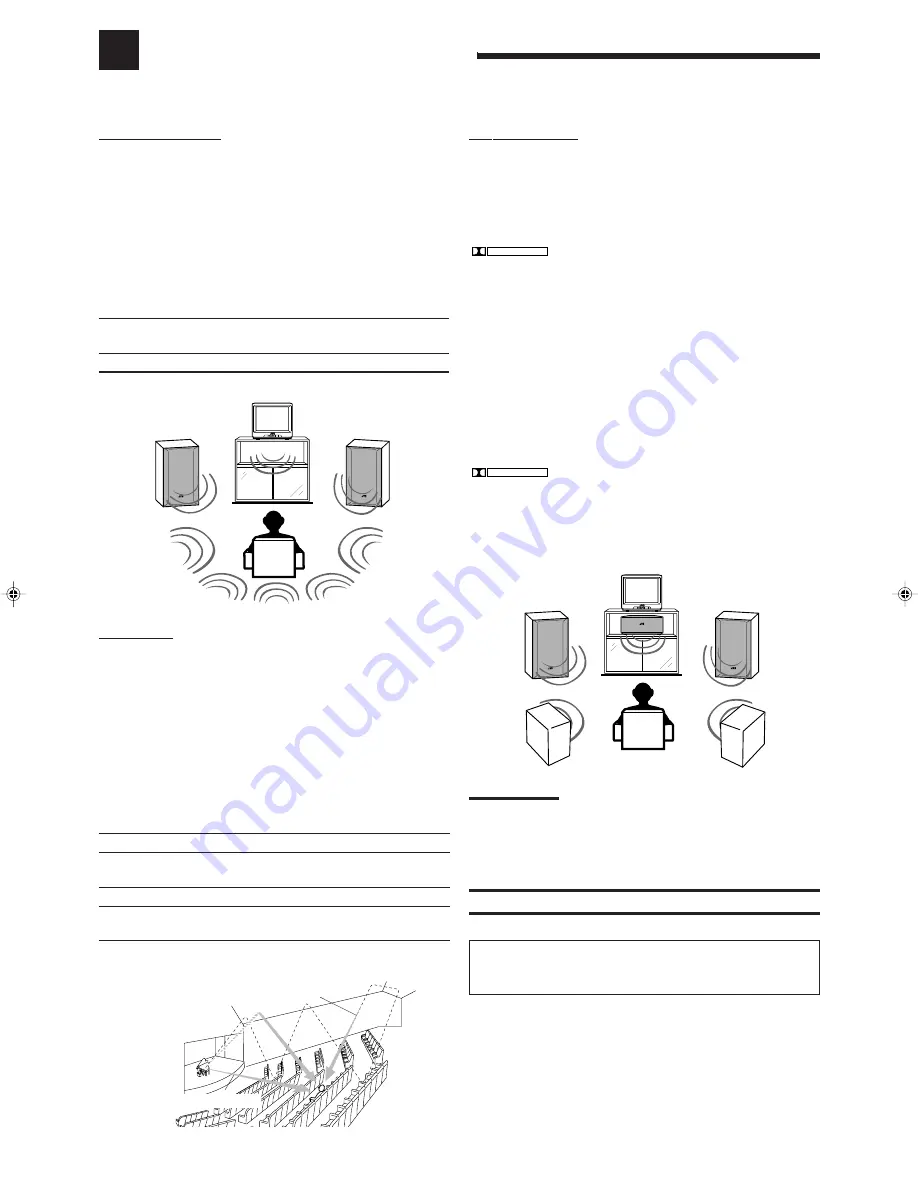
Early reflections

Reflections from
behind

Direct sounds

3D-PHONIC modes

The 3D-PHONIC mode gives you such a nearly surround effect as it
is reproduced through the Dolby Surround decoder, which is widely
used to reproduce sounds with a feeling of movement like those
experienced in movie theaters. The 3D-PHONIC mode is the result
of research on sound localization technology carried out at JVC for
many years. This mode can be used when two front speakers are
connected to this receiver (without respect to the rear/center
speaker connection).
You can select either 3D ACTION or 3D THEATER to your
preference.

3D ACTION:

Best for action and war movies — where the
action is fast and explosive.

3D THEATER: Reproduces the sound field of a large theater.

DAP modes

The sound heard in a concert hall or club consists of direct sound
and indirect sound — early reflections and reflections from behind.
Direct sounds reach the listener directly without any reflection. On
the other hand, indirect sounds are delayed by the distances of the
ceiling and walls. These direct sounds and indirect sounds are the
most important elements of the acoustic surround effects. The DAP
mode can create these important elements, and gives you a real
“being there” feeling. This mode can be used when the front
speakers are connected to this receiver (without respect to the
rear/center speaker connection).
You can select one of the following to your preference.

DANCE CLUB: Gives a throbbing bass beat.

LIVE CLUB:

Gives the feeling of a live music club with a low
ceiling.

HALL:

Gives clear vocal and the feeling of a concert hall.

PAVILION:

Gives the spacious feeling of a pavilion with a
high ceiling.

Surround Modes

With this receiver, you can use two types of the Surround modes.

• Dolby Surround

Dolby Surround has been developed to reproduce the important
elements of the acoustic surround at home.
To watch the soundtracks of video software bearing the mark

DOLBY SURROUND

* which includes the same encoded surround

information as found in Dolby Stereo films, the receiver can provide
you with Dolby Surround decoder.
There are two types of Dolby Surround – “Pro Logic” and “3
Stereo.”
“Pro Logic” can be used when the front speakers and rear
speakers are connected to this receiver (regardless of the center
speaker connection). On the other hand, “3 Stereo” can be used
when the rear speakers are not connected (center speaker must
be connected).

• JVC Theater Surround

In order to reproduce a more realistic sound field in your listening
room while playing soundtracks of video software bearing the mark

DOLBY SURROUND

, JVC Theater Surround has been designed to give

you clearer vocals and to create a real “being there” feeling.
This mode can be used when the front speakers and rear
speakers are connected to this receiver (without respect to the
center speaker connection).

Notes:

• The DSP modes have no effect on monaural sources.
• The DSP modes cannot be used for recording.
• When you select “DVD MULTI” as the source to play, you cannot

select or adjust the DSP modes.

IMPORTANT:

Before recording, turn off the DVD MULTI playback mode.

As for the DVD MULTI playback mode, see
page 20.

EN08-20.RX-558V[J]/1

98.12.21, 2:25 PM

15

Summary of Contents for RX-558VBK

Page 1: ...EMOTE CONTROL TAPE MD FM AM VCR DVD SOUND CONTROL SLEEP 8 3 2 1 5 SURROUND TEST DELAY 6 5 4 EFFECT CENTER 5 9 8 7 P REAR L 5 TV VCR AUDIO CD 10 10 REAR R MENU ENT 5 TV CH TV VIDEO PHONO CD DISC TV VOL DVD MULTI ONE TOUCH OPERATION VCR CH MUTING VOLUME POWER RX 558V AUDIO VIDEO CONTROL RECEIVER STANDBY PHONES SPEAKERS 1 2 ADJUST BASS BOOST SETTING MEMORY DVD MULTI CD DVD PHONO VCR TAPE MD SOURCE NA...

Page 2: ...ngle is intended to alert the user to the presence of important operating and maintenance servicing instructions in the literature accompanying the appliance CAUTION WARNING TO REDUCE THE RISK OF FIRE OR ELECTRIC SHOCK DO NOT EXPOSE THIS APPLIANCE TO RAIN OR MOISTURE CAUTION To reduce the risk of electrical shocks fire etc 1 Do not remove screws covers or cabinet 2 Do not expose this appliance to ...

Page 3: ...s 10 Adjusting the Tone 10 Basic Settings 11 Changing the Source Name 11 Setting Center and Rear Speakers for the DSP Modes 11 Storing the Basic Settings and Adjustments One Touch Operation 12 Using the Sleep Timer 12 Receiving Radio Broadcasts 13 Setting the AM Tuner Internal spacing 13 Tuning in Stations Manually 13 Using Preset Tuning 13 Selecting the FM Reception Mode 14 Using the DSP Modes 15...

Page 4: ...TV VCR AUDIO 2 Source selecting buttons 8 CD TAPE MD FM AM VCR DVD DVD MULTI PHONO 3 ONE TOUCH OPERATION button 12 4 VOLUME buttons 9 5 MUTING button 9 6 SLEEP button 12 7 Operatingbuttonsforaudio videocomponents 22 8 10 keys for selecting preset channel 14 22 10 keys for adjusting sound 12 17 22 10 keys for operating other components 22 9 SOUND CONTROL button 12 17 22 p TV VOL buttons 23 q CD DIS...

Page 5: ...ol 1 Batteries 2 AM Loop Antenna 1 FM Antenna 1 AC Plug Adaptor 1 If anything is missing contact your dealer immediately Setting the Voltage Selector Switch Before connections always set the voltage selector switch first if necessary Set the correct voltage for your area with the voltage selector switch on the rear panel Use a screw driver to rotate the switch so the number the arrow is pointing a...

Page 6: ...connect the and terminals on the rear panel to the and terminals marked on the speakers For connecting a subwoofer see page 5 AM Antenna Connections AM Loop Antenna Snap the tabs on the loop into the slots of the base to assemble the AM loop Basic connecting procedure 1 Cut twist and remove the insulation at the end of each speaker signal cable 2 Open the terminal and then insert the speaker signa...

Page 7: ...r may be distorted Turntable If an earth cable is provided for your turntable connect the cable to the ground terminal H of the ANTENNA terminals on the rear panel Turntable To audio output Note Any turntables incorporating a small output cartridge such as an MC moving coil type must be connected to this receiver through a commercial head amplifier or step up transformer Direct connection may resu...

Page 8: ...you connect the DVD player with stereo output jacks DVD player VIDEO LEFT RIGHT MONITOR OUT OUT REC IN PLAY OUT REC IN PLAY DVD VCR L R LEFT FRONT CENTER REAR RIGHT SUBWOOFER DVD DVD Å ı Å To front left right channel audio output or to audio mixed output if necessary ı To video output When you connect the DVD player with its analog discrete output 5 1 CH reproduction jacks VIDEO LEFT RIGHT MONITOR...

Page 9: ...n voltage Always replace both batteries at the same time Do not expose batteries to heat or flame Connecting the Power Cord Before plugging the receiver into an AC outlet make sure that all connections have been made Plug the power cord into an AC outlet Keep the power cord away from the connecting cables and the antenna The power cord may cause noise or screen interference We recommend that you u...

Page 10: ...DVD player for viewing the digital video disc using the analog discrete output mode 5 1CH reproduction on the DVD player To enjoy the DVD MULTI playback see page 20 DVD Select the DVD player for viewing the stereo digital video disc VCR Select the video component connected to the VCR jacks FM Select an FM broadcast AM Select an AM broadcast TAPE MD Select the cassette deck or the MD recorder PHONO...

Page 11: ...rs press SPEAKERS 1 and SPEAKERS 2 to set them in the OFF position Note When only one set of the speakers is connected to either the FRONT SPEAKERS 1 or 2 terminals do not activate both pairs of the speakers If you do no sound comes out of the front speakers MASTER VOLUME Listening only with headphones 1 Connect a pair of headphones to the PHONES jack on the front panel 2 Press SPEAKERS 1 and SPEA...

Page 12: ...tput Reinforcing the Bass With this Bass Boost function you can boost the bass level Before you start remember There is a time limit in doing the following steps If the setting is canceled before you finish start from step 1 again On the front panel ONLY 1 Press ADJUST so that the cursor control fi buttons work for adjusting the sound 2 Press cursor control fi until B BOOST appears on the display ...

Page 13: ...following settings are required after connecting and positioning your speakers in your listening room while others will make operations easier 3 Press cursor control to select your center speaker size LARGE Select this mode when the size of the center speaker is the same as that of the front speakers SMALL Select this mode when the size of the center speaker is smaller than that of the front speak...

Page 14: ...r also cancels the Sleep Timer On the front panel 1 Press SETTING so that the cursor control fi buttons work for setting the delay time 2 Press cursor control fi repeatedly until DELAY appears on the display 3 Press cursor control to select an appropriate delay time DELAY 1 Select this mode when the distance from you to your rear speakers is greater than that to the front speakers DELAY 2 Select t...

Page 15: ...ss MEMORY again while the selected channel number is flashing on the display The selected channel number stops flashing The station is assigned to the selected channel number 5 Repeat steps 1 to 4 until you store all the stations you want To erase a stored preset station Storing a new station on a used number erases the previously stored one Tuning in Stations Manually On the front panel ONLY 1 Pr...

Page 16: ...ns The MUTE AUTO indicator goes off on the display To tune in a preset station On the front panel 1 Press FM or AM The last station of the selected band is tuned in The cursor control fi buttons can be now used for operating the tuner 2 Press cursor control fi repeatedly until PRESET appears on the display 3 Press cursor control to select a preset channel station Pressing decreases the preset chan...

Page 17: ...here feeling This mode can be used when the front speakers are connected to this receiver without respect to the rear center speaker connection You can select one of the following to your preference DANCE CLUB Gives a throbbing bass beat LIVE CLUB Gives the feeling of a live music club with a low ceiling HALL Gives clear vocal and the feeling of a concert hall PAVILION Gives the spacious feeling o...

Page 18: ...TV Front speaker Front speaker Rear speaker Rear speaker Each time you press SURROUND the DSP modes change as follows PRO LOGIC THEATER DANCE C DANCE CLUB LIVE C LIVE CLUB HALL PAVILION 3D ACTION OFF DSP mode is canceled TV Front speaker Front speaker Center speaker Each time you press SURROUND the DSP modes change as follows 3 STEREO 3D THEATER DANCE C DANCE CLUB LIVE C LIVE CLUB HALL PAVILION 3D...

Page 19: ...efore you start remember Make sure that you have set the speaker information correctly see page 11 There is a time limit in doing the following steps If the setting is canceled before you finish start from step 1 again On the front panel 1 Press SURROUND repeatedly until 3DACTION or 3D THEATR appears on the display The 3D PHONIC PRO LOGIC indicators also light up on the display 2 Press ADJUST so t...

Page 20: ...ectly See page 11 From the remote control 1 Press SOUND CONTROL The 10 keys are activated for sound adjustments 2 Press SURROUND repeatedly until the mode PROLOGIC or 3 STEREO or THEATER appears on the display For PROLOGIC and 3 STEREO the PRO LOGIC indicator lights up on the display For THEATER the PRO LOGIC and DAP indicators light up on the display 3 Press TEST to check the speaker output balan...

Page 21: ... enjoy the 3D PHONIC Dolby Surround and JVC Theater Surround play back a software which was processed with Dolby Surround and is labeled with DOLBY SURROUND mark To cancel the DSP mode Press SURROUND repeatedly until OFF appears on the display in step 2 above On the front panel You can also use the buttons on the front panel to adjust the Surround modes However no test tone is available when using...

Page 22: ... R decreases the output level up to 10 dB Pressing REAR R increases the output level up to 10 dB Activating the DVD MULTI Playback Mode You can adjust the DVD MULTI playback mode while playing back a DVD using the analog discrete output mode on the DVD player Once you made adjustments the receiver memorizes the adjustments until you change them Before you start remember Make sure that you have set...

Page 23: ...iately In both cases the previously selected source continues playing without sound for a few seconds Turntable CD player Cassette deck or MD recorder Automatic Power On Off Standby only possible with the COMPU LINK 3 connection Both the CD player and cassette deck or MD recorder turn on and off standby along with the receiver When you turn on the receiver the CD player or cassette deck or MD reco...

Page 24: ...onding source selecting button or CD DISC to operate your target source by using the 10 keys otherwise the 10 keys cannot be used for operating your target source CD player After pressing CD you can perform the following operations on the CD player 3 Starts playing 4 4 4 4 4 Returns to the beginning of the current or previous track Skips to the beginning of the next track 7 Stops playing 8 Pauses ...

Page 25: ... playing To release it press 3 Note To operate the cassette deck or MD recorder using the COMPU LINK remote control system set the source name correctly See page 11 IMPORTANT To operate JVC s video components using this remote control Aim the remote control directly at the remote sensor on the VCR DVD player or TV not on the receiver Some JVC VCRs can accept two types of the control signals remote...

Page 26: ...t disappear unplug the AC power cord then plug it back again Press POWER on the front panel then check the speaker wiring If OVERLOAD does not disappear unplug the AC power cord then plug it back again If speaker wiring is not short circuited contact your dealer Remove the obstruction Replace batteries POSSIBLE CAUSE The power cord is not plugged in Speaker signal cables are not connected The SPEA...

Page 27: ...0 kHz 1 dB CD TAPE MD VCR DVD 20 Hz to 20 kHz 1 dB RIAA Phono Equalization 1 0 dB 20 Hz to 20 kHz Video Video Input Sensitivity Impedance VCR DVD 1Vp p 75 phms Video Output Level VCR MONITOR OUT 1Vp p 75 ohms Synchronization Negative Signal to Noise Ratio 45dB FM tuner IHF Tuning Range 87 5 MHz to 108 0 MHz Usable Sensitivity Monaural 17 0 dBf 1 95 µV 75 ohms 50 dB Quieting Sensitivity Monaural 21...

Page 28: ...ICE CENTER LOCATIONS 107 Little Falls Road Fairfield NJ 07004 2105 973 808 9279 5665 Corporate Avenue Cypress CA 90630 0024 714 229 8011 13 Cummings Park Woburn MA 01801 781 376 9100 705 Enterprise Street Aurora IL 60504 8149 630 851 7855 10700 Hammerly Suite 110 Houston TX 77043 713 935 9331 890 Dubuque Avenue South San Francisco CA 94080 1804 650 871 2666 1500 Lakes Parkway Lawrenceville GA 3024...

Page 29: ...to any attachment not provided with the products or if the model or serial number has been altered tampered with defaced or removed 2 Initial installation and installation and removal for repair 3 Operational adjustments covered in the Owner s Manual normal maintenance video and audio head cleaning 4 Damage that occurs in shipment due to act of God and cosmetic damage 5 Signal reception problems a...

Page 30: ...VICTOR COMPANY OF JAPAN LIMITED EN J VC 1298HIMMDWJEM ...

Reviews: