background image

15

7.

Press OK.

This completes the setting.

Notes:

• You cannot select a locked PR channel

using the PR channel 

/

 buttons.

• Even if you can select a locked channel

and display it, you can not view the
programme of the locked channel.

To view a locked PR
channel

1.

Select a locked PR channel.

• Use the number buttons to select

the PR channel.
The locked channel is displayed.

2.

Press 

 (Information).

The ID NO. input menu appears.

3.

Press the number buttons
to enter the ID number.

You are now viewing the locked PR
channel.

If you forget the ID number:

Perform steps 1 to 3 of “To set the
CHILD LOCK”. After you confirm the ID
number, press the TV button to exit the
menu.

CHILD LOCK

You can lock some PR channels to
prevent your children from watching
them.

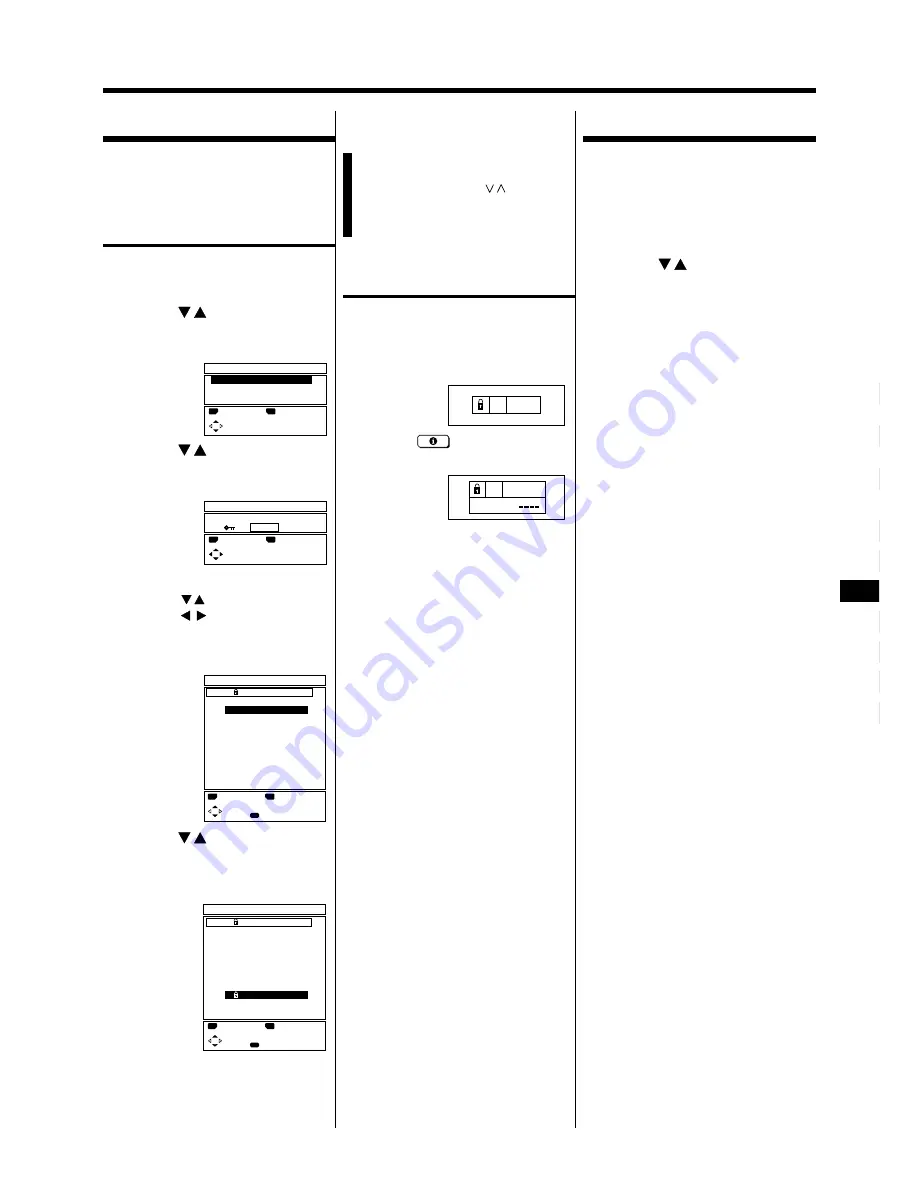
To set the CHILD LOCK

1.

Press OK.

The MENU appears.

2.

Press 

/

 to select

FEATURES, then press OK.

The FEATURES menu appears.

3.

Press 

/

 to select CHILD

LOCK, then press 0 button.

The SET ID NO menu appears.

4.

Enter the ID number.

1. Press 

/

 to select a number.

2. Press 

/

 to move the cursor.

5.

Press OK.

The CHILD LOCK menu appears.

6.

Press 

/

 to select a PR

channel, then press blue
button.

The selected PR channel is locked.

• To cancel the CHILD LOCK:

Press blue button again.

• Repeat step 6 to lock all PR

channels which you want to lock.

FEATURES

 SLEEP TIMER

 BLUE BACK
 CHILD LOCK

:EXIT

:OK

OK

TV

SET ID NO

0000

:EXIT

:OK

OK

TV

:EXIT

:OK

OK

TV

:CANCEL

 PR      ID   CH/CC
 AV     -----
  1     BBC1  CH 21
  2     BBC2  CH 22
  3     ITV   CH 23
  4     CH4   CH 24
  5     CH5   CH 25
  6           CH 26
  7           

CH 27

  8           CH 28
  9           CH 29

CHILD LOCK

7

ID NO. :

7

 PR      ID   CH/CC
 AV     -----
  1     

BBC1  CH 21

  2     BBC2  CH 22
  3     ITV   CH 23
  4     CH4   CH 24
  5     CH5   CH 25
  6           CH 26
  7           CH 27
  8           CH 28
  9           CH 29

:EXIT

:OK

OK

TV

:LOCK

CHILD LOCK

DEMONSTRATION

The demonstration runs
automatically and introduces the
menus of this TV’s main features.

1.

Press OK.

The MENU appears.

2.

Press 

/

 to select DEMO,

then press OK.

The demonstration begins.
• To stop the demonstration, press

any button on the remote control.

Summary of Contents for Natural Vision AV-24WT2EK

Page 1: ...S AV 24WT2EK AV 28WT2EK SAFETY PRECAUTIONS 2 Locations of remote control buttons 4 Locations of TV buttons and parts 5 PREPARATION AND BASIC OPERATION 6 SOUND AND PICTURE 12 OTHER FEATURES 14 TELETEXT 17 OTHER PREPARATION 19 TROUBLESHOOTING 24 SPECIFICATIONS 26 ...

Page 2: ...e plug fitted is not suitable for the power points in your home or the cable is too short to reach a power point then obtain an appropriate safety approved extension lead or adaptor or consult your dealer If nonetheless the mains plug is cut off remove the fuse and dispose of the plug immediately to avoid a possible shock hazard by inadvertent connection to the mains supply If a new mains plug has...

Page 3: ...is unattended unless it is specifically stated that it is designed for unattended operation or has a standby mode Switch off using the switch on the equipment and make sure that your family know how to do this Special arrangements may need to be made for infirm or handicapped people DON T use equipment such as personal stereos or radios that may distract you when driving It is illegal to watch tel...

Page 4: ...VCR TEXT selector switch When switched to the VCR side the buttons function as the JVC VCR control buttons Notes For details on button functions see the JVC VCR manual Depending on your VCR the remote control may not operate perfectly and may not even control the VCR at all When switched to the TEXT side the buttons function as teletext control buttons OUTSIDE BUTTONS INSIDE BUTTONS How to open th...

Page 5: ...hile the volume level indicator is displayed 6 Up down buttons p 10 You can use this button as the buttons of the PR channel Pressing the 5 Volume button makes this button function as the Volume buttons 7 Hyper Sound lamp p 12 8 ECO lamp p 13 9 Sleep timer lamp p 14 0 Power lamp p 8 10 Main power button p 8 10 EXT 2 terminal p 6 19 EXT 1 terminal p 6 19 Aerial socket p 6 REAR PANEL ECO L R EXT 3 P...

Page 6: ...ing cables are not supplied You can view video from a VCR without doing 3 For details refer to the manual provided with your VCR If not connecting a VCR do 1 only If connecting a VCR proceed 1 2 3 2 Connecting other external devices Automatic detection and switching of input mode Automatic detection and switching of ZOOM mode EXT 1 EXT 2 EXT 3 front VIDEO IN 1 1 VIDEO OUT 2 3 S VIDEO IN 1 1 S VIDE...

Page 7: ... be connected to the terminals on the rear panel Devices which can be connected to the terminals on the front panel EXT 2 S EXT 1 S 1 VCR 2 S VHS VCR 3 Decoder 4 TV game or 1 2 1 2 3 4 L R EXT 3 Camcorder Headphones To video output Push to open or TV game To audio output behind the door AC outlet Power cord ...

Page 8: ...ed in the selected language 2 Press button to select ENGLISH 3 Press OK button English is set for the on screen display description and the AUTO PROGRAM menu appears Automatically allocating stations to PR channels To view a TV programme you must first allocate broadcast stations to PR channels You can automatically allocate up to 99 stations to PR channels PR1 to PR 99 on this TV Broadcast statio...

Page 9: ...To use the PR LIST to select a PR channel 1 Press Information button The PR LIST appears To exit the PR LIST press TV button 6 Viewing a television programme Notes If the picture is not clear or no colour appears change the colour system manually see page 13 for details Enter 0 when selecting an AV channel PR 0 channel P P AUTO PROGRAM CH 60 81 EXIT OK OK TV EDIT PR ID CH CC AV 1 BBC1 CH 21 2 BBC2...

Page 10: ...ayed To turn off your TV press the Main power button The Power lamp goes off Note If your TV does not turn on press the Main power button and then press the Up down button again Note PR channel selection is not available while the volume level indicator is displayed P P Note To save energy we recommend that you turn the main power off if you do not plan to use your TV for a long time 2 Press butto...

Page 11: ... your TV EXT modes Shows images input from an external device such as a VCR connected to the selected EXT terminal To use S Video mode to view input from an S VHS VCR see To select S VIDEO input for a terminal on page 19 When selecting EXT 1 or EXT 2 input terminals as S VIDEO input E1 or E2 changes to S1 or S2 in the display EXT modes PR channel number TV mode EXT 1 EXT 2 EXT 3 E1 or S1 E2 or S2 ...

Page 12: ...when viewing film programmes NORMAL A normal white colour base with no boost in the colour or contrast levels 5 Press OK This completes the setting MUTE You can mute the volume to 0 instantly This is convenient when answering the phone or when receiving visitors 1 Press Mute The sound is muted To restore the sound Press the Mute button again HYPER SOUND You can enjoy sounds with a wider ambiance b...

Page 13: ...dish HUE Greenish picture hue Note You can adjust the HUE picture hue only when the colour system is NTSC 3 58 or NTSC 4 43 4 Press OK This completes the setting To adjust the sound 1 Press OK The MENU appears 2 Press to select SOUND SETTING then press OK The SOUND SETTING menu appears 3 Press to select an item and press to adjust it Item Weaker BASS Stronger low frequency sound Weaker TREBLE Stro...

Page 14: ...s OFF Turns off the SLEEP TIMER 5 Press OK The selected period of time is displayed for approx 3 seconds The Sleep timer lamp lights if you set the SLEEP TIMER To display the remaining Sleep timer time Perform steps 1 to 3 to display the SLEEP TIMER menu and press OK button when you finish checking the time To turn off the Sleep timer Perform steps 1 to 3 to display the SLEEP TIMER menu press butt...

Page 15: ...menu appears 3 Press to select CHILD LOCK then press 0 button The SET ID NO menu appears 4 Enter the ID number 1 Press to select a number 2 Press to move the cursor 5 Press OK The CHILD LOCK menu appears 6 Press to select a PR channel then press blue button The selected PR channel is locked To cancel the CHILD LOCK Press blue button again Repeat step 6 to lock all PR channels which you want to loc...

Page 16: ...If you cannot see subtitles at the bottom of the screen or if the top or bottom is cut off move the picture vertically Note You cannot move the picture vertically in AUTO REGULAR and FULL mode 1 Press ZOOM The current ZOOM mode is displayed 2 Before the display disappears press to move the picture up or down ZOOM Select a ZOOM mode to change the picture format You can enlarge the picture to fill t...

Page 17: ... watching TV 1 Select a teletext page The TV searches for a teletext page 2 Press DISPLAY CANCEL The TV programme appears When the TV finds the teletext page its page number appears in the upper left of the screen Note If selecting something other than REGULAR or FULL mode for ZOOM mode the page number does not appear on the screen 3 Press TV text when the page number is on the screen SIZE You can...

Page 18: ... You can hold a teletext page on the screen for a desired length of time even while several other teletext pages are being received 1 Press HOLD is displayed in the upper left of the screen and the teletext page is held on the screen To release hold mode Press HOLD button again INDEX Just press INDEX button to return to the index page 1 Press INDEX Fastext WST Returns to page 100 or a previously s...

Page 19: ...el is output from EXT 2 so you can record the output on a VCR connected to the EXT 2 terminal while watching a video input from the EXT 1 or EXT 3 terminal 5 Press OK The menu disappears OTHER PREPARATION EXT SETTING You can select S VIDEO or normal input for the EXT 1 and EXT 2 terminals and you can give an EXT ID to each EXT input terminal To select S VIDEO input for a terminal 1 Press OK The ME...

Page 20: ...actory 1 Press OK The MENU appears 2 Press to select INSTALL then press OK The INSTALL menu appears 3 Press to select AUTO PROGRAM then press OK The AUTO PROGRAM menu appears Note If you make a mistake when selecting your country or do not want to use the Automatic allocation function select CANCEL and then press OK button to return to the INSTALL menu 4 Press OK The PR channel is automatically se...

Page 21: ...oing any of the following You can delete an unwanted station from a PR channel You can change the PR channel number of a station You can add station IDs to PR channels You can add a new station to a PR channel or You can manually allocate the desired station to a PR channel To edit PR channels 1 Press OK The MENU appears 2 Press to select INSTALL then press OK The INSTALL menu appears 3 Press to s...

Page 22: ...TV MTV3 EDIT STORE OK TV PR ID CH CC AV 1 BBC1 CH 21 2 BBC2 CH 22 3 ITV CH 23 4 CH4 CH 24 5 CH5 CH 25 6 CH 26 7 M6 CH 27 8 CH 28 9 CH 29 EDIT DELETE MANUAL MOVE ID INSERT OK TV PR ID CH CC AV 1 BBC1 CH 21 2 BBC2 CH 22 3 ITV CH 23 4 CH4 CH 24 5 CH5 CH 25 6 CH 26 7 MOVIE CH 27 8 CH 28 9 CH 29 To add a new station to a PR channel 1 Press to select the row containing the PR channel number to which you...

Page 23: ... Scanning stops when the TV receives a broadcast Press green or red button to search for another station and keep searching until you see the station you want If reception is poor Press the blue or yellow button to fine tune the station Note For details on the relationship between the displayed CH number and the actual channel number see the Channel table on page 25 4 Press OK The station is alloc...

Page 24: ...r shuts off automatically Inoperable remote control Poor colour The screen mode suddenly changed Lines or streaks in picture interference Spots crosstalk Double pictures ghosts Snowy pictures noise The screen turns blue No sound from the TV s speakers No stereo sound No SUB I or SUB II sound in a multisound broadcast No teletext reception The current time is not displayed TROUBLESHOOTING If the pl...

Page 25: ... 53 E53 CH 54 E54 CH 55 E55 CH 56 E56 CH 57 E57 CH 58 E58 CH 59 E59 CH Channel CH 34 E34 CH 35 E35 CH 36 E36 CH 37 E37 CH 38 E38 CH 39 E39 CH 40 E40 CH 41 E41 CH 42 E42 CH 43 E43 CH 44 E44 CH 45 E45 CH 46 E46 CH Channel CH 60 E60 CH 61 E61 CH 62 E62 CH 63 E63 CH 64 E64 CH 65 E65 CH 66 E66 CH 67 E67 CH 68 E68 CH 69 E69 The following table shows the relationship between the displayed CH channel numb...

Page 26: ...5 W Speakers 3 10 cm oval 2 10 cm round 2 External input output EXT 1 EXT 2 21 pin Euroconnector SCART EXT 3 VIDEO IN RCA AUDIO L R IN RCA Headphone jack stereo mini jack dia 3 5 mm Dimensions W H D 645 mm 427 mm 443 mm 716 mm 489 mm 496 mm Weight 23 0 kg 32 9 kg Accessories Remote control unit RM C794 1 AAA R03 dry cell battery 2 SPECIFICATIONS Design and specifications subject to change without ...

Page 27: ...27 ...

Page 28: ...VICTOR COMPANY OF JAPAN LIMITED CQ40350 001 E 0497 Ki AB JMUK AV 24WT2EK AV 28WT2EK 1997 VICTOR COMPANY OF JAPAN LIMITED ...

Reviews: