background image

– 20 –

English

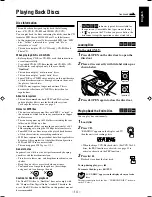
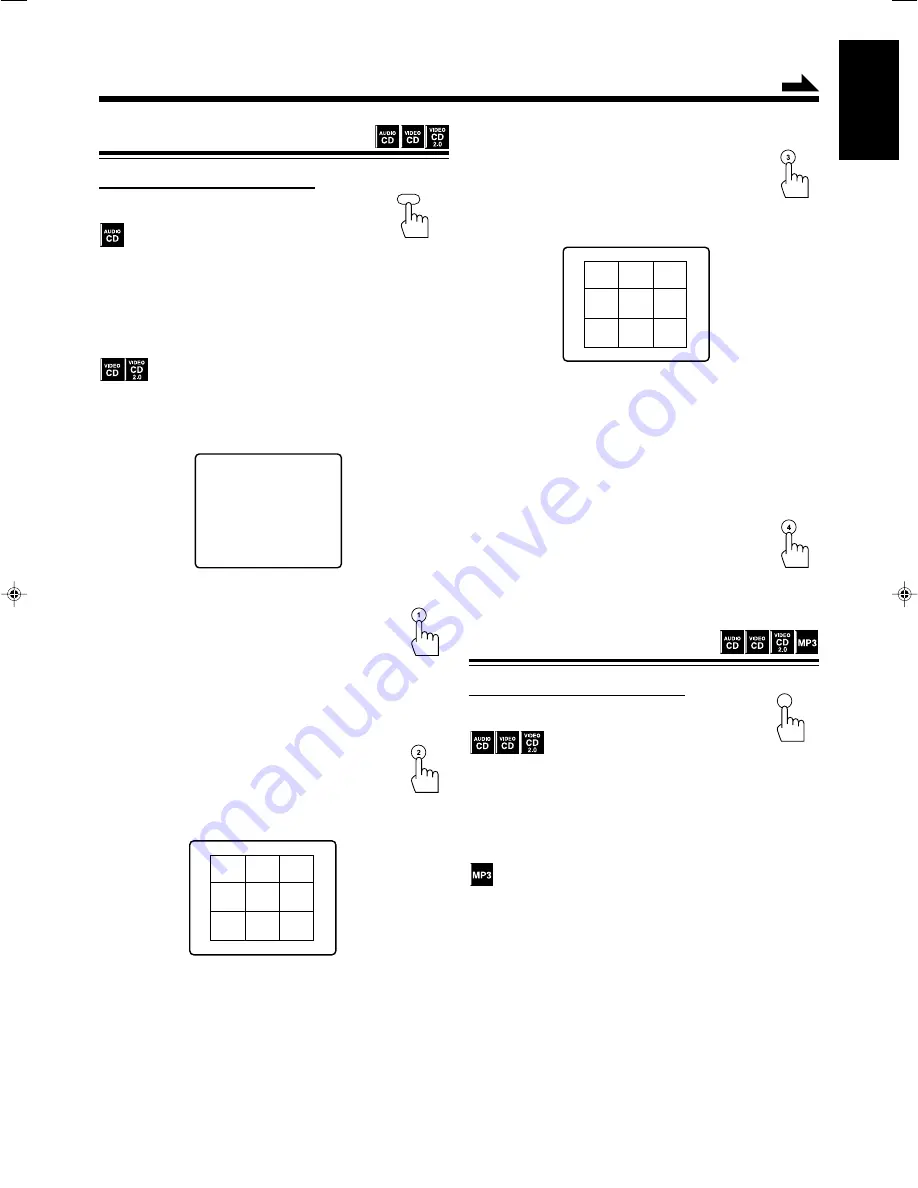
TRACK:
To select TRACK,

 press 3.

The unit shows the first track of the disc in 9
division—Track Scan.
“TRACK SCAN” appears on the TV, then Track Scan
starts.

Press 

¢

 to show next track, press 

4

 to show previous

track.
Press number button(s) to start playback. (See page 16 for
how to use the number buttons.)

To exit from Track Scan,

 press 

7

.

EXIT:
To exit from Digest menu, 

press 4.

1

2

3

4

5

6

7

8

9

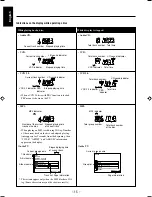
Using the Digest Menu

On the remote control ONLY:

Press DIGEST before playing.

The unit starts playing the first 10 seconds of all the tracks—
Intro Scan.
“INTRO SCAN” appears on the TV.

To resume normal playback,

 press DIGEST.

Digest menu appears on the TV.
• When the PBC function is activated, pressing DIGEST

cancels the PBC function to show the DIGEST menu.

INTRO:
To select INTRO, 

press 1.

The unit starts playing the first 10 seconds of all the
tracks.
“INTRO SCAN” appears on the TV.

To resume normal playback

, press DIGEST.

DISC:
To select DISC,

 press 2.

The unit shows the first image of all the tracks on
the disc in every 9 tracks—Disc Scan.
“DISC SCAN” appears on the TV, then Disc Scan
starts.

Press 

¢

 to show images of next 9 tracks, press 

4

 to

show previous 9 tracks.
Press number button(s) to start playback. (See page 16 for
how to use the number buttons.)

To exit from Disc Scan,

 press 

7

.

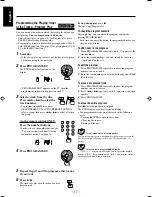
DIGEST  MENU

1 . INTRO

2 . DISC

3 . TRACK

4 . EXIT

DIGEST

1

2

3

4

5

6

7

8

9

Continued

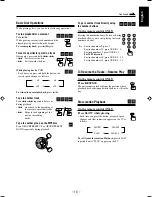
Displaying the
Playback Information

On the remote control ONLY:

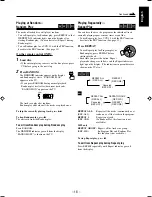
Press OSD.

The playback information appears on the TV.
• Each time you press the button, playback information

appears and disappears alternately.

• You can change the playback information by pressing

CLOCK/REMAIN. (See “Changing the Playback
Information” on the next page.)

The ID3 tag information is shown on the display. (When the
track does not have ID3 tag, “NO INFO” appears on the
display.)

OSD

EN14-22_PC-X292V[US]

05.4.15, 1:34 PM

20

Summary of Contents for LVT1370-001A

Page 1: ...ER TUNER TAPE TAPE PLA PLAY REW REW FF FF PAUSE PLAY REW REW FF STOP EJEC STOP EJECT PAUSE USE REC CD SYNCHRO RECORDING AUTO STOP SYSTEM CD PORTABLE COMPONENT SYSTEM STOP EJEC STOP EJECT STANDB STANDBY A B VOLUME H B S P R E S E T E Q C L O C K R E M A I N STANDBY ON STANDBY ON CD BAND TUNER TAPE AUX PROG SET CLOCK REMAIN DIGEST RESUME RM SPCX292V REMOTE CONTROL OSD OVER PBC GOTO SLOW REPEAT FM MO...

Page 2: ...ve screws covers or cabinet 2 Do not expose this appliance to rain or moisture CAUTION Do not block the ventilation openings or holes If the ventilation openings or holes are blocked by a newspaper or cloth etc the heat may not be able to get out Do not place any naked flame sources such as lighted candles on the apparatus When discarding batteries environmental problems must be considered and loc...

Page 3: ... ÄR ÖPPNAD OCH SPÄRR ÄR URKOPPLAD STRÅLEN ÄR FARLIG ADVARSEL USYNLIG LASERSTRÅLING VED ÅBNING NÅR SIKKERHEDSAFBRYDERE ER UDE AF FUNKTION UNDGÅ UDSÆTTELSE FOR STRÅLING 1 CLASS 1 LASER PRODUCT 2 CAUTION Do not open the top cover There are no user serviceable parts inside the unit leave all servicing to qualified service personnel 3 CAUTION Visible and invisible laser radiation when open and interloc...

Page 4: ...as follows 1 Front No obstructions and open spacing 2 Sides Top Back No obstructions should be placed in the areas shown by the dimensions below 3 Bottom Place on the level surface Maintain an adequate air path for ventilation by placing on a stand with a height of 10 cm or more Side view PC X292V PC X292V 10 cm 15 cm 15 cm 15 cm G 3 ...

Page 5: ...unit Leave sufficient distance between the unit and the TV Keep the speakers away from the TV to avoid interference with TV DO NOT install the unit in a location near heat sources or in a place subject to direct sunlight excessive dust or vibration We would like to thank you for purchasing one of our JVC products Before operating this unit read this manual carefully and thoroughly to obtain the be...

Page 6: ...eset Station 13 Playing Back Discs 14 Disc Information 14 Loading Disc 14 Playing Back the Entire Disc 14 Basic Disc Operations 16 To Resume the Tracks Resume Play 16 Slow motion Playback 16 Programming the Playing Order of the Tracks Program Play 17 Playing at Random Random Play 18 Playing Repeatedly Repeat Play 18 Repeating a Desired Portion A B Repeat 19 Selecting theAudio Channel L R Function ...

Page 7: ... E GROUP T U P R E P EAT P R O G R A M GROUP SET N W O D T E S E R P BAND TUNER TAPE PLAY REW FF PAUSE PLAY REW FF STOP EJECT PAUSE REC CD SYNCHRO RECORDING AUTO STOP SYSTEM CD PORTABLE COMPONENT SYSTEM STOP EJECT STANDBY A B VOLUME H B S P R E S E T E Q C L O C K R E M A I N STANDBY ON FM MODE BEAT CUT FM MODE BEAT CUT u o s 1 4 2 8 9 i 3 5 6 7 p w t e y a q r ...

Page 8: ...ton 11 u CLOCK REMAIN button 10 21 i GROUP PRESET UP DOWN button 12 13 16 17 o PROGRAM SET button 10 13 17 REPEAT button 18 a Deck B cassette holder 22 s Operation buttons for deck B 22 PLAY 3 REW 1 FF STOP EJECT 7 0 PAUSE 8 Continued Display Window Display Window 1 MP3 indicator 15 2 Repeat mode indicators 18 19 A B REPEAT 1 ALL GROUP 3 RANDOM indicator 18 4 TOTAL indicator 21 5 PROG indicator 13...

Page 9: ...uttons 13 16 19 21 i OVER button 13 16 21 o SLOW button 16 REPEAT button 18 a RANDOM button 18 s L R button 19 d VOLUME buttons 11 f MUTING button 11 g GROUP PRESET UP DOWN buttons 13 16 17 Remote sensor SENSOR TAPE AUX PLAY EC LAY P R O G R A M SET N O R T Y A L P S I D CD TUNER BAND PLAY REW FF PAUSE PLAY REW FF STOP EJECT PAUSE CD SYNCHRO RECORDING AUTO STOP SYSTEM CD PORTABLE COMPONENT SYSTEM ...

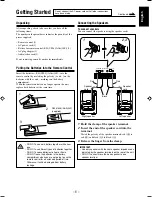
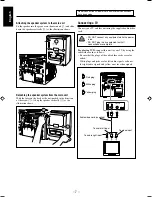
Page 10: ...s together DO NOT expose batteries to heat or flame DO NOT leave the batteries in the battery compartment when you are not going to use the remote control for an extended period of time Otherwise it will be damaged from battery leakage R03 UM 4 AAA 24F supplied 2 Continued Do not connect the AC power cord until all other connections have been made Connecting the Speakers To connect speakers You ca...

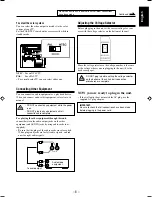
Page 11: ...ed audio video cord DO NOT connect any equipment while the power is on DO NOT plug in any equipment until all connections are complete For playing VCD connect this unit to your TV by using the audio video cord as follows Be sure that the plugs of the audio video cords are color coded White plugs and jacks are for left audio signals red ones for right audio signals and yellow ones for video signals...

Page 12: ...g Other Equipment You can connect an audio equipment as a playback device When you connect and use this equipment refer also to its manual DO NOT connect any equipment while the power is on DO NOT plug in any equipment until all connections are complete For playing the other equipment through this unit connect between the audio output jacks on the other equipment and AUX IN jacks by using audio co...

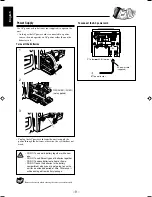
Page 13: ... will be damaged from battery leakage 1 3 2 To insert the batteries Remove batteries when storing this unit over one month Power Supply Use AC power or dry batteries not supplied to operate the unit As long as the AC power cord is connected to a power source the unit operates on AC power rather than on the batteries in it AC power cord supplied 1 To the AC IN terminal 2 To a wall outlet To connect...

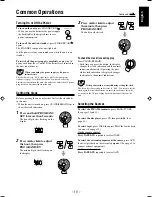
Page 14: ...t press STANDBY ON When you use the batteries for power supply the backlight of the display dims to save power consumption To turn off the unit on standby press STANDBY ON again The STANDBY lamp on the unit lights red A little power is always consumed even while the unit is on standby To switch off the power supply completely unplug the AC power cord from the AC outlet If the batteries are inserte...

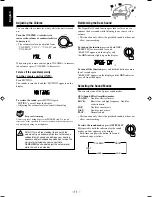
Page 15: ...he volume level while the unit is on standby VOLUME Reinforcing the Bass Sound The Hyper Bass Sound function provided for this unit can enhance the bass sound while listening to any source at low volume This function only affects the playback sound but does not affect your recording To turn on the function press and hold HBS PRESET EQ for more than 1 second BASS ON appears on the display and the H...

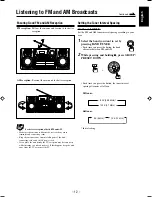
Page 16: ...rient it for better reception AM reception Reorient the main unit for better reception Setting the Tuner Interval Spacing On the unit ONLY Set the FM and AM tuner interval spacing according to your area 1 Select the band you want to set by pressing BAND TUNER Each time you press the button the band alternates between FM and AM 2 While pressing and holding 7 press GROUP PRESET DOWN Each time you pr...

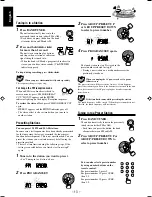
Page 17: ...again 1 Tune in to the station you want to preset See Tuning in to a Station above 2 Press PROGRAM SET 3 Press GROUP PRESET UP or GROUP PRESET DOWN to select a preset number 4 Press PROGRAM SET again The tuned station in step 1 is stored in the preset number selected in step 3 Storing a new station on a used number erases the previously stored one When you unplug the AC power cord or if a power fa...

Page 18: ...folders including the root folder and 640 files on a disc It is recommended that you record your material at a 44 1 kHz sampling rate using the 128 kbps data transfer rate Some MP3 files or discs may not be played back because of their characteristics or recording conditions MP3 discs requires a longer readout time than regular discs because of the complexity of the folder file configuration MP3i ...

Page 19: ...ck number L R sound indicator VCD 2 0 indicator Total track number When a VCD 2 0 disc with PBC function is loaded PBC menu is shown on the TV When playing an MP3 track having ID3 tag Number of the current track on the disc and elapsed playing time appears for 5 seconds from the beginning then TITLE ARTIST and ALBUM information appears on the display ROOT PAGE 01 01 THE ONE HOLDING 8 HOURS LONGEST...

Page 20: ...ly during playback x2 x5 x10 x20 P R E S E GROUP T U P R E P EAT P R O G R A M GROUP SET N W O D T E S E R P OVER To go to another track directly using the number buttons On the remote control ONLY Pressing the number button s before or during playback allows you to start playing the track number you want Ex For track number 5 press 5 For track number 10 press OVER 1 0 For track number 15 press OV...

Page 21: ...ars on the display and the program number returns to P 01 Programming more tracks overwrites the tracks already programmed to those numbers OVER Programming the Playing Order of the Tracks Program Play You can arrange the order in which the tracks play before you start playing You can program up to 40 tracks To use Repeat play see page 18 for Program play press REPEAT after starting Program play P...

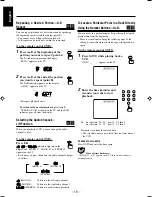
Page 22: ...y RANDOM OFF is shown on the TV RANDOM Playing Repeatedly Repeat Play You can have the disc the program or the individual track currently playing repeat as many times as you like To use Repeat play for a VCD 2 0 with the PBC function deactivate the PBC function See page 21 Press REPEAT To use Repeat play for Program play or Random play press REPEAT before starting playback Each time you press the ...

Page 23: ...L MONO R or STEREO appears on the TV Each time you press the button the audio channel changes as follows MONO L To listen to the left audio channel MONO R To listen to the right audio channel STEREO To listen to normal stereo playback MONO L MONO R STEREO L R To Locate a Particular Point in a Track Directly Using the Number Buttons Go To You can move to a particular point by specifying the elapsed...

Page 24: ...laying the first 10 seconds of all the tracks INTRO SCAN appears on the TV To resume normal playback press DIGEST DISC To select DISC press 2 The unit shows the first image of all the tracks on the disc in every 9 tracks Disc Scan DISC SCAN appears on the TV then Disc Scan starts Press to show images of next 9 tracks press 4 to show previous 9 tracks Press number button s to start playback See pag...

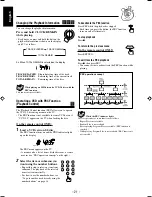
Page 25: ...TRACK REMAIN Remaining time of the current track TOTAL REMAIN Remaining time of the disc While playing an MP3 disc and a VCD 2 0 disc with the PBC function This function is not available TRACK ELAPSED TRACK REMAIN TOTAL REMAIN H B S P R E S E T E Q C L O C K R E M A I N Operating a VCD with PBC Function Playback Control The Playback Control function PBC allows you to operate the VCD 2 0 disc using...

Page 26: ...he right press REW 1 FF while the tape is not running To remove the cassette press STOP EJECT 7 0 To play the tapes in the decks B and A continuously 1 Set the cassette tapes in the decks A and B If the source is not TAPE select the tape for source See page 10 If the tape direction is set wrong replace the cassette 2 Press PLAY 3 for the deck B The tape in the deck B begins to play 3 Press PAUSE 8...

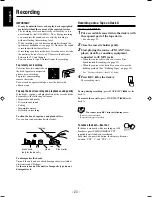
Page 27: ...ing To clean the heads capstans and pinch rollers Use a cotton swab moistened with alcohol To demagnetize the heads Turn off the unit and use a head demagnetizer available at electronics and CD shops As the erase head of the unit is of magnetic type do not demagnetize it Recording Recording onto a Tape on Deck A On the unit ONLY 1 Put a recordable cassette into the deck A with the exposed part of ...

Page 28: ...t another cassette then press REC When disc playback ends press STOP EJECT 7 0 to stop the recording You cannot press REC in the following cases If no cassette is inserted If a protected tape is inserted To stop recording for a moment press PAUSE 8 The recording is paused but the disc playback does not stop To resume recording press PAUSE 8 again To stop recording press STOP EJECT 7 0 The recordin...

Page 29: ...lem with your unit check this list for a possible solution before calling for service If you cannot solve the problem from the hints given here or the unit has been physically damaged call a qualified person such as your dealer for service Troubleshooting Symptom No sound is heard The disc sound is discontinuous No picture is displayed on the TV The disc does not play Impossible to record Operatio...

Page 30: ...pe I 50 Hz 10 000 Hz Wow and flutter 0 15 WRMS General Power requirements AC 110 V 127 V 220 V 240 V adjustable with the voltage selector 50 Hz 60 Hz DC 12V R20 SUM 1 D 13D batteries x 8 Power consumption 30 W at operation 2 W on standby Dimensions approx 270 mm x 274 mm x 298 mm W H D Mass approx 4 1 kg Supplied accessories See page 6 Speaker section SP PCX292V Type 2 way bass reflex magnetically...

Page 31: ...e IMPORTANT for mains AC line BEFORE PLUGGING IN do check that your mains AC line voltage corresponds with the position of the voltage selector switch provided on the outside of this equipment and if different reset the voltage selector switch to prevent from a damage or risk of fire electric shock VOLTAGE SELECTOR ON THE BOTTOM SIDE ...

Reviews: