background image

18

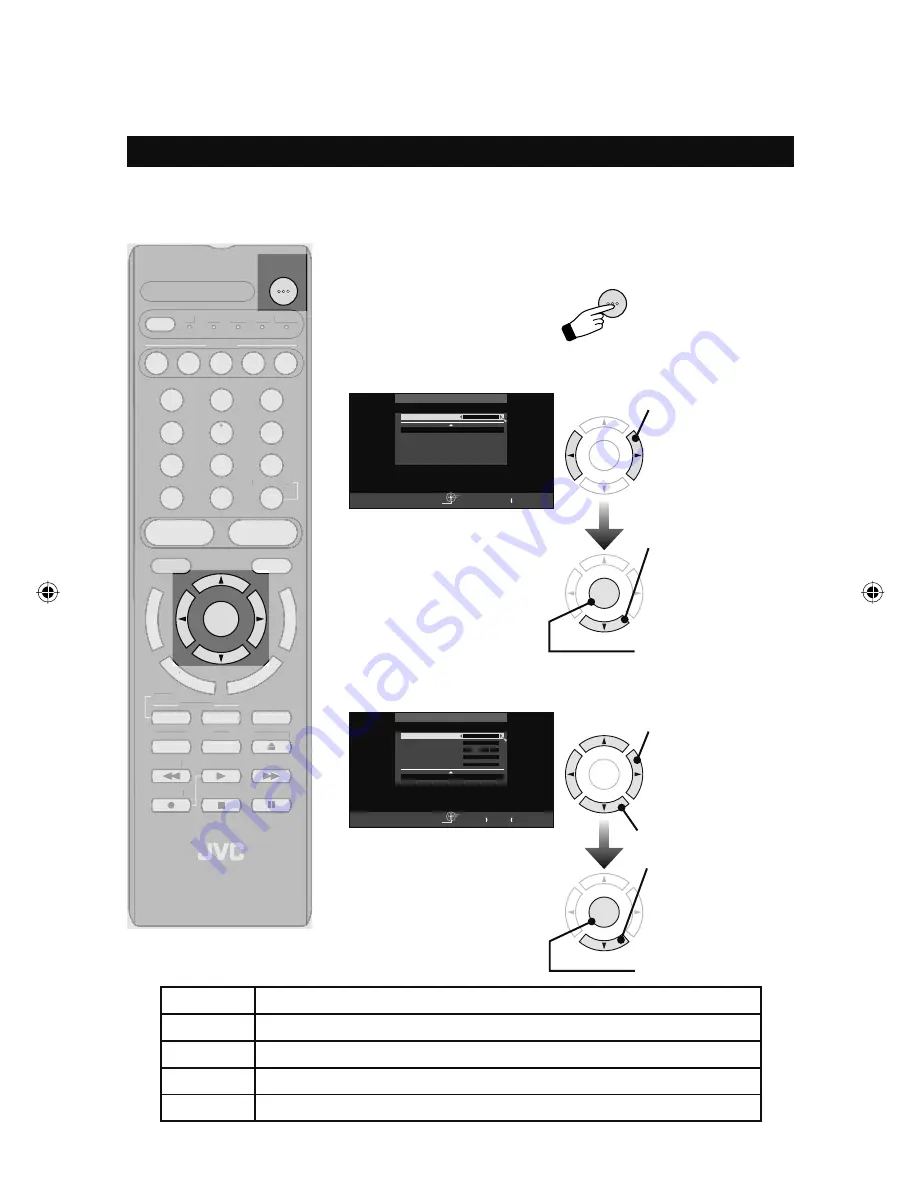
 Interactive Plug-In Menu

When you turn on your TV for the first time, the Interactive Plug-In Menu appears automatically.  
These menus will help you setup your TV with basic information for 

Language

Time

 and 

Tuner Setup

.

Setup

POWER

1)  Turn on the TV

1

 Select a language

Mode

Auto (Analog), Auto (Digital), Manual

Channel

Only can select when 

Mode

 is in 

Auto (Digital)

Time

Only can select when 

Mode

 is in 

Manual

Time Zone

Choose the time zone you live in.

D.S.T.

Changes the clock automatically for daylight saving time.  

On / Off

1

 Change settings

3)  Set time attribute

Select

Operate

Exit

MENU

Interactive Plug-In Menu

> Set Clock

Start Clock

Mode

Channel

Time

Time Zone

D.S.T

Back

BACK

Manual

– –

– –     :     – –     – –

Pacific

Off

2

 Select an item

4

 Move to next menu

3

   Select “Start 

Clock”

OK

OK

2)  Set the language

Select

Operate

Exit

MENU

Language/Langue/Idioma

English

Interactive Plug-In Menu

> Language/Langue/Idioma

Set

OK

OK

2

 Select “Set”

3

 Move to next menu

POWER

MODE

TV

STB

VCR

DVD AUDIO

INPUT

1

2

3

4

5

6

7

8

9

0

TUNE

TV

LIGHT

MUTING

– CH +

– VOL +

RM-C1430

TV

DVR

STATUS

VIDEO

GUIDE

TV/VCR

SUB T.

SUB CH

C.C.

DISPLAY

SOUND

OK

M

E

N

U

FA

VO

RITE

ASP

EC

T

B

A

C

K

V1

V2

V3

V4

V5

SWAP

TWIN

SLEEP

ML/MTS

SELECT

MODE

TV

STB

VCR

DVD AUDIO

INPUT

1

2

3

4

5

6

7

8

9

0

TUNE

TV

LIGHT

MUTING

– CH +

– VOL +

RM-C1430

TV

DVR

STATUS

VIDEO

GUIDE

TV/VCR

SUB T.

SUB CH

C.C.

DISPLAY

SOUND

M

E

N

U

FA

FF

V

AA

O

V

RITE

AS

A P

EC

T

C

B

A

C

K

V1

V2

V3

V4

V5

SWAP

TWIN

SLEEP

ML/MTS

SELECT

LCT2403-001A-A English.indd   18

LCT2403-001A-A English.indd   18

5/2/08   9:59:30 AM

5/2/08   9:59:30 AM

Summary of Contents for LT-42X899 - 42" LCD TV

Page 1: ...he inside cover of this guide Keep this user s guide in a convenient place for future reference Keep the carton and original packaging for future use Model Number Serial Number POWER MODE TV STB VCR DVD AUDIO INPUT 1 2 3 4 5 6 7 8 9 0 TUNE TV RETURN LIGHT MUTING CH VOL RM C1430 TV DVR STATUS VIDEO GUIDE TV VCR SUB T SUB CH C C DISPLAY SOUND OK M E N U F AVORITE ASPECT B A C K V1 V2 V3 V4 V5 SWAP T...

Page 2: ...imer 33 Mode 33 On Time 33 Off Time 33 Channel 33 On Volume 33 Table of Contents Picture Adjust 34 Video Status 34 Natural Cinema 35 Theater Pro I I 35 x v Color 35 Color Temp 35 Color Management 36 Dynamic Gamma 36 Smart Picture 36 Digital VNR 36 MPEG NR 36 Smart Sensor 36 Reset 36 Sound Adjust 37 Balance 37 Turn On Volume 37 Volume Limit 37 Optical Out 38 Reset 38 Features 39 Video 5 Input 39 No...

Page 3: ...ety To prevent electric shock do not use this polarized plug with an extension cord receptacle or other outlet unless the blades can be fully inserted to prevent blade exposure CAUTION To reduce the risk of electric shock Do not remove cover or back No user serviceable parts inside Refer servicing to qualified service personnel The lightning flash with arrowhead symbol within an equilateral triang...

Page 4: ...pecified by the manufacturer 12 Use only with a cart stand tripod bracket or table specified by the manufacturer or sold with the apparatus When a cart is used use caution when moving the cart apparatus combination to avoid injury from tip over 13 Unplug this apparatus during lightning storms or when unused for long periods of time 14 Refer all servicing to qualified service personnel Servicing is...

Page 5: ... is available around the TV to allow satisfactory cooling Have two people remove the TV from the box with the screen facing away from you It s possible your clothing such as a belt buckle or button may scratch the front of the TV Do the same when moving the TV to another location 21 When attaching to a wall use the optional JVC wall mounting unit For LT 42X899 JVC XUF 2637 LCD FLAT WALL MOUNT For ...

Page 6: ...p feature on page 25 Warnings FCC Notice Caution Changes or modifications not expressly approved by party responsible for compliance could void the user s authority to operate the equipment Note This equipment has been tested and found to comply with the limits for a Class B digital device pursuant to Part 15 of the FCC Rules These limits are designed to provide reasonable protection against harmf...

Page 7: ...n with a cloth dipped in a diluted kitchen cleaner and thoroughly wrung out Then wipe immediately after with a clean dry cloth Do not apply alcohol organic solvents like acetone acidic or alkaline cleansers to the screen These will remove the coating layer and cause discolorations Do not push or hit the screen This could cause scratches on the screen surface and image distortions Precautions Displ...

Page 8: ...e TV Note To re install the stand reverse the procedure from 3 to 1 Precautions Tidying the cables A cable holder which keeps your connection cables tidy is attached to the back of the stand Install your TV To prevent the TV from falling thread the belt through the hole on the back of the standand secure it to the TV rack Belt and screw not included Hole ...

Page 9: ...x 2 Television x 1 Remote Control x 1 Package Contents Make sure you have the following Insert the batteries Precautions If this symbol is shown it is only valid in the European Union Your TV has a glossy frame and stand which have protection sheets attached to them Peel them off before use but only after the TV has been properly placed Take care with handling the glossy frame and stand because th...

Page 10: ... volume VOL Move sequentially through the channels CH Lets you go back to the previously selected channel See page 20 TV RETURN Lets you decide the input channel and select it After pressing the remote 0 9 buttons press TUNE TUNE Change channels Input remote codes See page 55 1 2 3 4 5 6 7 8 9 0 TUNE TV RETURN Switch between devices connected to Video 1 2 3 4 and 5 INPUT V1 V2 V3 V4 V5 Switch betw...

Page 11: ...S VIDEO Change the sound mode of the MaxxAudio function See page 21 STAT SOUND Change the aspect ratio of the image on your TV screen See page 20 ASPECT Save your favorite channels See page 20 DVR F AVORITE Remote Control See page 56 for buttons that control your external devices Listen to a program in stereo mono or another language SAP Depending on availability in the program See page 23 ML MTS ...

Page 12: ...n Some of the connection terminals are color coded for easy connection with the proper cables Front Panel Side Panel INPUT MENU C H VOL OK BACK POWER TV Basic Controls Illumination Input Change the input MENU Used to access the TV s onscreen menus CH Move sequentially through the channels VOL Raises or lowers the volume POWER Turn the TV on or off Rear Panel Antenna Cable 75 Ω VHF UHF IR IN F POWE...

Page 13: ...AUDIO L R AUDIO L RS 232C INPUT 5 INPUT 4 INPUT 3 FOR HDMI 1 AUDIO OUT INPUT 5 INPUT 2 INPUT 1 DIGITAL AUDIO OPTICAL OUT PC IN D SUB PHOTO VIEWER H Audio System G Game Console Video Camera STB Digital Cable satellite Tuner Box DVD Player C D E E For more detailed information see pages 48 54 For governing the usage of the RS 232C terminal consult your dealer This is used when you are using a DVI de...

Page 14: ...omponent Video Audio Component Video Audio INPUT 3 or 4 D S Video Audio S Video Cable Audio Cable INPUT 3 AUDIO Input E Composite Video Audio Composite Video Audio INPUT 3 4 or 5 F Antenna Cable VHF UHF RF Cable 75Ω VHF UHF Good Best AUDIO G OPTICAL INPUT OPTICAL AUDIO Cable DIGITAL AUDIO OPTICAL OUT H AUDIO INPUT L R Audio Cable AUDIO OUT L R TV Basic Controls ...

Page 15: ...0i 720p Audio L R Analog See page 51 Input Component Analog SD 480i 480p HD 1080i 720p Audio L R Analog See page 49 Input S Video Analog Audio L R Analog Input Composite Analog Audio L R Analog See page 49 ATSC Digital NTSC Analog Clear QAM Digital See page 48 Output Audio L R Digital PCM or Dolby Digital See page 50 Output Audio L R Analog Fixed See page 50 TV Basic Controls ...

Page 16: ...rols Device Side With Cables TV Side I D SUB Audio 3 5 mm stereo mini jack D sub 15 pin Cable Audio Cable PC IN D SUB PC IN D SUB INPUT 5 AUDIO Input Device Side With Cables TV Side J USB USB Cable PHOTO VIEWER PC USB ...

Page 17: ...rama and Cinema will fill the screen with various aspect settings See page 40 6 Photo Viewer allows you to enjoy your digital pictures stored on your USB Mass Storage Class devices See page 45 i clear Motion NR Provides 3D noise reduction for moving images by applying the high precision motion prediction techniques Real 12bit Driver JVC s new bit extention technology takes 8 bit images and turns t...

Page 18: ...lock Start Clock Mode Channel Time Time Zone D S T Back BACK Manual Pacific Off 2 Select an item 4 Move to next menu 3 Select Start Clock OK OK 2 Set the language Select Operate Exit MENU Language Langue Idioma English Interactive Plug In Menu Language Langue Idioma Set OK OK 2 Select Set 3 Move to next menu POWER MODE TV STB VCR DVD AUDIO INPUT 1 2 3 4 5 6 7 8 9 0 TUNE TV RETURN LIGHT MUTING CH V...

Page 19: ...STATUS VIDEO GUIDE TV VCR SUB T SUB CH C C DISPLAY SOUND OK M E N U F AVORITE ASPECT B A C K SWAP TWIN SLEEP ML MTS SELECT Tuner Mode Choose Air antenna Cable or Skip Scan Mode Auto STD HRC IRC Interactive Plug In Menu Continued LIGHT MUTING CH VOL RM C1430 TV DVR STATUS VIDEO GUIDE TV VCR SUB T SUB CH C C DISPLAY SOUND M E N U F A F F V A A O V RITE AS A PECT C B A C K SWAP TWIN SLEEP ML MTS SELE...

Page 20: ... save channels you like so you can view them easily First you must register the channels you like Notes Go to the channel you want to register and press the FAVORITE button for three seconds To view your favorite channels press FAVORITE Move π to select your channel and press OK To erase your favorite channels press FAVORITE Move π to select your channel and press Both analog and digital channels ...

Page 21: ...ND button You can view program information for Digital Channels Note When the program information is not being broadcast the correct information will not be displayed The GUIDE will not show the correct time and date depending on the Time Zone and D S T settings See page 43 Digital broadcast sometimes offers sub channels By using the SUB CH button you can select a sub channel easily For example to...

Page 22: ...ppear on the left the new channel will appear on the right To turn split screen off and return to normal television viewing press TWIN again or press the BACK button At first select TV mode to use the TWIN function TV MAIN SCREEN PICTURE Video 1 SPLIT SCREEN PICTURE Notes You can enter the TWIN mode when you are in a single screen Split screen functions will not work when you are receiving a 1080 ...

Page 23: ...es you can change the language by pressing the ML MTS button Keep the TV in stereo mode to get the best sound quality The sound will work in stereo mode even if a certain broadcast is in mono sound only Choose the mono setting to reduce excessive noise on a certain channel or broadcast MTS is unavailable if your television s Input source is V1 V2 V3 V4 V5 ML MTS will not work when you are using HD...

Page 24: ...K Enter To the previous screen B A C K 4 Close the menu Note Depending on the situation analog channels digital channels video signal format external inputs etc some items will be displayed in gray and can not be selected English English French Spanish Example Language M E N U POWER MODE TV STB VCR DVD AUDIO INPUT 1 2 3 4 5 6 7 8 9 0 TUNE TV RETURN LIGHT MUTING CH VOL V1 V2 V3 V4 V5 RM C1430 TV DV...

Page 25: ...authorized viewers from watching any or all 181 channels Regarding digital channels the only channels that will appear are the ones that are broadcasting The Channel summary screen will now be displayed with the channels set to scan marked with an Regarding analog channels you can delete channels from the scan by removing the If any channels were missed during auto tuner setup and you wish to add ...

Page 26: ... channel label by selecting the Station column Initial setup Continued Find Channel Allows you to add channels by pressing the 10 key pad Digital Antenna Level This is a bar graph displaying the state of the Digital Antenna Level Tuner Diagnostic Service Use Only The set clock function is described on page 18 as the Interactive Plug In Menu You can choose to set the clock automatically or manually...

Page 27: ...u skipped this step in the initial setup or your setup has changed you can redo your setup in this menu The Interactive Plug in Menu is described on page 18 Software Version You can confirm the TV s software version Auto Demo Auto Demo explains this TV s features to you Notes Please complete the Initial Setup menu first The Auto Demo mode will start automatically when the Interactive Plug In Menu ...

Page 28: ...ayed sometimes This depends on the broadcast you are receiving When entering the password When you try and access the V Chip menu Please input password will appear Press the 0 button four times on your remote to access the V Chip menu for the first time Set US TV RATINGS V FV S L D TV MA TV 14 TV PG TV G TV Y7 TV Y OK 1 Select 2 Lock Unlock 1 2 3 4 5 6 7 8 9 0 When you lock or unlock channels You ...

Page 29: ...s or older TV G General Audience Suitable for all ages TV PG Parental Guidance Suggested Suitable for all ages with parental guidance TV 14 Parents Strongly Cautioned Intended for viewers 14 years or older TV MA Mature Audiences Only Intended for viewers 18 years or older Viewing Guidelines In addition to the above ratings you can also block or allow more specific content Except for unrated progra...

Page 30: ...in a rating G General Audience Suitable for all ages PG Parental Guidance Suggested Suitable for all ages with parental guidance PG 13 Parents Strongly Cautioned Intended for viewers 13 years or older R Restricted Not recommended for viewers 17 years without parental guidance NC 17 No One Under 17 Not intended for viewers 17 years or younger X No One Under 18 Not intended for viewers 18 years or y...

Page 31: ...ous Programs Sports Weather Some Commercials Note TV programs or movies that do not have rating signals will be blocked if the unrated category is set to Block Unrated This setting is based on the Canada rating system E Exempt Any type of programming that does not contain a rating C Intended for children Suitable for all ages C8 Intended for children over 8 years old Suitable for all ages over 8 y...

Page 32: ...ce Mode Auto Manual Font Size Choose how big the text appears in Closed Captioning Font Style Choose the style of the font in Closed Captioning Text Edge Opacity Choose how translucent the text appears in Closed Captioning Background Opacity Choose how translucent the background box color for the Closed Captioning text Text Color Choose the color of the text in Closed Captioning Edge Color Choose ...

Page 33: ...elect timer frequency No Once Everyday Mode You can set the time you want the television to turn itself on On Time You can set the time you want the television to turn itself off Off Time You can set the channel of when On Timer is on Note The On Off Timer cannot be set to locked or guarded channels Channel You can set the volume level when On Timer is on 0 50 Volume level Current Start with curre...

Page 34: ... display to the factory settings Dynamic Gives a vivid picture with better contrast when viewing in a brightly lit room Theater Gives a rich film like look to video when viewing in a dimly lit room Game Used for when you are playing video games connected to your TV Memory 1 Memory 2 You can memorize your favorite picture settings Tint Color Picture Bright Detail Energy Saver Mode Notes Each mode i...

Page 35: ...w Green Cyan Axis Color Mngmt Red Yellow Green Cyan Tint Color Mngmt Red Yellow Green Cyan Color Color Bright Area Color Dark Area Shows the edge of the picture clearly Emphasizes the edge of the picture horizontally Emphasizes the edge of the picture vertically Reduces picture noise Adjusts the screen red blue or green color Adjust the blue color naturally Select a corrected color Adjusts the tin...

Page 36: ...ng digital channels block noise removal will have no effect Digital VNR This function can be selected to change the effect of Digital VNR Video Noise Reduction Auto Max Min Off Smart Picture Allows you to adjust the brightness level automatically to a level suitable for what you are watching On Off Smart Sensor This function automatically adjusts the brightness on your TV according to the amount o...

Page 37: ...mes too loud all of the sudden during commercial breaks etc On Off Note Adjustment made to the four sound features MaxxBass MaxxTreble MaxxStereo and MaxxVolume will be stored in the selected MaxxAudio setting MaxxAudio is a registered trademark of Waves Audio Ltd in the USA Japan and other countries Select Operate Back Exit BACK MENU MaxxAudio MaxxBass MaxxTreble MaxxStereo MaxxVolume Balance Sou...

Page 38: ...his only applies to digital channels Notes Optical Out can be used for both digital and analog channels If your amplifier does not have DOLBY DIGITAL decoder select PCM If you don t select PCM it cannot output the sound from the speakers For connecting an amplifier using the optical output see page 50 Manufactured under license from Dolby Laboratories Dolby and the double D symbol are trademarks o...

Page 39: ...to lock the keys on the side of the TV On Off Front Panel Lock Auto Shut Off will work when there is no signal and there is no TV operation for 10 minutes Auto Shut Off will not work while you are receiving a signal even though there is no TV operation for 10 minutes On Off Note If the channel that you have on does not receive a signal for more than one minute the blinking text No Program or Weak ...

Page 40: ...will appear along the picture s sides The picture will be centered within the boundaries of the 16 9 screen Slim This aspect mode shrinks the screen of a 16 9 broadcast to 4 3 There are some programming that is already stretched by mistake at broadcasting companies so this mode corrects it Black side bars will appear Notes Depending on the signal format some aspect modes are unavailable Slim can o...

Page 41: ...0i and 720p signals or when PC mode is set It is also possible to use Position Adjustment when you are in PC Mode Position Adjustment Select Operate Back Exit BACK MENU Illumination Allows you adjust the brightness of the illumination on the front of the TV High Low Off Power Indicator Allows you adjust the brightness of the POWER LED on the front of the TV High Low Off The HDMI Size menu can only...

Page 42: ...of the device refer to the device s manual Control the HDMI CEC enabled device using the TV Turn off the operating device by turning off the TV Some device may not support this function For more details refer to the device s manual Send status of the TV to the HDMI CEC enabled device When switching the TV s external input or channel When switching the TV s menu language Information regarding behav...

Page 43: ...ot performed the set clock function on your television When the program information is not being broadcasted it will not show the correct information Guide Display Change display of channel banner clock etc Banner Clock Clock Short Banner Off Sleep Timer Allows you to choose how long the TV will stay on before turning off First set the MODE to TV 0 min 15 min 30 min 45 min 60 min 90 min 120 min 18...

Page 44: ...ges you can change the language by pressing the ML MTS button Keep the TV in stereo mode to get the best sound quality The sound will work in stereo mode even if a certain broadcast is in mono sound only Choose the mono setting to reduce excessive noise on a certain channel or broadcast MTS unavailable if your television s input source is V1 V2 V3 V4 V5 ML MTS will not work when you are using the ...

Page 45: ...er to the Customer Support website at www jvc com support for information and notes regarding your devices you wish to connect Supported file formats are jpg or JPG All your stored data should be backed up first as a precaution before connecting to the TV Depending on your stored file size it can take extra time to display Photo Viewer page Select Operate Back Exit BACK MENU Photo Viewer Photo Vie...

Page 46: ...ral times Preview Guide You can display control help screen when you watch the picture On Off Multi Screen continued Reset Exit Guide Back BACK MENU Next Prev VOLUME ROTATE DISPLAY VOL 90º right handed rotation VOL 90º left handed rotation 123456789 Move to display area in each direction only when zoomed in 5 Resets to default condition π Zoom in Zoom back BACK Back to Multi screen MENU Back to TV...

Page 47: ... in 5 patterns randomly of Fade Slide Wipe Zoom and Blind Slide Show Transition Allows you to change Slide Show interval 1 10 15 20 30 45 60 90 120 Manual Manual You can slide the picture by pressing the buttons Note Slide Show may take extra time more than what you set in the Interval Time This depends on how large the file size is of the picture Interval Time sec ...

Page 48: ... 75 Ω VHF UHF IR IN TV Rear Panel Cable or Antenna Output Connect a Cable Box 75 Ω VHF UHF IR IN Cable or Antenna Output TV Rear Panel CABLE BOX IN OUT Note To view channels on your cable box make sure your TV s channel is set to 2 3 or 4 depending on the area you live in Connecting Your Devices Notes If you are able to receive ATSC Digital terrestrial signal High Definition HD broadcasting can be...

Page 49: ...yer INPUT 4 Y VIDEO R AUDIO L INPUT 3 Y PR PB VIDEO R AUDIO L S VIDEO PR PB VIDEO R AUDIO L INPUT 5 DVD Player Y PB PR OUT AUDIO OUT R L Green Blue Red TV Rear Panel INPUT 4 Connect a Camcorder INPUT 4 Y VIDEO R AUDIO L PR PB R AUDIO L INPUT 5 TV Rear Panel INPUT 4 Camcorder Note To watch video from your camcorder make sure your TV is displaying INPUT 3 INPUT 4 or INPUT 5 by pressing the V3 V4 or ...

Page 50: ...e 38 PC IN D SUB PHOTO VIEWER DIGITAL AUDIO OPTICAL OUT INPUT 5 INPUT 2 INPUT 1 TV Rear Panel DIGITAL AUDIO OPTICAL OUT Speaker Speaker Amplifier with DIGITAL AUDIO OPTICAL INPUT Connect an Amplifier or Home Theater System UDIO OUT FOR HDMI 1 R AUDIO INPUT L UDIO OUT AUDIO OUT R AUDIO L TV Rear Panel AUDIO OUT Speaker Speaker Amplifier or Home Theater System Note Refer to your amplifier s or Home ...

Page 51: ... R AUDIO L S VIDEO UDIO OUT AUDIO OUT R AUDIO L PC IN D SUB PHOTO VIEWER DIGITAL AUDIO OPTICAL OUT INPUT 5 INPUT 2 INPUT 1 TV Rear Panel INPUT 1 Digital TV Device TV Rear Panel FOR HDMI 1 HDMI ANALOG AUDIO After the connections have been made tighten the screw to secure the cables DIGITAL OUT L R AUDIO OUT Connecting Your Devices Connect a IR IN Device 75 Ω VHF UHF IR IN TV Rear Panel IR Device se...

Page 52: ...his TV can accept 480i 480p 720p 1080i and 1080p signals via HDMI This JVC television can accept a variety of HD signals including 1080 60p 1080 60i 1080 30p 1080 24p and 720 60p Please use a High Speed HDMI Cable High Speed HDMI Cables are tested to carry an HD signal up to 1080p and higher Some HDMI Output Devices may fail to detect this TV as a 1080p device If this occurs manually select 1080p ...

Page 53: ... Receiver s manual for more information on connecting your speakers and other devices Use your AV Receiver s remote to switch to the different devices you have connected Some AV Receivers may not respond when the V3 Smart Input function is turned on Your AV Receiver s signal priority in order is Component S VIDEO and Composite Connect an AV Receiver using SMART INPUT INPUT 3 UDIO OUT FOR HDMI 1 R ...

Page 54: ...age 39 Use a D SUB cable with ferrite cores and no longer than 3 Meters to avoid electromagnetic disturbances Refer to your computer s manual for more information Resolution 640 x 480 VGA 800 x 600 SVGA 1024 x 768 XGA Vertical Frequency Hz 60 60 60 Horizontal Frequency kHz 31 5 37 9 48 4 Notes Depending on signal quality some pictures may not be displayed correctly Computers that cannot set the re...

Page 55: ... 55 Some codes may have only limited functions Try other codes that may have more functions Programming Your Remote 1 2 3 4 5 6 7 8 9 0 Search Code Function This function searches for codes one by one if none of the codes listed for your device has worked 1 Manually turn on the device 2 Change the remote control mode according to the device Press MODE to select the correct mode 3 Activate the sear...

Page 56: ...ramming Your Remote Remote Control Functions MODE TV STB VCR DVD AUDIO POWER Operates menus Changes the remote control mode Turns the selected device off OK M E N U F A T B A C K Select OK Display menu Back to previous menu Playback Record etc SWAP TWIN SLEEP ML MTS SELECT Rewind Play Forward Record Stop Pause Displays Subtitles SUB T C C Channel Up Down Volume Up Down Open Close S VOL CH Audio In...

Page 57: ... Level Panasonic Pansat Paysat Philips Proscan Proton RadioShack RCA 0772 0216 1806 1109 1377 0392 0566 0639 1639 1142 0247 0749 1749 0724 0819 1856 1076 1108 0099 1109 1414 1442 1609 1392 1640 1505 1005 0775 1170 1775 1505 1005 0775 1775 1505 1005 0775 1170 1775 0775 1775 0566 0869 0775 1775 1535 0819 0775 1775 1142 0749 1749 1442 1790 1535 0775 1170 1775 1414 0724 0722 0724 0749 0869 0869 0247 0...

Page 58: ...Magnin Marantz 0047 0104 0046 0035 0033 0000 0593 1593 0000 1972 0060 0035 0240 0202 0760 0761 0807 1035 1060 0432 0526 0037 0209 0038 0225 1237 0000 0000 0081 0038 0072 0046 1972 0047 0037 0240 0000 0042 0041 0105 1037 1972 1972 0042 0739 0739 1972 1972 0041 0045 0067 0041 0008 0366 1707 1945 1774 1775 1776 1777 0037 0278 0067 0041 0038 0072 0035 0037 0037 0045 0042 0209 0038 1037 1972 0000 0208 ...

Page 59: ...deo Concepts Videomagic Videosonic Viewsonic Villain Voodoo Wards White Westinghouse XR 1000 Yamaha Zenith ZT Group Echostar Hughes Network Systems JVC Philips Samsung ABS Alienware CyberPower Dell DirecTV Dish Network System Echostar Gateway Hewlett Packard 0000 0593 1593 1972 1972 0081 0045 0000 0067 0041 0008 0366 0000 0041 0035 0162 0035 0037 0000 0000 0618 0636 0739 1996 0240 0208 0081 0045 0...

Page 60: ...estar RCA Rio Rotel Sampo Samsung Sansui Sanyo Sensory Science Sharp Sharper Image Sherwood Shinsonic Sonic Blue Sony Superscan Sylvania Symphonic Teac Technics Theta Digital Tivo Toshiba Urban Concepts US Logic Venturer Xbox Yamaha Zenith 0503 0539 0646 0675 0821 1268 0539 0695 0831 1270 0522 1708 0839 0717 1521 0521 0741 0785 0717 1402 1003 1107 0503 0627 0651 0490 0703 1362 1462 1490 1762 0503 ...

Page 61: ...37 1293 1869 1497 1189 1269 0531 1514 1189 1269 0891 1289 1393 1751 1389 1751 1389 0135 0842 1298 1320 1531 1023 0531 1074 1366 1497 1308 1518 0367 1288 1316 1548 1633 1763 1764 1189 1269 0891 1266 1289 1673 1023 0014 0150 0531 0630 1123 1384 1823 1508 1289 1414 1254 1023 1609 1254 0531 1074 1123 1390 1511 1437 1869 0531 1519 1295 1500 1764 1251 1469 0771 1286 1556 1517 1653 1426 1602 1532 1869 10...

Page 62: ... far from the TV You must be within 23 feet 7 meters Make sure nothing is connected to the IR IN terminal except for an IR device Make sure the set did not become unplugged Perhaps the Auto Shut Off is set See page 33 Check to see if the Sleep Timer was set See page 43 Tint and Color may be improperly adjusted See page 34 The Video Status mode may be turned to the wrong setting See page 34 There c...

Page 63: ... page 23 This OSD appears when the digital channel that you have selected is too weak to receive or no signal is being detected for that channel Weak Signal appears It appears when that channel is not receiving a signal and you have the Noise Muting function OFF and you have a single screen It moves automatically every two seconds to prevent the screen from burn in Even if NO PROGRAM appears on th...

Page 64: ...nput 4 Y 1 Vp p positive 75 ohms negative sync provided C 0 286 Vp p burst signal 75 ohms Video 1 Vp p 75 ohms Audio 500 mVrms 4dBs high impedance Input 3 4 Terminal Component Terminal 1080i 720p 480p 480i Y 1 Vp p positive 75 ohms negative sync provided PB PR 0 7 Vp p 75 ohms Input 1 2 5 Terminal HDMI Input Terminal Video 1080 60p 1080 30p 1080 24p 1080i 720p 480p 480i Audio 2ch PCM 32 44 1 48 KH...

Page 65: ...rized service center nearest you If shipping the product to the service center please be sure to package it carefully preferably in the original packaging and include a brief description of the problem s Please call 1 800 252 5722 to locate the nearest JVC authorized service center Service locations can also be obtained from our website http www jvc com If your product qualifies for in home servic...

Page 66: ...rviceable parts inside Please refer to qualified service personnel for repairs NEED HELP ON HOW TO HOOK UP NEED ASSISTANCE ON HOW TO OPERATE NEED TO LOCATE A JVC SERVICE CENTER LIKE TO PURCHASE ACCESSORIES THANK YOU FOR PURCHASING THIS JVC PRODUCT WE WANT TO HELP YOU ACHIEVE A PERFECT EXPERIENCE Remember to retain your Bill of Sale for Warranty Service TOLL FREE 1 800 252 5722 http www jvc com ...

Page 67: ...67 Notes ...

Page 68: ...fter the end of full power analog TV broadcasting in the United States on February 17 2009 Some older television receivers if they rely on a TV antenna will need a TV Converter to receive over the air digital programming but should continue to work as before for other purposes e g for watching low power TV stations still broadcasting in analog watching pre recorded movies or playing video games Fo...

Reviews: