background image

12

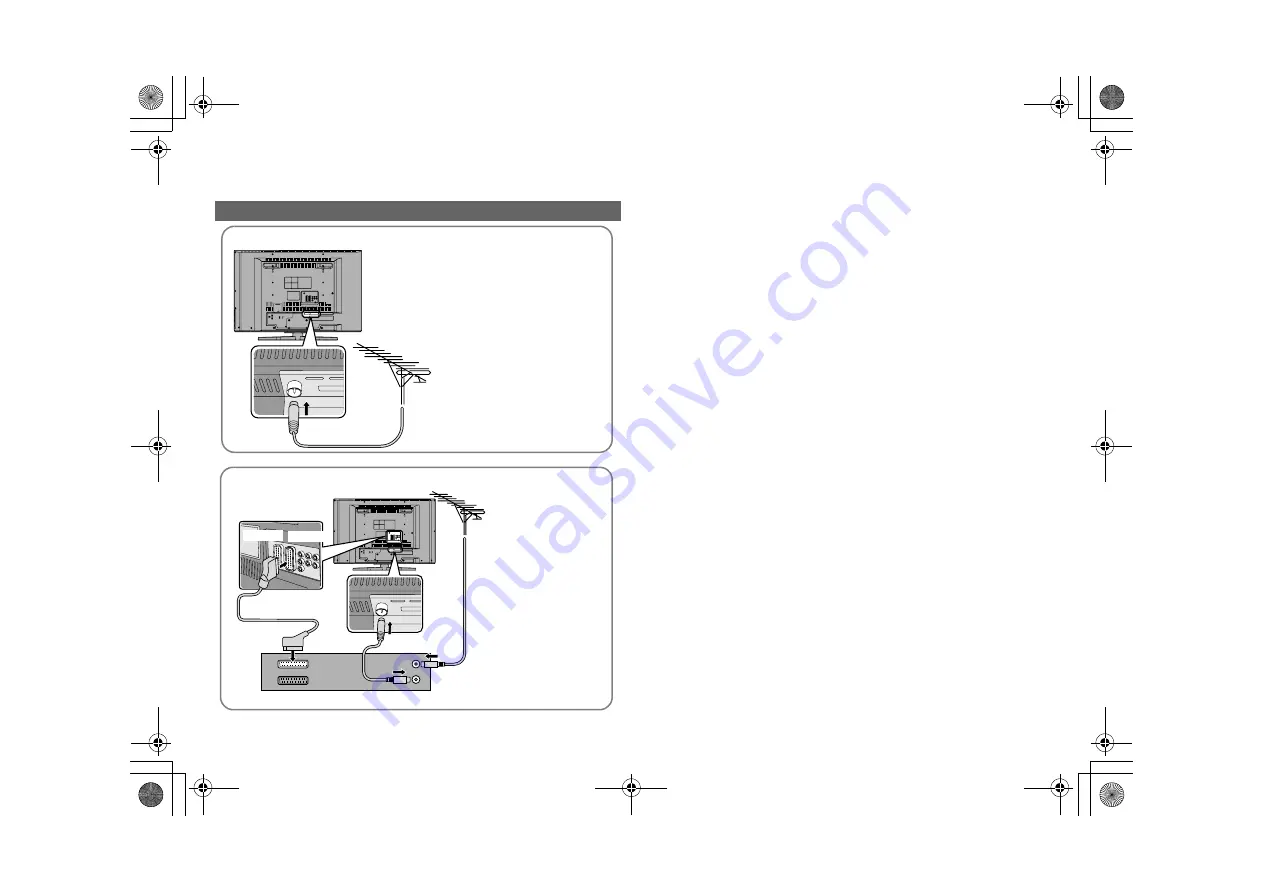
Connecting the aerial

AERIAL

z

After all the connections 

have been made, insert the 

plug into an AC outlet.

Connect the aerial

AERIAL

Connect a VCR / DVD recorder

z

After all the 

connections have 

been made, insert 

the plug into an AC 

outlet.

VCR / DVD recorder

EXT-2

EXT-1

Getting started

LT-42R10BU_EN.book  Page 12  Thursday, December 11, 2008  10:14 AM

Summary of Contents for LT-32R10BU

Page 1: ...D LCD TV TELEVISOR CON PANEL LCD PANORÁMICO TV LCD WIDESCREEN NESTEKIDENÄYTÖLLÄ VARUSTETTU LAAJAKUVATELEVISIO WIDE SCREEN LCD TV BREDBILDS LCD TV INSTRUCTIONS BEDIENUNGSANLEITUNG MANUEL D INSTRUCTIONS GEBRUIKSAANWIJIZING MANUAL DE INSTRUCCIONES ISTRUZIONI KÄYTTÖOHJE INSTRUKTIONSBOG BRUKSANVISNING GGT0298 001A L LT 42R10BU_EN book Page 0 Thursday December 11 2008 10 14 AM ...

Page 2: ...LT 42R10BU_EN book Page 0 Thursday December 11 2008 10 14 AM ...

Page 3: ... of these products For more information about collection points and recycling of these products please contact your local municipal office your household waste disposal service or the shop where you purchased the product Penalties may be applicable for incorrect disposal of this waste in accordance with national legislation Business users If you wish to dispose of this product please visit our web...

Page 4: ...sumes no responsibility for damage due to improper mounting Do not allow the TV to fall z Do not rest your elbows on or allow children to hang from the TV There is a risk that the TV will fall and cause injuries If the TV is damaged or behaving strangely stop using it at once g Unplug the power cord and contact your retailer Take care when handling the glossy finish z For more details see P 7 Hand...

Page 5: ...AGE 14 PAGE First things first z Warning 2 Getting started z Remote control 4 z Names and functions of parts 6 z Getting started 8 Let s try it out Try the advanced features z Enjoy your new TV 16 z Watching TV 17 z Viewing teletext 18 z Watching videos DVDs 19 z Useful functions 20 Just the way you like it z Configuring your remote control 22 z Customising your TV 24 Picture 24 Features sub menu ...

Page 6: ...s DVDs P 19 Colour buttons Select a page when viewing teletext Operate functions in menus Switch between TV STB DVD AUDIO P 22 STB AUDIO Return to TV Display on screen menu Customising your TV P 24 Select and confirm settings in menus Change channel page Volume control View teletext Viewing teletext P 18 To the previous channel Hold the current page when viewing teletext P 19 Display your favourit...

Page 7: ... teletext P 19 Choose a favourite channel P 17 Display sub pages when viewing teletext P 18 Save your favourite page when viewing teletext P 18 Switch briefly from teletext to TV when viewing teletext P 19 Display the index page when viewing teletext P 19 Change the aspect ratio P 20 Turn on 3D Cinema Sound P 20 Change the sound mode or language P 21 Set the sleep timer P 21 Note LT 42R10BU_EN boo...

Page 8: ...by the TV Headphone jack stereo mini jack R3 5 mm Change channel EXT terminal To switch to an external input press P repeatedly Volume Eco Sensor g What is Eco Sensor P 32 ON Lit OFF Unlit z When Power Lamp is set to Off the Power lamp will not light up g Power Lamp P 27 Note Names and functions of parts LT 42R10BU_EN book Page 6 Thursday December 11 2008 10 14 AM ...

Page 9: ...ced properly z If the glossy finish gets dirty clear the dust off the glossy finish first Then wipe softly with the cleaning cloth provided If you do not clear the dust first or you wipe the glossy finish too hard or a cleaning cloth other than the one provided is used the glossy finish may be scratched Change the direction of TV Handling the glossy finish of the TV Glossy finish Attach the stand ...

Page 10: ...om the surface of the TV LT 42R10BU M5 x 4 400 mm x 200 mm Depth of screw hole is 13 mm from the surface of the TV 䡵 Installation requirements z Place the TV on a flat and stable location z To avoid overheating ensure the unit has ample room Use two AAA R03 dry cell batteries Insert the batteries from the end making sure the and polarities are correct Check accessories Install your TV Remote contr...

Page 11: ...Please read the user manuals of each device before setting up z Connecting cables are not supplied with this TV Connecting your external devices Note Audio system Satellite broadcast tuner VCR DVD recorder EXT 1 AUDIO OUT EXT 4 HDMI 1 EXT 5 HDMI 2 EXT 6 HDMI 3 HD Video camera Digital Satellite broadcast tuner DVD player Video camera Game consoles Not available For service adjustments DVD player D ...

Page 12: ... 60Hz 720p 750p Audio L R If there is no sound change the HDMI 1 Audio Setting P 28 Please use a High Speed HDMITM Cable High Speed HDMITM Cables are tested to carry an HD signal up to 1080p and higher B DVI Audio DVI HDMI cable Audio cable EXT 4 EXT 3 L and R jacks Input z DVI digital ED 576p 625p 480p 525p HD 1080i 1125i 1080p 1125p 24Hz 1080p 1125p 50Hz 1080p 1125p 60Hz 720p 750p z Audio L R an...

Page 13: ... analogue If you want to input the S Video signal change the Ext Setting P 29 Select the dubbing source in Ext Setting P 29 Good E Video and audio Video and audio cable EXT 3 V L R jacks Input z Composite video analogue z Audio L R analogue Change the EXT 3 setting from component to composite P 29 Audio system Connecting cables Connect to your TV Available signals Notes F Audio input Audio cable A...

Page 14: ...de insert the plug into an AC outlet Connect the aerial AERIAL Connect a VCR DVD recorder z After all the connections have been made insert the plug into an AC outlet VCR DVD recorder EXT 2 EXT 1 Getting started LT 42R10BU_EN book Page 12 Thursday December 11 2008 10 14 AM ...

Page 15: ...ke changes later g Language and Auto Program P 28 Suomi Română Türkçe Language Svenska Norsk Dansk Nederlands Castellano Italiano Deutsch Français English Català Português Magyar Polski B set A select 4 Select the country of installation z If the country you want to select is not available press the yellow button to check the next page 5 Automatically register channels z If ACI Start appears start...

Page 16: ...t function ID Insert Delete Manual Move Next Move Move a channel s position PR ID Edit a channel name ID Insert Insert a new channel directly by entering the CH CC number Delete Delete a channel z Pressing the button deletes the channel set select 䡵 When selecting a preset name from the ID List B set A select character B move position C set A select enter the first character blue 䡵 Naming a channe...

Page 17: ...g Repeat the previous steps until the desired channel is displayed A Search a channel Fine tune B Set Select a system z If necessary press X to change the broadcasting system g Receivable broadcast systems P 32 AV PR ID Manual CH CC 01 02 03 CH 03 04 CH 04 05 06 07 05 CH 06 CH 01 CC 02 CC B G ARD _ _ _ _ _ _ 02 CH LT 42R10BU_EN book Page 15 Thursday December 11 2008 10 14 AM ...

Page 18: ... ID 䡵 Picture settings Picture Mode Features etc 䡵 Sound settings Stereo t u 3D Cinema Sound etc 䡵 Set Up settings Auto Program Language etc 䡵 Features settings Sleep Timer Child Lock etc Customising your TV 䡵 Change the aspect ratio 䡵 Change the sound mode or language 䡵 3D Cinema Sound 䡵 Emphasize the bass sound 䡵 Set the sleep timer LT 42R10BU_EN book Page 16 Thursday December 11 2008 10 14 AM ...

Page 19: ...ct B view A select z Close PR List 䡵 Press a channel number 䡵 Move up or down a channel E g 15 1 up down Note While the channel is displayed Press the number to register it on The following Picture and Sound menu settings applied to the channel will be stored in the favourite channel as well z Picture Mode Digital VNR DigiPure P 24 25 z Surround Bass Boost MaxxBass P 26 䡵 Recall the favourite chan...

Page 20: ...Display your favourites list 2 Select a coloured button to save your page to 3 Enter the number of the page to save 4 Save 䡵 Recall your favourite page 1 Display your favourites list 2 Press a coloured button red green yellow blue 䡵 Exit g red green yellow blue Viewing teletext 1 2 Enter a teletext page 䡵 Move up or down a page TEXT TV TEXT up down When watching TV LT 42R10BU_EN book Page 18 Thurs...

Page 21: ...t Leave the current page open while you switch to watch TV z Useful when running a page search Returns to page 100 or a previously designated page 䡵 To return to TV channels z Press the TV button or select ATV from the Ext Mode menu 1 Select the video source 2 Operate the connected device and play a video Ext Mode ATV EXT 1 EXT 2 EXT 3 HDMI1 HDMI2 HDMI3 0 1 2 3 4 5 6 E g For EXT 1 B watch A select...

Page 22: ...eadphones Hyper Sound P 26 Ambient sound z Hyper Sound and 3D Cinema Sound cannot be set to On simultaneously z Hyper Sound does not work with headphones 1 2 Select the aspect ratio 3 z When Slim is selected a 4 3 image stretched out to 16 9 will revert back to its original aspect ratio with black bands z When Panoramic Zoom is selected a 4 3 image with black bands will be stretched out to 16 9 z ...

Page 23: ...m z There are more functions available in the menus see Customising your TV P 24 29 1 2 Select the sound mode or language z When viewing a bilingual broadcast programme you can select either Bilingual I Sub I or Bilingual II Sub II sound z If the stereo broadcast reception is poor you can change to mono sound for clearer sound A select B set Sound Off Off Bass Treble Balance Hyper Sound 3D Cinema ...

Page 24: ...and from the Remote control codes list Refer to P I X at the back of this manual 4 Set the remote control code z The indicator will unlit for a second after entering the four digit remote control code number TV STB AUDIO DVD Press and hold Enter four digit number Release the button 5 Point the remote control at your device press and confirm that your device is turned off If your device does not re...

Page 25: ...ress to select the mode 3 Activate the search code function Hold down and until the mode indicator blinks 4 Point the remote control at your device and press If there is no response try the next code by pressing and press again Repeat the process until your device turns off 5 Press to register the code The code is now set Confirm that the mode indicator goes out 䡵 If your TV s remote control still...

Page 26: ...ction Colour System 4 3 Auto Aspect Off Off Auto On On On On On Picture Mode Bright in a fairly bright room Soft in a dark room Standard in a room with standard brightness Game Mode when playing video games Backlight Backlight brightness Darker l Brighter Contrast Contrast Lower l Higher Brightness Brightness Darker l Brighter Sharpness Sharpness Softer l Sharper Colour Colour Lighter l Deeper Hue...

Page 27: ...c Backlight Reduce the brightness of the backlight when the screen is dark On Off Features sub menu Digital VNR DigiPure Movie Theatre Colour Management Picture Management Smart Picture Dynamic Backlight MPEG Noise Reduction Colour System 4 3 Auto Aspect Off Off Auto On On On On On Features MPEG Noise Reduction Reduce MPEG video noise On Off Colour System When there is no colour change the colour ...

Page 28: ...ost Emphasize the bass sound Low Mid High Auto Volume Control Maintains a uniform sound volume even if the sound becomes loud suddenly during commercial breaks etc On Off z To turn on off the 3D Cinema Sound refer to 3D Cinema Sound P 20 z 3D Cinema Sound does not work with headphones MaxxBass Compensates low frequencies to widen the frequency band Low High Off z MaxxBass does not work with headph...

Page 29: ... No 0 0 0 0 C set A select a number B to the next column ARD _ _ _ _ _ _ AV PR ID CH CC 01 02 CH 02 03 CH 03 04 CH 04 05 06 07 05 CH 06 CH 01 CC 02 CC Child Lock select blue Lock Release Blue Back Displays a blue screen and mutes the sound when the signal is weak or absent On Off Favourite Setting Remove a channel from the Favourite channel list 䡵 For more details g Register a channel to a button ...

Page 30: ...ia España France Deutschland United Kingdom Country Norge Suomi Sverige Österreich Danmark Switzerland Ireland Auto Program blue Auto Program CH 02 0 ARD _ _ _ _ _ _ AV PR ID Edit CH CC 01 CH 02 CH 03 CH 04 05 06 07 CH CH CC CC 02 03 04 05 06 01 02 Edit Manual g Editing channels P 14 Language Select a language for the menus Ext Setting g Setting external terminals P 29 HDMI 1 Audio Setting Set to ...

Page 31: ... ID List S In Arrow Select an EXT Select the arrow select select S In Switch to S Video input ID List Edit names of connected devices Dubbing Set up dubbing on EXT 2 A Select EXT 3 B Set to component input 䡵 Cancel this mode g Press yellow again z mark will appear at the selected EXT z The device selection display will change from E2 to S2 yellow A Show the name list B Select a name from the list ...

Page 32: ...ears unnatural when receiving a signal from a DVD player etc with 576p 625p change the output setting of the external device to 576i 625i LCD Troubleshooting Severe noise or snow z Is the TV connected correctly to the aerial z Change the direction of the aerial z Is the aerial or its cable damaged g Consult your retailer Patterns stripes or noise z Is the aerial receiving interference from high vo...

Page 33: ...uation some function items will be displayed in black colour and will not work P 24 HDMI Wrong screen size z Read the user manual of the connected device and perform the following g Check if the output setting of the device is correct g Change the signal format of the device to other format No picture no sound z Use the cable marked with HDMI logo No sound z Check if the device is compliant with H...

Page 34: ...creen automatically adjusts to the optimum contrast of light and dark according to the brightness of your room This function reduces eyestrain and the power consumption of this TV z Set Eco Sensor g Eco Sensor P 27 z Make sure not to block the Eco Sensor on front of the TV P 6 z To fully reduce eyestrain and the power consumption of this TV Set to the following functions Eco Sensor On or Demo P 27...

Page 35: ... F59 CH 38 CH 238 E38 R38 CH 110 F10 CH 160 F60 CH 39 CH 239 E39 R39 CH 121 F21 CH 161 F61 CH 40 CH 240 E40 R40 CH 122 F22 CH 162 F62 CH 41 CH 241 E41 R41 CH 123 F23 CH 163 F63 CH 42 CH 242 E42 R42 CH 124 F24 CH 164 F64 CH 43 CH 243 E43 R43 CH 125 F25 CH 165 F65 CH 44 CH 244 E44 R44 CH 126 F26 CH 166 F66 CH 45 CH 245 E45 R45 CH 127 F27 CH 167 F67 CH 46 CH 246 E46 R46 CH 128 F28 CH 168 F68 CH 47 CH...

Page 36: ...16 cm normal x 2 4 cm x 16 cm oblique x 2 Power consumption standby 142 W 0 4 W 210 W 0 6 W Screen size visible area size measured diagonally 81 cm 107 cm Connectors HDMI 1 x 3 RCA x 7 component or composite video audio L R Euroconnector SCART x 2 For details g P 10 11 Headphone jack Stereo mini jack 3 5 mm in diameter x 1 Dimensions W x H x D mm without stand 791 x 570 x 279 791 x 521 x 104 1014 ...

Page 37: ...659 Allsat 0200 Alltech 0713 Allvision 1232 1334 1412 Amitronica 0713 Ampere 0132 0396 Amstrad 0132 0396 0501 0713 0847 1113 1175 1693 Anglo 0713 Ankaro 0713 Anttron 0613 Apollo 0455 Apro 1672 Arcon 1075 Armstrong 0200 Arnion 1300 Asat 0200 ASCI 0114 1334 ASLF 0713 AssCom 0853 Aston 1261 Astra 0607 0713 Astratec 1743 Astro 0173 0501 0607 0613 0658 1099 1100 1113 Atsat 1300 AtSky 1334 Audioline 167...

Page 38: ...0480 0504 0553 0613 0658 0713 0818 1416 1561 1567 Kenwood 0853 Key West 0132 Kiton 0114 Konig 0607 KR 0613 Kreiling 0114 0658 1480 Kreiselmeyer 0173 Kyostar 0613 L S Electronic 0132 1334 Labgear 1296 LaSAT 0132 0173 0299 0607 Legend 1718 Lemon 1334 Lenco 0607 0713 Lenson 0501 LG 1075 Lifesat 0132 0299 0713 Listo 1626 Lodos 1284 Logik 1284 Logix 1075 Lorenzen 0132 0299 0607 1161 1294 1579 Luxor 050...

Page 39: ...132 0396 0713 1113 1232 1273 1404 1413 Sony 0282 0292 0455 0847 0853 1558 SR 0132 Starland 0713 Starlite 0200 Stream 1848 Strong 0132 0613 0713 0820 0853 1159 1284 1409 1626 1765 Sunny 1300 Sunsat 0713 Sunstar 0132 0642 Supratech 1413 Systec 1334 Tantec 0455 Tatung 0455 Tboston 1659 Tecatel 1200 TechniSat 0114 0396 0455 0501 1099 1100 1195 1197 1322 Technomate 1283 1610 Technosonic 1672 Technotren...

Page 40: ... AKI 1005 Akura 0898 1051 1140 1233 1367 Alba 0539 0672 0695 0699 0713 0730 0783 1140 1530 1695 Alize 1151 All Tel 1451 Altacom 1224 Amitech 0770 0850 Amoi 0852 Amstrad 0713 0770 1151 1367 AMW 0872 Ansonic 0774 0831 1316 Apex Digital 0672 1004 Arena 1115 Aria 0893 Arianet 0818 0893 Aristona 0539 0646 ASCOMTEC 1923 Asono 1224 Astro 1513 Atacom 1224 Audiola 1660 Audiosonic 1923 Audix 0713 Autovox 07...

Page 41: ... 0730 0770 Home Tech Industries 1224 HotMedia 1152 Humax 0646 Hyundai 0850 1660 IISonic 1508 Ingelen 0788 Inno Hit 0713 Irradio 0869 1115 1224 1233 IRT 0783 ISP 0695 Jamo 1036 Jaton 0665 JDB 0730 JDV 1367 Jeken 0699 JMB 0695 JVC 0503 0539 0623 1164 1241 1275 1550 1597 1602 1701 1860 1863 1940 jWin 1051 Kansas Technologies 1233 1530 Karcher 0783 Kendo 0672 0699 0713 0831 Kennex 0713 0770 0898 Kenwo...

Page 42: ...3 1394 1423 1923 Seeltech 1224 1451 1513 1643 SEG 0665 0713 0763 0872 1483 1530 1994 Shanghai 0672 Sharp 0630 0675 0713 0752 1419 2015 2024 Sherwood 0741 Siemssen 1382 Sigmatek 1005 1224 Siltex 1224 Silva 0788 0898 Silva Schneider 0831 0898 SilverCrest 0131 1152 Sinudyne 1221 1316 Sistemas 0672 Skantic 0539 0713 Skymaster 0730 0768 Skyworth 0898 Sliding 1115 SM Electronic 0730 0768 1152 Smart 0713...

Page 43: ...21 LG 0741 Lifetec 1347 LiteOn 1158 1416 Loewe 0741 Lumatron 1321 Luxor 1730 Mastec 1221 Matsui 1730 MBO 1730 Medion 1347 MiCO 0751 1221 Mustek 1730 Oopla 1158 Packard Bell 1321 Panasonic 0490 1010 1011 1579 Philips 0646 1158 Pioneer 0631 ProVision 1321 Pye 0646 Relisys 1347 Roadstar 1227 Samsung 1635 ScanMagic 1730 Schneider 0646 SEG 1530 Sharp 1419 Sinudyne 1221 Sony 1033 1070 2132 Star Clusters...

Page 44: ...3 Goodmans 0713 0879 Grandin 0713 Grundig 0539 0695 Hitachi 0713 JDV 1367 Kotron 0879 Logik 0713 Luker 1367 Luxor 0713 Matsui 0713 Maxim 1367 Medion 0879 Mirror 0879 Naiko 1367 Narita 1367 Neovia 1271 Orion 0695 Pacific 0695 Philips 0539 Roadstar 0879 Saivod 1367 Schneider 1367 SEG 0713 Sliding 1115 Stevison 1367 Technica 1367 Thomson 0551 Toshiba 0695 United 0713 1367 Universum 0713 Amplifier Ver...

Page 45: ...554 Tevion 1389 1611 Thomson 1154 1354 Thorens 1189 Thorn 0744 Tokai 1390 Toshiba 1572 United 1390 1772 Universum 0609 0744 0797 1220 1390 1609 Venturer 0797 1390 Vestel 1554 Victor 0074 Waitec 1352 Watson 0797 Welltech 0797 Wharfedale 1390 1772 Xenius 1390 Yamaha 0176 0186 0712 1276 1331 1949 Yukai 1352 Zenith 0744 Home Theater in Box Heimkino Box Home Theater in Box Thuistheater in doos Cine en ...

Page 46: ...raf i Boks Home Theater in Box Sunstech 1420 Tandberg 1554 Targa 1293 Technics 1763 1765 Techwood 1554 Tevion 1389 1611 Tokai 1390 Toshiba 1572 United 1390 1772 Universum 1220 1390 1609 Venturer 1390 Vestel 1554 Waitec 1352 Wharfedale 1390 1772 Xenius 1390 Yamaha 0712 1331 Yukai 1352 RemoteControlCodes fm Page X Thursday December 11 2008 10 11 AM ...

Page 47: ...Blank fm Page 0 Thursday December 11 2008 10 22 AM ...

Page 48: ...1208GLT SW MU 2008 Victor Company of Japan Limited LT 42R10BU_EN book Page 35 Thursday December 11 2008 10 14 AM ...

Reviews: