background image

17

.

A

Set to 

A

TV

B

B

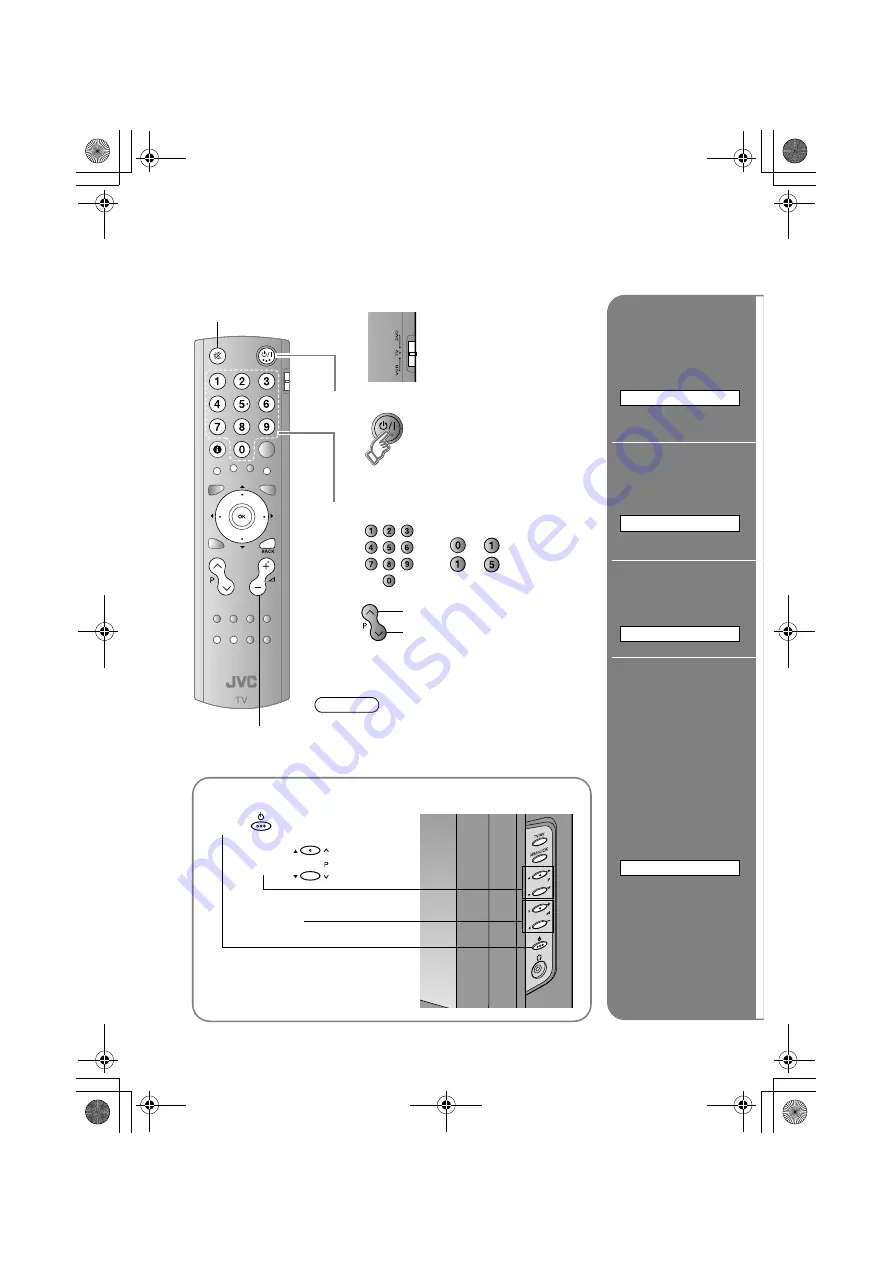
Power on

The blue power lamp on the TV lights

Press again to turn the screen off and put the 
TV into standby mode.

C

Select a channel

E.g.

    1 :


¨


15 :


¨


Move up or down a channel

Switch between mono / stereo / bilingual 
broadcasting

¨

A

STEREO/

t

·

u

B

(P. 26)

Note

To completely turn off the TV, unplug the AC plug.

Mute

Volume

up

down

Basic operations using the side buttons

A

Power on

B

Volume

Change the 
channel

Channel 
information and 
clock

INFORMATION

Change the 
aspect ratio

ZOOM

Enjoy ambient 
sound

3D SOUND

Register a 
channel to a 
button

FAVOURITE CHANNEL

Watching TV

LT-A70.book  Page 17  Thursday, November 16, 2006  11:21 AM

Summary of Contents for LT-26A70BJ

Page 1: ...LT 32A70BJ LT 26A70BJ LT 32A70SJ LT 26A70SJ WIDE LCD PANEL TV INSTRUCTIONS LCT2174 001B U LT A70 book Page 1 Thursday November 16 2006 11 21 AM ...

Page 2: ...LT A70 book Page 0 Thursday November 16 2006 11 21 AM ...

Page 3: ...nal legislation By disposing of this product correctly you will help to conserve natural resources and will help prevent potential negative effects on the environment and human health which could otherwise be caused by inappropriate waste handling of this product For more information about collection point and recycling of this product please contact your local municipal office your household wast...

Page 4: ...1 Expanding the world of LT A70 book Page 1 Thursday November 16 2006 11 21 AM ...

Page 5: ...ing TV 17 Viewing teletext 19 Watching videos DVDs 21 Try the advanced features Useful functions 23 ASLEEP TIMERB ACHILD LOCKB Advanced picture adjustment 24 Reduce noise Set the aspect ratio etc Just the way you like it Customising your TV 25 When you have trouble Troubleshooting 27 Technical information 30 ACH CCB List 31 Specifications 32 Enjoy rich multi media with JVC VHF UHF Digital camera V...

Page 6: ...ry to repair the TV yourself If the problem cannot be solved in ATroubleshootingB P 27 unplug the power cord and contact your retailer Make enough room for inserting and removing the power plug Place the TV as close to the outlet as possible The main power supply for this TV is controlled by inserting or removing the power plug Never cut or damage the power cord If the AC plug is not the right sha...

Page 7: ... children are near Never listen to headphones at high volume It may damage your hearing Hold the TV so as not to scratch the screen Do not touch the screen when carrying the TV Do not carry the TV on your own In order to prevent accidents ensure that the TV is carried by two or more people Never dismantle the rear panel It may cause an electric shock Never obstruct the ventilation holes It may cau...

Page 8: ...s Insert the batteries from the end making sure the and polarities are correct AAA R06B Batteries For confirming the TV works Power lamp ON Lit Blue OFF Unlit Power lamp lights while the TV is on Remote control sensor Switch between TV AV devices Display on screen menu set Change channel page Volume Power On Off To headphones P 13 Getting started Names of all the parts LT A70 book Page 5 Thursday ...

Page 9: ... Hold the current page Bookmark pages Reveal hidden pages Enlarge the text Switch briefly between teletext and TV To index page Colour buttons The coloured buttons can perform different functions according to the situation When viewing teletext P 19 Follow on screen instructions Other uses When watching TV Video COUNTRY START MORE Follow instructions in on screen guides Change the aspect ratio P 1...

Page 10: ...he optional JVC wall mounting unit Consult a qualified technician See the included manual on mounting procedures JVC assumes no responsibility for damage due to improper mounting 200 mm x 200 mm mount which conforms to VESA standards Installation requirements To avoid overheating ensure the unit has ample room AERIAL After all the connections have been made insert the plug into an AC outlet Connec...

Page 11: ...VD recorder After all the connections have been made insert the plug into an AC outlet Connect AT V LINKB compatible recording device to AEXT 2B AT V LINKB AWhat is AT V LINKB B P 9 VCR DVD recorder EXT 1 EXT 2 LT A70 book Page 8 Thursday November 16 2006 11 21 AM ...

Page 12: ...s not appear or if you wish to make changes later ALANGUAGEB and AAUTO PROGRAMB P 26 What is AT V LINKB Connecting the TV to a AT V LINKB compatible device allows Channels on the TV to be instantly registered on the device The ADIRECT RECB function to be used ATechnical informationB P 30 AT V LINKB variations AT V LINKB JVC AQ LINKB Panasonic AMegalogicB Grundig AData LogicB Metz ASMARTLINKB Sony ...

Page 13: ... z AUTO PROGRAM CH 28 14 E Check what was registered z EDIT PR n ID CH CC AV _ _ _ _ _ _ 01 BBC1 CH 21 02 BBC2 CH 22 03 ITV CH 23 04 CH4 CH 24 05 CH5 CH 25 06 07 CH 26 08 CH 27 09 CH 28 Edit channels D in AEditing channelsB P 11 Confirm F T V LINK DOWNLOAD TV RECORDING DEVICE Finish When using AT V LINKB If AFEATURE NOT AVAILABLEB appears Is the AT V LINKB compatible device connected to AEXT 2B Is...

Page 14: ...2 03 ITV CH 23 04 CH4 CH 24 05 CH5 CH 25 06 07 CH 26 08 CH 27 09 CH 28 E Edit F Confirm settings G Finish When using AT V LINKB When not using AT V LINKB T V LINK DOWNLOAD TV RECORDING DEVICE If AFEATURE NOT AVAILABLEB appears Is the AT V LINKB compatible device connected to AEXT 2B Is the device turned on AT V LINKB P 9 A select B next A select B next select Move a channel s position MOVE Edit a ...

Page 15: ...Receives the broadcast signal ACH CCB List P 31 In Ireland select CH CC with 14 ADelete z EDIT PR n ID CH CC AV _ _ _ _ _ _ 01 BBC2 CH 22 02 ITV CH 23 03 CH4 CH 24 04 CH5 CH 25 05 06 CH 26 07 CH 27 ABegin BBeginning channel search From high frequencies From low frequencies z MANUAL PR n ID CH CC 10 CH 29 11 CH 30 I 12 13 14 15 16 17 z MANUAL PR n ID CH CC 10 CH 29 11 CH 30 I 12 13 14 15 16 17 Auto...

Page 16: ...als of each device before setting up Connecting cables are not supplied with this TV Headphones EXT 3 EXT 2 T V LINK EXT 1 Connecting external devices HDMI DVD player HDMI compatible AERIAL Headphone EXT 4 Not use For service adjustments only LT A70 book Page 13 Thursday November 16 2006 11 21 AM ...

Page 17: ... V LINK Use S VIDEO AS INB P 22 Select dubbing sources ADUBBINGB P 22 Connect a decoder ADECODER EXT 2 B P 26 EXT 3 Watching videos Output Input ª Composite signal Sound L R EXT 4 Watching DVDs Output Input ª Component signal P 32 Sound L R Common with EXT 3 HDMI Connecting HDMI devices Output Input ª HDMI signal P 32 VCR DVD other devices Game consoles Video camera Satellite broadcast Digital bro...

Page 18: ...avourite channels Viewing teletext Enlarge the text To the index page Hold the current page Switch briefly between teletext and TV Bookmark your favourite pages Reveal hidden pages TV mode Text mode Let s try it out Enjoying your new TV TV Teletext Video etc LT A70 book Page 15 Thursday November 16 2006 11 21 AM ...

Page 19: ...P TIMER CHILD LOCK etc Watchingvideos DVDs Watch high quality video S VIDEO Name connected devices Dub videos PAGE 21 Personal preferences PAGE 25 Adjust the picture Adjust the sound Basic settings channel settings etc LT A70 book Page 16 Thursday November 16 2006 11 21 AM ...

Page 20: ...eo bilingual broadcasting ASTEREO t uB P 26 Note To completely turn off the TV unplug the AC plug Mute Volume up down Basic operations using the side buttons A Power on B Volume Change the channel Channel information and clock INFORMATION Change the aspect ratio ZOOM Enjoy ambient sound 3D SOUND Register a channel to a button FAVOURITE CHANNEL Watching TV LT A70 book Page 17 Thursday November 16 2...

Page 21: ...24 Not available in 1080i 1125i 720p 750p signals 3D SOUND ON While the channel is displayed SET 1 4 Press the number to register it on PROGRAMMED Recall the favourite channel FAVOURITE 1 4 Press the number you registered BBC1 Customisations P 26 to the picture of a favourite channel get saved as well Check your favourite channels Press A B and confirm that the channels you have registered have a ...

Page 22: ...tep 2 blue yellow green red Bookmark your favourite page LIST MODE This TV can display TV broadcasts and teletext on the same channel in two windows A B Enter a teletext page Move up or down a page When watching TV TEXT up down Viewing teletext View sub pages Display sub pages Move up or down a page Release Press A B again Sub page blue yellow up down LT A70 book Page 19 Thursday November 16 2006 ...

Page 23: ...s A B again HOLD Switch briefly from teletext to TV Leave the current page open while you switch to watch TV Useful when running a page search CANCEL Reveal hidden pages Display hidden information answers to quizzes etc REVEAL To the index page Returns to page A100B or a previously designated page INDEX LT A70 book Page 20 Thursday November 16 2006 11 21 AM ...

Page 24: ...d press A B The remote control code of this unit is AAB or A1B Confirm the remote control code of your recorder by checking the manual it came with Change the remote control code of your recorder if necessary Some models of JVC devices cannot be operated with this remote control DVD players VCR and DVD recorders Rewind Playback Fast forward Record Stop Pause Select a chapter DVD mode Select a chan...

Page 25: ...B connected to S VIDEO BSet the S VIDEO mode z EXT SETTING EXT 1 EXT 3 TV EXT 2 DUBBING z EXT SETTING EXT 1 EXT 3 TV EXT 2 DUBBING y The device selection display will change from AE2B to AS2B Cancel this mode Press A B yellow in B again Set up dubbing on AEXT 2B ASelect the arrow BSelect the dubbing source z EXT SETTING EXT 1 EXT 3 TV EXT 2 DUBBING z EXT SETTING EXT 1 TV EXT 2 DUBBING EXT 3 S IN y...

Page 26: ...CH 25 06 07 CH 26 08 CH 27 09 CH 28 6 C CHILD LOCK PR n ID CH CC AV _ _ _ _ _ _ 01 n BBC1 CH 21 02 BBC2 CH 22 03 ITV CH 23 04 CH4 CH 24 05 CH5 CH 25 06 07 CH 26 Lock more channels Repeat steps 5 and 6 7 Release a channel Press A B blue again in step 6 View a locked channel Use the numerical buttons to enter the channel number When n appears press A B and enter your AID NO B If you forget your AID ...

Page 27: ...AL VNR ON COLOUR SYSTEM 3 4 3 AUTO ASPECT 3 B COLOUR SYSTEM PAL Select the colour system PAL NTSC 3 58 NTSC 4 43 AUTO Western Europe USA 3 58 MHz USA 4 43 MHz Whenwatching videos etc Set a default aspect ratio B FEATURES DIGITAL VNR ON COLOUR SYSTEM 3 4 3 AUTO ASPECT 3 B 4 3 AUTO ASPECT PANORAMIC REGULAR 14 9 ZOOM Select a default aspect ratio for AUTO in AZOOMB P 17 PANORAMIC REGULAR 14 9 ZOOM DI...

Page 28: ...it The menu disappears after one minute of inactivity D Adjust configure PICTURE MODE STANDARD When adjusting with the sliding bar When selecting from presets 2 STANDARD 3 The item will change Some items have a sub menu A select B next A select B next OK or 3 A adjust select B set Move A adjust B set A select B set Just the way you like it Customising your TV Selected menu s title LT A70 book Page...

Page 29: ...er v Right Stronger 3D SOUND Ambience level ON MONO OFF FEATURES SLEEP TIMER Timer for turning off the TV P 23 CHILD LOCK Stops children from watching specific channels P 23 APPEARANCE Format for displaying the channel number TYPE A TYPE B BLUE BACK Displays a blue screen and mute the sound when the signal is weak or absent ON OFF FAVOURITE SETTING Clear favourite channel settings P 17 SET UP AUTO...

Page 30: ...tance between the aerial and the cause of interference until no interference Ghosting Doubling of images Are you receiving interference from signals reflected off mountains or buildings Adjust the direction of your aerial or change to a good quality directional aerial The remote control doesn t work Are the batteries flat Are you more than 7 meters away from the TV Is the VCR TV DVD switch set to ...

Page 31: ... functions PICTURE MODE BRIGHT DIGITAL VNR OFF 26 24 26 24 26 24 Strange picture when using an external device If you connected S Video output device check the AS INB setting If the top of the image is distorted check the video signal quality itself If movement appears unnatural when receiving a signal from a DVD player etc with 625p progressive scanning change the output setting of the external d...

Page 32: ...Use the cable marked with HDMI logo y No sound Check if the device is compliant with HDMI y Green and distorted screen Wait a little for the signal to stabilize when switching the signal format for an HDMI device y Some functions do not display on the menu It is not a malfunction Some functions dark background in the menu do not work depending on the situation y Problem Actions Page The shadow of ...

Page 33: ...ces Connect a ADVIB device to the HDMI connector using ADVI HDMIB conversion cable Connect analogue sound output of the DVI device to L and R terminals in EXT 3 If you accidentally cut the power cord Attach a new plug following the steps below If in doubt contact your local retailer Never connect to the larger terminal marked with an AEB the safety earth symbol A B or coloured green or green and y...

Page 34: ...6 CC 07 S7 CC 37 S37 CH 09 E9 CH 47 E47 CC 08 S8 CC 38 S38 CH 10 E10 IR H CH 48 E48 CC 09 S9 CC 39 S39 CH 11 E11 IR J CH 49 E49 CC 10 S10 CC 40 S40 CH 12 E12 CH 50 E50 CC 11 S11 CC 41 S41 CH 21 E21 CH 51 E51 CC 12 S12 CC 75 X CH 22 E22 CH 52 E52 CC 13 S13 CC 76 Y CH 23 E23 CH 53 E53 CC 14 S14 CC 77 Z CH 24 E24 CH 54 E54 CC 15 S15 CC 78 Z 1 CH 25 E25 CH 55 E55 CC 16 S16 CC 79 Z 2 CH 26 E26 CH 56 E5...

Page 35: ... 686 x 474 x 121 5 Weights without stand 14 6 kg 12 6 kg 11 6 kg 9 6 kg Accessories See ACheck accessoriesB P 5 Terminals Connectors Terminal name Terminal type Signal type IN Signal type OUT Notes Input Output terminals EXT 1 Euroconnector x 1 SCART connector Composite video Analogue RGB Audio L R TV out EXT 2 Euroconnector x 1 SCART connector Composite video S Video Analogue RGB Audio L R Dubbin...

Page 36: ... 2006 Victor Company of Japan Limited 1006KTH SW MU LT A70 book Page 1 Thursday November 16 2006 11 21 AM ...

Reviews: