background image

GB-

connecting eXternAL DeViceS

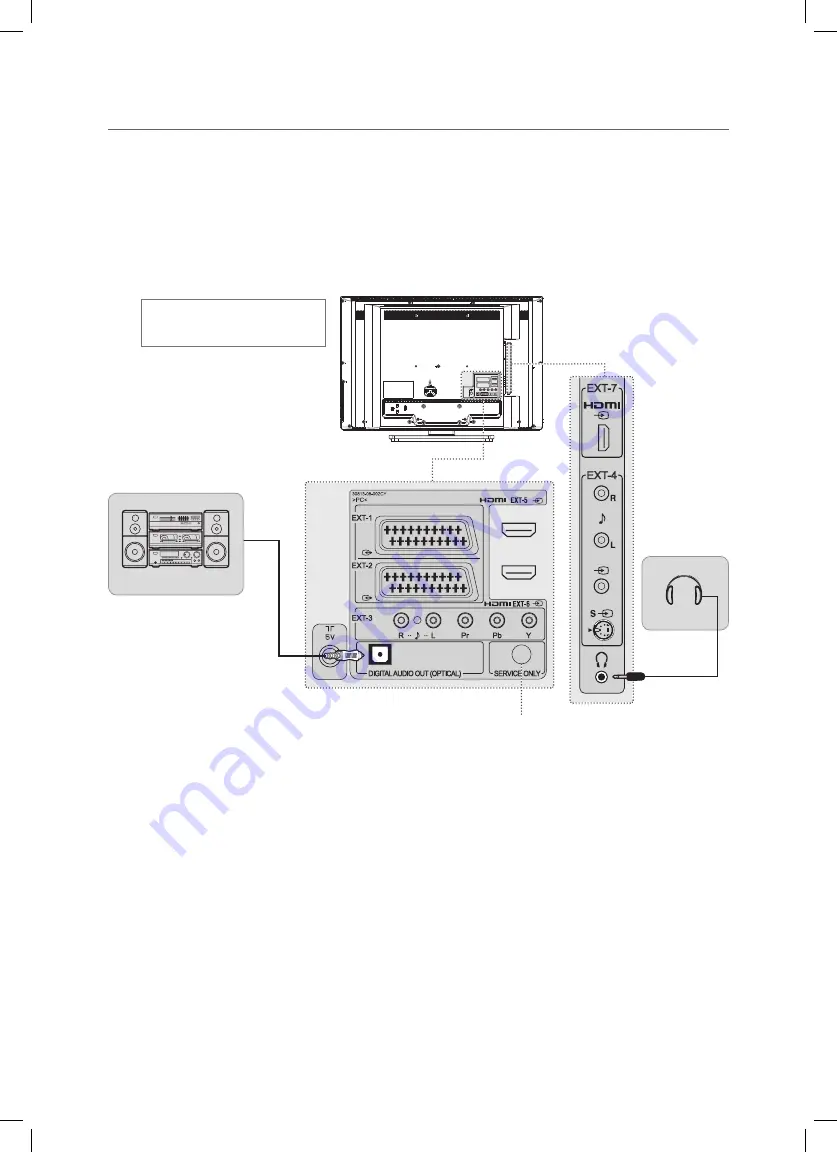
connecting the Digital Audio System

DigitAL AuDio out (opticAL)

Connect the optical cable between the 

DigitAL AuDio out (opticAL)

 on TV and the composite optical audio 

input connector of digital audio system.

connecting Headphones

Connect a set of headphones to 

Hp

 on TV if you want to watch a television programme without disturbing other 

people close to you.

note: 

Prolonged use of headphones at a high volume may cause health damage on your ears.

Headphone

Digital Audio System

Not available 

(Service only)

Here the shown illustration is 

LT-DA9BJ model and may be 
somewhat different from your TV.

Summary of Contents for LT-19DA9BJ

Page 1: ...DA9BJ LT 26DA9BJ LT 19DA9BJ Trade Mark of the DVB Digital Video Broadcasting Project 1991 to 1996 Number 5231 LT 42DA9BJ 5232 LT 32DA9BJ 5233 LT 26DA9BJ 5234 LT 19DA9BJ LCD FLAT TV LCD FLAT TV INSTRUCTIONS INSTRUCTIONS ...

Page 2: ... Europe GmbH Postfach 10 05 52 61145 Friedberg Deutschland FR Français Cher e client e Cet appareil est conforme aux directives et normes européennes en vigueur concernant la compatibilité électromagnétique et à la sécurité électrique Représentant européen de la société Victor Company of Japan Limited JVC Technology Centre Europe GmbH Le nom de la compagnie a changé dans JVC Technical Services Eur...

Page 3: ...or Company of Japan Limited Not to be copied used or translated in part or whole without JVC s prior consent in writing except approval of ownership of copyright and copyright law Warranty The information in this document is subject to change without notice JVC does not have any responsibility for direct indirect accidental and other damage caused by the use of the information contained in this ma...

Page 4: ...se this TV for a long period of time be sure to disconnect the power plug from the AC outlet This is a class 1 product so it shall be connected to a Main Socket outlet with a protective earthing connections except for LT 19DA9BJ Installation Keep the product away from any heating devices Placing it close to a heating device may cause fire Keep the power cord away from any heating devices A melted ...

Page 5: ...r fire Do not place water pots flower vases beverage cans small metals or heavy objects over the product Contact of these contents with the product may cause electrical shock or fire while any falling of the product may cause injury Do not place naked flame source such as lighted candles over the product It may cause a fire If the product breaks down turn off the power and unplug it from the outle...

Page 6: ... Main Input Source 20 Setting the Aspect Ratio 20 Displaying Teletext information In Analog TV Mode only 21 PROGRAMME GUIDE In Digital TV mode only 22 Changing the Channel List Group 22 Moving the Time Bar 23 Reserving a Watching Schedule 23 Finding a Programme 24 MENU SETTINGS 25 Picture Settings 25 Sound Settings 25 Installation Settings In Analog TV Mode Only 26 Feature Settings 26 DTV Setup In...

Page 7: ...batteries ensuring that the plus and minus signs of the batteries are correctly aligned NOTE Do not mix different battery types such as alkaline with manganese AA batteries X2 User s manual Power cord except for LT 19DA9BJ Note Stand and screws are also included For details refer to page 7 only for LT 32DA9BJ PREPERATION Changes input source Displays menu confirms selection Changes channel moves s...

Page 8: ...t M5 x 4 200mm x 200mm Depth of screw holes LT 42DA9BJ 17 6mm 2 screws of upper part and 14 7mm 2 screws of lower part from the surface of the TV LT 32DA9BJ 13 7mm from the surface of the TV Installation requirements To avoid overheating ensure the unit has ample room Stand Installation only for LT 32DA9BJ Assemble the TV as shown Fix the 4 screws securely using the holes in the back of the TV Not...

Page 9: ...D or STB H p Connects to headphones Ac input Connects the power cord ScArt input output Connect to the SCART input output of VCR DVD or STB coMponent input Connect to the component outputs of DVD or STB rf input Connects to an antenna or a cable system DigitAL AuDio out opticAL Connects to a digital audio component Digital TV audio output only coMpoSite input Connect to the Composite video and aud...

Page 10: ...d for interactive applications in the EPG Edit Channels and Teletext mode Menu Displays the OSD menu Arrow Buttons Controls the selection in the OSD menu BAcK Returns to the previous display VoL Adjusts the volume ZooM Select the aspect ratio LCD LCD Hyper Sound Gives the ambient sound effect tV rADio Switches between digital TV and Radio modes guiDe Displays the EPG in Digital TV input LCD LCD Du...

Page 11: ...aptops There are different kinds of CAM Conditional Access Module suitable for different coding systems 1 Follow the instructions of the module and insert a Viewing Card into the CAM Conditional Access Module 2 Keep the CAM Conditional Access Module with a Viewing Card vertically 3 Insert the CAM Conditional Access Module completely into the CI slot on the side of the TV note Ensure the Viewing Ca...

Page 12: ... jacks may be identified as Y PB PR Y B Y R Y or Y CB CR With an HDMi cable Connect the HDMI cable between the eXt 4 eXt 5 eXt 6 or eXt 7 on TV and the HDMI output connector of DVD or STB note All HDMI inputs support DVI video but only first HDMI input EXT 4 or EXT 5 supports DVI audio through component audio input EXT or EXT SCART Input Output COMPONENT Input HDMI Input LT 9DA9BJ EXT EXT EXT LT 6...

Page 13: ...he S Video and audio output connectors of VCR note The composite video and S Video share Audio L R in EXT 3 or EXT 4 on side connecting the camcorder or game console With a composite cable Connect the composite video and audio cable between the composite video and audio input connectors eXt 3 or eXt 4 on TV and the composite video and audio output connectors of camcorder or game console SCART Inpu...

Page 14: ...r of digital audio system connecting Headphones Connect a set of headphones to Hp on TV if you want to watch a television programme without disturbing other people close to you note Prolonged use of headphones at a high volume may cause health damage on your ears Headphone Digital Audio System Not available Service only Here the shown illustration is LT DA9BJ model and may be somewhat different fr...

Page 15: ...elect the country 3 Channel Search Please wait for finishing the channel search If you want to stop during search press the OK button If the channel search is stopped or finished you can edit the found channels Select All Select all the found channels Unselect All Unselect all the found channels Delete Delete the selected channels Select Save and press the OK button to save the result 4 Time Setti...

Page 16: ...ch press the BAcK button If the channel search is stopped or finished you can edit the found channels Skip Sets the channel to be skipped using the reD button Move Shifts the channel using the green button Delete Deletes the channel using the yeLLoW button note If you do not want to setup the channels at this time you can setup it later using the installation menu If you connect an active antenna ...

Page 17: ...or enter the channel number using the nuMBer buttons to move to the channel directly 2 Press the tV rADio button to switch between digital TV channels and radio channels 3 Press the tV DtV button to switch between analog TV channels and digital TV channels note You can switch channels using the channel list or programme guide Volume control 1 Press the VoL button to adjust the audio volume 2 Press...

Page 18: ...name 2 Programme name 3 Icons REC MHP 13 Reserved programme REC MHP 13 Subtitle information REC MHP 13 Locked channel REC MHP 13 Teletext information REC MHP 13 Scrambled channel REC MHP 13 Parental control level minimum age for viewing REC MHP 13 Compressed bitstream audio signal Teletext information MHEG 4 Current time 5 Detailed programme information Press the button again to view detailed info...

Page 19: ...e Displaying channel List Press the oK button while watching a programme to display the channel list To change the channel select a channel using the button and press the oK button C h a n n e l s Digital channel List In Digital TV Mode Only Analog channel List In Analog TV Mode Only for Digital channel List Digital Channel List is provided in three types as follows for easy and quick channel brow...

Page 20: ...o language in DtV Setup configuration Language Setting Audio Language menu If you select compressed in DtV Setup configuration Language Setting Audio priority menu the programme is automatically broadcasted in the compressed audio regardless of default audio language If the programme is broadcasted in the compressed bitstream audio signal you cannot set the audio direction text and interactive Ser...

Page 21: ...an select a default aspect ratio for 4 3 signal except when 480p 576p mode Refer to p 6 When the component or HDMI input mode with 480p or 576p signal you can select only the Auto Full or Regular When the component or HDMI input mode with 720p or 1080i signal you can select only the Full HD Zoom or Slim SUBTITLE SUBTITLE SUBTITLE Full HD Zoom Slim For pictures with a 16 9 aspect ratio that have be...

Page 22: ... resume press it again reveal Shows the hidden information answers to quiz games for example Press it again to return to normal display Size Displays the double size letters for lower half of the screen press it again to return to normal display Subpage Displays the available subpage cancel Displays TV programme when waiting for the new teletext page index Displays the teletext index page number 0...

Page 23: ...review window 7 Current date and time 1 Move to another channel using the button and move to previous or next programme within the same channel using the button 2 To change the current programme select a programme and press the oK button 3 Press the button in the selected programme to view the detailed information if available of the selected programme note Press the p button to move to the previo...

Page 24: ...to hours ahead Day Moves back to one day before Day Moves forwards to one day ahead reserving a Watching Schedule you can reserve a watching of the future programme in the Programme Guide 1 Select the desired programme and press the oK button 2 When a reservation has been completed the icon REC MHP 13 is displayed on the reserved programme Press the oK button again to cancel reservation 3 By the r...

Page 25: ...ogramme You can sufficiently find the programme you want by programme name or genre 1 Press the BLue button to move to the Find screen 2 Enter the programme name directly and select find and press the oK button note If you select previous or next on the keyboard displayed on the screen and press the oK button the keyboard layout is switched 3 Select By genre and press the oK button to search progr...

Page 26: ...g colour balance colour temperature Cool Normal Warm noise reduction Low Medium High Off Backlight Brightness High Auto Low Medium note You can adjust the Hue item only in NTSC signal Sound Settings Sound Bass Adjusts the strength of low tones treble Adjust the strength of high tones Balance Adjusts the balance of speaker AVL Auto Volume Level Off On Adjusts automatically the volume of the channel...

Page 27: ...he screen into a blue power Lamp On Off Illuminates the power lamp in blue on the front panel 4 3 Aspect Setting Panoramic Regular Select a default aspect ratio for 4 3 signal when the aspect ratio is set to Auto Default Setting Enabled only in Analog TV mode Sets the current all settings of the TV to the default settings except for the Digital TV mode settings note Please note that once you perfo...

Page 28: ...s the date and time over the air when you successfully search digital channels Otherwise you can set the date and time manually using the nuMBer button parental control for the Analog channels only Select feature parental control Enter your PIN code note The default PIN code is 0000 If you have forgotten your PIN code please contact your local TV distributor child Lock Select enable to lock the bu...

Page 29: ...data are deleted After completing the default setting the installation wizard for digital channels will appear automatically in a few seconds For more information about Default Setting of the analog channels refer to p 6 System Status You can view system information Signal Detection You can view the signal strength and signal quality of the channel that is currently on air common interface You can...

Page 30: ... you have to set the Antenna power to on to supply the 5V power into antenna The default value is off Active antenna is a portable or indoor antenna which needs power supply from the product because it does not have power cord for itself Automatic Search Select Auto Search Search to start to search channels The found channels are automatically saved in order To stop searching channels press the BA...

Page 31: ... channel searching completes the edit channels menu is displayed automatically The first found channel if only will be automatically displayed edit channels Select edit channels Skip Sets the channel to be skipped using the reD button Once channels are selected to skip you can select the skipped channels using number buttons only Move Shifts the channel using the green button Delete Deletes the ch...

Page 32: ...g menu Switch to Digital tV input mode using the AV or tV DtV button Select DtV Setup installation menu country Shows the selected country in wizard Auto Search Select Auto Search It starts to search channels immediately Please wait for finishing the channel search If you want to stop during search press the oK button If the channel search is stopped or finished you can edit the found channels Sel...

Page 33: ...cted channels Delete Delete the selected channels Edit Favourite Channels Select Edit Favourite Channels Select a favourite group to edit Add Adds to the favourite group Remove Removes grom the favourite group TV Radio Switches between TV and Radio channel list Fav Group Changes the favourite group Move Changes the order of channels within the favourite group Rename Renames the name of favourite g...

Page 34: ...dio Subtitle Language Select the language for audio and subtitle Audio priority Language Compressed Select the priority of audio Language You can watch programme in the selected language compressed Outputs the compressed audio signal such as Dolby Digital or DTS note Select Compressed if your amplifier system has multi channel digital audio surround decoding Dolby Digital and or DTS Dolby and the ...

Page 35: ...and press the OK button to add a new reservation NOTE For detailed information about Schedule refer to Programme Guide Reserving a Watching Schedule p 24 Miscellaneous Settings Select DTV Setup Configuration Miscellaneous Settings i Plate Display Time Set the duration of the information box to be displayed when you switch the channel NOTE When it is set to Disable the i plate will not be displayed...

Page 36: ... Update Automatic Update 1 Select Automatic Update 2 Automatically search for new software Manual Update 1 Select DTV Setup Installation Software Update Manual Update 2 Select a channel to update and enter the frequency 3 Select Search to search software When detecting software update select Yes and press the OK button to start updating Select No and press the OK button to return to the previous m...

Page 37: ... update 2 The manufacturer decides to release software downloading via a designated aerial system 3 The equipment must be tuned properly according to the guidelines within this manual 4 Update software when the quality of receiving signal strength is high If the weather is not so good that the quality of receiving signal strength is not recommendable perform the software update later Caution Pleas...

Page 38: ...age Time Setting Parental Control OSD Transparency Blue Back Power Lamp 4 3 Aspect Setting Default Setting In Analog TV mode only p 26 p 27 p 27 p 26 p 26 p 26 p 26 p 26 DTV Setup In Digital TV Mode Only Configuration Parental Control Language Setting Time Setting Schedule Miscellaneous Settings p 33 p 33 p 34 p 34 p 34 Edit Channels Edit Channels Edit Favourite Channels p 32 p 32 Installation Cou...

Page 39: ...e RF is weakened by heavy rain the condition of the sound and picture may temporarily be poor However the poor sound and picture quality due to weather conditions cannot be accepted as a malfunction of product When the 1080i video input signal is displayed on the TV screen through the Component or HDMI jack the screen flicker may occur LT 19DA9BJ only 4 No or poor sound Check that your AV cable is...

Page 40: ...annel is scrambled or not available The channel has a signal but no audio or video is provided Confirm if the channel is currently on air The channel is for data broadcasting The channel cannot be viewed without the appropriate model that supports data channels Viewing Card is not plugged in Insert Viewing Card Wrong Viewing Card is in use Insert the appropriate Viewing Card for the channel s you ...

Page 41: ...nd 6 1 kg 5 2 kg 10 5 kg 9 0 kg 14 4 kg 12 8 kg 22 5 kg 20 2 kg Accessories Remote control unit 1 RM C1892B AA R6 dry cell battery 2 Input Output Euroconnector EXT 1 EXT 1 EXT 2 EXT 1 EXT 2 Video input Audio L R inputs and RGB inputs are available TV broadcast outputs Video and Audio L R are available Video and Audio L R outputs are available EXT 2 RCA connectors 5 Component EXT 2 EXT 3 EXT 3 Comp...

Page 42: ...9BJ 100GB P N 20010 00003 For users in the UK If you have any problems setting up your new TV please call the Helpline on 0870 330 5000 For users in the Republic of Ireland If you have any problems setting up your new TV please call the Helpline on 1890 582500 ...

Reviews: