background image

Preparations

8

XV-C5SL/LET0227-003A/English

Prep

ar

atio

n

s

Using the remote control unit

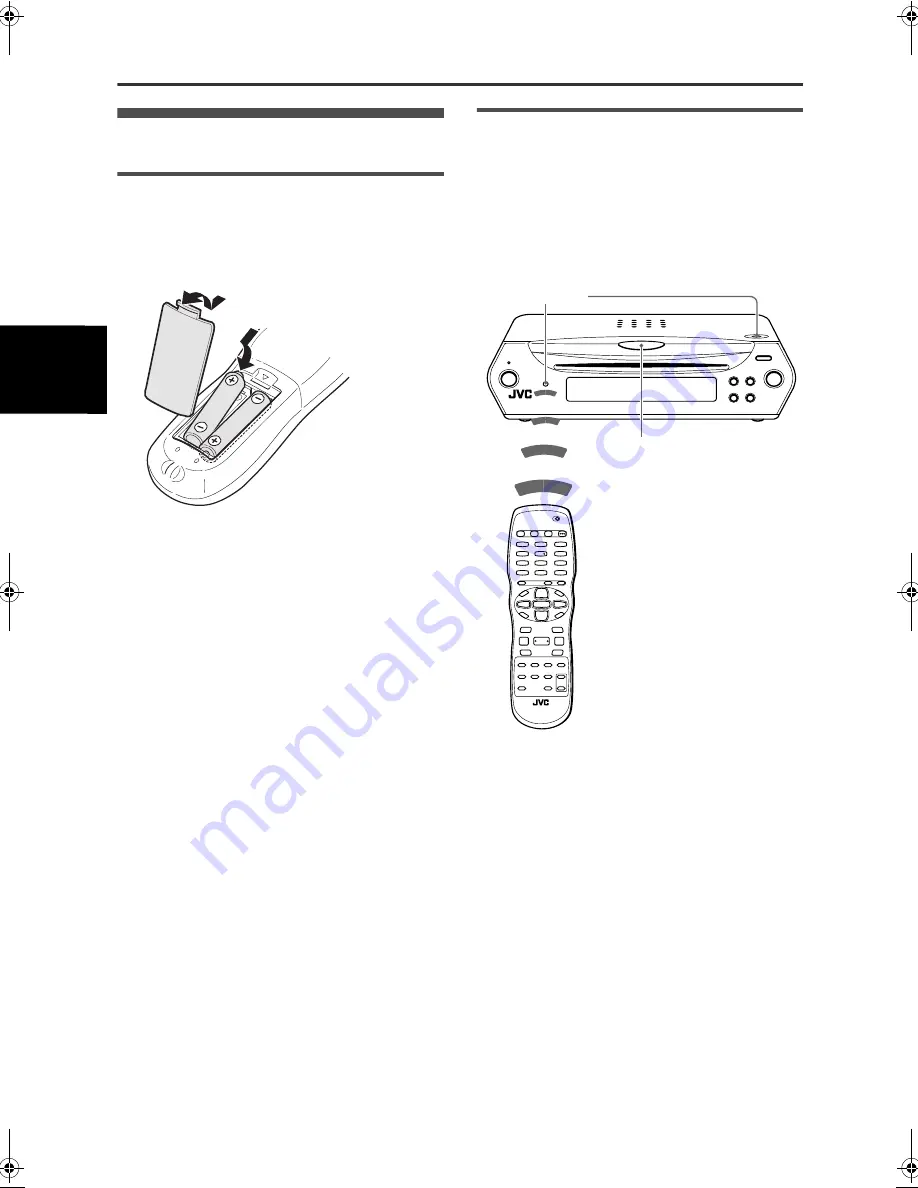
To install batteries

Open the compartment cover, and place the two 
supplied R6P (SUM-3)/AA(15F) batteries in the remote 
control unit according to the polarity markings (“+” and “–
”) inside the compartment. Then replace the cover.

The batteries will last about six months with normal use.
If the functions of the remote control unit become erratic, 
replace the batteries. 

Precautions of the safe use of batteries

Observe the following precautions for the safe use of 
batteries. If they are used improperly their lives will be 
shortened, they may burst or their contents may leak.
• Remove the batteries from the remote control unit if it is 

not going to be used for a long period of time.

• Remove dead batteries and dispose of them properly.
• Never leave dead batteries lying around, take them 

apart, mix them with other refuse, or throw them into an 
incinerator.

• Never touch liquid that has leaked out of a battery.
• Do not mix new and old batteries, or batteries of 

different types, when replacing them.

Remote sensor

Point the top of the remote control unit toward the remote 
sensor as directly as possible. If you operate it from a 
diagonal position, the operating range (approx. 5 m) may 
be shorter.
The illumination lamp flashes in a few seconds when the 
unit receives the remote signal from the remote control 
unit.

Remote sensor

Illumination lamp

XV-C5SL(B).book  Page 8  Friday, February 21, 2003  10:59 AM

Summary of Contents for LET0227-003A

Page 1: ...C5SL LET0227 003A B INSTRUCTIONS V I D E O Before operation 2 Preparations 4 Basic operations 10 Advanced operations 16 MP3 disc playback 26 JPEG disc playback 29 Changing the initial set tings 32 Additional information 38 ...

Page 2: ...e U K DO NOT cut off the mains plug from this equipment If the plug fitted is not suitable for the power points in your home or the cable is too short to reach a power point then obtain an appropriate safety approved extension lead or consult your dealer BE SURE to replace the fuse only with an identical approved type as originally fitted If nonetheless the mains plug is cut off ensure to remove t...

Page 3: ...ibrations To prevent malfunction of the unit There are no user serviceable parts inside If anything goes wrong unplug the power cord and consult your dealer Do not insert any metallic objects such as wires hairpins coins etc into the unit Do not block the vents Blocking the vents may damage the unit To clean the cabinet Use a soft cloth Follow the relevant instructions on the use of chemically coa...

Page 4: ...C video signal on a disc is converted to a PAL signal and output Unplayable discs The unit does not play back discs listed below If you try to play back these discs noise may generate causing damage to speakers DVD RW discs written in the VR format DVD ROM DVD RAM DVD AUDIO CD ROM PHOTO CD SACD In addition the unit does not play Unfinalized discs Discs of irregular shape or discs with tape seals o...

Page 5: ... soft dry cloth moving from the center outwards If a disc is difficult to clean wipe with a cloth moistened with water Never use record cleaners petrol alcohol or any anti static agents Notes on copyright Check the copyright laws in your country before recording from DVD VIDEO SVCD Video CD Audio CD MP3 and JPEG discs Recording of copyrighted material may infringe copyright laws This product incor...

Page 6: ...ural B To connect to a TV with the SCART connector You can enjoy using the unit by simply connecting it to your television set with a 21 pin SCART cable NOTES In this connection you need to set the VIDEO SIGNAL SELECTOR correctly according to your TV See below for details Do not connect multiple devices using multiple connectors Set the VIDEO SIGNAL SELECTOR correctly according to your TV If your ...

Page 7: ...al cable It is not recommended to use the digital jacks for dubbing When recording the sounds DVD VIDEO SVCD Video CD or Audio CD played back on the unit record them through the analog jacks Depending on the disc no signal may be output from the DIGITAL OUT Make an analog connection in this case Set DIGITAL AUDIO OUTPUT in the AUDIO preference display correctly according to the connected digital a...

Page 8: ... which may cause fire electric shock or other accidents If the cord is damaged consult a dealer and have the power cord replaced with a new one Installation You can select one of the following four installations According to your installation set the DIRECTION switch on the rear of the unit When setting the DIRECTION switch set it during standby mode When you set the DIRECTION switch with the unit...

Page 9: ...n the opposite direction the remote control unit does not work Installation on the wall Peel off the stickers on the bottom of the unit hook the unit onto the screws Slide the unit downward to secure it Be sure to set the DIRECTION switch on the rear of the unit to 1 Mount two commercial screws onto the wall with each screw located in the same height 1 2 DIRECTION 1 2 DIRECTION Remote sensor CAUTI...

Page 10: ...urst or their contents may leak Remove the batteries from the remote control unit if it is not going to be used for a long period of time Remove dead batteries and dispose of them properly Never leave dead batteries lying around take them apart mix them with other refuse or throw them into an incinerator Never touch liquid that has leaked out of a battery Do not mix new and old batteries or batter...

Page 11: ...eiver You can control the volume of a JVC s amplifier or receiver by using the AMP VOL buttons on the remote control unit Pressing the AMP VOL button raises the audio volume of the amplifier or receiver while pressing the AMP VOL button lowers the volume Manufacturer No Manufacturer No AIWA 36 MIVAR 29 BEIJING 22 NEC 20 CCE 02 NOBLEX 22 CHANGHONG 34 NOKIA 31 DAEWOO 17 37 PANASONIC 04 11 FERGUSON 2...

Page 12: ...set the display language TV monitor type and digital output before using the unit by following the procedure below 1 Press ENTER The first page of the DVD PLAYER SET UP display appears The pull down menu of the ON SCREEN LANGUAGE is already open Note Make sure that the TV DVD switch on the remote control unit is set to DVD when using the 5 2 3 and numeric buttons for controlling the unit About inv...

Page 13: ... item When connecting to a DTS MPEG Multichannel and DOLBY Digital decoder select STREAM PCM When connecting to a Dolby Digital decoder select DOLBY DIGITAL PCM When connecting to other digital device select PCM ONLY 7 Press ENTER The TV screen returns to the opening display To bring up the DVD PLAYER SET UP display later Press CHOICE for a few seconds until the DVD PLAYER SET UP display appears S...

Page 14: ...he transport status stop playback pause etc on the TV screen Press ON SCREEN Example for DVD VIDEO Note that pressing ON SCREEN again brings up the menu bar under the status bar from which you can access various functions See page 24 for details about the menu bar To turn off the status bar Press ON SCREEN repeatedly until the status bar goes off 7 8 0 3 ON SCREEN MENU DISPLAY EJECT TOP MENU 3 7 8...

Page 15: ...unit is turned on and playback starts from the interrupted position If you turn on the unit by pressing STANDBY ON then press 3 playback starts from the beginning of the disc Note that the memory is cleared if you eject the disc When the resume mode is DISC RESUME When you press 7 the unit stops playback and memorizes the interrupted position The TV screen shows RESUME STOP and the RESUME indicato...

Page 16: ...egards each side as a different disc Therefore to resume playback of such a disc the disc must be inserted with the same side down When the unit memorizes an interrupted point for a disc it also memorizes Audio Subtitle and Angle settings The unit may not resume playback exactly from the interrupted point In the case of an SVCD Video CD disc with PBC function the unit may resume playback from a po...

Page 17: ...fore the current position NOTES This function works only within the same title though it works between chapters This function may not work with some DVD VIDEO discs Locating the beginning of a scene or song For DVD VIDEO During playback you can skip a chapter or title depending on the disc configuration For SVCD Video CD During playback without PBC function you can skip a track For Audio CD During...

Page 18: ... abbreviation of Playback Control Some SVCD Video CD discs recorded with PBC have their own menus such as a list of the songs of the disc You can locate a specific scene by using the PBC menu 1 In stop mode press 3 or TOP MENU A disc menu appears on the TV screen 2 Press the numeric buttons to select the desired item To select 5 press 5 To select 23 press 10 10 then 3 To select 40 press 10 10 10 t...

Page 19: ...ied time is displayed in the pull down menu Example for DVD VIDEO To play back from 2 H 34 M 00 S Press 2 3 then 4 Example for SVCD Video CD Audio CD To play back from 23 M 40 S Press 2 3 then 4 You do not have to press 0 to enter the trailing zeros for the last two digits in the example above To correct a mistake Press 2 repeatedly to move back to the digit where you entered a wrong number and re...

Page 20: ...sing ON SCREEN brings up the status bar When all of the programmed tracks have finished playback the unit stops and the program table appears again Note that the program remains During program playback you cannot edit the program contents To check the program contents During playback press 7 Playback stops and the program table is shown When the unit is playing back an Audio CD and the program tab...

Page 21: ...ll repeat Repeat 1 and off The indication on the display window shows the selected repeat mode Repeats the current title for DVD VIDEO or all tracks for SVCD Video CD Audio CD 1 Repeats the current chapter for DVD VIDEO or the current track for SVCD Video CD Audio CD No indication The repeat mode is off A window which indicates the current repeat mode will be displayed on the TV screen The mode in...

Page 22: ...scene angle To select the subtitle language SUBTITLE Some DVD VIDEO and SVCD discs contain more than one subtitle language You can choose a desired one from them Hint At the beginning of the part if the subtitles are recorded appears on the TV screen except when the ON SCREEN GUIDE preference is set to OFF 1 During playback press SUBTITLE The subtitle selection window appears on the TV screen 2 Pr...

Page 23: ...r several seconds For DVD VIDEO the selected language may be abbreviated on the TV screen See Appendix B Table of languages and their abbreviations on page 43 To select a scene angle of DVD VIDEO ANGLE You can enjoy a variety of scene angles if the DVD VIDEO disc contains multi angle parts where multiple cameras were used to shoot the same scene from different angles Hint At the beginning of a mul...

Page 24: ...ayback press VFP The VFP mode selection window appears on the TV screen 2 Press 2 3 to select the desired preset Each time you press the button the VFP mode changes as follows Set the video type most suitable to the current program or the room conditions NORMAL for watching TV in a general room CINEMA for watching a movie software in a room with suppressed light USER 1 USER 2 you can adjust parame...

Page 25: ...the button the 3D PHONIC mode changes as follows ACTION Suitable for action movies and sports programs in which the sound source moves DRAMA Natural and warm sound You can enjoy movies in a relaxed mood THEATER You can enjoy sound effects like in a theater 3 Press 5 to adjust the effect level You can set the effect level from 1 to 5 The higher value enhances the effect To dismiss the 3D PHONIC win...

Page 26: ...ime mode shown in the display window and in the status bar Press ENTER to select the time mode from the following TOTAL Current title elapsed time T REM Current title remaining time TIME Current chapter elapsed time REM Current chapter remaining time Repeat mode See also page 19 Selects the repeat mode during playback 1 Open the pull down window 2 Press 5 to select the repeat mode from the followi...

Page 27: ...nt track remaining time while in stop mode current track total time TOTAL Disc elapsed time T REM Disc remaining time while in stop mode disc total time Repeat mode See also page 19 Selects the repeat mode 1 Open the pull down window 2 Press 5 to select the repeat mode from the following TRACK Current track repeat ALL All track repeat A B A B repeat OFF Repeat mode deactivated 3 Press ENTER to mak...

Page 28: ...back ENTER Starts playback while stopped 3 SELECT Starts playback while stopped or paused 7 Stops playback 8 Pauses playback 4 Skips back or forward a track during playback Selects the previous or next track while stopped If you press 3 during playback or press 7 to stop playback followed by 3 the unit starts playback from the beginning of the current track NOTES The unit does not support packet w...

Page 29: ...Only MP3 files are shown on the MP3 CONTROL display The order of groups tracks shown in the MP3 CONTROL display may differ from the order shown on your personal computer when you set the disc on your computer Direct selection You can select a desired group directly by specifying the group number 1 During playback or while stopped press TITLE GROUP G is shown in the group display area of the displa...

Page 30: ... playback press REPEAT until no repeat icon is shown on the display window While stopped press REPEAT until repeat mode indication on the MP3 CONTROL display goes off MP3 CONTROL display Display window Function REPEAT TRACK 1 Repeats the current track REPEAT GROUP Repeats all tracks in the current group REPEAT ALL Repeats all tracks on the disc No indication The repeat mode is off 7 ENTER REPEAT 3...

Page 31: ...rmat The unit does not support packet writing UDF format discs The unit supports discs recorded with multiple sessions The unit may not be able to read some discs or may take a long time to display a picture on the disc due to disc characteristics recording conditions or numbers of groups folders etc Programmed and random playback functions do not work with JPEG discs The screen saver function wil...

Page 32: ...ly slide show mode You can see files still pictures one after another automatically To start the slide show Press 3 SELECT The slide show starts from the beginning of the disc Each file still picture is displayed for approximately 3 seconds To stop slide show playback in the middle Press 7 or MENU The TV screen returns to the JPEG CONTROL display Pressing 3 SELECT resumes slide show playback from ...

Page 33: ...s the repeat mode When the repeat mode is turned on the indicator lights in the display window The selected repeat mode is shown on the JPEG CONTROL display REPEAT ALL All files on the disc are repeated REPEAT GROUP All files in the current group are repeated No indication The repeat mode is off 2 Press 3 SELECT to start repeat playback To stop repeat playback Press 7 The repeat mode remains activ...

Page 34: ...ed item changes 4 Press ENTER A pull down menu appears over the selected item Note Make sure that the TV DVD switch on the remote control unit is set to DVD when using the 5 2 3 and numeric buttons for controlling the unit ENTER CHOICE 5 2 3 TV DVD switch TV DVD SELECT ENTER USE 5 23 TO SELECT USE ENTER TO CONFIRM TO EXIT PRESS CHOICE MENU LANGUAGE ENGLISH AUDIO LANGUAGE ENGLISH SUBTITLE ENGLISH O...

Page 35: ... playback SUBTITLE You can select the default subtitle language to be displayed if it is contained on a DVD VIDEO disc Setting options OFF ENGLISH SPANISH FRENCH CHINESE GERMAN ITALIAN JAPANESE language code from AA to ZU If the disc does not have a subtitle in the selected language the disc s default language will be used For details about language codes see Appendix B Table of languages and thei...

Page 36: ...be set correctly See Appendix C Digital output signal chart on page 43 for details about the relation between the setting and output signals Setting options PCM ONLY DOLBY DIGITAL PCM STREAM PCM PCM ONLY select when you connect the DIGITAL OUT jack of the unit to the linear PCM digital input of other audio equipment DOLBY DIGITAL PCM select when you connect the digital input of a Dolby Digital dec...

Page 37: ...function is deactivated DISC RESUME when selected the unit can resume playback of the last 30 discs played The unit retains a memory of the interrupted positions of the last 30 discs played even though they have been removed from the disc slot ON SCREEN GUIDE The unit can display on screen guide icons or characters on the picture which show what is happening to the disc or the unit Example of on s...

Page 38: ...enu In the pull down menu NONE and levels 8 to 1 are available NONE does not restrict playback Level 1 is the strictest level Discs rated higher than the selected level are restricted 7 Press 5 to select a desired parental lock level then press ENTER moves to PASSWORD 8 Press the numeric buttons 0 to 9 to enter a 4 digit password 9 Press ENTER The parental lock feature is set moves to EXIT Pressin...

Page 39: ...rd The password entered in this step becomes the new password If you want to keep the same password as before enter the same password 7 Press ENTER moves to EXIT Pressing ENTER again returns to the OTHERS menu of the preference display NOTE If you enter the wrong password more than 3 times in step 3 above moves to EXIT automatically and 5 do not work To temporarily release the Parental Lock If the...

Page 40: ...indicator 2 Program mode indicator 3 Repeat mode indicator 4 Random indicator 5 Resume indicator 6 S VIDEO indicator 7 3 play 8 pause indicators 8 Multi information window Connector panel 1 PCM STREAM connector 2 COAXIAL jack 3 AUDIO OUT jacks 4 VIDEO OUT jack 5 AV COMPU LINK jacks 6 AV OUT connector 7 VIDEO SIGNAL SELECTOR 8 DIRECTION switch 1 2 3 4 3 9 0 6 8 7 5 1 2 3 4 5 6 8 7 1 3 6 8 4 5 2 7 P...

Page 41: ...Y ON buttons 10 Numeric buttons 9 15 18 TV VIDEO CANCEL button 18 TITLE GROUP button 16 27 31 MENU button 16 Cursor selection 5 Up Down 2 Left 3 Right CH VOL buttons 9 24 32 _ ON SCREEN button 12 17 24 3 SELECT button 12 14 26 30 8 button 13 15 26 ZOOM button 22 VFP button 22 AUDIO button 21 AMP VOL button 9 TV2 2 TV1 1 TV3 3 TV5 5 TV4 4 TV6 6 TV8 8 TV7 7 TV9 9 TV0 0 TV 10 MUTING 10 VFP ZOOM AUDIO...

Page 42: ...The unit is connected to a VCR directly and the copyguard function is activated Connect the unit so that the picture signal flows directly to the TV With some discs the picture may be blurred when PICTURE SOURCE is set to FILM or AUTO Set PICTURE SOURCE to VIDEO NORMAL or VIDEO ACTIVE Check that the DIRECTION switch is set to the appropriate position according to your installation See page 6 Audio...

Page 43: ...UT pin jack 2 0 Vrms 10 kΩ DIGITAL OUT COAXIAL 0 5 Vp p 75 Ω termination DIGITAL OUT OPTICAL 21 dBm to 15 dBm peak Audio characteristics Frequency response CD sampling frequency 44 1 kHz 2 Hz to 20 kHz DVD sampling frequency 48 kHz 2 Hz to 22 kHz 4 Hz to 20 kHz for DTS and Dolby Digital bitstream signals DVD sampling frequency 96 kHz 2 Hz to 44 kHz Dynamic range 16 bit More than 98 dB 20 bit More ...

Page 44: ...moros KN Saint Kitts and Nevis KP Korea Democratic People s Republic of KR Korea Republic of KW Kuwait KY Cayman Islands KZ Kazakhstan LA Lao People s Democratic Republic LB Lebanon LC Saint Lucia LI Liechtenstein LK Sri Lanka LR Liberia LS Lesotho LT Lithuania LU Luxembourg LV Latvia LY Libyan Arab Jamahiriya MA Morocco MC Monaco MD Moldova Republic of MG Madagascar MH Marshall Islands ML Mali MM...

Page 45: ...alayalam SG Sangho TT Tatar BR Breton IA Interlingua MN Mongolian SH Serbo Croatian TW Twi CA Catalan IE Interlingue MO Moldavian SI Singhalese UK Ukrainian CO Corsican IK Inupiak MR Marathi SK Slovak UR Urdu CS Czech IN Indonesian MS Malay MAY SL Slovenian UZ Uzbek CY Welsh IS Icelandic MT Maltese SM Samoan VI Vietnamese DA Danish IW Hebrew MY Burmese SN Shona VO Volapuk DZ Bhutani JI Yiddish NA ...

Page 46: ...er or in an external receiver DTS stands for Digital Theater Systems Not all DTS discs contain six 5 1 channels of information Dynamic range The difference between the loudest and softest sounds JPEG A popular file format for still image compression and storage JPEG stands for Joint Photographic Experts Group There are three sub types of the JPEG format as follows baseline JPEG used for digital ca...

Page 47: ...ess it is specifically stated that it is designed for unattended operation or has a standby mode Switch off using the switch on the equipment and make sure that your family know how to do this Special arrangements may need to be made for infirm or handicapped people DON T use equipment such as personal stereos or radios so that you are distracted from the requirements of traffic safety It is illeg...

Reviews: