JVC KW-M950BW Instruction Manual Download Page 17

Widget

17

English

Widget

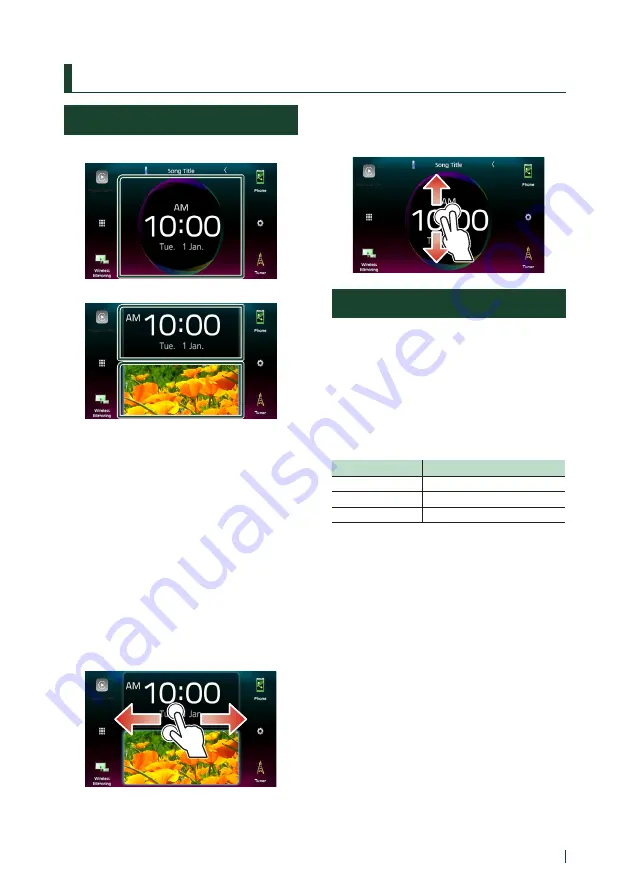
Widget Basic Operation

Big widget

Split widget

Widget list

• Clock/Spectrum analyzer Widget
• Current source information Widget
• Compass Widget
• VU meter Widget
• Photo Frame Widget


To change the widget style

Touch the widget area. You can change the 

displayed information or design.


To change the widget

Slide two fingers leftward/rightward.
When the split widget mode is selected, you 

should put the fingers on each of the windows 

before slide.


To change the widget format

Slide two fingers upward/downward to switch 

between the big and the split widget mode.

Photo Frame Widget

You can display a slideshow of the image 

files stored in the USB memory on the HOME 

screen.


Ñ

Preparation

• Select “ON” for Photo Frame Widget in the 

Widget SETUP screen. 

(P.18)


Acceptable Picture files

Max. Picture size

JPEG (.jpg, .jpeg) *

5,000 × 5,000

PNG (.png) 

1,000 × 1,000

BMP (.bmp)

1,000 × 1,000

• This unit can only play back files which are less 

than 50 MB.

• The maximum number of files per device is 

500.

• Picture files may not be played depending on 

their condition.

*  A progressive format is not supported.

Summary of Contents for KW-M950BW

Page 1: ...2 X 2019 JVC KENWOOD Corporation MONITOR WITH RECEIVER KW M950BW KW M950BWM INSTRUCTION MANUAL Updated information the latest Instruction Manual system updates new functions etc is available from http www jvc net cs car ...

Page 2: ...on 24 USB 26 Connecting a USB device 26 USB Basic Operation 26 Search Operation 28 iPod iPhone 29 Preparation 29 iPod iPhone Basic Operation 30 Search Operation 31 Tuner 32 Tuner Basic Operation 32 Memory Operation 33 Selecting Operation 33 Traffic Information FM only 34 Tuner Setup 34 Other External Components 36 View Camera 36 External audio video players AV IN 38 Using the external navigation u...

Page 3: ... Zone Control 65 Sound Effect 66 Listening Position DTA 67 Audio Setup memory 69 Remote control 70 Functions of the Remote control Buttons 70 Connection Installation 72 Before Installation 72 Installing the unit 74 Troubleshooting 79 Problems and Solutions 79 Error Messages 79 Appendix 81 Playable Media and Files 81 Specifications 82 About this Unit 84 ...

Page 4: ...faceplate is stained badly wipe it with a cloth moistened with neutral cleaner then wipe it again with a clean soft dry cloth NOTE Applying spray cleaner directly to the unit may damage its mechanical parts Wiping the faceplate with a hard cloth or using a volatile liquid such as thinner or alcohol may scratch the surface or erase the screened print Ñ Ñ Acquiring GPS signal The first time you turn...

Page 5: ...e a clear explanation of operations For this reason they may be different from the actual screens or panels or some display patterns may be different from the actual ones Display language English is used for the purpose of explanation You can select a display language from the SETUP menu See User Interface Setup P 53 ...

Page 6: ...ill go up to 15 when you keep pressing P 10 2 FNC Displays the popup menu screen Pressing for 1 second starts the voice recognition function P 48 While Apple CarPlay or Android Auto is connected starts the function on the Apple CarPlay or the Android Auto screen When neither Apple CarPlay Android Auto nor a Bluetooth Hands Free phone is connected pressing and holding displays Bluetooth pairing wai...

Page 7: ...se this unit first time 1 Set each item as follows Language Select the language used for the control screen and setting items Default is British English en 1 Touch Language 2 Touch Language select 3 Select the desired language 4 Touch For details see User Interface Setup P 53 Clock Sets the synchronization of the clock and adjusts it For details see Calendar clock settings P 9 Display Set the butt...

Page 8: ...rity Code Setup You can set up a security code to protect your receiver system against theft When the Security Code function is activated the code cannot be changed and the function cannot be deactivated Note that the Security Code can be set with a 4 to 8 digit number of your choice Preparation Set DEMO to OFF in the Special screen P 56 1 Press the FNC button h h Popup menu appears 2 Touch h h HO...

Page 9: ...screen h h Security Code Set screen appears 2 Enter the current registered security code and touch Enter 3 Enter a new security code with 4 to 8 digit number and touch Enter 4 Enter the same code again and touch Enter The new security code is registered To clear the security code 1 Touch Security Code Cancellation on the Security screen h h Security Code Set screen appears 2 Enter the current regi...

Page 10: ... screen gently to select an item on the screen Touch and hold Touch the screen and keep your finger in place until the display changes or a message is displayed Flick Slide your finger quickly to the left or right on the screen to change the page You can scroll a list screen by flicking up down on the screen Swipe Slide your finger up or down on the screen to scroll the screen Gesture Touch Contro...

Page 11: ...s to the one you have set The function key1 and 2 are set to Camera and Audio function as default For the function setting refer to Customize popup menu functions P 55 Displays the view camera screen P 36 Displays the Audio screen P 60 Touch and hold to display the Customize FNC Menu screen P 55 2 Short cut source icons The source changes to the one you have set with a short cut For the short cut ...

Page 12: ...or split widget mode by sliding 2 fingers upward downward 5 Displays the SETUP screen P 56 Display the HOME screen 1 Press the FNC button h h Popup menu appears 2 Touch h h HOME screen appears Source selection screen description You can display icons of all playback sources and options on the source selection screen To change pages flick your finger leftward rightward on the screen 2 3 4 1 1 Chang...

Page 13: ...cted to the AV IN input terminal 2 P 38 Displays the Wireless Mirroring screen P 23 Displays the Audio screen P 60 Displays the screen you have set in the Customize Favorite Key screen P 54 Touch and hold to display the Customize Favorite Key screen 3 Turns off the AV source P 14 Turns off the unit P 7 1 When connecting as Apple CarPlay or Android Auto it works as a phone provided in Apple CarPlay...

Page 14: ...urce 1 Press the FNC button h h Popup menu appears 2 Touch h h HOME screen appears 3 Touch 4 Touch AV Off Customize Short cut source icons on HOME screen You can arrange the positions of the source icons as you like 1 Press the FNC button h h Popup menu appears 2 Touch h h HOME screen appears 3 Touch 4 Touch and hold the icon which you want to move in the customizing mode 5 Drag the icon to the de...

Page 15: ...ith a short cut For the short cut setting refer to Customize Short cut source icons on HOME screen P 14 3 Content list Displays the track file station channel list 4 Connected Bluetooth device information 5 Artwork information You can select whether to display an artwork and song information or only song information in more detail Touching the artwork area switches to the VU meter The USB iPod Blu...

Page 16: ...m this screen 6 1 2 3 4 5 1 Displays the list type selection window 2 Displays a music movie file list 3 Text scroll Scrolls the displayed text 4 etc Keys with various functions are displayed here Plays all tracks in the folder containing the current track Jumps to the letter you entered alphabetical search Moves to the upper hierarchy level 5 Page scroll You can change pages to display more items...

Page 17: ...windows before slide To change the widget format Slide two fingers upward downward to switch between the big and the split widget mode Photo Frame Widget You can display a slideshow of the image files stored in the USB memory on the HOME screen Ñ Ñ Preparation Select ON for Photo Frame Widget in the Widget SETUP screen P 18 Acceptable Picture files Max Picture size JPEG jpg jpeg 5 000 5 000 PNG pn...

Page 18: ...Widget Determine whether to use the photo frame widget ON Default OFF Photo Frame SETUP Make settings related to photo play display 7 Touch To Photo Frame Setup 1 Touch Photo Frame SETUP on the Widget SETUP screen 2 Set each item as follows Sort Order Specify a file sorting criterion By Name Ascending By Name Descending By Date Newest First Default By Date Oldest First Slide Show Interval Specify ...

Page 19: ...Device List and use it as the Apple CarPlay device Preparation To register an iPhone by the connection via the USB Black terminal Connect an iPhone via the USB Black terminal and operate the iPhone according to the confirmation messages displayed on the iPhone The iPhone is registered in Apple CarPlay Device List Removing the iPhone from the USB Black terminal and selecting the registered iPhone f...

Page 20: ...pup menu appears 2 Touch h h HOME screen appears 3 Touch h h SETUP screen appears 4 Touch AV h h AV screen appears 5 Touch Apple CarPlay Device List 6 Select a device The Apple CarPlay device connected via the USB and the registered Apple CarPlay devices ready for wireless connection are displayed Displays a Bluetooth pairing waiting dialog For details see Register the Bluetooth device P 41 Displa...

Page 21: ... Switch to the Apple CarPlay screen while listening to another source 1 Press the FNC button h h Popup menu appears 2 Touch DISP NOTE This operation is available when DISP Key is set to Mirroring on the User Interface screen P 53 When listening to another source with the Apple CarPlay screen displayed playing music in the Apple CarPlay mode will switch the current source to the Apple CarPlay sourc...

Page 22: ...id device 3 Press the FNC button h h Popup menu appears 4 Touch 5 Touch 6 Touch Android Auto P 13 Ñ Ñ Operation buttons and available Apps on the Android Auto screen You can perform the operations of the Apps of the connected Android device The items displayed on the screen differ among the connected Android devices To enter the Android Auto mode touch the Android Auto icon on the source selection...

Page 23: ...s 2 Touch h h HOME screen appears 3 Touch 4 Touch Wireless Mirroring P 13 h h The App screen is displayed 5 Operate your Android device to activate the Wireless Mirroring function then connect to this unit 6 Select KW M as the network to use h h When the connection is established then the same screen displayed on the Android device is displayed NOTE Apps is discontinued when the power is turned ON...

Page 24: ...rtwork Displays hides artwork area Picture data is displayed if available from the current content 2 Playing time For confirmation of play time 3 Operation keys Displays the Menu screen New radio station that relates to the artist of the currently being played song is selected and playback starts Skips the current song Plays or pauses the content of the current station Saves the currently being pl...

Page 25: ...ur smartphone or at www spotify com Because Spotify is a third party service the specifications are subject to change without prior notice Accordingly compatibility may be impaired or some or all of the services may become unavailable Some functions of Spotify cannot be operated from this unit For issues on using the application contact Spotify at www spotify com Establish an Internet connection ...

Page 26: ...is manual indicates a flash memory device About the file system The file system should be the one of the following FAT16 FAT32 exFAT NTFS NOTE Install the USB device in the place where it will not affect safe driving You cannot connect a USB device via a USB hub and Multi Card Reader Take backups of the audio files used with this unit The files can be erased depending on the operating conditions o...

Page 27: ...g the circle left or right to change the playing position Video file only 4 Operation keys 1 Searches track file For details on search operation see Search Operation P 28 E F Searches the previous next track file Touch and hold to fast forward or fast backward DH Plays or pauses Touch to attenuate restore the sound 5 Content list Touch the right side of the screen to display the Content list Touch...

Page 28: ...t the desired item in the list Repeat this step until you find the desired file Ñ Ñ Link search You can search for a file of the same artist album genre as that in the current track 1 Touch Link Search 2 Touch the desired tag type You can select from artists albums and genres h h The list corresponding to your selection appears 3 Touch the desired item in the content list Ñ Ñ Folder search You can...

Page 29: ...apable iPhone turn off Apple CarPlay by operating the iPhone at functional setup before connecting iPhone For details of the setup method contact the manufacturer of the terminal Plug the iPod iPhone into the gray USB terminal with the KS U62 optional accessory Only one iPod iPhone can be connected 1 Connect the iPod iPhone using the KS U62 P 77 2 Press the FNC button h h Popup menu appears 3 Touc...

Page 30: ... B fast forward A fast backward H pause 4 Operation keys 1 Searches for a track file For details on search operation see Search Operation P 31 E F Searches for the previous next track file Touch and hold to fast forward or fast backward DH Plays or pauses Touch to attenuate restore the sound 5 Content list Touch the right side of the screen to display the Content list Touch again to close the list...

Page 31: ... Touch the desired category h h The list corresponding to your selection appears 3 Touch to select the desired item in the list Repeat this step until you find the desired file Ñ Ñ Link search You can search for a file of the same artist album genre composer as that in the current track 1 Touch Link Search 2 Touch the desired tag type You can select from artists albums genres and composers h h The...

Page 32: ...anged see 2 in table SSM FM only Presets stations automatically For details see Auto memory P 33 Displays the Tuner SETUP screen For details see Tuner Setup P 34 Touch to attenuates restores the sound 6 PTY FM only Searches a program by setting program type For details see Search by program type P 33 7 MONO FM only Select the Monaural reception 8 TI FM only Sets the traffic information mode on For...

Page 33: ... memory 3 Touch 1 6 in which you want to store the station for 2 seconds until a beep sounds Selecting Operation Ñ Ñ Preset select You can list and select memorized station This function can be used from the remote control P 71 1 Select a station from the list Ñ Ñ Search by program type FM only You can tune to a station with a specific program type when listening to FM 1 Touch PTY h h PTY Search s...

Page 34: ...tion Touch Cancel Tuner Setup You can set tuner related parameters 1 Touch h h Tuner SETUP screen appears 2 Set each item as follows NEWS FM only Sets a news bulletin interrupt time Default is OFF AF FM only When station reception is poor automatically switches to the station that is broadcasting the same program over the same Radio Data System network Default is OFF Regional FM only Sets whether ...

Page 35: ... FM AM intervals are set to 50 kHz 9 kHz US Select this when using in North Central South America FM AM intervals are set to 200 kHz 10 kHz Europe Select this when using in any other areas FM AM intervals are set to 50 kHz 9 kHz Outside Oceania area US Select this when using in North Central South America FM AM intervals are set to 200 kHz 10 kHz Others Default FM AM intervals are set to 50 kHz 9 ...

Page 36: ...camera switching keys It is necessary to set Camera Assignment Settings beforehand See To switch the view camera P 36 2 Camera off Touch to exit the camera screen 1 When two or more cameras of rear front left and right are connected with this unit To switch the view camera 1 Touch 1 h h Camera switching keys appear left right side 2 Select a view camera you want to switch NOTE To switch to the pic...

Page 37: ...the camera assignment settings 1 Touch Camera Assignment Settings on the Camera screen P 36 2 Set each item as follows FRONT VIEW CAMERA Set the camera assignment from view camera connected to Front view camera input terminal AV IN Set the camera assignment from view camera connected to AV IN input terminal For Front view camera input terminal 1 Touch FRONT VIEW CAMERA h h Displays the picture fro...

Page 38: ...ks to their initial default position External audio video players AV IN 1 Connect an external component to the AV IN input terminal P 76 2 Select AV IN as the source P 13 3 Turn on the connected component and start playing the source NOTE To select the AV IN source it is necessary to set AV IN to None in Camera Assignment Settings P 37 Using the external navigation unit outside oceania area You ca...

Page 39: ...onnect the TV tuner commercially available with this unit and watch TV Preparation When you use TV control function connect the TV tuner commercially available and set 3rd Party TV Tuner Control in AV Setup P 58 to ON The TV tuner can be controlled with its supplied remote control through the remote sensor on the front panel of this unit 1 Press the FNC button h h Popup menu appears 2 Touch h h HO...

Page 40: ...ces Connecting conditions may vary depending on your environment Some Bluetooth devices are disconnected when this unit is turned off The Bluetooth devices cannot be used while using Apple CarPlay The Bluetooth currently connected with other device is disconnected when an iPhone compatible with Apple CarPlay is connected Ñ Ñ About the cell phone and Bluetooth audio player This unit conforms to the...

Page 41: ...iOS smartphone registers the smartphone as a Bluetooth device 1 Press the FNC button h h Popup menu appears 2 Touch h h HOME screen appears 3 Touch h h SETUP screen appears 4 Touch Bluetooth h h Bluetooth SETUP screen appears 5 Touch Select Device on the Bluetooth Setup screen 6 Touch on the Select Device screen h h Bluetooth pairing waiting dialog appears NOTE You can also register an iPhone on t...

Page 42: ...eted the Bluetooth connection icon appears on the screen NOTE When registering the iPhone that is available for Apple CarPlay wirelessly a confirmation message appears Yes Displays the Apple CarPlay screen for wireless connection No Apple CarPlay is not connected When using Apple CarPlay see Select an Apple CarPlay device P 20 Bluetooth Setup NOTE The Bluetooth Setup is disabled while using Apple ...

Page 43: ...as hands free phone 1 or 2 Audio A2DP App SPP Select to interwork with an application installed in a smartphone or to use as an audio player 4 Touch Close To delete the registered Bluetooth device 1 Touch on the Select Device screen 2 Touch the device name to check þ All Selects all Bluetooth devices All Clears all check marks NOTE You cannot select an Android device connected as an Android Auto d...

Page 44: ... 13 NOTE The Bluetooth audio source is disabled while using Apple CarPlay The Bluetooth audio source is disabled when the device set as Audio App is using Android Auto Ñ Ñ Bluetooth basic operation Control screen 3 2 1 4 6 5 1 Artwork VU meter Displays hides artwork area When touched switches the artwork to the VU meter 2 Play mode indicator Playing time D H Current play mode indicator Meanings of...

Page 45: ...ys do not appear operate from the player Depending on your cell phone or audio player sound may be heard and controlled but text information may not appear If the volume is too low raise it on your cell phone or audio player Ñ Ñ JVC Streaming DJ Up to 5 Bluetooth audio device can be connected and switched easily to play music 1 Touch h h A list of registered devices is displayed 2 Touch of device ...

Page 46: ... and two Bluetooth devices connections cannot be used Only the Apple CarPlay or Android Auto Hands Free function can be used Ñ Ñ Make a call 1 Press the FNC button h h Popup menu appears 2 Touch h h HOME screen appears 3 Touch 4 Touch Phone P 13 h h Hands Free screen appears NOTE If your cell phone supports PBAP you can display the phone book and call lists onto the touch panel screen when the cel...

Page 47: ...nds free function Call using call records 1 Touch 2 Select the phone number from the list Call using the phonebook 1 Touch 2 Touch 3 Select the initial Characters with no corresponding name will not appear A first character with an accent character such as ü can be searched for with a non accent character u A character with an accent character in a sentence cannot be searched for 4 Select the pers...

Page 48: ...ce Recognition You can access the voice recognition function of the cell phone connected to this unit You can search the cell phone phonebook by voice The functionality depends on the cell phone 1 Press the FNC button for 1 second Press for 1 second h h Voice Recognition screen appears 2 Start speaking NOTE You can use the voice recognition function by touching on the Hands Free screen ...

Page 49: ...ne Touch DTMF to display the tone input screen You can send tones by touching desired keys on the screen Switching between speaking voice output destinations Touching each time switches speaking voice output destinations between the cell phone and the speaker Call waiting When you receive a new call while talking on the phone you can answer the newly received call by touching The current call is p...

Page 50: ...uch SET See Call by entering a phone number P 48 Delete To delete a preset number touch Delete and then touch OK on the confirmation screen Ñ Ñ Phonebook transfer You can transfer phonebook data from your Bluetooth smartphone using PBAP 1 Touch 2 Touch h h Phonebook data transfer starts NOTE If the Phonebook contains more than 1000 entries Phonebook data cannot be transferred If no Phonebook has b...

Page 51: ...kers All Default Outputs sound from all speakers Auto Response Set the automatic response time to pick up an incoming call OFF Default Turns off the Automatic response function 1 5 10 15 20 25 30 Sets the ringing time second Auto Pairing When set to ON the Apple Auto Pairing function is turned on to automatically register the iPod touch or iPhone connected to this unit ON Default Turns on the Appl...

Page 52: ...spect ratio of video and displays video fully on the screen Normal Displays video at the ratio of 4 3 Auto Displays video fully vertically or horizontally with no ratio change NOTE Settings to adjust vary depending on the current source System Setup 1 Press the FNC button h h Popup menu appears 2 Touch h h HOME screen appears 3 Touch See the following section for each setting Set up AV P 58 Set up...

Page 53: ...t Adjust the sensing position of the touch panel P 55 Time Format Select the time display format 12 Hour Default 24 Hour Clock GPS SYNC Default Synchronizes the clock time with the GPS Manual Set the clock manually Time Zone Select the time zone Clock Adjust If you select Manual for Clock adjust the date and time manually P 55 DISP Key Select the source screen displayed when in the popup menu scre...

Page 54: ...To initialize the contents touch Learning initialisation of Steering Remote Controller in User Interface screen After you touch Initialise a confirmation message appears Follow the message and complete the operation Ñ Ñ Customize Favorite key You can jump to your favorite function easily from Favorite icon NOTE Favorite icon may be disabled on some screens depending on the registered function When...

Page 55: ...t when you touch and hold the desired function key Ñ Ñ Adjust the date and time manually 1 Touch Clock on the User Interface screen 2 Select Manual 3 Touch Time Zone on the User Interface screen 4 Select the time zone 5 Touch Clock Adjust on the User Interface screen 6 Adjust the date then adjust the time 7 Touch Set Ñ Ñ Touch panel adjustment 1 Touch Touch Panel Adjust on the User Interface scree...

Page 56: ...e and then touch Yes to set all the settings to the initial default settings Audio SETUP Memory is not initialized Ñ Ñ Software Information You can confirm the software version of this unit 1 Touch Software Information in the Special screen 2 Confirm the software version NOTE For how to update the software see the relevant update procedure manual which comes with the software Display Setup 1 Press...

Page 57: ...lect whether to use the screen transition effect when the source control screen is switched to the Home screen ON Default OFF Ñ Ñ Change the wallpaper image 1 Touch Wallpaper Customize on the Display screen 2 Select an image from live or static wallpapers 1 2 1 Select a wallpaper color in advance 2 Select an original image in advance To select wallpaper color 1 Touch Wallpaper Colour on the Wallpa...

Page 58: ...can set AV parameters 1 Press the FNC button h h Popup menu appears 2 Touch h h HOME screen appears 3 Touch h h SETUP screen appears 4 Touch AV h h AV screen appears 5 Set each parameter as follows Android Auto Device Select KW M950BW Select the device to be used in the Android Auto mode P 59 Apple CarPlay Device List Select the device to be used in the Apple CarPlay mode P 20 Speech Quality Adjus...

Page 59: ... screen You cannot select iPod if it is connected via Bluetooth If you select USB iPod Tuner Spotify or Bluetooth audio as the main source you cannot select USB or iPod as the AV output source If you select Wireless Mirroring Apple CarPlay or Android Auto as the main source you cannot select USB or iPod as the AV output source Driving Position Select the driving position left or right Left Right D...

Page 60: ...rossover network mode for the speaker system used 2 way or 3 way speaker system 1 Press the FNC button h h Popup menu appears 2 Touch h h HOME screen appears 3 Touch h h Source selection screen appears 4 Touch AV Off 5 Press the FNC 1 button and the 2 button for 1 second at the same time 1 2 h h Speaker system select screen appears 6 Select the crossover network mode h h A confirmation screen appe...

Page 61: ...speaker type and its size to get the best sound effects When the speaker type and size are selected the speaker crossover network is set automatically Location Only for Front Rear Select the speaker position you have installed Tweeter Only for Front You can set up the tweeter when you are selecting front speakers None Small Medium Large Xʼover Display the speaker crossover setup screen You can adj...

Page 62: ...han Through in Xʼover 2 Only when Tweeter is set to Small Medium Large in Speaker Setup 3 Only when Subwoofer is set to a mode other than None in Speaker Setup When Speaker network is set to 3 way FREQ High Pass High Pass Filter adjustment HPF FREQ LPF FREQ Band Pass Band Pass Filter adjustment When Mid Range Speaker is selected on the Speaker Select screen FREQ Low Pass Low Pass Filter adjustment...

Page 63: ...ized setting for each category 1 Press the FNC button h h Popup menu appears 2 Touch h h HOME screen appears 3 Touch h h SETUP screen appears 4 Touch Audio h h Audio screen appears 5 Touch EQ SW Level 6 Touch the screen and set the Graphic Equalizer as desired Gain level area in dotted frame Adjust the gain level by touching each frequency bar You can select a frequency bar and adjust its level by...

Page 64: ...SB Ñ Ñ Save the EQ curve 1 Adjust the EQ curve 2 Touch Memory 3 Select where to save Volume Offset Finely adjust the volume of the current source to minimize the difference in volume between different sources 1 Press the FNC button h h Popup menu appears 2 Touch h h HOME screen appears 3 Touch h h SETUP screen appears 4 Touch Audio h h Audio screen appears 5 Touch Volume Offset 6 Touch or to adjus...

Page 65: ...e rear speaker sound is switched the audio source that is output at the AV OUTPUT terminal is also switched to the same source When the dual zone function is set to on the following functions are not available Output from the subwoofer Subwoofer Level Bass Boost P 66 Equalizer Control Sound Effect Listening Position P 63 66 67 Speaker Setup P 61 High resolution Sound Source File Playback You canno...

Page 66: ...driving noise by boosting specific frequencies in the audio signal OFF ON Space Enhancement Select the feeling of sound space enhancement OFF Small Medium Large This setting is not available for the Tuner source K2 Turn ON OFF the K2 function Technology to extrapolate and supplement with proprietary algorithm the high frequency range that is cut off when encoding Sound Response Virtually make the ...

Page 67: ...t up Front Focus P 68 Ñ Ñ Listening Position Adjust the sound delay time so that the sounds from different speakers arrive at the listener sitting on the selected seat at the same time 1 Touch Listening Position on the Position DTA screen 2 Select a listening position from Front R Right front Front L Left front Front All All front and All Position DTA control You can fine adjust your listening pos...

Page 68: ...meter as follows Sound Image LR Front Focus the sound image on the front of front seats Sound Image LR Rear Focus the sound image on the front of rear seats Size of the Virtual Sound Field Adjust the size of sound image to meet your taste If the sound image is shifted from the front move it back by Sound Image LR Front or Sound Image LR Rear Subwoofer Delay Adjust the delay time of subwoofer sound...

Page 69: ...TUP screen appears 4 Touch Audio h h Audio screen appears 5 Touch Audio Memory SETUP Memory Lock or unlock the Audio SETUP Memory Recall Clear Audio SETUP Memory Memorize the current audio settings Fader Balance Speaker X over Equalizer User Preset SW Level Position DTA Sound Effect P 60 Audio SETUP Recall Recall the memorized audio setting Audio SETUP Clear Clear the Audio SETUP Memory and the cu...

Page 70: ...t if the remote control falls down and gets wedged under the pedals while driving Do not leave the battery near fire or under direct sunlight A fire explosion or excessive heat generation may result Do not recharge short break up or heat the battery or place it in an open fire Such actions may cause the battery to leak fluid If spilled fluid comes in contact with your eyes or on clothing immediate...

Page 71: ... search mode see Direct search mode P 71 ASPECT Changes the aspect ratio To confirm the current aspect ratio setting operate on the touch panel P 52 Numeric Keypad Allows you to enter the number to search in the direct search mode For details on the direct search mode see Direct search mode P 71 For the tuner source allows you to enter the preset number If the preset number is single digit press t...

Page 72: ...be checked If your car s ignition does not have an ACC position connect the ignition wires to a power source that can be turned on and off with the ignition key If you connect the ignition wire to a power source with a constant voltage supply such as with battery wires the battery may be drained If the console has a lid make sure to install the unit so that the front panel will not hit the lid whe...

Page 73: ... mm x6 6 M5 x 8 mm x6 7 x1 8 3 5 m x1 9 x1 0 x1 Ñ Ñ Installation procedure 1 To prevent a short circuit remove the key from the ignition and disconnect the terminal of the battery 2 Make the proper input and output wire connections for each unit 3 Connect the speaker wires of the wiring harness 4 Connect the wiring harness wires in the following order ground battery ignition 5 Connect the wiring h...

Page 74: ...ing the GPS antenna other than the supplied one may cause a drop in positioning accuracy Depending on the type of car reception of the GPS satellite signals might not be possible with an inside installation Please install this GPS antenna in an area away from any antennas that are used with CB radios or satellite televisions The GPS antenna should be installed at a position that is spaced at least...

Page 75: ...icle s reverse lamp harness when using the optional rear view camera To steering remote To use the steering wheel remote control feature you need an exclusive remote adapter not supplied matched to your car If no connections are made do not let the cable come out from the tab Purple Black To rear right speaker To rear left speaker To front right speaker To front left speaker Speaker impedance 4 8 ...

Page 76: ... Left White Right Red 4 TV tuner remote output 5 External navigation interface Not covered areas Oceania 6 This jack accepts either AV IN 1 Left audio 2 Right audio 3 Ground 4 VIDEO or Side Left or Right view camera input 1 For more information see To set up the camera assignment settings P 37 1 2 3 4 7 Accessory 8 GPS Antenna Use the supplied GPS antenna Using the GPS antenna other than the suppl...

Page 77: ... also be connected to 11 Ñ Ñ Connecting a USB device USB device 2 USB Gray terminal 1 USB Black terminal 1 Accessory 2 Black 1 m 3 Accessory 3 Gray 1 m 3 1 USB maximum power supply current DC 5 V 1 5 A 2 Sold separately 3 See Securing the USB extension cable P 78 Ñ Ñ Connecting an iPod iPhone Lightning connector KS U62 0 8m 3 KS U62 0 8m 3 iPod iPhone 2 iPhone with Apple CarPlay 2 USB Gray termina...

Page 78: ...ring the USB extension cable Secure the USB extension cable with insulating tape or the like so that its connectors are not disconnected Ñ Ñ Connecting the camera 2 Front view camera 1 Left Side View Camera and Right Side View Camera 1 AV IN input Rear view camera input Yellow Front view camera input Yellow Rear view camera 1 AV cable 1 1 Sold separately 2 Up to 2 cameras of Front view camera Left...

Page 79: ...cord the file again Ñ Ñ Others The Touch Sensor Tone doesn t sound The preout jack is being used The Touch Sensor Tone cannot be output from the preout jack Error Messages When you fail to operate the unit correctly the cause of the failure appears as the message on the screen There is an error in the speaker wiring Please check the connections Protective circuit has been activated because a speak...

Page 80: ...e CarPlay The GPS antenna must be connected to use Apple CarPlay wirelessly Please verify the proper connections or plug in by USB to use Apple CarPlay The GPS antenna is not connected when the Apple CarPlay is started by connecting wirelessly or when the iPhone compatible with wireless Apple CarPlay is registered in Apple CarPlay Device List Check the connection of the GPS antenna or plug in over...

Page 81: ...ended that a car audio system should be configured with all High Resolution Audio compatible products from player to speaker to enjoy its high quality sound Acceptable Video files Profile Max Picture size Max bit rate Audio format MPEG 1 mpg mpeg 352 240 352 288 1 5 Mbps MPEG Audio Layer 2 MPEG 2 mpg mpeg MP ML 720 480 720 576 8 Mbps MPEG Audio Layer 2 H 264 MPEG 4 AVC mp4 m4v avi flv f4v Baseline...

Page 82: ...950BW 802 11 a b g n ac KW M950BWM 802 11 b g n Frequency Range KW M950BW Dual Band 2 4GHz 5GHz KW M950BWM 2 4GHz Channels KW M950BW Auto 1 11ch Auto 149 153 157 161ch KW M950BWM Auto 1 11ch Transfer rates MAX KW M950BW 11a 54 Mbps 11b 11 Mbps 11g 54 Mbps 11n 300 Mbps 11ac 867 Mbps KW M950BWM 11b 11 Mbps 11g 54 Mbps 11n 72 2 Mbps Output Power 2 4 GHz SISO 11b 14 dBm 2 dB 11g 13 dBm 2 dB 11n 20MHz ...

Page 83: ...W 4 Typical Power Output Front Rear Full Bandwidth Power at less than 1 THD 22 W 4 Output frequency band 20 88 000 Hz Preout Level V 4 V 10 kΩ Preout Impedance 300 Ω Speaker Impedance 4 8 Ω Graphics equalizer Band 13 Band Frequency BAND1 13 62 5 100 160 250 400 630 1k 1 6k 2 5k 4k 6 3k 10k 16k Hz Gain 9 8 7 6 5 4 3 2 1 0 1 2 3 4 5 6 7 8 9 dB 2 way X Over High pass filter Frequency Through 30 40 50...

Page 84: ...ries Use of the Made for Apple badge means that an accessory has been designed to connect specifically to the Apple product s identified in the badge and has been certified by the developer to meet Apple performance standards Apple is not responsible for the operation of this device or its compliance with safety and regulatory standards Please note that the use of this accessory with an Apple prod...

Page 85: ... BY THE COPYRIGHT HOLDERS AND CONTRIBUTORS AS IS AND ANY EXPRESS OR IMPLIED WARRANTIES INCLUDING BUT NOT LIMITED TO THE IMPLIED WARRANTIES OF MERCHANTABILITY AND FITNESS FOR A PARTICULAR PURPOSE ARE DISCLAIMED IN NO EVENT SHALL THE FOUNDATION OR CONTRIBUTORS BE LIABLE FOR ANY DIRECT INDIRECT INCIDENTAL SPECIAL EXEMPLARY OR CONSEQUENTIAL DAMAGES INCLUDING BUT NOT LIMITED TO PROCUREMENT OF SUBSTITUT...

Page 86: ...UCH DAMAGE חשמלי ציוד של לאשפה השלכה בדבר מידע למדינות רלוונטי סוללות וכן ישן ואלקטרוני מופרדת אשפה איסוף במערכת שמשתמשות X עם אשפה פח הסימון עם וסוללות מוצרים להשליך ניתן לא רגילה ביתית כאשפה עליו במתקן סוללות וכן ישן ואלקטרוני חשמלי ציוד למחזר יש שלהם הלוואי ובתוצרי כאלה בפריטים לטפל המסוגל מתקן אודות פרטים לקבלת המקומית הרשות עם קשר צרו יעזרו נאותים לאשפה והשלכה מיחזור אליכם הקרוב המיחזור ועל ב...

Page 87: ...nglish Hereby JVC KENWOOD declares that the radio equipment KW M950BWM is in compliance with Directive 2014 53 EU The full text of the EU declaration of conformity is available at the following internet address Türkçe Burada JVC KENWOOD KW M950BWM radyo ekipmanının 2014 53 AB Direktifine uygun olduğunu bildirir AB uyumluluk deklarasyonunun tam metni aşağıdaki internet adresinde mevcuttur URL http ...

Page 88: ......

Reviews: