


1-4
KS-F161
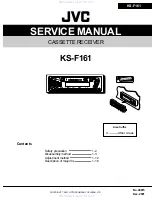
Removing the heat sink (SeeFig.5)
1. Removing the front chassis.
2. Removing the bottom cover.
3. Remove the three screws ( 1 and 1` ) retaining the
heat sink.
Removing the main board assembly
( See Fig. 5 to 7)
1. Removing the front chassis.
2. Removing the bottom cover.
3. Removing the heat sink.
Attach the heat sink with a screw ( 1` ) on operat-
ing checks.
4. Remove the two screws ( 2 ) retaining the main
board assembly.
5. Remove the two screws ( 3 ) retaining the rear
panel .
6. Separate the main board assembly and cassette
mechanism assembly.
7. Take out the main board assembly.
Heat sink
Fig. 5
1
1
1`
Main board assembly
Fig. 6
2
2
(
)
Rear panel
Fig. 7
3
3
www. xiaoyu163. com
QQ 376315150
9
9
2
8
9
4
2
9
8
TEL 13942296513
9
9
2
8
9
4
2
9
8
0
5
1
5
1
3
6
7
3
Q
Q
TEL 13942296513 QQ 376315150 892498299
TEL 13942296513 QQ 376315150 892498299


