background image

5

ENGLISH

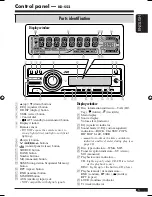
Control panel — 

KD-S52

Display window

Parts identification

1


5

 (up) / 

 (down) buttons

2

  E EQ (equalizer) button

3

  D DISP (display) button

4

  S SEL (select) button

5

  • Control dial


• 

 (standby/on attenuator) button

6

  Display window

7

  Remote sensor


•  DO NOT expose the remote sensor to 

strong light (direct sunlight or artificial 
lighting).

8


0

 (eject) button

9


4

/

¢


 buttons

p


 (control panel release) button

q

  SOURCE button

w

  BAND button

e

  Number buttons

r

  MO (monaural) button

t

  SSM (Strong-station Sequential Memory) 

button

y

  RPT (repeat) button

u

  RND (random) button

i

  M MODE button

o

  AUX (auxiliary) input jack


•  NOT compatible with digital signals.

Display window

;

  Disc information indicators—TAG (ID3 

Tag), 

 (folder), 

 (track/file)

a

  Main display

s

  Source display


Volume level indicator

d

  EQ (equalizer) indicator

f

  Sound mode (C-EQ: custom equalizer) 

indicators—ROCK, CLASSIC, POPS, 
HIP HOP, JAZZ, USER


• 

 also works as the time countdown 

indicator and level meter during play (see 
page 18).

g

  Disc type indicators—WMA, MP3

h

  Tuner reception indicators—ST (stereo), 

MO (monaural)

j

  Playback source indicators —


CH: 

Lights up only when CD-CH is selected 

as the playback source.

DISC: 

Lights up for the built-in CD player.

k

  Playback mode / item indicators—

RND (random), 

 (disc), 

 (folder), 

RPT (repeat)

l

  LOUD (loudness) indicator

/

  Tr (track) indicator

EN02-05_KD-S52[J]f.indd   5

EN02-05_KD-S52[J]f.indd   5

7/15/05   12:28:48 PM

7/15/05   12:28:48 PM

Summary of Contents for KD-S52

Page 1: ... página 8 For installation and connections refer to the separate manual Para la instalación y las conexiones refiérase al manual separado INSTRUCTIONS MANUAL DE INSTRUCCIONES For customer Use Enter below the Model No and Serial No which are located on the top or bottom of the cabinet Retain this information for future reference Model No Serial No GET0322 001A J ...

Page 2: ... guarantee that interference will not occur in a particular installation If this equipment does cause harmful interference to radio or television reception which can be determined by turning the equipment off and on the user is encouraged to try to correct the interference by one or more of the following measures Reorient or relocate the receiving antenna Increase the separation between the equipm...

Page 3: ...layback modes 15 Sound adjustments 16 Selecting preset sound modes C EQ custom equalizer 16 Adjusting the sound 16 General settings PSM 17 Basic procedure 17 Other main functions 20 Assigning titles to the sources 20 External component operations 21 Playing an external component 21 SIRIUS radio operations 22 Listening to the SIRIUS radio 23 Storing channels in memory 23 Listening to a preset chann...

Page 4: ...e begins Press and hold both buttons at the same time How to use the M MODE button If you press M MODE the unit goes into functions mode then the number buttons and 5 buttons work as different function buttons Ex When number button 2 works as MO monaural button Time countdown indicator To use these buttons for their original functions again after pressing M MODE wait for 5 seconds without pressing...

Page 5: ...utton i M MODE button o AUX auxiliary input jack NOT compatible with digital signals Display window Disc information indicators TAG ID3 Tag folder track file a Main display s Source display Volume level indicator d EQ equalizer indicator f Sound mode C EQ custom equalizer indicators ROCK CLASSIC POPS HIP HOP JAZZ USER also works as the time countdown indicator and level meter during play see page ...

Page 6: ...features 1 standby on attenuator button Turns the power on if pressed briefly or attenuates the sound when the power is on Turns the power off if pressed and held 2 SRC source button Selects the source 3 R reverse F forward buttons Searches for stations if pressed briefly Fast forwards or reverses the track if pressed and held Changes the tracks of the disc While listening to the SIRIUS radio Chan...

Page 7: ...e setting Discs produce very little noise compared with other sources Lower the volume before playing a disc to avoid damaging the speakers by the sudden increase of the output level Getting started Basic operations Ÿ You cannot select some sources if they are not ready For FM AM tuner For SIRIUS radio Select CD CH when using an Apple iPod or a JVC D player see page 21 iPod is a registered tradema...

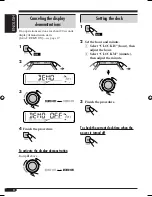
Page 8: ...tial DEMO ON see page 17 1 2 3 4 Finish the procedure To activate the display demonstration In step 3 above Setting the clock 1 2 Set the hour and minute 1 Select CLOCK H hour then adjust the hour 2 Select CLOCK M minute then adjust the minute 3 Finish the procedure To check the current clock time when the power is turned off ...

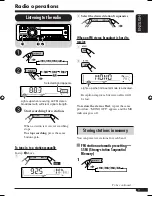
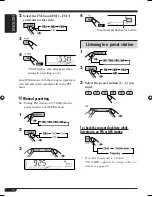
Page 9: ...in to a station manually In step above 1 2 Select the desired station frequencies When an FM stereo broadcast is hard to receive 1 2 Lights up when monaural mode is activated Reception improves but stereo effect will be lost To restore the stereo effect repeat the same procedure MONO OFF appears and the MO indicator goes off Storing stations in memory You can preset six stations for each band FM s...

Page 10: ...matically in the FM band Manual presetting Ex Storing FM station of 92 5 MHz into the preset number 4 of the FM1 band 1 2 3 4 Preset number flashes for a while Listening to a preset station 1 2 3 Select the preset station 1 6 you want or To check the current clock time while listening to an FM or AM station If no title is assigned to a station NO NAME appears To assign a title to a station see pag...

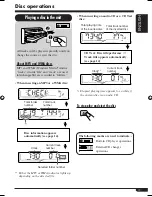
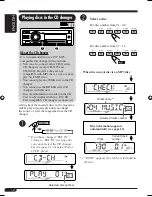
Page 11: ...erted disc CD Text Disc title performer Track title appears automatically see page 14 Current track number Clock 2 Total folder number Total track number Disc information appears automatically see page 14 Selected folder number Current track number Clock All tracks will be played repeatedly until you change the source or eject the disc About MP3 and WMA discs MP3 and WMA Windows Media Audio tracks...

Page 12: ...nect other CH X series CD changers except CH X99 and CH X100 However they are not compatible with MP3 discs so you cannot play back MP3 discs You cannot play any WMA disc in the CD changer You cannot use the KD MK series CD changers with this unit Disc text information recorded in the CD Text can be displayed when a JVC CD Text compatible CD changer is connected All tracks of the inserted discs in...

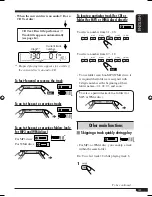
Page 13: ...e page 14 Current track number Clock 3 To locate a particular track for CD or folder for MP3 or WMA discs directly To select a number from 01 06 To select a number from 07 12 To use folder search on MP3 WMA discs it is required that folders are assigned with 2 digits number at the beginning of their folder names 01 02 03 and so on To select a particular track in a folder for MP3 or WMA disc Other ...

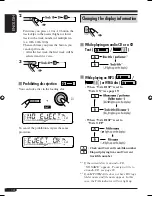
Page 14: ... slot To cancel the prohibition repeat the same procedure Changing the display information While playing an audio CD or a CD Text While playing an MP3 or WMA disc When TAG DISP is set to TAG ON see page 19 When TAG DISP is set to TAG OFF Clock and Current track file number Elapsed playing time and Current track file number 1 If the current disc is an audio CD NO NAME appears To assign a title to a...

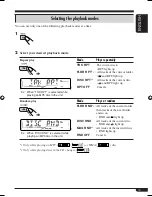
Page 15: ...t folder and RPT light up DISC RPT 4 All tracks of the current disc and RPT light up RPT OFF Cancels Random play Ex When DISC RND is selected while playing an MP3 disc in the unit Mode Plays at random FLDR RND 3 All tracks of the current folder then tracks of the next folder and so on RND and light up DISC RND All tracks of the current disc RND and light up MAG RND 4 All tracks of the inserted dis...

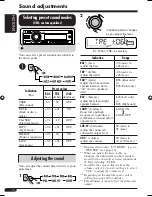
Page 16: ...L O MODE is set to WOOFER see page 19 2 When you adjust the bass treble or loudness the adjustment you have made is stored for the currently selected sound mode C EQ including USER 3 Normally the control dial works as the volume control So you do not have to select VOL to adjust the volume level 4 Depending on the amplifier gain control setting See page 19 for details 5 This adjustment cannot affe...

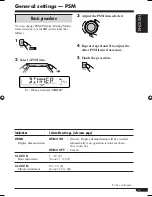
Page 17: ...elected 4 Repeat steps 2 and 3 to adjust the other PSM items if necessary 5 Finish the procedure To be continued Indications Selectable settings reference page DEMO Display demonstration DEMO ON Initial Display demonstration will be activated automatically if no operation is done for about 20 seconds 8 DEMO OFF Cancels CLOCK H Hour adjustment 1 12 8 Initial 1 1 00 CLOCK M Minute adjustment 00 59 8...

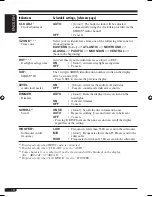
Page 18: ...LEVEL Audio level meter ON Initial Activates the audio level indicator OFF Cancels sound mode indicator is shown DIMMER Dimmer AUTO Initial Dims the display when you turn on the headlights ON Activates dimmer OFF Cancels SCROLL 3 Scroll ONCE Initial Scrolls the disc information once AUTO Repeats scrolling 5 second intervals in between OFF Cancels Pressing D DISP for more than one second can scroll...

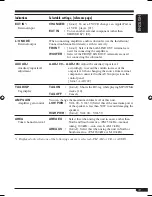
Page 19: ...void the sudden increase of the output level when changing the source from external component connected to the AUX input jack on the control panel Initial A ADJ 00 TAG DISP Tag display TAG ON Initial Shows the ID3 tag while playing MP3 WMA tracks 14 TAG OFF Cancels AMP GAIN Amplifier gain control You can change the maximum volume level of this unit LOW PWR VOL 00 VOL 30 Select this if the maximum ...

Page 20: ... assign a title to a CD Text or an MP3 WMA disc 1 Select the sources For FM AM tuner Tune in to a station For a CD in this unit Insert a CD For CDs in the CD changer Select CD CH then select a disc number 2 Enter the title assignment mode Ex When you select CD as the source 3 Assign a title 1 Select a character 2 Move to the next or previous character position 3 Repeat steps 1 and 2 until you fini...

Page 21: ...n external component This unit is ready for any Apple iPod or JVC D player control interface For details refer also to the manual supplied with the interface adapter for iPod KS PD100 or D player KS PD500 You can connect an external component to CD changer jack on the rear using Line Input Adapter KS U57 not supplied for any other components except iPod or D player Interface adapter for iPod KS PD...

Page 22: ...date If channels are updated after subscription updating starts automatically UPDATING flashes and no sound can be heard Update takes a few minutes to complete During update you cannot operate your SIRIUS radio Before operating your SIRIUS radio For connection see Installation Connection Manual separate volume Refer also to the Instructions supplied with your SIRIUS radio Before you can listen to ...

Page 23: ...channels rapidly When changing the category or channel invalid and unsubscribed channels are skipped automatically Listening to the SIRIUS radio Storing channels in memory You can preset six channels for each band Ex Storing a channel into preset number 4 1 Perform steps to on the left column to tune in to a channel you want 2 Preset number flashes for a while Listening to a preset channel 1 2 3 S...

Page 24: ...r holder of the case and lift the disc out holding it by the edges Always hold the disc by the edges Do not touch its recording surface When storing a disc into its case gently insert the disc around the center holder with the printed surface facing up Make sure to store discs into the cases after use To keep discs clean A dirty disc may not play correctly If a disc does become dirty wipe it with ...

Page 25: ...ded selecting CD for the playback source starts disc play Inserting a disc When a disc is inserted upside down PLEASE and EJECT appear alternately on the display Press 0 to eject the disc Do not insert 8 cm 3 3 16 discs single CD and unusual shape discs heart flower etc into the loading slot Playing a disc While fast forwarding or reversing on an MP3 or WMA disc you can only hear intermittent soun...

Page 26: ... VBR have a discrepancy in elapsed time display and do not show the actual elapsed time This difference becomes noticeable especially after performing the search function This unit cannot play back the following files MP3 files encoded with MP3i and MP3 PRO format MP3 files encoded in an unappropriated format MP3 files encoded with Layer 1 2 WMA files encoded with lossless professional and voice f...

Page 27: ... display Insert a correct disc into the loading slot MP3 WMA playback Disc cannot be played back Use a disc with MP3 WMA tracks recorded in the format compliant with ISO 9660 Level 1 Level 2 Romeo or Joliet Add the extension code mp3 or wma to the file names Noise is generated Skip to another track or change the disc Do not add the extension code mp3 or wma to non MP3 or WMA tracks A longer readou...

Page 28: ...art subscribing see page 22 NO SIGNAL scrolls on the display Move to an area with stronger signals NO ANTENNA scrolls on the display Connect the antenna firmly NO CH appears on the display for about 5 seconds then returns to the previous display Select another channel or continue listening to the previous channel NO information appears or scrolls on the display No text information for the selected...

Page 29: ...n 35 dB Capture Ratio 1 5 dB AM Tuner Sensitivity 20 µV Selectivity 35 dB CD PLAYER SECTION Type Compact disc player Signal Detection System Non contact optical pickup semiconductor laser Number of Channels 2 channels stereo Frequency Response 5 Hz to 20 000 Hz Dynamic Range 96 dB Signal to Noise Ratio 98 dB Wow and Flutter Less than measurable limit MP3 Decoding Format MPEG1 2 Audio Layer 3 Max B...

Page 30: ...ith operation Please reset your unit Refer to page of How to reset your unit Still having trouble USA ONLY Call 1 800 252 5722 http www jvc com We can help you 2005 Victor Company of Japan Limited EN SP 0705DTSMDTJEIN ...

Page 31: ...eaker output lead grounded Are the terminals of L and R speakers grounded in common This unit does not work at all Have you reset your unit ELECTRICAL CONNECTIONS Make sure to disconnect the battery s negative terminal Be sure to ground this unit to the car s chassis again after installation Note It is recommended to connect to the speakers with maximum power of more than 50 W both at the rear and...

Page 32: ...RIUS radio adapter KS U100K not supplied KS U100K CD changer jack Stereo mini plug DC power plug To DC IN jack To headphones jack Set EXT IN to CHANGER see page 19 of the INSTRUCTIONS JVC SIRIUS radio PnP Plug and Play and External component Signal cord not supplied Signal cord not supplied 1 Firmly attach the ground wire to the metallic body or to the chassis of the car to the place not coated wi...

Reviews: