background image

20

ENGLISH

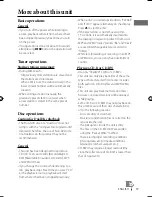
Symptom

Remedy/Cause

Disc playback

Disc cannot be played back.

Insert the disc correctly.

• CD-R/CD-RW cannot be played 

back.

• Tracks on the CD-R/CD-RW 

cannot be skipped.

• Insert a finalized CD-R/CD-RW.
• Finalize the CD-R/CD-RW with the component 

which you used for recording.

Disc can neither be played back 
nor ejected.

• Unlock the disc. ( 

 8)

• Eject the disc forcibly. ( 

 3)

Disc sound is sometimes 
interrupted.

• Stop playback while driving on rough roads.
• Change the disc.
• Check the cords and connections.

“NO DISC” appears on the display.

Insert a playable disc into the loading slot.

“PLEASE” and “EJECT“ appear 
alternately on the display.

Press 

0

, then insert a disc correctly.

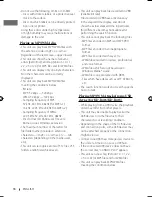
MP3/WMA playback

Disc cannot be played back.

• Use a disc with MP3/WMA tracks recorded in a 

format compliant with ISO 9660 Level 1, Level 2, 
Romeo, or Joliet.

• Add the extension code <.mp3> or <.wma> to the 

file names.

Noise is generated.

Skip to another track or change the disc. (Do not 
add the extension code <.mp3> or <.wma> to 
non-MP3 or WMA tracks.)

A longer readout time is required 
(“READING” keeps flashing on the 
display).

Do not use too many hierarchical levels and folders.

Tracks do not play back in the order 
you have intended them to play.

The playback order is determined when the files are 
recorded.

The elapsed playing time is not 
correct.

This sometimes occurs during playback. This is 
caused by how the tracks are recorded on the disc.

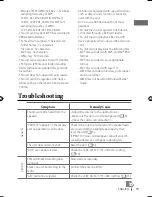
For KD-R416/KD-R415: “NO FILE” 
appears on the display.

Selected folder is an empty folder *. Select another 
folder that contains MP3/WMA tracks.

* Folder that is physically empty or folder that contains 

data but does not contain valid MP3/WMA track.

“NOT SUPPORT” appears on the 
display and track skips.

Skip to the next track encoded in an appropriate 
format or to the next non-copy-protected WMA 
track.

The correct characters are not 
displayed (e.g. album name).

This unit can only display letters (upper case), 
numbers, and a limited number of symbols.

EN18-23_KD-R416_001A_4.indd   20

EN18-23_KD-R416_001A_4.indd   20

10/7/09   10:42:54 AM

10/7/09   10:42:54 AM

Summary of Contents for KD-R315

Page 1: ...ENGLISH GET0623 001A U UH For canceling the display demonstration see page 4 CD RECEIVER KD R416 KD R415 KD R316 KD R315 INSTRUCTIONS For installation and connections refer to the separate manual ...

Page 2: ...nion only Warning If you need to operate the unit while driving be sure to look around carefully or you may be involved in a traffic accident For safety Do not raise the volume level too much as this will block outside sounds making driving dangerous Stop the car before performing any complicated operations Temperature inside the car If you have parked the car for a long time in hot or cold weathe...

Page 3: ...How to read this manual 3 How to attach detach the control panel 3 How to reset your unit 3 How to forcibly eject a disc 4 Canceling the display demonstration 4 Setting the clock 5 Preparing the remote controller RM RK50 6 Basic operations 7 Listening to the radio 8 Listening to a disc 10 Listening to a USB device For KD R416 KD R415 11 Listening to the other external components 12 Selecting a pre...

Page 4: ...e clock 1 Turn on the power 2 3 Select CLOCK 4 Select CLOCK SET 5 Adjust the hour 6 Adjust the minute 7 Finish the procedure 4 Select DEMO OFF 5 6 Finish the procedure Canceling the display demonstration Initial setting Hold Initial setting Hold ...

Page 5: ...metallic materials Do not poke the battery with tweezers or similar tools Wrap the battery with tape and insulate when throwing away or saving it Preparing the remote controller RM RK50 When you use the remote controller for the first time pull out the insulation sheet If the effectiveness of the remote controller decreases replace the battery Replacing the lithium coin battery Caution Danger of e...

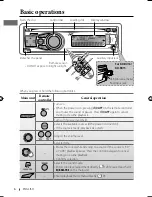
Page 6: ... to cancel muting or resume playback Turns off if pressed and held Selects the available sources if the power is turned on If the source is ready playback also starts Adjusts the volume level Selects items Mutes the sound while listening to a source If the source is CD or USB playback pauses Press the control dial again to cancel muting or resume playback Confirms selection Selects the sound mode ...

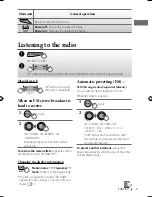
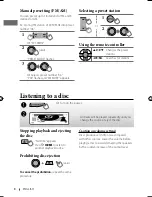
Page 7: ...15 Automatic presetting FM SSM Strong station Sequential Memory You can preset up to 18 stations for FM While listening to a station 1 2 TUNER SSM SSM 01 06 SSM 07 12 SSM 13 18 SSM flashes and local stations with the strongest signals are searched and stored automatically To preset another 6 stations repeat the above procedure by selecting one of the other 6 SSM setting ranges Listening to the rad...

Page 8: ...ck source Prohibiting disc ejection To cancel the prohibition repeat the same procedure Listening to a disc Turn on the power Ÿ All tracks will be played repeatedly until you change the source or eject the disc Caution on volume setting Discs produce very little noise compared with other sources Lower the volume before playing a disc to avoid damaging the speakers by the sudden increase of the out...

Page 9: ... current disc is an audio CD NO NAME appears If an MP3 WMA file does not have Tag information or TAG DISPLAY is set to TAG OFF 13 folder name and file name appear Selecting the playback modes You can use only one of the following playback modes at a time 1 2 REPEAT RANDOM 3 REPEAT TRACK RPT Repeats current track FOLDER RPT Repeats current folder RANDOM FOLDER RND Randomly plays all tracks of curre...

Page 10: ...her sources Lower the volume before playing a USB device to avoid damaging the speakers by sudden increase of the output level Cautions Avoid using the USB device if it might hinder your safety driving Do not pull out and attach the USB device repeatedly while READING is shown on the display Do not start the car engine if a USB device is connected This unit may not be able to play the files depend...

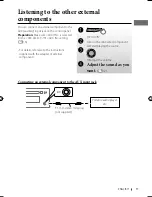
Page 11: ...s selected for the SRC SELECT AUX IN setting 15 For details refer also to the instructions supplied with the adapter or external components AUX IN Ÿ Turn on the connected component and start playing the source Adjust the volume Adjust the sound as you want 12 Connecting an external component to the AUX input jack 3 5 mm stereo mini plug not supplied Portable audio player etc ...

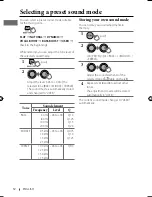
Page 12: ...ged to USER Tone Sound element Frequency Level Q BASS 60 Hz 80 Hz 100 Hz 200 Hz 06 to 06 Q1 0 Q1 25 Q1 5 Q2 0 MIDDLE 0 5 kHz 1 0 kHz 1 5 kHz 2 5 kHz 06 to 06 Q0 75 Q1 0 Q1 25 TREBLE 10 0 kHz 12 5 kHz 15 0 kHz 17 5 kHz 06 to 06 Q FIX Storing your own sound mode You can store your own adjustments in memory 1 2 PRO EQ BASS MIDDLE TREBLE 3 Adjust the sound elements of the selected tone table on the le...

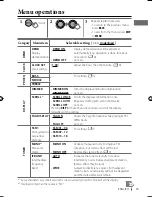
Page 13: ...5 second intervals Cancels Pressing DISP for more than one second can scroll the display regardless of the setting TAG DISPLAY TAG ON TAG OFF Shows the Tag information while playing MP3 WMA tracks Cancels TUNER SSM 2 Strong station Sequential Memory SSM 01 06 SSM 07 12 SSM 13 18 For settings 7 MONO 2 Monaural mode MONO ON MONO OFF Activate monaural mode to improve FM reception but stereo effect wi...

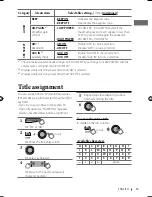
Page 14: ...evel will automatically increase or decrease when you change the source Before making an adjustment select the source you want to adjust VOL ADJ FIX appears on the display if FM is selected as the source L O MODE Line output mode SUB W REAR Select if the REAR LINE OUT terminals are used for connecting a subwoofer through an external amplifier Select if the REAR LINE OUT terminals are used for conn...

Page 15: ...to VOLUME 30 if you change to LOW POWER with the volume level is set higher than VOLUME 30 8 Displayed only when any source other than AM is selected 9 Displayed only when any source other than AUX IN is selected You can assign titles to 30 station frequencies FM and AM using 8 characters maximum for each title If you try to assign titles to more than 30 station frequencies NAME FULL appears Delet...

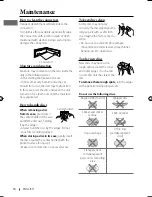
Page 16: ...ctors Frequent detachment will deteriorate the connectors To minimize this possibility periodically wipe the connectors with a cotton swab or cloth moistened with alcohol being careful not to damage the connectors Moisture condensation Moisture may condense on the lens inside the unit in the following cases After starting the heater in the car If it becomes very humid inside the car Should this oc...

Page 17: ...ck source playback will start from where it had been stopped previously When a disc is inserted upside down PLEASE and EJECT appear alternately on the display Press 0 to eject the disc If the ejected disc is not removed within 15 seconds it is automatically inserted into the loading slot again to protect it from dust MP3 and WMA tracks words file and track are used interchangeably are recorded in ...

Page 18: ...l levels This unit can play back files recorded in VBR variable bit rate Files recorded in VBR have a discrepancy in the elapsed time display and do not show the actual elapsed time In particular this difference becomes noticeable after performing the search function This unit cannot play back the following files MP3 files encoded in MP3i and MP3 PRO format MP3 files encoded in an inappropriate fo...

Page 19: ...ay not play back files in a USB device properly when using a USB extension cord This unit cannot play back the following files MP3 files encoded with MP3i and MP3 PRO format MP3 files encoded in an inappropriate format MP3 files encoded with Layer 1 2 WMA files encoded in lossless professional and voice format WMA files not based on Windows Media Audio Troubleshooting Symptom Remedy Cause General ...

Page 20: ...e names Noise is generated Skip to another track or change the disc Do not add the extension code mp3 or wma to non MP3 or WMA tracks A longer readout time is required READING keeps flashing on the display Do not use too many hierarchical levels and folders Tracks do not play back in the order you have intended them to play The playback order is determined when the files are recorded The elapsed p...

Page 21: ...rs are not played back in the order you have intended The playback order is determined by the write in time stamp The first track folder written into the USB device will be the first track folder for playback CANNOT PLAY flashes on the display NO USB appears on the display The unit cannot detect the USB device Attach a USB device that contains tracks encoded in an appropriate format Reattach the U...

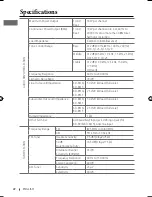
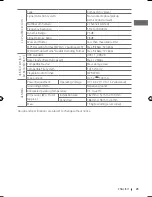
Page 22: ...0 Hz Signal to Noise Ratio 70 dB Line Out Level Impedance KD R416 KD R415 5 0 V 20 kΩ load full scale KD R316 KD R315 2 5 V 20 kΩ load full scale Subwoofer Out Level Impedance KD R416 KD R415 5 0 V 20 kΩ load full scale KD R316 KD R315 2 5 V 20 kΩ load full scale Output Impedance 1 kΩ Other Terminal AUX auxiliary input jack USB input jack for KD R416 KD R415 Antenna input TUNER SECTION Frequency R...

Page 23: ...Max Bit Rate 192 kbps USB SECTION for KD R416 KD R415 USB Standard USB 1 1 USB 2 0 Data Transfer Rate Full Speed Max 12 Mbps Compatible Device Mass storage class Compatible File System FAT 32 16 12 Playable Audio Format MP3 WMA Max Current DC 5 V 500 mA GENERAL Power Requirement Operating Voltage DC 14 4 V 11 V to 16 V allowance Grounding System Negative ground Allowable Operating Temperature 0 C ...

Page 24: ...EN TH 1009DTSMDTJEIN 2009 Victor Company of Japan Limited Having TROUBLE with operation Please reset your unit Refer to page of How to reset your unit ...

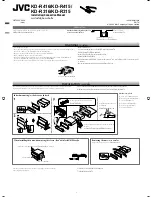
Page 25: ...Ω หรือเปลี ยนการตั งค า AMP GAIN ดูหน า 15 คำแนะนำ แผ นระบายความร อนร อนมากหลังใช งาน ห ามสัมผัสเมื อถอดเครื องออก 12 V DC NEGATIVE ground ไฟฟ ากระแสตรง 12 V พื นดินเป นขั วลบ To the car system สำหรับระบบในรถยนต You need the installation kits which corresponds to your car ต องใช ชุดติดตั งที เหมาะสมกับรถของท าน Check the battery system in your car ตรวจสอบระบบแบตเตอรี ในรถ WARNINGS คำเตือน Removing...

Page 26: ...e the power cannot be turned on Front speaker left ลำโพงหน า ซ าย Front speaker right ลำโพงหน า ขวา Rear speaker left ลำโพงหลัง ซ าย Rear speaker right ลำโพงหลัง ขวา ELECTRICAL CONNECTIONS การเชื อมต อไฟฟ า Reset the unit ตั งค าเครื องใหม JVC Amplifier แอมพลิฟลายเออร ของ JVC Connecting the external amplifier or subwoofer การเชื อมต อเครื องขยายเสียงหรือซับวูฟเฟอร ภายนอก To the remote lead of othe...

Reviews: