background image

10

LT-32/26C31BUE/SUE/BJE/SJE / LCT1590-001A-U  / English (EK)

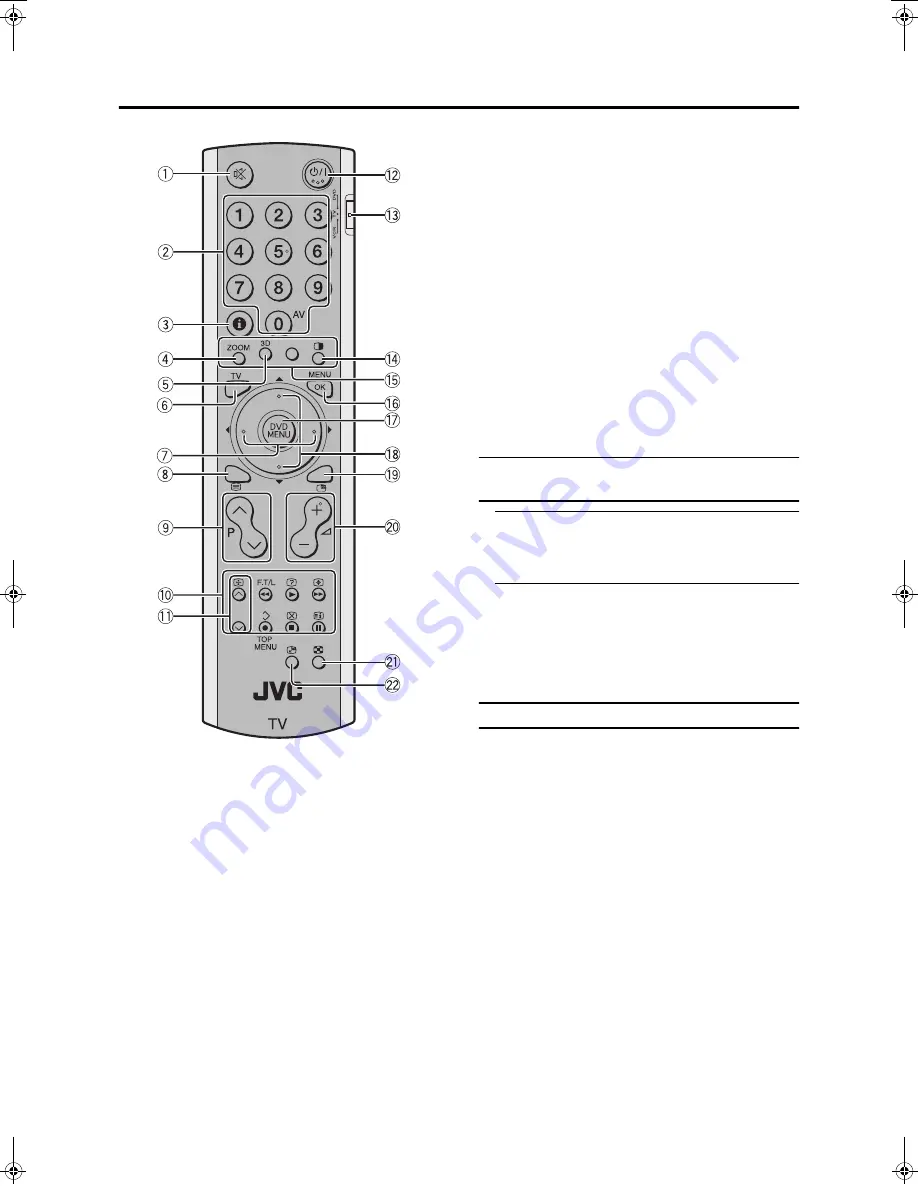
Remote control buttons and functions

1

Muting button

2

Number buttons

3

Information button

4

c

 button

5

3

 sound button

6

b

 button

7

5

 buttons

8

g

 (Text) button

9

p


p

 buttons

0

VCR/DVD/Teletext control buttons

-

p

 buttons

=

Standby button

~

VCR/TV/DVD switch

!

R

 button

@

Colour buttons

#

a

 button

$

D

 button

%

6

 buttons

^

f

 button

&

r


q

 buttons

*

X

 button

(

g

 button

Turn the TV on or off from standby 

mode

1 Make sure to set the VCR/TV/DVD switch to the 

TV position.

• You cannot turn the TV on or off when the VCR/TV/

DVD switch is set to the VCR or DVD position.

2 Press the 

#

#

#

#

 (standby) button to turn the TV on 

or off.

When the TV is turned on, the power lamp dims slightly.

• The power can be turned on by pressing the 

b


button, 

p


p

 buttons or Number buttons.

• Check that the AC plug on the power cord from the 

TV is connected to an AC outlet.

Choose a TV channel

„

Use the number buttons:

Enter the programme number (PR) of the 

channel using the number buttons.

Example:

• PR  6 

 press 

6

• PR 12 

 press 

1

 and 

2

„

Use the 

p

p

p

p


p

p

p

p

 buttons:

Press the 

p

p

p

p


p

p

p

p

 buttons to choose the 

programme number (PR) you want.

LT-32&26C31BUE(EK)_Eng.book  Page 10  Wednesday, January 14, 2004  9:44 AM

Summary of Contents for InteriArt LT-26C31BJE

Page 1: ...UNGSANLEITUNG TELEVISEUR A ECRAN LCD PANORAMIQUE MANUEL D INSTRUCTIONS WIDE LCD PANEL TV INSTRUCTIONS ENGLISH DEUTSCH FRANÇAIS LT 32C31BUE LT 32C31SUE LT 32C31BJE LT 32C31SJE LT 26C31BUE LT 26C31SUE LT 26C31BJE LT 26C31SJE ...

Page 2: ...care must be taken to ensure optimal results and operational safety Before attempting to use this equipment read the operating instructions thoroughly Ensure that all electrical connections including the mains plug extension leads etc have been made in accordance with the manufacturer s instructions If ever in doubt about the installation operation or safety of this equipment consult your dealer H...

Page 3: ...AIN OR MOISTURE WARNING Fingers may be trapped under the TV causing injuries Hold the TV at the bottom in the middle and do not allow it to tilt up or down The TV may fall causing injuries Hold the bottom of the stand with your hand and tilt the TV up and down Do not allow children to hang from the TV place their elbows on the TV or lean against the TV Doing so may cause the TV to fall over and le...

Page 4: ... problem with more than 99 99 of these pixels please understand that a very small number of pixels may not light or may light all the time Distance recommendations Avoid improper installation and never position the unit where good ventilation is impossible When installing this TV distance recommendations must be maintained between the set and the wall as well as inside a tightly enclosed area or p...

Page 5: ...TURE function 14 Operating a JVC brand VCR or DVD player 14 Teletext function 15 Basic operation 15 Using the List Mode 15 Hold 15 Sub page 16 Reveal 16 Size 16 Index 16 Cancel 16 Using the TV s menu 17 Basic operation 17 PICTURE SETTING 18 PICTURE MODE 18 Picture Adjustment 18 COLOUR TEMP 18 PICTURE FEATURES 19 DIGITAL VNR 19 Super DigiPure 19 COLOUR SYSTEM 20 MOVIE THEATRE 20 4 3 AUTO ASPECT 20 ...

Page 6: ...stand can be used to adjust the direction of the TV screen 5 up 10 down and 20 to the left or right Tilt the TV up and down While holding the bottom of the stand with one hand use your other hand to hold the middle of the top of the TV and slowly tilt the TV up and down As a safety measure the stand needs a certain amount of force to tilt the TV Rotate the TV to the left and right While holding th...

Page 7: ... connection terminals behind the covers on the left and right of the rear of the TV Remove these two covers before connecting an antenna or VCR Leave the covers off if they do not fit properly Do not force to replace the covers Doing so may cause damage to the connection cables and the covers For LT 32C31 Remove the covers by removing the hooks When replacing the covers place the side of the cover...

Page 8: ...xternal equipment on page 33 To connect additional audio equipment see Connecting Speakers Amplifier on page 34 If you connect a decoder to a T V LINK compatible VCR set the DECODER EXT 2 function to ON For details see Using the DECODER EXT 2 function on page 32 Otherwise you will not be able to watch scrambled channels Connecting the power cord to the AC outlet Insert the AC plug on the power cor...

Page 9: ...eceive SKY 1 you need a satellite tuner You must have the satellite tuner set to SKY 1 before starting the AUTO PROGRAM function which follows 6 Press the blue button to start the AUTO PROGRAM function The AUTO PROGRAM menu appears and received TV channels are automatically stored in the programme numbers PR To cancel the AUTO PROGRAM function Press the b button After the TV channels have been reg...

Page 10: ...f Grundig Corporation SMARTLINK a trademark of Sony Corporation Pre set download The VCR will automatically download the registered data on the TV channels from the TV This means you do not need to set up the program channels on your VCR manually The preset download function automatically begins when the initial setting is complete or whenever you carry out the AUTO PROGRAM or EDIT MANUAL function...

Page 11: ... Check that the AC plug on the power cord from the TV is connected correctly to an AC outlet Choose a TV channel Press the P p p p p buttons to choose a programme number PR or an EXT terminal Watch images from external devices Press the TV AV button to choose an EXT terminal Adjust the volume Press the q q q q buttons The volume level indicator appears Using the headphone The headphone volume is a...

Page 12: ... position You cannot turn the TV on or off when the VCR TV DVD switch is set to the VCR or DVD position 2 Press the standby button to turn the TV on or off When the TV is turned on the power lamp dims slightly The power can be turned on by pressing the b button p p buttons or Number buttons Check that the AC plug on the power cord from the TV is connected to an AC outlet Choose a TV channel Use th...

Page 13: ...he PR LIST 1 Press the h h h h information button to display the PR LIST 2 Press the 5 5 5 5 and 6 6 6 6 buttons to choose an EXT terminal Then press the a a a a button The EXT terminals are registered after the programme number PR 99 You can choose a video input signal from the S VIDEO signal Y C signal and regular video signal composite signal For details see S IN S VIDEO input on page 23 If you...

Page 14: ...l screen FULL This uniformly stretches the left and right sides of a normal picture 4 3 aspect ratio to fill the wide TV screen For 16 9 aspect ratio pictures that have been squeezed into a normal picture 4 3 aspect ratio use the FULL mode to restore the picture to its original shape Choose the ZOOM mode 1 Press the c c c c button to display the ZOOM menu The c button does not work in the twin pic...

Page 15: ...rk while a sub picture is displayed The still picture cannot be output from the TV Using the PIP function You can view two pictures Main picture and sub picture A TV programme and a video programme from an external device can be watched at the same time 1 Press the R R R R button Pressing the R R R R button changes the PIP mode as follows 2 Press the p p p p buttons to change the sub picture to th...

Page 16: ...s will appear in multi picture mode 12 pictures multi 2 Press the p p p p buttons to choose the screen you want to see The chosen picture changes to a moving picture 3 Press the a a a a button The multi pictures disappear and the chosen picture appears Cancelling the multi pictures Press the b button the number buttons or the a button Pictures from external devices cannot be displayed in the 12 pi...

Page 17: ...try s For detail Changing the COUNTRY setting on page 32 Using the List Mode You can store the numbers of your favourite teletext pages in memory and call them up quickly using the colour buttons To store the page numbers 1 Press B B B B button to go into the List mode The page numbers you have stored are displayed at the bottom of the screen 2 Press a Colour button to choose a position Then press...

Page 18: ...ght of the teletext display Press the F F F F Size button Index You can return to the index page instantly Press the G G G G Index button Returns to page 100 or a previously specified page Cancel You can search for a teletext page while watching TV 1 Press the number button to enter a page number or press a colour button The TV searches for a teletext page 2 Press the H H H H Cancel button The TV ...

Page 19: ...s the 5 5 5 5 buttons to choose the setting of that function If you want to operate a function which appears only with its name follow the descriptions of that function on the following pages The display appearing at the bottom of a menu shows you a button on the remote control that you can use when you operate a chosen function 5 Press the a a a a button to complete the setting The menu disappear...

Page 20: ...NTSC 3 58 NTSC 4 43 or a signal from the EXT 4 terminal However you cannot do this when the PIP function main picture is set to EXT 4 To return to the default settings in each PICTURE MODE mode Press the blue button This returns the picture settings in the PICTURE MODE mode you have chosen to the default settings and stores them in the PICTURE MODE mode COLOUR TEMP You can select one of three COLO...

Page 21: ...o create a natural looking picture by eliminating unnecessary edges from high contrast and crisp images For images with low contrast edges are added to produce a sharper more detailed picture You can choose from the three DigiPure function settings of AUTO MIN and MAX If you set the DigiPure effect too high on a low quality picture that contains a lot of noise this may actually make the noise wors...

Page 22: ... on the screen AUTO The television automatically recognizes the type of signal and turns the function on and off ON This function is turned on OFF This function is turned off The motion may appear unnatural when viewing images with the NTSC colour system When the MOVIE THEATRE function is set to AUTO or ON the motion may appear unnatural when viewing images with the NTSC colour system You cannot s...

Page 23: ...ft speaker s volume level up 3 turn the right speaker s volume level up SPEAKER You can turn off the sound from the TV speakers but you should only do this if an audio system is connected to the TV as a substitute for the TV speakers ON The TV speakers issue sound OFF The TV speakers does not issue sound BBE You can use the BBE function to enjoy easy to listen sound that is faithful to the origina...

Page 24: ...on or off ON The sound comes from the TV s speakers when using the headphones OFF The sound does not come from the TV s speakers when using the headphones OUTPUT You can choose the sound output to the headphones MAIN You can listen to the sound of the main picture with your headphones SUB You can listen to the sound of the sub picture with your headphones When the sub picture is a television progr...

Page 25: ...anges to S2 or S3 when it receives an S VIDEO signal Even a device which can output an S VIDEO signal Y C signal may output a regular video signal composite signal depending on the device setting If a picture cannot appear because the S IN S VIDEO input setting has been made read the device instruction manual carefully again to check for the device settings ID LIST You can have a name correspondin...

Page 26: ...the EXT 2 terminal TV The picture and sound of the TV channel you are currently viewing are output from the EXT 2 terminal During dubbing you cannot turn off the TV Turning off the TV also turns off the output from the EXT 2 terminal When you choose an EXT terminal as an output you can view a TV programme or a picture from the other EXT terminal while dubbing the picture from a device connected to...

Page 27: ... the TV channel cannot be viewed Unless you enter a pre set ID number by a special operation the lock cannot be released and the child cannot view the TV channel To set the CHILD LOCK function 1 Choose CHILD LOCK then press the o o o o button SET ID NO ID number setting screen appears 2 Set the ID number to your liking 1 Press the 6 6 6 6 buttons to choose a number 2 Press the 5 5 5 5 buttons to m...

Page 28: ...ction again To stop it being easy to choose the programme number PR of a locked TV channel the programme number PR has been set so that it cannot be chosen with the 6 buttons or the buttons of the TV To stop it being easy to reset the lock ID NO ID No input screen is set so that it cannot appear unless you press the h information button DECODER EXT 2 You can only use this function if you have a de...

Page 29: ...rs in the AUTO PROGRAM menu You can use the ACI Automatic Channel Installation function to decode the ACI data and complete the registration of all the TV channels quickly For details of the ACI function and how to use it refer to Using the ACI function on page 31 If you don t want to use the ACI function press the 6 buttons to choose ACI SKIP and then press a 4 Press the a a a a button to display...

Page 30: ...This function adds a new TV channel in the current programme numbers PR list by using the CH CC number You cannot use the INSERT function if you do not know a channel number of a TV channel Use the MANUAL function to register a TV channel in the programme number PR DELETE This function deletes a TV channel you do not want to list MANUAL This function manually stores a new TV channel in a programme...

Page 31: ...t FRANCE follow the description Changing the COUNTRY setting on page 32 to change the COUNTRY setting to FRANCE then start the INSERT function 1 Press the 6 6 6 6 buttons to choose a programme number PR for which you will register a new TV channel 2 Press the green button and start the INSERT function To cancel the INSERT function Press the h information button 3 When the COUNTRY setting is UNITED...

Page 32: ... Press the 3 3 3 3 button to choose the SYSTEM broadcasting system for a TV channel you want to register TV channel SECAM L system from a French station Set the SYSTEM to L If it is set to one other than L you cannot receive the TV channel of the SECAM L system Other TV channels If you do not know the correct broadcasting system set the SYSTEM to B G If B G is not correct it results in the fact th...

Page 33: ...u were reading before and continue the operation When the Initial settings have been made Return to step 6 of Initial settings on page 8 When the AUTO PROGRAM has finished Return to step 4 of AUTO PROGRAM on page 27 If you have any questions about the items in the Broadcast Selection menu or how to operate the menu please contact your cable TV station When the cable TV broadcast reception is poor ...

Page 34: ...lay the scrambled TV channel on the TV Even if the decoder is working a scrambled picture appears 3 Press the a a a a button to display the MENU The MENU main menu appears 4 Press the 6 buttons to choose FEATURES Then press the a a a a button The FEATURES menu appears 5 Press the 6 buttons to choose DECODER EXT 2 Then press the 5 buttons to choose ON An unscrambled picture appears To cancel the DE...

Page 35: ...s If you are connecting equipment not listed in the following connection diagram see the table to choose the best EXT terminal Connecting cables are not supplied 1 VCR composite signal 2 VCR composite signal S VIDEO signal 3 T V LINK compatible VCR composite signal S VIDEO signal 4 Decoder 5 DVD player composite signal S VIDEO signal 6 DVD player composite signal RGB signal 7 DVD player component ...

Page 36: ... terminal This is useful when you want to dub the video sound from another device onto the VCR connected to the EXT 2 terminal For details on how to do this see DUBBING on page 23 TV output from the EXT 1 terminal The video sound signal of a TV channel you are viewing is always output from the EXT 1 terminal Changing over a programme number PR also changes over the TV output from the EXT 1 termina...

Page 37: ...9 CH 259 E59 R59 CH 60 CH 260 E60 R60 CH 61 CH 261 E61 R61 CH 62 CH 262 E62 R62 CH 63 CH 263 E63 R63 CH 64 CH 264 E64 R64 CH 65 CH 265 E65 R65 CH 66 CH 266 E66 R66 CH 67 CH 267 E67 R67 CH 68 CH 268 E68 R68 CH 69 CH 269 E69 R69 CC Channel CC 01 CC 201 S1 CC 02 CC 202 S2 CC 03 CC 203 S3 CC 04 CC 204 S4 CC 05 CC 205 S5 CC 06 CC 206 S6 CC 07 CC 207 S7 CC 08 CC 208 S8 CC 09 CC 209 S9 CC 10 CC 210 S10 C...

Page 38: ...ointing in the right direction Is the aerial itself faulty If the TV or aerial suffers interference from other equipment stripes or noise may appear in the picture Move any equipment such as an amplifier personal computer or a hair drier that can cause interference away from your TV Or try moving the TV If the aerial suffers interference from a radio tower or high voltage wire please contact your ...

Page 39: ...causes As a precaution ask your service technician to inspect it In the twin pictures mode the sub picture may disappear when the external device is operated If this happens press the R button and display the sub picture again The headphone volume is adjusted with the HEADPHONE menu It cannot be adjusted with the r volume q buttons When TV SPEAKER in the HEADPHONE menu is ON even if the headphones...

Page 40: ...m measured diagonally Display resolution 1280 768 W XGA Audio output Rated Power output 10 W 10 W Speakers 6 6 cm round 2 EXT 1 terminal Euroconnector 21 pin SCART Video input Audio L R inputs and RGB inputs are available TV broadcast outputs Video and Audio L R are available EXT 2 terminal Euroconnector 21 pin SCART Video input S VIDEO Y C input Audio L R inputs and RGB inputs are available Video...

Page 41: ...a 66 cm measured diagonally Display resolution 1280 768 W XGA Audio output Rated Power output 10 W 10 W Speakers 6 6 cm round 2 EXT 1 terminal Euroconnector 21 pin SCART Video input Audio L R inputs and RGB inputs are available TV broadcast outputs Video and Audio L R are available EXT 2 terminal Euroconnector 21 pin SCART Video input S VIDEO Y C input Audio L R inputs and RGB inputs are available...

Page 42: ...40 ...

Page 43: ... 2004 VICTOR COMPANY OF JAPAN LIMITED 3 LCT1590 001A U 0204 MK CR JMUK ...

Reviews: