JVC I Art AV-20FA44 User Manual Download Page 38

The on/off timer lets you program your television to turn itself on or off. You can use it as an 
alarm to wake up, to help you remember important programs, or as a decoy when you’re not 
home.


Press the M

ENU

 button

π

† 

To ON/OFF TIMER

®


To operate (begins with ON TIME)

®


 To set the hour (AM/PM) you want the TV to turn 
on


   †


To move to minutes

®


To set the minutes


   †


To accept ON TIME and move to OFF TIME (the time the TV will turn off). Set the  


OFF TIME the same way as ON TIME


   †


To accept OFF TIME and move to CHANNEL

®


To select channel


   †


To ON VOLUME

®


To set the volume level 


   †


To move to MODE

®


Choose ONCE or EVERYDAY


   †

 To 

ON/OFF 

TIMER

®


Choose YES to accept the timer setting, choose NO if you don’t wish to accept


   †

 To 

FINISH

®


To save settings


Press the E

XIT

 button when finished

Notes:

•  The on/off time cannot be set to locked or guarded channels.

•  In order for the on/off timer to work, the clock must be set.

•  After a power interruption, the timer settings must be reset.

Clock/Timers

38

 On/Off Timer

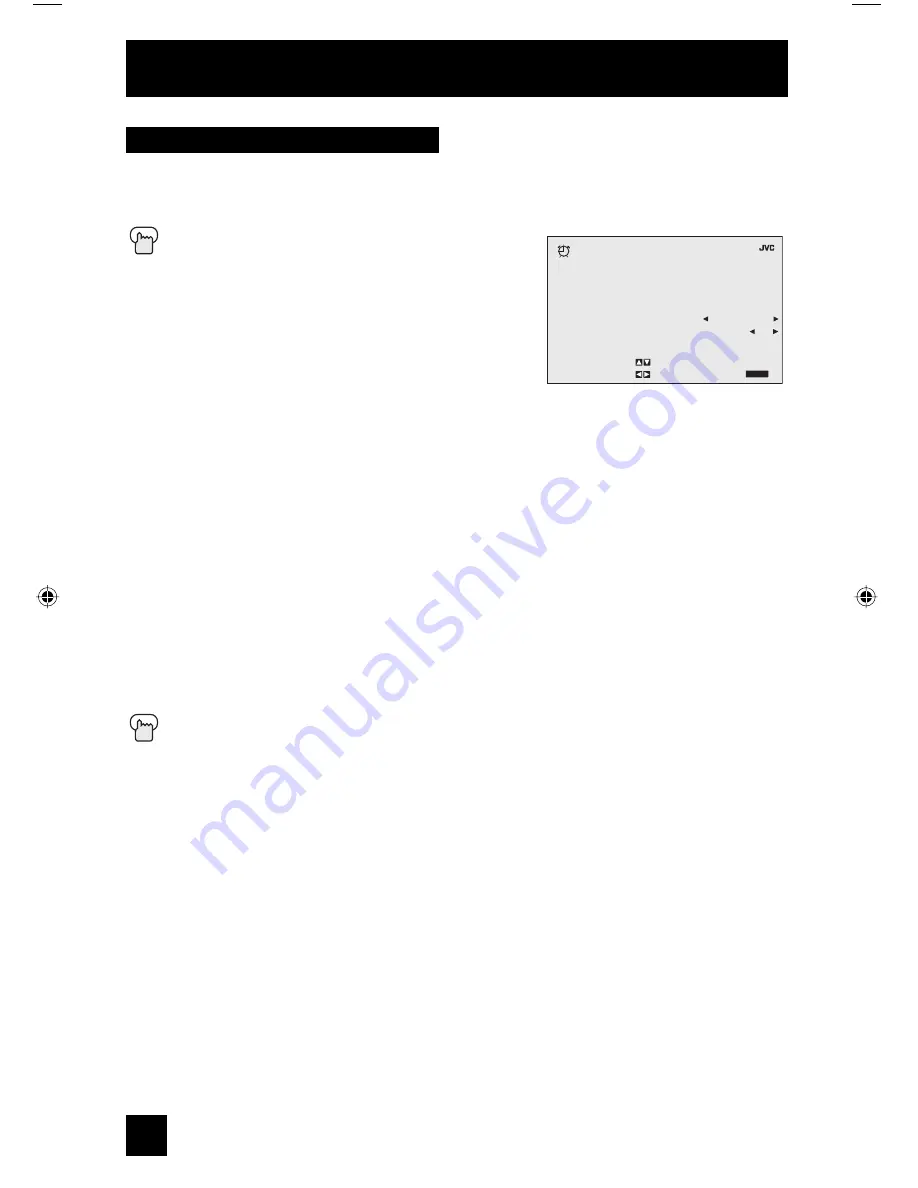
C L O C K / T I M E R S

>

O N / O F F   T I M E R

O P E R A T E   B Y

E X I T   B Y

S E L E C T       B Y

E X I T

F I N I S H

O N   T I M E

O F F   T I M E

C H A N N E L

O N   V O L U M E

M O D E

O N / O F F   T I M E R

7 : 0 0   P M

1 0 : 0 0   P M

0 2

C U R R E N T

E V E R Y D A Y

N O

AV-20FA44 English   38

8/19/03, 9:37:41 AM

Summary of Contents for I Art AV-20FA44

Page 1: ...on located at the rear of the television cabinet Staple your sales receipt or invoice to the inside cover of this guide Keep this user s guide in a convenient place for future reference Keep the carton and original packaging for future use Model Number LCT1466 001B A 0803 KG II IM Illustration of AV 20FA44 and RM C1251G Serial Number ...

Page 2: ...power source specified on the unit 2 Avoid damaging the AC plug and power cord 3 Avoid Improper installation and never position the unit where good ventilation is unattainable 4 Do not allow objects or liquid into the cabinet openings 5 In the event of trouble unplug the unit and call a service technician Do not attempt to repair it yourself or remove the rear cover Changes or modifications not ap...

Page 3: ...he operating instructions for this information If you are not sure of the type of power supply to your home consult your TV set dealer or local power company For battery operation refer to the operating instructions 3 Overloaded AC outlets and extension cords are dangerous and so are frayed power cords and broken plugs They may result in a shock or fire hazard Call your service technician for repl...

Page 4: ...ter 9 To avoid personal injury Do not place a TV set on a sloping shelf unless properly secured Use only a cart or stand recommended by the TV set manufacturer Do not try to roll a cart with small casters across thresholds or deep pile carpets Wall or shelf mounting should follow the manufacturer s instructions and should use a mounting kit approved by the manufacturer GROUND CLAMP ELECTRICAL SERV...

Page 5: ...in any way F When the TV set exhibits a distinct change in performance this indicates a need for service 16 Do not attempt to service this TV set yourself as opening or removing covers may expose you to dangerous voltage or other hazards Refer all servicing to qualified service personnel 17 When replacement parts are required have the service technician verify in writing that the replacement parts...

Page 6: ...ture Settings 34 Color Temperature 35 Noise Muting 35 VSM 35 Sound Settings 36 Adjust Sound Settings 36 MTS Multi channel Sound 36 Power 39 Number Buttons 39 100 Button 39 Channel 39 Volume 39 Muting 39 Menu 39 Exit 39 Return 40 Input 40 Display 41 Sleep Timer 41 Sound 42 C C 42 Video Status 43 TheaterPro D6500K 43 Aspect 43 Light 43 TV CATV Slide Switch 44 VCR DVD Slide Switch 44 VCR Buttons 44 D...

Page 7: ...levision the next step is to connect it to your antenna cable or satellite system and to connect the audio video devices you want to use with your television To make these connections you will use plugs like the ones illustrated below 7 POWER DISPLAY SLEEP TIMER LIGHT INPUT THEATER PRO VIDEO STATUS 1 7 4 100 3 9 6 RETURN MUTING MENU C C EXIT 2 8 0 5 CH VOL VOL REC OPEN CLOSE STILL PAUSE STOP PAUSE...

Page 8: ...rams for your specific TV and remote These will help assist you in understanding how to connect your television to another device as well as use the remote to set up your television 8 Rear Panel Diagram MODEL AV 20FA44 INPUT 3 MENU CHANNEL VOLUME OPERATE VIDEO L MONO AUDIO R MODEL AV 20FA44 Front Panel Diagram ...

Page 9: ...V Remote Control RM C1251G POWER DISPLAY SLEEP TIMER LIGHT INPUT THEATER PRO VIDEO STATUS 1 7 4 100 3 9 6 RETURN MUTING MENU C C EXIT 2 8 0 5 CH VOL VOL REC OPEN CLOSE STILL PAUSE STOP PAUSE PLAY FF REW TV CATV VCR DVD VCR CHANNEL PREV NEXT TV VCR VCR DVD POWER SOUND CH TV RM C1251G ASPECT ...

Page 10: ...s If you take longer than three minutes the remote control codes for your VCR DVD and or cable box satellite receiver may have to be reset See pages 18 20 Getting Started Step 1 The Remote Control 10 Key Feature Buttons The four key feature buttons at the center of the remote can be used for basic operation of the television The top and bottom buttons will scan forward and back through the availab...

Page 11: ...u have a satellite television system please refer to the satellite TV manual Diagram 2 Do you use a Cable TV Box Do you have a VCR Do you have a VCR Diagram 1 Diagram 3 Diagram 1 Yes No Yes No Yes No Basic Operation Turn the television on and off by pressing the POWER button at the top right corner of the remote If this is the first time you are turning on the TV the interactive plug in menu appea...

Page 12: ...urned on to view premium cable channels Note If you do not have a cable box connect the cable wire from the wall outlet into the back of the TV Diagram 1 Illustration of AV 20FA44 Diagram 2 Illustration of AV 20FA44 Quick Setup Connections TV Rear Panel Coaxial Cable Cable or Antenna Output OR Cable Box OUT IN TV Rear Panel Coaxial Cable Cable or Antenna Output OR Cable Box OUT IN VCR OUT IN IN OU...

Page 13: ... KHz will not work properly with this television Set your DVD player s output to interlaced or non progressive mode Diagram 3 Illustration of AV 20FA44 Quick Setup Connections OUT R L V IN OUT IN Cable or Antenna Output Coaxial Cable TV Rear Panel Green Blue Red DVD Player OPTIONAL Y PB PR OUT AUDIO OUT L R OR VCR TV Rear Panel Speaker Speaker Amplifier 1 Connect a white composite cable from the L...

Page 14: ...mcorder Quick Setup Connections Illustration of AV 20FA44 INPUT 3 MENU CHANNEL VOLUME OPERATE VIDEO L MONO AUDIO R Camcorder You may connect a camcorder game console or other equipment to your television by using the front input jacks Input 3 located under the front panel door To access push on the door to open it You can also connect these using the television s rear input jacks using the same in...

Page 15: ... receive We recommend you complete the interactive plug in items before you start using your television Step 3 The Interactive Plug In Menu 15 After the JVC INTERACTIVE PLUG IN MENU has been displayed the TV automatically switches to the LANGUAGE settings You can choose to view your onscreen menus in three languages English French Français or Spanish Español To choose a language English Français o...

Page 16: ...one Atlantic Eastern Central Mountain Pacific Alaska or Hawaii To move to D S T Daylight Savings Time To turn D S T ON or OFF To NEXT To Auto Tuner Setup Notes The Daylight Savings Time feature automatically adjusts your TV s clock for Daylight Savings The clock will move forward one hour at 2 00 am on the first Sunday in April The clock will move back one hour at 2 00 am on the last Sunday in Oct...

Page 17: ...de for more information on programming your remote control or using the JVC onscreen menu system to customize your television viewing experience Notes Noise muting will not work during Auto Tuner Setup Skip appears only for interactive plug in menu The interactive plug in menu setting does not appear if your TV has been turned on before In this case use the initial setup menu to perform these sett...

Page 18: ... 061 070 032 058 064 040 041 042 045 068 034 037 032 051 038 051 057 058 059 051 047 051 056 032 051 067 047 051 044 035 036 066 050 032 025 022 032 052 029 030 Zenith 063 046 Zenith Drake Satellite 046 Cable Box CODES Echostar Express VU G E G I Gradiente Panasonic Philips Primestar RCA Proscan Sony Star Choice Toshiba Uniden 100 113 114 115 100 113 106 108 112 Hitachi HNS Hughes 104 111 104 105 ...

Page 19: ...087 093 Realistic 024 063 036 067 040 027 VCRs CODES Samsung Samtron Sansui Sanyo Scott Sears Shintom Sharp Signature 2000 Sony Singer SV 2000 Sylvania Symphonic Tashiro Tatung Teac Technics Teknika Toshiba Vector Research Wards 037 060 062 033 089 089 003 026 020 052 063 067 091 071 059 060 062 067 038 040 047 048 026 020 063 064 065 066 058 000 001 075 035 036 080 088 027 035 075 028 029 030 053...

Page 20: ...er tray open close and still pause operation 1 Find the DVD player brand from the list of codes shown below 2 Slide the first 2 way selector switch to TV and the other 2 way selector switch to DVD 3 Press and hold down the DISPLAY button then enter the first code number listed with the 10 key pad 4 Release the DISPLAY button and confirm the operation of the DVD player If your DVD player does not r...

Page 21: ...se the remote control that came with your equipment 6 Press RETURN to exit VCR DVD Search Codes Function 1 Slide the first 2 way selector switch to TV and the other 2 way selector switch to VCR or DVD 2 Press and hold down the VCR or DVD POWER button then press the RETURN button for more than three seconds 3 Release the RETURN button then release the VCR or DVD POWER button 4 Press the VCR or DVD ...

Page 22: ...y are π Up and Down arrows mean press the CH or CH buttons Pressing the CH or CH buttons let you Move vertically in a main menu screen Move through a submenu screen Move to the next letter number or other choice in a submenu Back up to correct an error Scan through TV channels when not in a menu screen Left and right arrows mean press the VOLUME or VOLUME buttons to move left or right to Select a ...

Page 23: ... V I O U S B A S S T R E B L E B A L A N C E M T S N E X T P A G E S E L E C T B Y O P E R A T E B Y E X I T B Y E X I T S T E R E O S A P M O N O R E S E T B Y 0 P I C T U R E A D J U S T P R E V I O U S N O I S E M U T I N G V S M N E X T P A G E S E L E C T B Y O P E R A T E B Y E X I T B Y E X I T O N O N S T A N D A R D R E S E T B Y 0 I N I T I A L S E T U P P R E V I O U S L A N G U A G E C...

Page 24: ...o operate The Channel summary screen will now be displayed with the channels set to scan marked with an You can delete channels from the scan by removing the If any channels were missed during auto tuner setup and you wish to add them you may by placing an next to the channel number π To the SCAN column To include or delete from scan Press the EXIT button when finished You can block access to a ch...

Page 25: ...a rating guidelines V Chip has no effect on video signals from a DVD discs VCR tapes or Camcorder connection Note Some programs and movies are broadcast without a ratings signal Even if you set up V CHIP ratings limits these programs will not be blocked See page 26 for information on how to block unrated programs Note for Canadian viewers The V Chip function is based on specifications designed for...

Page 26: ...ill be placed in the Unrated Programming category Examples of Unrated programs Emergency Bulletins Locally Originated Programming News Political Programs Public Service Announcements Religious Programs Sports Weather Some Commercials Note TV programs or movies that do not have rating signals will be blocked if the unrated category is set to BLOCK 26 I N I T I A L S E T U P V C H I P V C H I P S E ...

Page 27: ...ng language limited violence and some suggestive sexual dialog or situations It is recommended that parents watch these programs first or with their children TV 14 Parents Strongly Cautioned Programs contain some material that may be unsuitable for children under the age of 14 including possible intense violence sexual situations strong coarse language or intensely suggestive dialog Parents are ca...

Page 28: ...ress the EXIT button when finished Note If you want to change the setup move the cursor to the top column and change the lock icon to by pressing or again You may then select individual categories to block Directions to set US V Chip Ratings Press the MENU button π To V CHIP To operate lock icon appears Press ZERO to access the V Chip menu To turn V Chip ON or OFF π To move to SET US TV RATINGS To...

Page 29: ... include more explicit sexual language and violence content than movies rated PG R Restricted These films contain material that is explicit in nature and is not recommended for unsupervised children under the age of 17 NC 17 No One Under 17 These movies contain content which most parents would feel is too adult for their children to view Content can consist of strong language nudity violence and s...

Page 30: ...s that are clearly imaginary comedic or unrealistic in nature C8 Programming Intended for Children 8 and Over Violence Guidelines Any realistic depictions of violence will be infrequent discreet of low intensity and will show the consequences of the acts There will be no offensive language nudity or sexual content G General Audience Programming will contain little violence and will be sensitive to...

Page 31: ...de is now set Press the EXIT button when finished After a power interruption you must reset the lock code Write your lock code number down and keep it hidden from potential viewers If you forget the lock code a new code may be set using the steps listed above Notes When a viewer attempts to watch a blocked channel this message appears The channel will remain blocked until the correct lock code is ...

Page 32: ...ISH To save settings and exit Press the EXIT button when finished Closed Caption Closed caption subtitles are usually found on closed caption channel CC1 Some programs may include additional text information which is usually found on text channel T1 The other channels are available for future use Closed captioning may not work correctly if the signal being received is weak or if you are playing a ...

Page 33: ...huts off your TV when there is no signal from the channel the TV is on Press the MENU button π To AUTO SHUT OFF To turn ON or OFF Press the EXIT button when finished If the channel that you have on does not receive a signal for more than one minute the blinking text NOT RECEIVING A SIGNAL appears on the screen and starts the countdown If no signal is being received within 10 minutes the TV shuts i...

Page 34: ...e colors in the TV picture appear either more vivid or subtle PICTURE Picture allows you to adjust the levels of black and white on the TV screen giving you a darker or brighter picture overall BRIGHT You can adjust the overall brightness of the TV picture with the Bright control DETAIL The Detail feature adjusts the level of fine detail displayed in the picture Picture Adjust 34 Picture Settings ...

Page 35: ...n when finished Note If you press the 0 button you can reset the setting to the factory default setting P I C T U R E A D J U S T P R E V I O U S T I N T C O L O R P I C T U R E B R I G H T D E T A I L C O L O R T E M P E R A T U R E N E X T P A G E S E L E C T B Y O P E R A T E B Y E X I T B Y E X I T S T A N D A R D L O W R E S E T B Y 0 Picture Adjust 35 Velocity scan modulation circuitry varie...

Page 36: ...ne is available These settings allow you to change and adjust the sound on your television BASS You can increase or decrease the level of low frequency sound in the TV s audio with the bass adjustment TREBLE Use treble to adjust the level of high frequency sound in your TV s audio BALANCE Adjust the level of sound between the TV s left and right speakers with the balance setting Press the MENU but...

Page 37: ... move to the hour To set the hour π To move to minutes To set the minutes To START CLOCK To operate C L O C K T I M E R S S E T C L O C K M O D E A U T O F I N I S H S E L E C T B Y O P E R A T E B Y E X I T B Y E X I T T I M E Z O N E D S T P A C I F I C O F F C L O C K T I M E R S S E T C L O C K S T A R T C L O C K S E L E C T B Y O P E R A T E B Y E X I T B Y M O D E T I M E M A N U A L E X I ...

Page 38: ...channel To ON VOLUME To set the volume level To move to MODE Choose ONCE or EVERYDAY To ON OFF TIMER Choose YES to accept the timer setting choose NO if you don t wish to accept To FINISH To save settings Press the EXIT button when finished Notes The on off time cannot be set to locked or guarded channels In order for the on off timer to work the clock must be set After a power interruption the ti...

Page 39: ...nu system Press MENU to activate the onscreen menu system See individual topics like Sound Adjust for specific information on using menus Menu Button Functions 39 Use these buttons to move up or down all the available channels your TV is able to recieve Channel Use these buttons to raise or lower the TV s volume level Volume Use this button to enter or exit the TV s onscreen menus Exit The MUTING ...

Page 40: ... message RETURN CHANNEL CANCELLED will appear Return works only with the CH buttons Pressing any number key will cancel Return Return Selects the signal input source for the television TV for Antenna or Cable or Video 1 2 or V2 Component or Video 3 for video devices like VCR s DVD players or camcorders Press the INPUT button By pressing the INPUT button you can change the mode Note You can also ac...

Page 41: ...ressing MENU If the clock sleep timer or on off timer are not set the display screen will show CLOCK NOT SET SLEEP TIMER OFF and ON OFF TIMER OFF respectively Display Time Channel Off Display 07 KLVX PBS JAZZ FESTIVAL NOW SLEEP TIMER ON OFF TIMER ON TIME OFF TIME 12 20 PM OFF EVERYDAY 7 00 PM 10 00 PM Button Functions 41 The Sleep Timer can turn the TV off for you after you fall asleep Program it ...

Page 42: ...etting Press the EXIT when finished Note BBE is a registered trademark of BBE Sound Inc For U S licensed from BBE Sound Inc under USP 4638258 4482866 and 5510572 For Canada licensed from BBE Sound Inc BBE is a registered trademark of BBE Sound Inc Sound S O U N D E F F E C T A H S B B E S E L E C T B Y O P E R A T E B Y E X I T B Y E X I T M O V I E O N C C Closed Caption Use the C C Closed Captio...

Page 43: ... the factory settings DYNAMIC Heightens contrast THEATER Gives a rich film like look to video when viewing in a dimly lit room GAME Used for when you are playing video games connected to your TV Press the VIDEO STATUS button By every press of the video status button you change the mode Video Status STANDARD DYNAMIC THEATER GAME This adjusts the dimensions of the film or movie you are watching so t...

Page 44: ...nd VCR s For any other manufacturer s brand VCR please see the code chart and instructions on page 19 VCR Buttons Button Functions 44 You can control a VCR or DVD player with the buttons on the lower part of the remote control Move the slide switch to VCR or DVD to operate Notes The remote is preset with the code 000 to control JVC brand VCR s For any other manufacturer s brand VCR please see the ...

Page 45: ...e Tint and Color may be improperly adjusted See page 34 The Video Status mode may be turned to the wrong setting See page 43 There could be interference from another electrical appliance such as a computer another TV or VCR Move any such appliances further away from the TV There could be interference from a high wattage appliance like a hairdryer or vacuum operating nearby Move the antenna away fr...

Page 46: ...he Television by the service representatives If in home service is not available carry in service will be provided If service is not locally available box the product carefully preferably in its original carton and ship insured with a copy of your bill of sale plus a letter of explanation of the problem to the nearest JVC Factory Service Center the name and location which will be given to you by t...

Page 47: ...SE ARE LIMITED TO THE WARRANTY PERIOD SET FORTH ABOVE Some states do not allow the exclusion of incidental or consequential damages or limitations on how long the warranty lasts so these exclusions or limitations may not apply to you This warranty gives you specific legal rights and you may also have other rights which vary state to state JVC COMPANY OF AMERICA 1700 Valley Road DIVISION OF JVC AME...

Page 48: ... 537 5722 for your nearest authorized servicer or visit our website at www JVC com Remember to retain your Bill of Sale for Warranty Service Caution To prevent electrical shock do not open the cabinet There are no user serviceable parts inside Please refer to qualified service personnel for repairs Accessories To purchase accessories for your JVC product please call toll free 1 800 882 2345 or on ...

Page 49: ...ms VHF UHF F type connector Power Source AC 120V 60Hz Video 1 Vp p 75 ohms Audio 500mVrms 4dBs high impediance FIX 500 mVrms 4dBs Low impedance 400 Hz when modulated 100 Remote control unit x 1 AA batteries x 2 Component Input Jacks Y 1Vp p positive 75 ohms negative sync provided C 0 286 Vp p burst signal 75 ohms S Video Input Jack Y 1Vp p positive 75 ohms negative sync provided PB PR 0 7 Vp p 75 ...

Page 50: ...Notes 50 ...

Page 51: ...Notes 51 ...

Page 52: ...JVC COMPANY OF AMERICA Division of JVC Americas Corp 1700 Valley Road Wayne New Jersey 07470 JVC CANADA INC 21 Finchdene Square Scarborough Ontario Canada M1X 1A7 ...

Reviews: