background image

Page 14

November 17, 2000 12:40 pm

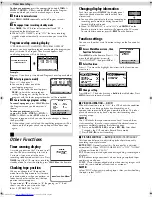
To control two VCRs with the same Remote

You can control two JVC VCRs by switching the remote control 
code for the Remote between A and B (

 step 

A

A

A

A

), keeping two 

VCRs to different control codes.

To change only the remote control code for the Remote, DO 
NOT perform steps 

B

B

B

B

 and 

C

C

C

C

.

Editing

You can use your VCR as the playback or recording VCR. You can 
use a camcorder as the playback VCR and your VCR as the 
recording VCR. Refer also to the other components’ instruction 
manuals for connection and its operations.

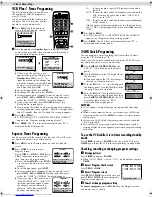
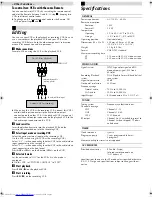
A

Make connections

Example: When using this VCR as the playback VCR

When using this VCR as the recording VCR, connect this VCR’s 
audio/video input connectors to the audio/video output 
connectors on the other VCR. If the playback VCR is monaural, 
connect the audio output connector on the playback VCR to the 
left audio input connector on this VCR.

B

Load cassettes

Insert the playback cassette into the playback VCR and the 
cassette to be recorded on into the recording VCR.

C

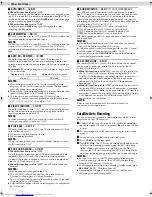
Select input mode on recording VCR

Select the correct external input on the recording VCR.
On this VCR (when using this VCR as the recording VCR);
Select “L-1” — when connecting the other VCR to the audio/video 
input connectors on the rear panel.
Select “F-1” — when connecting the other VCR to the audio/video 
input connectors on the front panel.
Press 

AUX

 or 

CH+/–

 on the Remote [

CH+/–

 on the VCR].

D

Select edit mode

Set the edit mode to “ON” for the VCRs if such a mode is 
equipped.

On this VCR, set “PICTURE CONTROL” to “EDIT”.

E

Start playback

Press 

PLAY

 (

4

) on the playback VCR.

F

Start recording

Press 

REC

 (

7

) on the recording VCR.

Specifications    

Specifications shown are for SP mode unless specified otherwise.
E. & O.E. Design and specifications subject to change without 
notice.

To audio/video input

This VCR (for playback)

Another VCR (for recording)

Audio/video cable
(not supplied)

To AUDIO/VIDEO OUT

GENERAL

Power requirement

: AC 120 V

d

, 60 Hz

Power consumption

Power on

: 18 W

Power off

: 2.0 W

Temperature

Operating

: 5°C to 40°C (41°F to 104°F)

Storage

: –20°C to 60°C (–4°F to140°F)

Operating position

: Horizontal only

Dimensions (W x H x D) : 400 mm x 94 mm x 255 mm

(15-3/4" x 3-3/4" x 10-1/16")

Weight

: 3.1 kg (6.8 lbs)

Format

: VHS NTSC standard

Maximum recording time

SP

: 210 min. with ST-210 video cassette

EP

: 630 min. with ST-210 video cassette

VIDEO/AUDIO

Signal system

: NTSC-type color signal and EIA 

monochrome signal, 525 lines/
60 fields

Recording/Playback 
system

: DA-4 (Double Azimuth) head helical 

scan system

Signal-to-noise ratio

: 45 dB

Horizontal resolution

: 230 lines

Frequency range

Normal audio

: 70 Hz to 10,000 Hz

Hi-Fi audio

: 20 Hz to 20,000 Hz

Input/Output

: RCA connectors (IN x 2, OUT x 1)

TUNER

Tuning system 

: Frequency-synthesized tuner

Channel coverage

VHF

: Channels 2–13

UHF

: Channels 14–69

CATV

: 113 Channels

RF output

: Channel 3 or 4 (switchable; preset to 

Channel 3 when shipped) 75 ohms, 
unbalanced

TIMER

Clock reference

: Quartz

Program capacity

: 1-year programmable timer/

8 programs

Memory backup for timer is not supported.

ACCESSORIES

Provided accessories

: RF cable (F-type),

Infrared remote control unit,
“AA” battery x 2

– Other Functions –

HR-VP793U-EN.fm  Page 14  Friday, November 17, 2000  12:40 PM

Summary of Contents for HR-VP793U

Page 1: ... with AC 120Vd 60Hz only To prevent electric shocks and fire hazards DO NOT use any other power source CAUTION TO PREVENT ELECTRIC SHOCK MATCH WIDE BLADE OF PLUG TO WIDE SLOT FULLY INSERT ATTENTION POUR ÉVITER LES CHOCS ÉLECTRIQUES INTRODUIRE LA LAME LA PLUS LARGE DE LA FICHE DANS LA BORNE CORRESPONDANTE DE LA PRISE ET POUSSER JUSQU AU FOND Note to CATV system installer This reminder is provided t...

Page 2: ...tional Electrical Code ANSI NFPA 70 provides information with regard to proper grounding of the mast and supporting structure grounding of the lead in wire to an antenna discharge unit size of grounding connectors location of antenna discharge unit connection to grounding electrodes and requirements for the grounding electrode 2 Lightning For added protection for this product during a lightning st...

Page 3: ...xes and DBS receivers Point the Remote toward the remote sensor on the target component The maximum operating distance of the remote control is about 8 m NOTE If the Remote does not work properly remove its batteries wait for a few seconds replace the batteries and then try again Video heads cleaning Use a dry cleaning cassette TCL 2UX when Rough poor picture appears while a tape is played back Th...

Page 4: ...e VCR the Plug Play setting will be automatically reactivated If Plug Play setting is not performed though the antenna cable is connected correctly perform Manual Clock Set and Auto Channel Set or Manual Channel Set E Set VCR channel The VCR channel is the channel on which you can watch the picture from the VCR on the TV when only using the RF connection Press POWER to turn off the VCR then press ...

Page 5: ...automatically when the clock setting is complete Setting clock manually Manual Clock Set First follow steps 1 1 1 1 to 2 2 2 2 in Preparations above then go to the following steps A Set time date and year Press rt until the desired time appears then press OK or e Set the date and year in the same way Holding rt changes the time in 30 minute intervals or changes the date in 15 day intervals B Selec...

Page 6: ...ideo output connectors connect an audio video cable between the AUDIO VIDEO IN connectors on the rear of the VCR and the audio video output connectors on the unit If both a cable box and a DBS receiver are used it is recommended that you connect the DBS receiver to your VCR s AUDIO VIDEO IN connectors and the cable box to your VCR s ANT IN connector D Connect Controller to VCR Connect the Controll...

Page 7: ... BRAND CODE DBS RECEIVER BRAND CODE JVC DISH Network ECHOSTAR DISH Network 51 51 PRIMESTAR SONY DSS RCA DSS 50 41 40 JVC ECHOSTAR PRIMESTAR 100 100 55 SONY RCA 205 205 CABLE BOX BRAND SET 1 PRESS NUMBER KEY 0 9 THEN OK TO TEST PRESS MENU TO END CABLE BOX BRAND SET 1 DID YOUR CABLE BOX CHANGE TO CHANNEL 09 YES NO PRESS THEN OK PRESS MENU TO END DBS RECEIVER BRAND SET 51 DID YOUR DBS RECEIVER CHANGE...

Page 8: ...t the Automatic Timer Standby function if the cassette s record safety tab is removed Playing back tape repeatedly 100 times Repeat Play During playback press and hold PLAY 4 for more than 5 seconds The play indicator on the display panel starts blinking slowly To stop playback press STOP 8 on the Remote or STOP EJECT 0 on the VCR Locating beginning of recordings Index Search Index codes are place...

Page 9: ...mer NOTES If all the 8 programs have already been set PROGRAM FULL or Full appears on the TV screen or the display panel After timer recording is completed the VCR turns off automatically You can program the timer recording while a regular recording is in progress the menu screens will not be recorded To timer record cable or satellite channels perform Cable Box and or DBS Receiver Control Setting...

Page 10: ...ETED PROGRAM OVERLAP appears see Program overlap warning display D Press TIMER The VCR turns off automatically and is displayed on the display panel 24HR Quick Programing You can program a timer recording that starts within 24 hours using the JOG dial on the VCR Load a cassette with the record safety tab intact The VCR turns on and the counter is reset automatically A Press 24HR QUICK PROGRAM on t...

Page 11: ...the TV screen To reset the time counter press C RESET on the Remote Function settings You can use the other useful function settings on the Function Set screen A Access Main Menu screen then Function Set screen Press MENU on the Remote Press rt to move the highlight bar arrow to FUNCTION SET then press OK or e B Select Function Press rt to move the highlight bar arrow to the function you want to s...

Page 12: ... simultaneously normal and Hi Fi on a Hi Fi stereo tape You can select the sound track s to listen to while playing back a Hi Fi stereo tape In addition when playing back a prerecorded tape containing two separate audio programs on the Hi Fi tracks you can choose either one by selecting either HI FI L or HI FI R HI FI Normally select this Hi Fi sound is played back HI FI L Sound on the left Hi Fi ...

Page 13: ...BS receiver While holding down CABLE DBS press one of the following buttons POWER TV CH and the Number keys For some brands you must press ENTER after having pressed the Number keys to enter a channel number To change the cable box s or DBS receiver s channels press TV CH or the Number keys The CH button can be used to change the VCR s channels only Changing Remote Control Code This Remote is capa...

Page 14: ... a mode is equipped On this VCR set PICTURE CONTROL to EDIT E Start playback Press PLAY 4 on the playback VCR F Start recording Press REC 7 on the recording VCR Specifications Specifications shown are for SP mode unless specified otherwise E O E Design and specifications subject to change without notice To audio video input This VCR for playback Another VCR for recording Audio video cable not supp...

Page 15: ...OF JVC AMERICAS CORP Sophisticated electronic products may require occasional service Just as quality is a keyword in the engineering and production of the wide array of JVC products service is the key to maintaining the high level performance for which JVC is world famous The JVC service and engineering organization stands behind our products NATIONAL HEADQUARTERS JVC SERVICE ENGINEERING COMPANY ...

Page 16: ... to abuse accident alteration modification tampering negligence misuse faulty installation lack of reasonable care or if repaired or serviced by anyone other than a service facility authorized by JVC to render such service or if affixed to any attachment not provided with the products or if the model or serial number has been altered tampered with defaced or removed 2 Initial installation and inst...

Reviews: