JVC HR-V610EX Instructions Manual Download Page 5

February 27, 2004 9:29 am

Page 5

— 5 —

Master Page: Right

To view picture signals from the recorder, set your TV to the 
video channel.

With AV connection

Press 

PR – 

until the display panel shows 

“1 – –” (or “2 – –”). Now the video channel 
is set to off. Then press 

OK

.

To view picture signals from the recorder, set your TV to its AV 
mode.

E

Check results

If both Auto Channel Set and Clock Set 
have been performed successfully, the 
correct current time is displayed.

Turn on the TV and select its video channel or AV mode. Then 
make sure that all necessary stations have been stored in the 
recorder’s memory by using the 

PR

 button(s).

If Auto Channel Set has succeeded but 
Clock Set has not, “1” is displayed.

A

Turn on the TV and select its video 

channel or AV mode. Then make sure that all necessary stations have 
been stored in the recorder’s memory by using the 

PR

 button(s).

B

Perform “Clock Set” (

13).

If both Auto Channel Set and Clock Set 
have failed, “– –:– –” is displayed.

Make sure the cables are connected 
properly. Turn off the recorder once, then turn the recorder back on 
again. The Country Set screen appears on the screen. Perform “Auto 
Set Up” (

4) or “Preset Download” again.

Preset Download

— Auto Channel Set by downloading preset data from TV/
Auto Clock Set*/Auto Guide Program Number Set

* If you select a country in Central or Eastern Europe, set the clock 

manually 

(

13).

ATTENTION:

You can use this function only with a TV offering T-V Link, etc.* Be 
sure to use a fully-wired 21-pin SCART cable.

* Compatible with TVs offering T-V Link, EasyLink, Megalogic, 

SMARTLINK, Q-Link, DATA LOGIC or NexTView Link via fully-wired 21-
pin SCART cable. The degree of compatibility and available functions 
may differ by system.

Before starting:

Perform steps

1

1

1

1

2

2

2

2

 of “Auto Set Up” (

4).

A

Perform Preset Download

Press 

RT

 to place the pointer next to “T-V 

LINK” and press 

OK

 or 

.

If you are using the display panel, press 

RT

 to select “CH – –” and press 

OK

 or 

.

Do NOT

 press any button during Preset Download. When Preset 

Download is completed, “COMPLETED” appears for about 
5 seconds, then the normal screen appears.

B

Check results

Perform step

5

5

5

5

 of “Auto Set Up” (

4).

C

Set video channel to off

Perform “Video Channel Set” (

15).

NOTES:

Depending on the area, the recorder cannot perform Auto Set 
Up or Preset Download properly.

In the area where no TV station transmits a PDC (Programme 
Delivery Control) signal, the recorder can perform neither Auto 
Clock Set nor Auto Guide Program Number Set.

If you have moved to a different area, perform “Video Channel 
Set” (

15) (with RF connection), “Tuner Set” (

13) and 

“Clock Set” (

13) as required.

If a new station starts broadcasting in your area, perform “Tuner 
Set” (

13) and, if necessary, “Video Channel Set” (

15).

Language Set

You can change the language setting manually as required.

A

Access Main Menu screen, then Auto 
Channel Set screen

Press 

MENU

. Press 

RT

 to place the 

pointer next to “AUTO CH SET”, then press 

OK

 or 

.

B

Select your country

Press 

RT

 to place the pointer next to your country, then press 

OK


or .

C

Select language

Press 

RT

 to place the pointer next to the desired language.

You do not have to press 

OK

; pressing 

OK

 enters AUTO SET/T-V 

LINK screen.

D

Return to normal screen

Press 

MENU

.

When you connect the recorder to your TV via a fully-wired 
21-pin SCART cable, the following functions are available. You 
can use these functions only with a TV offering T-V Link, etc.*
For details, refer to the instruction manual of your TV.

* Compatible with TVs offering T-V Link, EasyLink, Megalogic, 

SMARTLINK, Q-Link, DATA LOGIC or NexTView Link via fully-wired 
21-pin SCART cable. The degree of compatibility and available functions 
may differ by system.

NextView Link

You can download the EPG (Electronic Programme Guide) 
information from your TV for timer-programming on the recorder.

TV Auto Power On

The TV will turn on and be set to its AV mode automatically 
whenever you play a tape.

VCR Auto Standby

You can use your TV’s remote control to turn off the recorder.

Direct Rec

You can easily start recording the programme that you are 
watching on your TV. When you use this function, set “DIRECT 
REC” to “ON”. (

12)

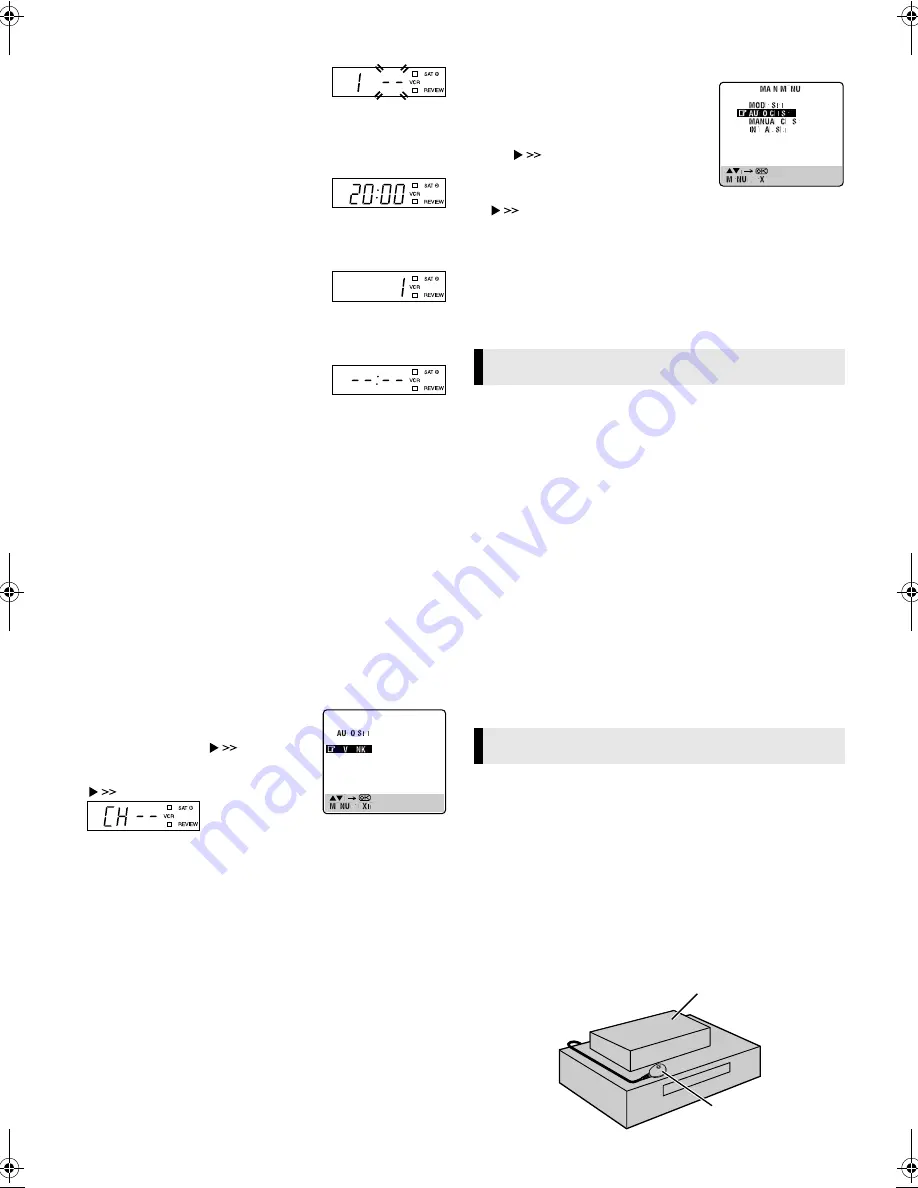
When you use an optional Satellite Controller and perform the 
following settings, you can control your satellite receiver’s channel 
for timer recording. Approximately 20 seconds before the timer 
recording starts, the recorder sets its input mode to “L-2” and the 
Satellite Controller switches the satellite receiver’s channels.

A

Situate Satellite Controller

Place the Satellite Controller so that the path between its 
transmitter and the satellite receiver’s remote sensor is 
unobstructed.

B

Attach Satellite Controller

Fix securely using the adhesive strip attached on the back of the 
Satellite Controller.

T-V Link Functions

Satellite Receiver Control Set

Your recorder

Satellite receiver

Satellite Controller
(not provided)
(suggested locations)

HR-V610_001EN.fm  Page 5  Friday, February 27, 2004  9:29 AM

Summary of Contents for HR-V610EX

Page 1: ...ead or aerial WARNING There are two different types of SECAM colour systems SECAM L used in FRANCE also called SECAM West and SECAM B used in Eastern European countries also called SECAM East 1 This recorder can also receive SECAM B colour television signals for recording and playback 2 Recordings made of SECAM B television signals produce monochrome pictures if played back on a video recorder of ...

Page 2: ...n the recorder when you move it from a cold place to a warm place or under extremely humid conditions just as water droplets form on the surface of a glass filled with cold liquid Moisture condensation on the head drum will cause damage to the tape In conditions where condensation may occur keep the recorder s power turned on for a few hours to let the moisture dry How to use the remote control Be...

Page 3: ... position on the tape H VPS PDC indicator PDC recording is not possible in Central and Eastern Europe I Type of broadcast J Current day month year K Clock L Channel and auxiliary input M Cassette loaded mark Buttons Connectors and Indicators Cassette loading slot Display panel Play indicator Record indicator Timer mode indicator Channel and auxiliary input Clock time SAT indicator VCR indicator Ea...

Page 4: ... If you have connected your TV to the recorder with RF connection and the on screen display appearing on UHF channel 36 looks distorted perform Video Channel Set 墌 15 B Select your country Press RT to place the pointer next to your country then press OK The language is automatically selected for the on screen display depending on the country you have selected The AUTO SET T V LINK screen appears I...

Page 5: ...trol signal the recorder can perform neither Auto Clock Set nor Auto Guide Program Number Set If you have moved to a different area perform Video Channel Set 墌 15 with RF connection Tuner Set 墌 13 and Clock Set 墌 13 as required If a new station starts broadcasting in your area perform Tuner Set 墌 13 and if necessary Video Channel Set 墌 15 Language Set You can change the language setting manually a...

Page 6: ...ack begins automatically B Start playback Press 4 BRAND NAME CODE BRAND NAME CODE JVC AMSTRAD ASTON CANAL SATELLITE CANAL D BOX ECHOSTAR VIA DIGITAL FINLUX FORCE GALAXIS GRUNDIG HIRSCHMANN HUMAX ITT NOKIA JERROLD KATHREIN LUXOR MASCOM 73 60 61 62 63 92 97 81 81 85 82 68 89 88 64 65 102 64 78 99 88 68 75 70 71 96 68 93 MASPRO NOKIA PACE PANASONIC PHILIPS RADIX RFT SABA SAGEM SALORA SAMSUNG SIEMENS ...

Page 7: ... screen only if O S D is set to ON 墌 12 Example To locate the beginning of B from the current position press 2 twice To locate the beginning of D from the current position press 6 once Playback begins automatically when the desired recording is located Locating beginning of timer recordings Instant Review After ensuring that the recorder is turned off and that the timer mode is disengaged press RE...

Page 8: ...le the one selected with the PR R T on the remote control or PR on the recorder is recorded on the tape If a decoder is connected to the recorder you can select a scrambled channel as well with the TV channel controls Specifying recording length Instant Timer Recording ITR During recording press 7 on the recorder repeatedly until the desired recording length appears on the display panel 䡬 on the d...

Page 9: ... number key 7 To change the stop time press STOP number keys 2 and or 5 To timer record daily Monday Friday or weekly serials press DAILY number key 8 or WEEKLY number key 9 Pressing the button again makes the DAILY or WEEKLY display disappear To change the channel position number press PR D Press OK or PROG If PROGRAM OVERLAPPED appears see Program overlap warning display 墌 10 E Press The recorde...

Page 10: ...this overlap press PROG to finish the timer program setting The program starting earlier or program with the lower program number will be recorded B Cancel or change program setting To cancel a program press when the Program screen you do not want is shown To change a program press the appropriate button START number keys 1 and or 4 STOP number keys 2 and or 5 DATE number keys 3 and or 6 PR and or...

Page 11: ...programme via the satellite receiver set the input mode to L 2 by pressing AUX or PR R T on the remote control or PR on the recorder To receive a scrambled broadcast descramble the signal with the satellite receiver For details refer to the instruction manual for the satellite receiver and decoder Connecting Using a decoder You can enjoy the variety of programming that is available through scrambl...

Page 12: ...ape speed manually during timer programming There may be some noise and sound disturbance where the tape speed switches from SP to LP mode on the tape This function is not available during ITR Instant Timer Recording and will not work properly with any tapes longer than E 180 or with some tapes of shorter lengths If you perform timer recording with both this function and VPS PDC activated and the ...

Page 13: ...ess Main Menu screen then Auto Channel Set screen Press MENU Press RT to place the pointer next to AUTO CH SET then press OK or B Select your country Press RT to place the pointer next to your country then press OK or C Select language Press RT to place the pointer next to the desired language D Perform Auto Channel Set Press OK twice When Auto Channel Set is completed SCAN COMPLETED is displayed ...

Page 14: ...t to ON by pressing RT Then press OK Repeat steps 3 3 3 3 4 4 4 4 as necessary E Return to normal screen Press MENU Changing station name A Access Confirmation screen Perform step 1 1 1 1 of Manual Channel Set 墌 13 B Select position Press RT until the desired channel begins blinking then press OK twice The Manual Channel Set screen appears C Select station name If the station name is registered in...

Page 15: ...ISC DK1 DK2 DK4 DR1 DR2 DSF DUNA ETB1 ETB2 ETV EUNW EURO EUSP FEMM FILM FNET FR2 FR3 FR5 GALA HBO HR3 HSEU INFO ITA1 ITA7 ITV1 JIM JSTV KA2 KAB1 KAN2 KAN5 KBH KIKA LA7 LIB LOCA M6 MBC MCM MDR MOVE MTV MTV1 MTV2 MTV3 NGEO N24 N3 N TV NBC NDR NED1 NED2 NED3 NET5 NEWS TV1000 3SAT 9LIVE AB3 ADULT Animal Planet ANTENA3 ARD ARTE ATV BERLIN1 BBC GROUP BBC1 BBC2 BBCW TV BIO BLOOMBERG BAYERN3 CANAL PLUS PO...

Page 16: ...our signal and CCIR monochrome signal 625 lines 50 fields Recording system DA4 Double Azimuth head helical scan system Signal to noise ratio 45 dB Horizontal resolution 250 lines Frequency range Normal audio 70 Hz to 10 000 Hz Hi Fi audio 20 Hz to 20 000 Hz Input Output 21 pin SCART connectors IN OUT x 1 IN DECODER x 1 RCA connectors AUDIO OUT x 1 TUNER TIMER TV channel storage capacity 99 positio...

Reviews: