background image

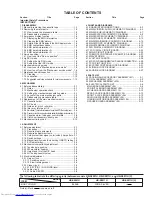
TABLE OF CONTENTS

Section

 Title

Page

Section

Title

Page

Important Safety Precautions
INSTRUCTIONS

1. DISASSEMBLY

1.1 Manually removing the cassette tape .........................  1-1
1.2 Removing the major parts ...........................................  1-2
   1.2.1 How to read the procedure table ...........................  1-2
   1.2.2 Disassembly procedure ........................................  1-2
1.3 Emergency display function ........................................  1-4
   1.3.1 Displaying the EMG information ...........................  1-4
   1.3.2 Clearing the EMG history ......................................  1-4
   1.3.3 Details of the OSD display in the EMG display mode ...  1-5
   1.3.4 EMG content description .......................................  1-6
   1.3.5 EMG detail information<1> ...................................  1-7
   1.3.6 EMG detail information<2> ...................................  1-8
   1.3.7 EMG detail information<3> ...................................  1-8
1.4 Service position ...........................................................  1-9
   1.4.1 How to set the "Service position" ..........................  1-9
1.5 Jig RCU mode .............................................................  1-9
   1.5.1 Setting the Jig RCU mode ....................................  1-9
   1.5.2 Setting the User RCU mode .................................  1-9
1.6 Mechanism service mode ...........................................  1-9
   1.6.1 How to set the "Mechanism service mode" ...........  1-9
   1.6.2 How to exit from the "Mechanism service mode" ..  1-9
1.7 Maintenance and inspection .....................................  1-10
   1.7.1 Cleaning ..............................................................  1-10
   1.7.2 Lubrication ..........................................................  1-10
   1.7.3 Suggested servicing schedule for main components ..  1-10

2. MECHANISM

2.1 Before disassembling ..................................................  2-1
   2.1.1 Notes .....................................................................  2-1
   2.1.2 Mechanism operation check .................................  2-1
   2.1.3 Setting the mechanism assembling mode ............  2-1
   2.1.4 Layout of the main mechanism parts ....................  2-2
   2.1.5 Disassembling procedure table .............................  2-3
2.2 Replacement of the main mechanism parts ................  2-4
   2.2.1 Cassette holder .....................................................  2-4
   2.2.2 A/C head ...............................................................  2-5
   2.2.3 Guide arm, pinch roller arm ..................................  2-6
   2.2.4 Idler arm, idler gear 1/2 .........................................  2-6
   2.2.5 Main brake(T), brake lever, tension arm,reel disk(S/T), Rec safety lever ...  2-6
   2.2.6 Press lever, control cam, capstan brake assembly,loading motor assembly .  2-7
   2.2.7 Capstan motor, load gear, control plate ................  2-8
   2.2.8 Clutch unit assembly, direct gear ..........................  2-9
2.3 Mechanism timing chart ............................................  2-10

3. ADJUSTMENT

3.1 Before adjustment ........................................................ 3-1
   3.1.1 Precaution .............................................................  3-1
   3.1.2 Required test equipments .....................................  3-1
   3.1.3 Required adjustment tools ....................................  3-1
   3.1.4 Color(colour) bar signal, color(colour) bar pattern  3-1
   3.1.5 Switch settings ......................................................  3-1
   3.1.6 Manual tracking mode (Auto tracking ON/OFF) setting  3-2
   3.1.7 EVR adjustment ....................................................  3-2
3.2 Mechanism compatibility adjustment ..........................  3-2
   3.2.1 Tension pole position .............................................  3-2
   3.2.2 FM waveform linearity ...........................................  3-3
   3.2.3 Height and tilt of the A/C head ..............................  3-3
   3.2.4 A/C head phase(X-value) ......................................  3-4
3.3 Electrical adjustment ...................................................  3-4
   3.3.1 Servo circuit ..........................................................  3-4
     3.3.1.1 Switching point .................................................  3-4
     3.3.1.2 Slow tracking preset .........................................  3-4
   3.3.2 Video circuit ...........................................................  3-5
     3.3.2.1 EE Y/PB Y (S-VHS/VHS)level ..........................  3-5
   3.3.3 Audio circuit ...........................................................  3-5
     3.3.3.1 Audio REC FM .................................................  3-5

The following table lists the differing point(s) between models HR-S5901U, HR-S5911U, and HR-S5911U(C).

MODEL

HR-S5901U

ITEM

BODY COLOR

BLACK

PURE-SILVER

4. CHARTS AND DIAGRAMS

4.1 BOARD INTERCONNECTIONS .................................  4-3
4.2 MAIN(VIDEO/N. AUDIO) SCHEMATIC DIAGRAM .....  4-5
4.3 MAIN(S-SUB) SCHEMATIC DIAGRAM ......................  4-7
4.4 MAIN(SYSCON) SCHEMATIC DIAGRAM ..................  4-9
4.5 MAIN(SW.REG) SCHEMATIC DIAGRAM .................  4-11
4.6 MAIN(TUNER) SCHEMATIC DIAGRAM ...................  4-13
4.7 MAIN(FMA/DEMOD) SCHEMATIC DIAGRAM .........  4-15
4.8 MAIN(FRONT) SCHEMATIC DIAGRAM ...................  4-17
4.9 MAIN(TERMINAL) SCHEMATIC DIAGRAM .............  4-19
4.10 2D DIGITAL SCHEMATIC DIAGRAM .....................  4-21
4.11 2D DIGITAL CIRCUIT BOARD ................................  4-23
4.12 MAIN CIRCUIT BOARD ..........................................  4-25
4.13 REMOTE CONTROLLER SCEMATIC DIAGRAM ..  4-27
4.14 WAVEFORMS .........................................................  4-28
4.15 VOLTAGE CHARTS ................................................  4-29
4.16 FDP GRID ASSIGNMENT AND ANODE CONNECTION ... 4-29
4.17 CPU PIN FUNCTION ..............................................  4-30
4.18 SYSTEM CONTROL BLOCK DIAGRAM ................  4-31
4.19 VIDEO BLOCK DIAGRAM ......................................  4-33
4.20 AUDIO BLOCK DIAGRAM ......................................  4-37

5. PARTS LIST

5.1 PACKING AND ACCESSORY ASSEMBLY<M1> .......  5-1
5.2 FINAL ASSEMBLY<M2> .............................................  5-2
5.3 MECHANISM ASSEMBLY<M4> .................................  5-4
5.4 ELECTRICAL PARTS LIST .........................................  5-6
  MAIN BOARD ASSEMBLY<03> .....................................  5-6
  2D DIGITAL BOARD ASSEMBLY<05> .........................  5-12
  A/C HEAD BOARD ASSEMBLY<12> ...........................  5-13
  REAR S JACK BOARD ASSEMBLY<29> .....................  5-13
  FRONT S JACK BOARD ASSEMBLY<36> ..................  5-13
  ADV.JOG/SW BOARD ASSEMBLY<38> ......................  5-13
  LOADING MOTOR BOARD ASSEMBLY<55> ..............  5-13
  R.PAUSE BOARD ASSEMBLY<99> .............................  5-13

HR-S5911U

HR-S5911U(C)

Note(s): Mark 

 is same as left.

Summary of Contents for HR-S5901U

Page 1: ...O Signal system NTSC type color signal and EIA monochrome signal 525 lines 60 fields Recording Playback system DA 4 Double Azimuth head helical scan system Signal to noise ratio 45 dB Horizontal resolution VHS 230 lines S VHS 400 lines Frequency range Normal audio 70 Hz to 10 000 Hz Hi Fi audio 20 Hz to 20 000 Hz Input Output RCA connectors IN x 2 OUT x 1 S video connectors IN x 2 OUT x 1 TUNER Tu...

Page 2: ......

Page 3: ... 3 1 3 Required adjustment tools 3 1 3 1 4 Color colour bar signal color colour bar pattern 3 1 3 1 5 Switch settings 3 1 3 1 6 Manual tracking mode Auto tracking ON OFF setting 3 2 3 1 7 EVR adjustment 3 2 3 2 Mechanism compatibility adjustment 3 2 3 2 1 Tension pole position 3 2 3 2 2 FM waveform linearity 3 3 3 2 3 Height and tilt of the A C head 3 3 3 2 4 A C head phase X value 3 4 3 3 Electri...

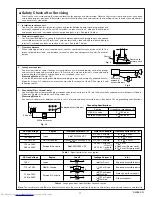
Page 4: ...e specified for compliance with recognized codes pertaining to X ray emission Consequently when servicing these products replace the cath ode ray tubes and other parts with only the specified parts Under no circumstances attempt to modify these circuits Unauthorized modification can increase the high voltage value and cause X ray emission from the cathode ray tube 12 Crimp type wire connector In s...

Page 5: ...eter to measure across both terminals of load Z See figure 9 and following table 2 5 Grounding Class 1 model only Confirm specified or lower grounding impedance between earth pin in AC inlet and externally exposed accessible parts Video in Video out Audio in Audio out or Fixing screw etc Measuring Method Connect milli ohm meter between earth pin in AC inlet and exposed accessible parts See figure ...

Page 6: ......

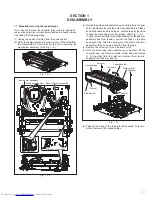
Page 7: ... hand to keep the slack away from any grease See Fig 1 1b In case of mechanical failures while keeping the tension arm assembly free from tension pull out the tape on the pole base assembly Take the spring a of the pinch roller arm assembly off the hook and detach it from the tape 4 Remove the screw a of the side frame L R 5 Hold the slack tape and cassette cover together lift the cassette tape to...

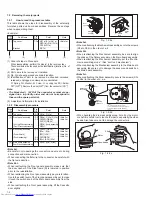
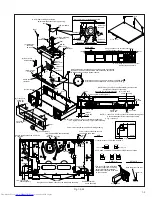
Page 8: ...o make it touch the switch knob of the Main board assembly from the side When reattaching the Front panel assembly lift the Cassette door slightly Step LocNo Part Name Fig No Point Note 1 Top cover 1 2 2d 3 S1a 2 L1a 2 Front panel assembly 1 2 2d 2 S2a 4 L2a 3 L2b Note 2a 1 2 2a CN7001 WR2a Note 2b CN7103 WR2b Adv Jog SW board assembly 3 S2b Knob assembly Front S Jack board assembly 2 S2c 3 Mechan...

Page 9: ...ew put jig under Front panel assembly NOTE Insert FFC wire to the connector before attaching Adv Jog SW board assembly to Front panel assembly back side back side 20mm NOTE 1 Insert FFC wire to the connector before attaching Front S Jack board assembly to Front panel assembly 2 Fig 1 reference 30mm 60mm Back side of Front panel assembly NOTE After screwing execute the adjustment inspection of the ...

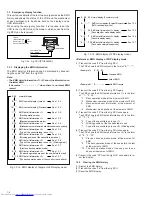
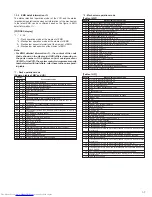
Page 10: ...r mode display mode EMG content display E Latest Previous See 1 3 4 EMG code display mode Normal display Counter or clock Reference EMG display of FDP display mode 1 Transmit the code 59 from the Jig RCU The FDP shows the EMG content in the form of E Example 1 E 01 03 Previous EMG Latest EMG No EMG record Example 2 E 2 Transmit the code 59 from the Jig RCU again The FDP shows the EMG detail inform...

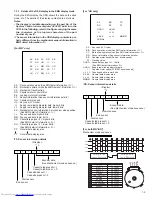
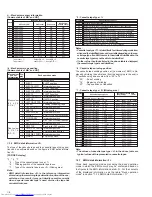
Page 11: ...information 1 L L Tape speed data higher 8 bits MM Tape speed data lower 8 bits NN Cassette tape type 2 higher 8 bits See EMG detail of information 2 OO Cassette tape type 2 lower 8 bits See EMG detail of information 2 P P General data display area Y Y General data display area For HD only AA BB CC DD EE FF GGGG HHHH I I J J J J KKKK L L L L MMMM ROM No Display h Encoder data See Mechanism mode se...

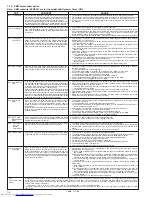
Page 12: ... is not generated due to a supply reel sensor failure 3 Power SW5V is not supplied to the reel sensor on the tape winding side 1 The drum could not start or the drum rotation has stopped due to too large a load on the tape because 1 The tape tension is abnormally high 2 The tape is damaged or a foreign object grease etc adheres to the tape 2 The drum FG pulse did not reach the System controller CP...

Page 13: ...peed including x2 speed 2E INSERT REC 43 REW 47 REV SEARCH 4C AUDIO DUB 6E INSERT REC VIDEO AUDIO 84 FWD STILL SLOW 85 REV STILL SLOW 8F REC PAUSE AF INSERT REC PAUSE C7 REV SEARCH x1 speed reverse playback using JOG CD AUDIO DUB PAUSE EF INSERT REC VIDEO AUDIO PAUSE F0 Mechanism being initialized F1 POWER OFF as a result of EMG F2 Cassette being inserted F3 Cassette being ejected F4 Transition fr...

Page 14: ... reference information stored using the remaining tape detection function of the cas sette tape As a result it may not identify cassette correctly when a special cassette tape is used or when the tape has variable thickness 1 3 6 EMG detail information 2 The type of the cassette tape and the cassette tape winding posi tion can be confirmed based on the figure in EMG detail informa tion 2 FDP OSD d...

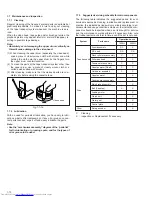
Page 15: ...hanism and board assemblies are attached by connectors only When carrying out a di agnosis or repair of the boards in the Service position make sure that the connectors are not disconnected Fig 1 4 1a 1 6 Mechanism service mode This model has a unique function to enter the mechanism into every operation mode without loading of any cassette tape This function is called the Mechanism service mode 1 ...

Page 16: ...th with alcohol and while holding the cloth onto the upper drum by the fingers turn the upper drum counterclockwise 2 To clean the parts of the tape transport system other than the upper drum use a piece of closely woven cloth or a cotton swab soaked with alcohol 3 After cleaning make sure that the cleaned parts are com pletely dry before using the cassette tape Fig 1 7 1a 1 7 2 Lubrication With n...

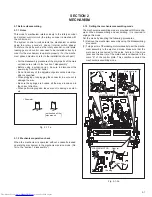
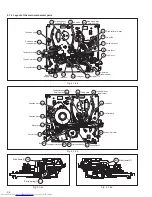
Page 17: ...amage the wire Be sure the springs are hooked all the way around and in the correct direction When performing repairs take care not to damage a catch etc Fig 2 1 1a Fig 2 1 3a 2 1 2 Mechanism operation check When the mechanism is operated without a cassette loaded operate the mechanism in the mechanism service mode Re fer to the section 1 disassembly 2 1 3 Setting the mechanism assembling mode The...

Page 18: ...l disk take up side B15 Direct gear T12 Idler arm T13 Reel disk supply side T14 Rec safety lever T15 Tension arm base T16 Tension arm assy T17 Full erase head T11 Ider gear 1 2 B1 Load gear assy take up side B2 Fixing plate B3 Load gear assy supply side B4 Load gear B5 Control plate B6 Tension arm lever B7 Change lever B8 Clutch unit assy B9 Loading motor assy B10 Belt B11 Control cam B12 Press le...

Page 19: ...ame L T 3 1 2 2 1 Drive arm T 5 1 2 3 4 2 1 Side frame R T 3 1 2 2 2 A C head T 1 FE head T B 1 2 3 Guide arm assy T 1 2 3 Lid guide T 1 2 3 Pinch roller arm assy T 2 1 2 4 Idler arm T 4 1 2 3 2 4 Idler gear 1 2 T 5 1 2 3 4 2 5 Main brake assy T T 6 1 2 3 4 5 2 5 Reel disk T T 7 1 2 3 4 5 6 2 5 T ension arm T 6 1 2 3 4 5 2 5 Reel disk S T 7 1 2 3 4 5 2 5 T ension arm base T 7 1 2 3 4 5 T up head T...

Page 20: ...nd phase adjustment 1 Turn gear a of the loading motor assembly so that the main deck connects to the guide hole a of the drive lever 2 Place the projection of the drive lever on section a of the side frame R and install the side frame R to the main deck 3 Secure screw b 4 Place section b of the drive arm on the gear of the side frame R Make sure that the pin of the door opener con nects with sect...

Page 21: ...head base secure the screws in the order of c d and e To make the adjustment easy tem porarily elevate the A C head Fig 2 2 2a Fig 2 2 2b Guide hole a Cassette Holder Assembly Gear a Screw a Section b Section c DRIVE ARM L SIDE FRAME L Section d DRIVE ARM R SIDE FRAME R Section a Screw b DRIVE LEVER SIDE FRAME R EARTH SPRING 1 Hook a TOP FRAME Position guide a Arrow a HEAD BASE Screw a Screw c Scr...

Page 22: ...el disk T and the spacer 4 Lift up and turn section b of the brake lever counterclockwise to remove the brake lever 5 Remove the spring b from the hook a 6 Release the catch c to detach the tension arm 7 Release the catch d to detach the reel disk S and the spacer 8 Remove the spring c from the hook b 9 Turn the tension arm base in the direction shown by arrow a to release catch e Place the projec...

Page 23: ...pring a Spring a Main brake T assembly BRAKE LEVER Main brake T assembly Catch a Catch b Section b Spring b Hook a Catch d Catch c Tension arm assembly REEL DISK S REEL DISK T REEL DISK T REEL DISK S Tension arm assembly Tension arm base assembly BRAKE LEVER REC SAFETY LEVER SPACER Spring c Catch f Tension arm base assembly Catch e Hole a Hole a Arrow a Hook b REC SAFETY LEVER Catch d Catch c Scre...

Page 24: ...e hole c of the control cam to install the control cam 9 Move the capstan brake in the direction shown by the arrow a to attach the press lever to the shaft a Make sure that the boss of the press lever fits in the control cam and that the shaft b of the pinch roller arm assembly connects with the hole of the press lever 10 Attach slit washer a to shaft a Fig 2 2 6b Fig 2 2 7a Screw a Shaft a Shaft...

Page 25: ...7 Place the main deck on the guide hole g of the control plate 8 Attach the load gear on the load gear base so that the con trol plate is placed on the edge h of the load gear 9 Place the fixing plate on the shaft of the load gear base and secure the screws b Fig 2 2 7b 2 2 8 Clutch unit assembly direct gear 2 2 8 1 Removal 1 Remove the slit washer a to detach the clutch unit assem bly 2 Remove th...

Page 26: ...ION ARM LEVER LOCK FREE OFF ON ON PLAY STOP MODE PRESS UP STOP REV OFF OFF OFF OFF ON OFF FF REW EJECT PLAY FOR SLOW STILL REV SERCH SLOW STILL FF REW STOP REEL BRAKE ON ON OFF ON ON OFF OFF2 OFF1 ON CLUTCH DIRECT Movements of a CONTROL PLATE m m 0 5 15 20 25 30 35 40 45 50 55 10 CONTROL PLATE MARK E P SL R ST B FR MECHANISM MODE CONTACT ...

Page 27: ...Unless otherwise specified all measuring points and adjustment parts are located on the Main board White 75 100 IRE 40 IRE Horizontal sync Q I 1V White 100 Yellow Cyan Green Magenta Red Blue Burst 40 IRE White Yellow Cyan Green Magenta Red Blue Q I Black White 100 75 Color colour bar signal NTSC Color colour bar pattern NTSC INITIAL MODE DATA CODE CUSTOM CODE 43 A CODE Data transmitting method Dep...

Page 28: ...e adjustment pin is located in the OK range If it is outside this range restart the adjustment from the beginning After completion of the adjustment rotate the loading gear motor to return it to the mode B2 position OK NG ADJUST PIN TENSION ARM Stamping b Stamping a CONTROL PLATE Fig 3 2 1a 3 1 7 EVR adjustment Some of the adjustments require the adjustment performed by the EVR system The main uni...

Page 29: ...gnal to D FF E to observe the V PB FM waveform at the measuring point D 3 Set the VCR to the manual tracking mode 4 Make sure that there is no significant level drop of the V PB FM waveform caused by the tracking operation with its generally parallel and linear variation ensured Perform the following adjustments when required See Fig 3 2 2b 5 Reduce the V PB FM waveform by the tracking opera tion ...

Page 30: ...at the switching point is the specified value G 3 3 1 2 Slow tracking preset Signal A1 Ext input A2 Color colour bar signal NTSC Mode B1 S VHS SP B2 S VHS EP Measuring point D TV Monitor Adjustment part F Jig RCU Code 71 or 72 Specified value G minimum noise Adjustment tool H Jig RCU PTU94023B 3 2 4 A C head phase X value Signal A1 Alignment tape SP stairstep NTSC MHP A2 Alignment tape EP stairste...

Page 31: ...oscope Measuring point D TP2253 A PB FM External trigger E TP111 D FF Adjustment part F VR2251 Specified value G1 350 50 mVp p G2 More than 200 mVp p 1 Apply the external trigger signal to D FF E to observe the Audio PB FM waveform at the measuring point D 2 Record the signal A3 with no audio signal input in the mode B and play back the recorded signal 3 Set the VCR to the manual tracking mode 4 I...

Page 32: ......

Page 33: ......

Page 34: ...65 Corporate Avenue Cypress California 90630 0024 1500 Lakes Parkway Lawrenceville Georgia 30043 5857 2969 Mapunapuna Place Honolulu Hawaii 96819 2040 973 317 5000 973 396 1000 630 851 7855 714 229 8011 770 339 2582 808 833 5828 JVC CANADA INC Head office Montreal Vancouver 21 Finchdene Square Scarborough Ontario M1X 1A7 16800 Rte Trans Canadienne Kirkland Quebec H9H 5G7 13040 Worster Court Richmo...

Reviews: