


10
1
2
3
4
5
6
7
8
9
0
1
2
3
4
5
6
7
8
9
0
INITIAL SETTINGS (cont.)
+
–
00
00
00
00
00
00
00
00
00
00
0
00
00
00
00
0
00
00
00
00
00
00
SELECT MODE
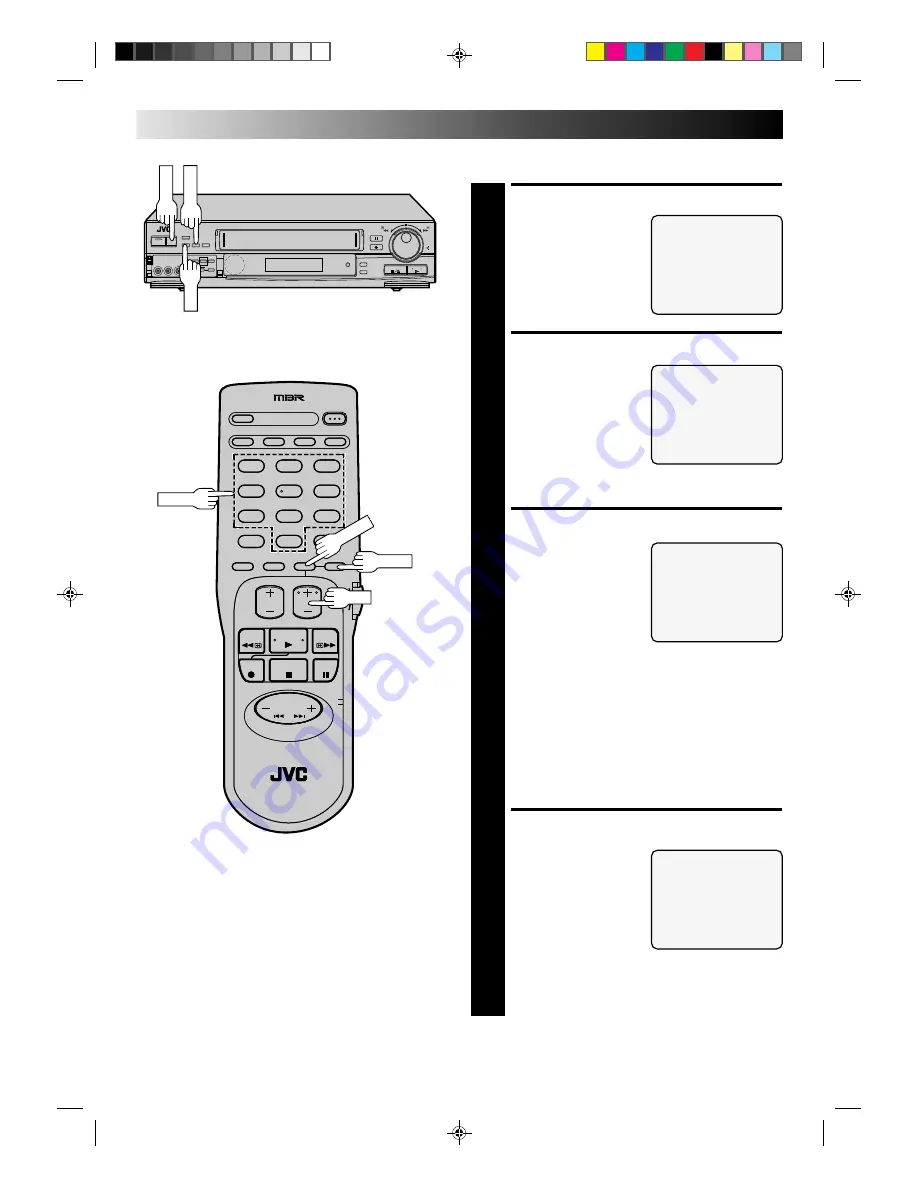
5
At the Override Auto
Clock Set screen, place the
arrow next to “SEMI-
AUTO CLOCK SET” by
pressing SET +/–, then
press SELECT.
ACCESS SELECT SCREENS
6
At the Semi-Auto Clock Set
screen, place the
arrow next to the desired
mode by pressing SET +/–,
then press SELECT.
To select the Host Channel
— step 7
To select the Time Zone
— step 8
To select the D.S.T. mode — step 9
SELECT HOST CHANNEL
7
You can either select
“AUTO”, or enter a PBS
channel number. For
automatic channel
selection, simply press
MENU. To manually select
the PBS channel, press the
appropriate DIGIT key or
SET +/– to cycle through
the channel numbers (hold button down to speed
through numbers) and stop when the desired number
appears. Press MENU and the Semi-Auto Clock Set
screen reappears.
NOTES:
●
For cable box users: Select "AUTO" or the channel
on your VCR that receives the cable box channels,
and set the cable box to the PBS channel.
●
There are some PBS channels that do not transmit
clock setting data.
SELECT TIME ZONE
8
You can either select
“AUTO”, or select the
correct zone. If you
selected "AUTO" in step 7
and if you live near the
boundary of an adjacent
time zone, or receive
cable TV channels, a PBS
channel from a different
time zone may become
your host channel. Therefore, in this case make sure to
manually select the correct time zone. Place the arrow
next to your choice by pressing SET +/–, then press
MENU to return to the Semi-Auto Clock Set screen.
Semi-Auto
OVERRIDE AUTO CLOCK SET
AUTO CLOCK SET
=
SEMI-AUTO CLOCK SET
MANUAL CLOCK SET
PRESS (SELECT, SET+/–)
PRESS (MENU) TO END
TIME ZONE SELECT
=
AUTO
MOUNTAIN
ATLANTIC
PACIFIC
EASTERN
ALASKA
CENTRAL
HAWAII
PRESS (SET+/–) FOR CHOICE
PRESS (MENU) TO END
SEMI-AUTO CLOCK SET
=
HOST CHANNEL SELECT
TIME ZONE SELECT
D.S.T. SELECT
PRESS (SELECT, SET+/–)
PRESS (MENU) TO END
HOST CHANNEL SELECT
(CATV)
CH AUTO
PRESS (SET+/–) TO SELECT
PRESS (MENU) TO END
MENU
SELECT
SET
DIGIT
MENU
SELECT
SET


