background image

EN 

31

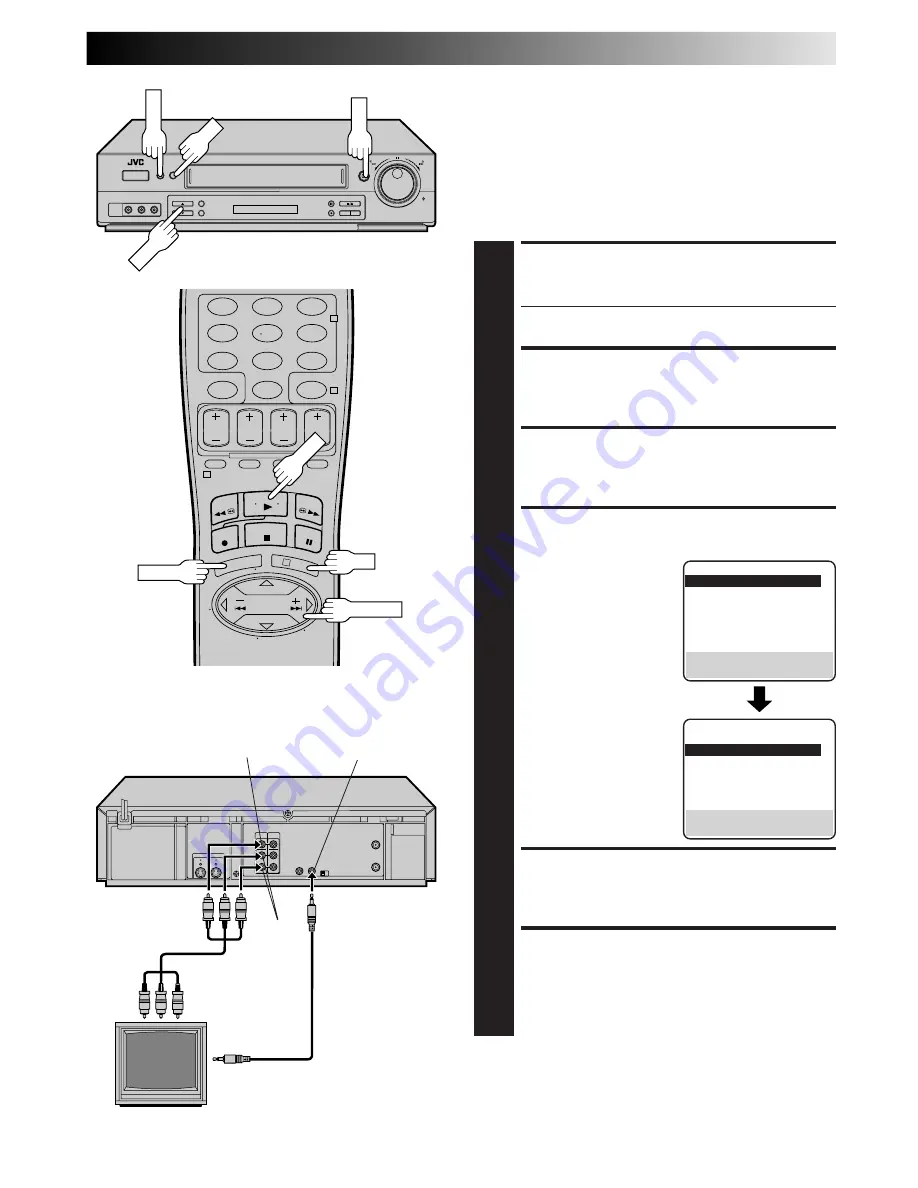
AV COMPU LINK Playback

Your VCR is compatible with JVC’s AV COMPU LINK components,
including amplifiers (or receivers) and televisions. AV COMPU
LINK provides one touch control of the audio and video compo-
nents that are linked via their AV COMPU LINK connectors.
For example: simply load a cassette in the VCR and press PLAY and
the AV COMPU LINK components automatically power on, the TV's
AV mode is selected and the VCR goes into play mode. (PLAY need
not be pressed if the cassette's record safety tab is removed.)

MAKE CONNECTION

1

Connect your VCR to an AV COMPU LINK component
as shown in the illustration in the left column.

The mini-plug cable is a mono 3.5 mm mini-plug to
mono 3.5 mm mini-plug connector.

ACCESS MAIN MENU SCREEN

2

Press MENU.

ACCESS FUNCTION SET SCREEN

3

Press CH

5∞

 or TIME SCAN 

%fi

 to move the highlight

bar (arrow) to “FUNCTION SET”, then press OK or
TIME SCAN 

#

.

ENABLE AV COMPU LINK

PLAYBACK

4

Press CH

5∞

 or TIME

SCAN 

%fi

 to move the

highlight bar (arrow) to
“AV COMPU-LINK”, then
press OK or TIME SCAN 

#

to set to "ON".

RETURN TO NORMAL SCREEN

5

Press MENU.

PERFORM AV COMPU LINK

PLAYBACK

6

Simply insert a cassette and press PLAY (if the cassette’s
record safety tab has been removed, playback begins
automatically). Linked components are turned on, and
the TV set to its AV mode, automatically!

NOTE:

Connection varies depending on the type of JVC TV you have.
Please refer to the TV’s instruction manual when making this
connection.

AV COMPU LINK II
(VCR ONLY)

VIDEO
IN

AUDIO
IN

AV COMPU LINK

Television

Your VCR

VIDEO OUT

AUDIO
OUT

Mini-plug cable
(not supplied)

Audio/Video cable
(supplied)

Example

REMOTE PAUSE/
AV COMPULINK

MENU

1

2

3

4

5

6

7

8

9

0

2

4

1

3

CH

OK

OK

MENU

PLAY

PLAY

FUNCTION

=

AUTO TIMER

OFF

SUPERIMPOSE

ON

AUTO SP

=

EP TIMER

OFF

VIDEO STABILIZER

OFF

2ND AUDIO RECORD

OFF

AUDIO MONITOR

HI-FI

NEXT PAGE
SELECT WITH (

5

,

) AND (OK)

PRESS (MENU) TO END

PREVIOUS PAGE
S-VHS MODE

AUTO

=

AV COMPU-LINK

ON

VIDEO CALIBRATION

ON

TIMESCAN AUDIO

ON

REAR AUX INPUT

VIDEO

TAPE DUB MODE

ON

SELECT WITH (

5

,

) AND (OK)

PRESS (MENU) TO END

TIME SCAN

Summary of Contents for HR-S4500U

Page 1: ...H T V V O L TV CH TV V O L TV CANCEL TIMER START STOP DATE MENU OK CH POWER TV VCR C RESET DBS DAILY M F AUX WEEKLY PROG CHECK PROG SP EP SKIP SEARCH DISPLAY ENTER OSD CABLE DBS 1 2 3 4 5 6 7 8 9 0 2 4 1 3 EXPRESS PROGRAMMING MULTI BRAND REMOTE CONTROL UNIT MBRSET A B PLAY REW REC STOP PAUSE FF TIME SCAN REW INSERT PAUSE REC STOP EJECT PLAY A DUB FF JOG SHUTTLE MENU OK POWER VIDEO MONO L AUDIO R R...

Page 2: ... VCR or remote control 5 AVOID violent shocks to the VCR during transport MOISTURE CONDENSATION Moisture in the air will condense on the VCR when you move it from a cold place to a warm place or under extremely humid conditions just as water droplets form on the surface of a glass filled with cold liquid Moisture condensation on the head drum will cause damage to the tape In conditions where conde...

Page 3: ... paying particular attention to cords at plugs convenience receptacles and the point where they exit from the product 5 Ventilation Slots and openings in the cabinet are provided for ventilation To ensure reliable operation of the product and to protect it from overheating these openings must not be blocked or covered Do not block the openings by placing the product on a bed sofa rug or other simi...

Page 4: ...plained in the manual This section also illustrates the controls and connections on the front and rear panel the front display panel and the remote control The Z mark signals a reference to another page for instructions or related information Operation buttons necessary for the various procedures are clearly indicated through the use of illustrations at the beginning of each major section BEFORE Y...

Page 5: ...ctions 6 Basic Connections 6 S Video Connection 7 INITIAL SETTINGS 8 Plug Play 8 Language 10 Clock 11 Preparation 11 Semi Auto 12 Manual 13 Tuner 14 Set Receivable Channels 14 Add Or Delete A Channel 15 Cable Box Control 16 Situate And Connect Controller 16 Set Cable Box Output Channel Cable Box Brand 17 DBS Receiver Control 19 Situate And Connect Controller 19 Set DBS Receiver Output Channel DBS ...

Page 6: ... the VCR is powered on the clock and tuner channels are being set automatically Wait for the time to be displayed on the front display panel before powering on the VCR FINAL PREPARATION FOR USE 5 Power on the VCR and if you are connected to the TV using the RF connector select the VCR channel 3 or 4 by setting the switch on the rear of the VCR as shown in the illustration You can now perform simpl...

Page 7: ...ou use the supplied S VIDEO cable to connect your VCR to a TV with an S VIDEO input connector To operate the VCR with your TV using the S VIDEO connec tion set your TV to the AV mode using the TV s remote control You can also use the TV VCR button on the VCR s remote control to set your TV to the AV mode Z pg 57 S VIDEO Connection CONNECT VCR TO TV a Connect both the RF cable and the AV cables to ...

Page 8: ...receivable by your VCR It then automatically assigns each receivable channels to the CH5 buttons It skips non receivable channels During auto channel set the channel numbers are displayed as they are scanned and set When Plug Play has been completed successfully the correct time is displayed If an incorrect time or appears on the display panel see What To Do If Plug Play Has Failed on next page AT...

Page 9: ... time is displayed on the front display panel you may be receiving the clock setting data of a PBS channel from an adjacent time zone or an incorrect PBS channel from a cable TV system In this case perform the Semi Auto Z pg 12 or Manual Clock Set Z pg 13 procedure Auto channel set has already taken place and it need not be set again If appears on the display your antenna cable may not be connecte...

Page 10: ...ow to INITIAL SET by pressing CH5 or TIME SCAN fi then press OK or TIME SCAN SELECT LANGUAGE 4 Move the highlight bar arrow to LANGUAGE by pressing CH 5 or TIME SCAN fi then press OK or TIME SCAN to select the desired language RETURN TO NORMAL SCREEN 5 Press MENU Turn on the TV and select the VCR channel 3 or 4 or AV mode MAIN MENU FUNCTION SET TUNER SET INITIAL SET PRESS 5 THEN OK PRESS MENU TO E...

Page 11: ...EN 3 At the Main Menu screen move the highlight bar arrow to INITIAL SET by pressing CH5 or TIME SCAN fi then press OK or TIME SCAN ACCESS CLOCK SET SCREEN 4 Move the highlight bar arrow at the Initial Set screen to CLOCK SET by pressing TIME SCAN fi then press OK or TIME SCAN CABLE BOX USERS SET CLOCK MANUALLY appears on the screen for about 5 seconds then the Clock Set screen appears MAIN MENU F...

Page 12: ...annels that do not transmit clock setting data SELECT D S T MODE 7 You have three choices a Select AUTO and the adjustment to your VCR s clock will be made according to the incoming signal from the host channel b Select ON and the adjustment will be made based on the clock itself c Select OFF if Daylight Saving Time does not apply to you Move the highlight bar to D S T by pressing OK or TIME SCAN ...

Page 13: ...rrections Press OK or TIME SCAN until the item you want to change blinks then press CH 5 or TIME SCAN fi SELECT TIME ZONE 8 You can select the time zone automatically or manually Move the highlight bar to TIME ZONE by pressing OK or TIME SCAN then press CH 5 or TIME SCAN fi to select AUTO or the desired time zone AUTO ATLANTIC HAWAII EASTERN ALASKA CENTRAL PACIFIC MOUNTAIN NOTE If an incorrect tim...

Page 14: ...pears on screen If the scan was unsuccessful SCAN COMPLETED NO SIGNAL appears on screen Check the connections and start again RETURN TO NORMAL SCREEN 5 Press MENU INITIAL SETTINGS cont INFORMATION The VCR detects the band TV or CATV and selects the correct band automatically during Auto Channel Set The selected band will be displayed on the right side of BAND on the Tuner Set screen Turn on the TV...

Page 15: ...ss OK or TIME SCAN ADD OR SKIP DESIRED CHANNEL 4 Input the channel number using the NUMBER keys or by pressing CH5 or TIME SCAN fi then press OK or TIME SCAN to set to ADD or SKIP as required Repeat for each channel you want to add or skip RETURN TO NORMAL SCREEN 5 Press MENU TUNER SET BAND CATV AUTO CHANNEL SET MANUAL CHANNEL SET SELECT WITH 5 AND OK PRESS MENU TO END MANUAL CHANNEL SET CATV CH 4...

Page 16: ...the rear of your VCR Set the VCR tuner to the same channel as the cable box RF output see page 17 also NOTE When connecting your cable box refer to its instruction manual CONNECT CONTROLLER TO VCR 4 Connect to the CABLE BOX connector on your VCR Suggested Location Place the cable box on top of the VCR Attach the VCR s Controller to the top of the VCR with the Controller s transmitter pointed towar...

Page 17: ...r cable box is connected to your VCR If your cable box is connected to your VCR using an RF connection press CH 5 or TIME SCAN fi until the channel number representing the cable box s output CH2 CH9 appears on the screen If your cable box is connected to your VCR s FRONT AUDIO VIDEO IN connectors press CH 5 or TIME SCAN fi until ON F 1 FRONT appears on the screen If your cable box is connected to ...

Page 18: ...ible with many different cable box brands it is possible that it will not work with your cable box If your cable box doesn t respond to any code between 1 and 25 you can t use the Controller to change cable box channels In this case make sure to leave the cable box turned on and tuned to the proper channel before the scheduled start of timer recording Please contact your cable company about the po...

Page 19: ... DBS Receiver This eliminates the need for a separate DBS Receiver Remote Control Unit The VCR s Controller can also control your DBS Receiver This allows the VCR to change your DBS receiver s channel number during timer recording Each method must be set up separately To set up the VCR s Remote Control unit refer to page 59 To set up the Controller go to page 20 CABLE BOX DBS receiver Controller s...

Page 20: ...r TIME SCAN SELECT DBS RECEIVER OUTPUT CHANNEL 6 Your selection depends on how your DBS receiver is connected to your VCR If your DBS receiver is connected to your VCR using an RF connection press CH 5 or TIME SCAN fi until the channel number representing the DBS receiver s output CH3 CH4 appears on the screen If your DBS receiver is connected to your VCR s FRONT AUDIO VIDEO IN connectors press CH...

Page 21: ...C DISH Network 51 ECHOSTAR DISH Network 51 PRIMESTAR 50 SONY DSS 41 RCA DSS 40 NOTES It is possible that the Controller will not work with all types of DBS receiver If your DBS receiver doesn t respond to the code you can t use the Controller to change satellite channels In this case make sure to leave the DBS receiver turned on and tuned to the proper channel before the scheduled start of timer r...

Page 22: ...RATION appears on the screen when VIDEO CALIBRATION is set to ON Z pg 32 STOP PLAYBACK 4 Press STOP or STOP EJECT Then press STOP EJECT to remove the cassette Turn on the TV and select the VCR channel 3 or 4 or AV mode 1 2 3 4 5 6 7 8 9 0 2 4 1 3 STOP EJECT PLAY PLAY REW Rewind FF Fast Forward STOP Usable cassettes Full Size VHS T 30 ST 30 T 60 ST 60 T 90 T 120 ST 120 T 160 ST 160 ST 210 Compact V...

Page 23: ...g of both the first SP and the first EP recording after inserting the cassette when Video Calibration is set to ON Z pg 32 PAUSE RESUME RECORDING 5 Press PAUSE Press PLAY to resume recording During record pause you can change the recording channel by using the CH5 buttons or NUMBER keys Video Calibration will not take place if the tape speed is changed while in record pause mode STOP RECORDING 6 P...

Page 24: ...or TIME SCAN repeatedly for reverse frame by frame playback To resume normal playback press PLAY Slow Motion Reverse Slow Motion ACTIVATE SLOW MOTION PLAYBACK 1 For hands free slow motion press and release TIME SCAN during playback to decrease speed in the forward direction Continue to press and release TIME SCAN to select the reverse slow motion reverse play and reverse search modes OR During pla...

Page 25: ...start of any recording using the Index Search function START SEARCH 1 While the tape is stopped press TIME SCAN or or ACCESS DISTANT CODE 2 To access a recording 2 9 index codes away press TIME SCAN or or repeatedly until the correct number is displayed on screen only if SUPER IMPOSE is set to ON Z pg 28 Playback begins automatically when the desired recording is located If necessary press REW or ...

Page 26: ...SCAN ACTIVATE VIDEO STABILIZER 3 Move the highlight bar arrow to VIDEO STABILIZER by pressing CH 5 or TIME SCAN fi then press OK or TIME SCAN to set to ON RETURN TO NORMAL SCREEN 4 Press MENU MAIN MENU FUNCTION SET TUNER SET INITIAL SET PRESS 5 THEN OK PRESS MENU TO END NOTES Regardless of the setting this function has no effect with SP recordings during recording and during special effects playba...

Page 27: ...omatic Timer Standby After Tape Rewind press REW then press TIMER within 2 seconds NOTE It is not possible to select the Automatic Timer functions if the cassette s record safety tab is removed SP VCR RESET COUNTER TO ZERO 1 Press C RESET NOTE By pressing the DISPLAY button you can change the display to show the counter reading channel number or clock time Channel number is not displayed during pl...

Page 28: ...CESS FUNCTION SET SCREEN 2 Move the highlight bar arrow to FUNCTION SET by pressing CH5 or TIME SCAN fi then press OK or TIME SCAN SELECT SUPERIMPOSE SET MODE 3 Move the highlight bar arrow to SUPERIMPOSE by pressing CH5 or TIME SCAN fi then press OK or TIME SCAN to select the desired mode a Select ON if you want the superimposed operational indications on the TV screen b Select OFF if you do not ...

Page 29: ... Move the highlight bar arrow to AUDIO MONITOR by pressing CH 5 or TIME SCAN fi then press OK or TIME SCAN to select the desired mode a Hi Fi b Hi Fi L c Hi Fi R d Normal e Mix RETURN TO NORMAL SCREEN 4 Press MENU NOTES If the tape being played back has no Hi Fi soundtrack the Normal soundtrack will be heard no matter what choice you make in step 3 If RF connection is used for TV even if Hi Fi aud...

Page 30: ... tape will forward search a little past the start of the next preview then will reverse search to the beginning of the preview and start playback SKIP MENU MOVIE ADVANCE MOVIE ADVANCE PREVIEW SKIP SEARCH PRESS 5 THEN OK PRESS SKIP TO CANCEL ATTENTION Movie Advance and Movie Advance Preview works only on prerecorded cassettes that have been recorded in the SP mode and have no safety tab If theVCR d...

Page 31: ...ss CH5 or TIME SCAN fi to move the highlight bar arrow to AV COMPU LINK then press OK or TIME SCAN to set to ON RETURN TO NORMAL SCREEN 5 Press MENU PERFORM AV COMPU LINK PLAYBACK 6 Simply insert a cassette and press PLAY if the cassette s record safety tab has been removed playback begins automatically Linked components are turned on and the TV set to its AV mode automatically NOTE Connection var...

Page 32: ...LIBRATION MODE 4 Press CH 5 or TIME SCAN fi to move the highlight bar arrow to VIDEO CALIBRATION then press OK or TIME SCAN to set to ON or OFF NOTE When recording or when playing back tapes recorded on this VCR set the Video Calibration to ON RETURN TO NORMAL SCREEN 5 Press MENU MAIN MENU FUNCTION SET TUNER SET INITIAL SET PRESS 5 THEN OK PRESS MENU TO END FUNCTION AUTO TIMER OFF SUPERIMPOSE ON A...

Page 33: ...rative To display the Video Calibration screen SUPERIM POSE must be set to ON or the Video Calibration screen will not appear Z pg 28 START RECORDING 1 Press and hold REC and press PLAY on the remote control or press REC on the VCR s front panel The VCR takes about 7 seconds to assess the quality of the tape in use then recording begins with the picture level optimized NOTES Calibration occurs imm...

Page 34: ... V C R C RESET Display Tape Remaining Time DISPLAY COUNTER INFORMATION 1 Press OSD All indications corresponding to the VCR s current status are displayed for 5 seconds The counter display remains on the screen indicating the elapsed time DISPLAY TAPE REMAINING TIME 2 Press DISPLAY until REMAIN appears on screen The approximate tape remaining time appears on the TV screen and also on the VCR displ...

Page 35: ...ils refer to page 36 To record in S VHS perform the steps 1 4 below to set the S VHS MODE to ON then insert a cassette marked S VHS the S VHS indicator will light on the display panel The S VHS recording mode will be automatically selected To record in S VHS ET on a VHS cassette Z Super VHS ET on page 36 To record in VHS insert a cassette marked VHS The VHS recording mode will be automatically sel...

Page 36: ...pictures over a longer period on this model S VHS recording on S VHS tape is recommended You can play back S VHS ET recordings not only on this VCR but also on another VHS VCR equipped with S VHS ET It is recommended to specifically label S VHS ET recordings so you can easily distinguish them from regular VHS recordings S VHS ET recordings can also be played back on an S VHS VCR or a VHS VCR equip...

Page 37: ...and 2ND AUDIO RECORD is set to ON the SAP audio is recorded on both the Normal and Hi Fi tracks The main audio program is not recorded If a non SAP program is received the main audio is recorded on both the Hi Fi and Normal audio tracks To Record SAP Programs ACCESS MAIN MENU SCREEN 1 Press MENU ACCESS FUNCTION SET SCREEN 2 Move the highlight bar arrow to FUNCTION SET by pressing CH5 or TIME SCAN ...

Page 38: ...asses a click position the playback speed changes Refer to the chart on pg 39 for playback speeds OR During playback repeatedly press and TIME SCAN or to select the search speed To increase the speed in the forward direction press and release repeatedly to select the various forward search modes To decrease the speed in the forward direction press and release To play in reverse slow motion and in ...

Page 39: ...or a moment when you change the playback speed During high speed search with a tape containing both SP and EP recordings where the recording tape speed switches from EP to SP the search speed will change automatically to 7 normal playback speed with TimeScan Depending on the tape in use noise may appear or the upper part of the picture may be distorted Picture may appear distorted in comparison to...

Page 40: ...ress OK or TIME SCAN SELECT TIMESCAN AUDIO MODE 3 Press CH 5 or TIME SCAN fi to move the highlight bar arrow to TIMESCAN AUDIO then press OK or TIME SCAN to set to ON or OFF RETURN TO NORMAL SCREEN 4 Place MENU MENU 1 2 3 4 5 6 7 8 9 0 2 4 1 3 C H O K OK MENU TIME SCAN CH PLAYBACK AND RECORDING FEATURES cont PREVIOUS PAGE S VHS MODE AUTO AV COMPU LINK ON VIDEO CALIBRATION ON TIMESCAN AUDIO ON REAR...

Page 41: ...k setting procedure ENTER PLUSCODE NUMBER 3 Press the appropriate NUMBER keys to enter the PlusCode number printed in the TV listings for the TV program you wish to record and press OK If the Guide Channel Set screen appears go to step 4 If the VCR Plus Program screen appears go to step 5 To make corrections press CANCEL and input the correct PlusCode number INPUT RECEIVING CHANNEL NUMBER 4 The Gu...

Page 42: ...pears ENGAGE TIMER MODE 8 Press TIMER The VCR turns off automatically and is displayed on the display panel IMPORTANT If you have moved to a different area or if a broadcasting station s channel number has been changed the wrong VCR or CABLE CH number will be displayed on the VCR Plus Program screen in step 5 When this happens set the correct Guide Channel number for that station Z pg 43 VCR Plus ...

Page 43: ... TV listings have a section usually a chart indicating the Guide Channel numbers assigned to each station For accurate VCR Plus Programming the VCR Plus Guide Channel number for each station should match the channel number on which it is received in your area NOTES In many instances the VCR Plus Guide Channel numbers for cable and broadcast TV stations DO NOT match the channel number on which it i...

Page 44: ...R 6 Press CH 5 TIME SCAN fi or the appropriate NUMBER keys to input the number of the channel on which the Guide Channel s broad casts are received Then press OK or TIME SCAN Repeat steps 5 and 6 for each instance RETURN TO NORMAL SCREEN 7 Press MENU Ex When inputting the Guide Channel number 6 for WNJU Ind Ex If WNJU Ind is received on channel 47 GUIDE CHANNEL SET GUIDE CH 6 VCR CH PRESS NUMBER K...

Page 45: ...IME 4 Press START to enter the time you want recording to start Press and hold START to move in 30 minute increments or press and release repeatedly to move 1 minute at a time SET PROGRAM STOP TIME 5 Press STOP to enter the time you want recording to stop Press and hold STOP to move in 30 minute increments or press and release repeatedly to move 1 minute at a time SET PROGRAM DATE 6 Press DATE The...

Page 46: ... 00 ATTENTION If there is a conflict in the timer schedule and one program overlaps with another only the parts shown below in gray will be recorded Pattern 1 The program with the lower program number will be recorded Pattern 2 The program that is broadcast earlier will be recorded Pattern 3 The program that is broadcast earlier will be recorded followed by the remaining portion of the other progr...

Page 47: ...12 12 24 2 10 00A 10 45 40 12 25 3 11 30P 01 00 125 12 25 4 5 6 7 8 PRESS CHECK TO NEXT CANCEL OR REVISE A PROGRAM 4 To cancel a program press CANCEL at the appropriate program screen To revise a program press the appropriate button START STOP DATE CH SP EP RETURN TO NORMAL SCREEN 5 Press PROG CHECK as many times as necessary If there are still programs remaining go to step 6 RE ENGAGE TIMER 6 Pre...

Page 48: ...i then press OK or TIME SCAN SELECT AUTO SP EP TIMER SET MODE 3 Move the highlight bar arrow to AUTO SP EP TIMER by pressing CH 5 or TIME SCAN fi then press OK or TIME SCAN to set to ON RETURN TO NORMAL SCREEN 4 Press MENU NOTES If you have programmed the VCR to timer record 2 or more programs the second program and those thereafter may not fit on the tape if you set the Auto SP EP Timer mode to O...

Page 49: ...TION 3 If you want to record for more than 30 minutes press REC to extend the time Each press extends recording time by 30 minutes NOTES You can only perform ITR using the REC button on the VCR s front panel After you set the ITR time the previous display reappears To check the remaining time press REC once during record ing and the remaining time will be displayed for about 5 seconds Be careful n...

Page 50: ...r the Timer mode even though AUTO TIMER is set to ON For timer programming of the satellite receiver refer to the instruction manual of the satellite receiver Auto Satellite Prog recording is not possible if your satellite receiver does not have a timer The REC LINK button s light blinks while Auto Satellite Prog recording is in progress Pressing the VCR s POWER button while Auto Satellite Prog re...

Page 51: ...h a superimpose OSD disable feature then set SUPERIMPOSE to OFF before pressing PLAY Z pg 28 START RECORDER 6 Set to its record mode Recorder Another VCR AUDIO IN Audio Video cable supplied VIDEO IN Player Your VCR VIDEO OUT AUDIO OUT Advantages Of S VHS Editing S VHS allows you make high resolution video recordings when dubbing from one VCR to another You can edit from VHS to S VHS from S VHS to ...

Page 52: ...nectors step 4 the VCR s rear panel VIDEO IN and AUDIO IN connectors step 4 the VCR s front panel VIDEO IN and AUDIO IN connectors step 8 If you are not using a JVC Master Edit Control equipped camcorder step 12 ACCESS MAIN MENU SCREEN 4 Press MENU ACCESS FUNCTION SET SCREEN 5 Press CH 5 or TIME SCAN fi to move the highlight bar arrow to FUNCTION SET then press OK or TIME SCAN SELECT REAR AUX INPU...

Page 53: ...AL SCREEN 15 Press MENU START PLAYER 16 Set the camcorder to its play mode NOTE If the camcorder is equipped with a superimpose OSD disable feature then set its superimpose or display feature to OFF before pressing play START RECORDER 17 Set your VCR to its record mode If you are using a Master Edit Control equipped JVC camcorder it can put the recorder automatically into Record mode Refer to camc...

Page 54: ... IN connector or F 1 for the front AUDIO VIDEO IN connector LOCATE END POINT 3 Load the recording cassette into your VCR and play it back to determine the edit out point the end of the segment to be replaced using the JOG TIME SCAN SHUTTLE controls or TIME SCAN 4 and PAUSE RESET THE COUNTER 4 Press C RESET to change the counter display to 0 00 00 LOCATE START POINT 5 Determine the edit in point th...

Page 55: ...l continue running in the Play mode If you wish to stop Insert Editing before the specified edit out point press C RESET FOR AV INSERT EDITING If you want to replace the picture Hi Fi audio soundtrack and normal audio soundtrack all at the same time In step 6 above after you press INSERT press A DUB also and blink and lights up on the display panel NOTES Insert editing is not possible with cassett...

Page 56: ...ins at this point blinks and is displayed on the front display panel To stop dubbing temporarily press PAUSE Press PLAY to resume dubbing END AUDIO DUBBING 6 Press STOP to stop the tape in your VCR and engage the audio component s Stop mode NOTES When monitoring the sound during Audio Dubbing the normal soundtrack is automatically selected If you wish to hear the Hi Fi or mixed sound Hi Fi Normal ...

Page 57: ...ote control to operate the TV you don t have to repeat this step until you replace your remote control s batteries PANASONIC has two codes If the TV does not function with one code try entering the other OPERATE TV 3 First while holding down TV press the corresponding button POWER TV CH TV VCR TVVOL NUMBER keys For some brands of TV you must press ENTER after having pressed the NUMBER keys POWER T...

Page 58: ...nge the cable box s channel press TV CH or the NUMBER keys The CH button can be used to change the VCR s channel only 1 2 3 4 5 6 7 8 9 0 2 4 1 3 POWER CABLE DBS M B R S E T STOP E N T E R NUMBER CABLE BOX BRAND NAME BRAND CODE ARCHER 01 05 17 CABLETENNA 01 17 CABLEVIEW 15 16 17 21 25 CITIZEN 15 16 17 21 25 CURTIS 02 DIAMOND 01 17 EASTERN 19 GC BRAND 15 16 17 21 25 GEMINI 15 GENERAL INSTRUMENTS 01...

Page 59: ... CH NUMBER keys Depending on the DBS receiver you may have to press ENTER after having pressed the NUMBER keys To change the DBS receiver s channel press TV CH or the NUMBER keys The CH button can be used to change the VCR s channel only POWER CABLE DBS M B R S E T E N T E R STOP NUMBER DBS BRAND NAME BRAND CODE JVC DISH Network 51 ECHOSTAR DISH Network 51 PRIMESTAR 50 SONY DSS 41 RCA DSS 40 NOTES...

Page 60: ... and another set to respond to B code control signals The remote control is preset to send A code signals because your VCR is initially set to respond to A code signals You can easily modify your VCR to respond to B code signals A B POWER NUMBER 1 STOP TURN VCR POWER ON 1 Press POWER ENGAGE CHILD LOCK 2 Press and hold POWER on the remote control until the Child Lock indicator appears on the front ...

Page 61: ...E If you re using the RF OUT connec tion Z pg 6 the channel selector on the TV is set incorrectly If you re using the AV connection Z pg 6 the TV receiver is set to the wrong mode Automatic tracking is engaged The video heads may be dirty The AUDIO MONITOR option was set incorrectly CORRECTIVE ACTION Set the channel selector to channel 3 or 4 Set the TV receiver to its AV mode Disengage Auto Track...

Page 62: ...g won t work 2 Timer programming won t work 3 and on the front display panel won t stop blinking 4 The cassette is automatically ejected and and on the front display panel won t stop blinking 5 blinks for 10 seconds and the timer mode is disengaged 6 The cassette is automatically ejected the power shuts off and and won t stop blinking 7 Cable channels are not automatically switched during timer re...

Page 63: ...y TV or cable box or DBS receiver 4 Even though Auto or Semi Auto clock setting has been selected the clock is incorrect POSSIBLE CAUSE Those channels have been preset to be skipped Recording is in progress The remote control brand setting is incorrect The clock setting data received from the Host Channel is incorrect ATTENTION This VCR contains microcomputers External electronic noise or interfer...

Page 64: ...Index Search the VCR can t find the program I want to see Why not A There may be index codes too close together Q During playback on screen operational indicators sometimes jitter Why does this happen A If the condition of the tape being played back is not good jittering of the video including on screen indicators may occur RECORDING Q When I pause and then resume a recording the end of the record...

Page 65: ...ion 12 I Index Search 25 Insert Cassette 22 Insert Edit 54 Instant ReView 27 ITR Instant Timer Recording 49 L Language Selection 10 M Main Menu 10 Manual Channel Setting 15 Manual Clock Setting 13 Manual Tracking 25 MBR Multi Brand Remote Code Setting 59 Movie Advance 30 N Next Function Memory 27 O On Screen Display 28 P PBS Channel 8 Playback 22 Plug Play 8 R REC LINK 50 Record Safety Tab 23 Reco...

Page 66: ... Input Connectors Z pg 52 9 Channel CH 5 Button Z pg 23 0 REC LINK Button Z pg 50 S VHS ET Button Z pg 36 Front Display Panel Z pg 67 Remote Control Sensor PAUSE Button Z pg 24 Record REC Button Z pg 23 INSERT Button Z pg 55 A DUB Button Z pg 56 STOP EJECT Button Z pg 22 REW INSERT PAUSE REC STOP EJECT PLAY A DUB FF JOG SHUTTLE MENU OK POWER VIDEO MONO L AUDIO R REC LINK S VHS ET CH SP VCR 1 2 3 0...

Page 67: ...OTE PAUSE Connector Z pg 52 AV COMPU LINK Connector Z pg 31 9 Channel 3 4 Switch Z pg 6 0 TV OUT Connector Z pg 6 FRONT DISPLAY PANEL 2 Tape Speed Indicators Z pg 23 3 Timer Mode Indicator 4 Tape Remaining Time Indicator Z pg 34 5 Child Lock Indicator Z pg 60 6 S VHS Indicator Z pg 35 7 VCR Mode Indicator Z pg 36 8 Cassette Loaded Mark 9 Channel Display L 1 and F 1 for AUX mode Counter Display Z p...

Page 68: ...ng Batteries 1 Open the battery compartment cover 2 Insert 2 AA size batteries provided in the direction indicated under the battery cover 3 Replace the cover How To Use The remote control can operate most of your VCR s func tions 1 Point the remote control toward the sensor window Z pg 66 2 Press the appropriate operation button 3 The maximum operating distance of the remote control is about 8 m ...

Page 69: ...B Horizontal resolution 240 lines VHS 400 lines S VHS Frequency range Normal audio 70 Hz to 10 000 Hz Hi Fi audio 20 Hz to 20 000 Hz Input Output RCA connectors IN x 2 OUT x 1 S Video connectors IN x 1 OUT x 1 TUNER Tuning system Frequency synthesized tuner Channel coverage VHF Channels 2 13 UHF Channels 14 69 CATV 113 Channels RF output Channel 3 or 4 switchable preset to Channel 3 when shipped 7...

Page 70: ...AL HEADQUARTERS JVC SERVICE ENGINEERING COMPANY OF AMERICA DIVISION OF US JVC CORP 107 Little Falls Road Fairfield NJ 07004 2105 Pack your JVC unit in the original carton or one of equivalent size and strength Enclose with the unit a letter stating the problem or symptom that exists and also a copy of the receipt or bill of sale you received when you purchased your JVC unit Print your home return ...

Page 71: ...ded with the products or if the model or serial number has been altered tampered with defaced or removed 2 Initial installation and installation and removal for repair 3 Operational adjustments covered in the Owner s Manual normal maintenance video and audio head cleaning 4 Damage that occurs in shipment due to act of God and cosmetic damage 5 Signal reception problems and failures due to line pow...

Page 72: ...HR S4500U COPYRIGHT 1998 VICTOR COMPANY OF JAPAN LTD U Printed in Malaysia 0698 IYV YP YP JVC COMPANY OF AMERICA DIVISION OF US JVC CORP 41 Slater Drive Elmwood Park N J 07407 ...

Reviews: