background image

Page 9

February 6, 2003 2:31 pm

    — 9 —

Automatic operations after rewinding
— Next Function Memory

The Next Function Memory “tells” the VCR what to do after 
rewinding is complete. Ensure that the VCR is in stop mode.

For Automatic Playback Start

Press 

REW

 (

3

), then press 

PLAY

 (

4

) within 2 seconds.

For Automatic Power Off

Press 

REW

 (

3

), then press 

POWER


1

 within 2 seconds.

For Automatic Timer Standby

Press 

REW

 (

3

), then press 

TIMER

 within 2 seconds.

NOTE:

It is not possible to select the Automatic Timer Standby function if 
the cassette’s record safety tab is removed.

Playing back tape repeatedly (100 times)
— Repeat Play

During playback, press and hold 

PLAY

 (

4

) for more than 

5 seconds. The play indicator (

$

) on the display panel starts 

blinking slowly. To stop playback, press 

STOP

 (

8

) on the Remote 

or 

STOP/EJECT

 (

0

) on the VCR.

NOTE:

Pressing 

PLAY


(

4

)

REW

 (

3

)

FF


(

5

)


or 

PAUSE


(

9

also 

cancels repeat playback.

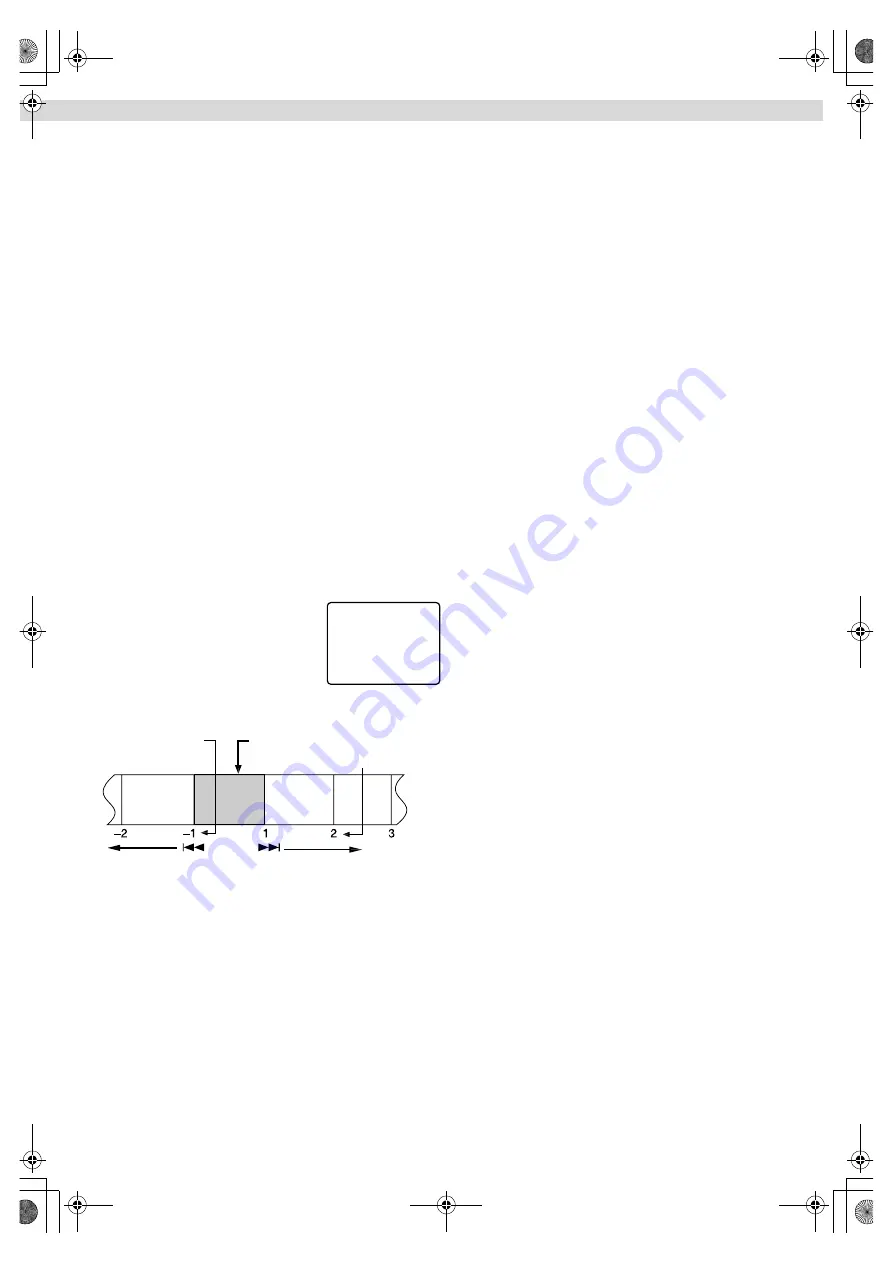
Locating beginning of recordings
— Index Search

Index codes are placed on the tape at the beginning of each 
recording when recording on this VCR.

A

While the tape is not running, press 

w

 or 

e

 (

2

 or 

6

) on 

the Remote to start search.

B

To access a recording of 2 to 9 index 
codes away, press 

w

 or 

e

 (

2

 or 

6

) repeatedly until the correct 

number is displayed on the screen 
(only if “SUPERIMPOSE” is set to 
“ON”)(

pg. 14). Playback begins 

automatically when the desired 
recording is located.

Locating beginning of timer recordings
— Instant Review

After ensuring that the VCR is turned off and that the timer mode 
is disengaged, press 

REVIEW

 on the Remote.

The VCR turns on, and rewinds to the index code indicating the 
beginning of the last timer-recorded program, then begins 
playback automatically.

You can access a program of 2 to 9 index codes away from the 
current position on the tape. If, for example, you have 
5 programs recorded and you want to watch the third one, press 

REVIEW

 three times.

The Instant Review function will also operate if the VCR is 
turned on.

Skipping unwanted portions
— Skip Search

Press 

SKIP SEARCH

 on the Remote once to 4 times during 

playback. Each press initiates a 30-second period of high speed 
playback (up to 2 minutes). When the specified portion of the tape 
is skipped, normal playback resumes automatically. To return to 
normal playback during Skip Search, press 

PLAY

 (

4

).

INDEX   1

2nd next

Beginning of the

current program

recorded

Current 
position on 
the tape

Beginning of the 
2nd next program 
recorded

Previous 

program 

recorded

Next 

program 

recorded

– Playback –

HR-J7010UM_EN.fm Page 9 Wednesday, February 6, 2002 2:49 PM

Summary of Contents for HR-J7010UM

Page 1: ...E INSIDE WARNING TO PREVENT FIRE OR SHOCK HAZARD DO NOT EXPOSE THIS UNIT TO RAIN OR MOISTURE The POWER 1 button does not completely shut off mains power from the unit but switches operating current on and off shows electrical power standby and shows ON This unit is produced to comply with Standard IEC 60065 POWER SYSTEM This set operates on voltage of AC 110 220Vd 50 Hz 60 Hz with automatic switch...

Page 2: ...ace of a glass filled with cold liquid Moisture condensation on the head drum will cause damage to the tape In conditions where condensation may occur keep the VCR s power turned on for a few hours to let the moisture dry How to use the Remote Before use insert the lithium battery CR2032 correctly with the plus side up into the battery compartment To open it press the release tab and carefully pul...

Page 3: ...el Rear Panel CH Cassette loading slot VIDEO AUDIO input connectors Display panel VCR mode indicator Play indicator Record indicator Timer mode indicator Channel and auxiliary input Clock time Remote sensor AC power cord HR J7010UM_EN fm Page 3 Thursday January 23 2003 11 56 AM ...

Page 4: ... Cassette mark J Tape speed K VCR operation mode L Timer warning display To recall an indication TIMER CANCEL Number keys A Press OSD OK All indications corresponding to the current status are displayed for 5 seconds After that the counter information and RECORD PAUSE if in the Record Pause mode are left displayed on the screen B Press OSD OK again to clear the display The RECORD PAUSE indication ...

Page 5: ...le watching another D Connect VCR to power source Plug the AC power cord into an AC outlet E Set VCR channel The VCR channel is the channel on which you can watch the picture from the VCR on the TV when only using the RF connection When the VCR is turned off press STOP EJECT 0 on the VCR for more than 5 seconds CH3 appears on the display panel Press CH r t on the Remote to select CH3 CH4 or CH OFF...

Page 6: ...anguage Press rt to move the highlight bar arrow to LANGUAGE then press OK or e repeatedly until the desired language is selected Press MENU to return to normal screen Clock Setting Perform clock setting only if the clock has not been set correctly by the Plug Play setting A Access Main Menu screen then Initial Set screen Press MENU on the Remote Press rt to move the highlight bar arrow to INITIAL...

Page 7: ... move the highlight bar arrow to TUNER SET then press OK or e B Access Manual Channel Set screen Press rt to move the highlight bar arrow to MANUAL CHANNEL SET then press OK or e C Add or skip desired channels To add channels A Press the Number keys on the Remote to input a channel number you want to add B Press OK or e to set to ADD C Repeat A to B to add other channels Press MENU to return to no...

Page 8: ...PERIMPOSE is set to ON 墌 pg 14 though the monitor sound changes in sequence During playback Stop playback Press STOP 8 on the Remote OR Press STOP EJECT 0 on the VCR Pause playback and view still picture Press PAUSE 9 Press PLAY 4 to resume normal playback NOTE During still picture vertical vibration may appear on the TV screen Press CH r t on the Remote to get a clearer picture Pause and Frame by...

Page 9: ...ay press w or e 2or 6 repeatedly until the correct number is displayed on the screen only if SUPERIMPOSE is set to ON 墌 pg 14 Playback begins automatically when the desired recording is located Locating beginning of timer recordings Instant Review After ensuring that the VCR is turned off and that the timer mode is disengaged press REVIEW on the Remote The VCR turns on and rewinds to the index cod...

Page 10: ...pecifying recording length Instant Timer Recording ITR During recording press REC 7 on the VCR repeatedly until the recording length you want appears on the display panel The record indicator 䡬 on the display panel starts blinking Each time you press the button recording length increases in 30 minute intervals up to 6 hours The VCR shuts off after recording is finished To cancel an ITR press STOP ...

Page 11: ... is reset automatically A Press PROG on the Remote to access the Program screen B Press START Number keys 1 and or 4 STOP Number keys 2 and or 5 DATE Number keys 3 and or 6 or CH repeatedly to enter the start time stop time date or channel Press and hold START or STOP to increase the time in 30 minute intervals To set the tape speed press SP EP To timer record daily Monday Friday or weekly serials...

Page 12: ... just made and Program 4 overlap each other A Select program to modify Press rt then press e You can only select one of the overlapping programs If you do not mind this overlap press PROG to finish the timer program setting The program starting earlier or program with the lower program number will be recorded B Cancel or change program setting To cancel a program press CANCEL when the Program scre...

Page 13: ...to the function you want to set C Change setting Press OK or e The default setting is bold in the following table Press MENU to return to normal screen 䡵 PICTURE CONTROL NORM EDIT SOFT SHARP This function helps you to adjust the playback picture quality according to your preference NORM Normally select this Picture quality is adjusted automatically EDIT Minimizes picture degradation during editing...

Page 14: ...ECORD ON OFF When this function is set to ON If a SAP program is received the SAP audio is recorded on both the normal and Hi Fi tracks The main audio is not recorded If a non SAP program is received the main audio is recorded on both the Hi Fi and normal tracks When this function is set to OFF the SAP audio cannot be recorded NOTES When the channel is changed on the VCR The STEREO indication appe...

Page 15: ...hen connecting the other VCR to the audio video input connectors on the front panel Press AUX or CH r r r r t t t t on the Remote You can select the input mode also by pressing PAUSE CH and then FF CH or REW CH on the VCR See step 2 2 2 2 in Basic Recording 墌 pg 10 D Select edit mode Set the edit mode to ON for the VCRs if such a mode is equipped On this VCR set PICTURE CONTROL to EDIT 墌 pg 13 E S...

Page 16: ...signal and EIA monochrome signal 525 lines 60 fields Recording Playback system DA 4 Double Azimuth head helical scan system Signal to noise ratio 45 dB Horizontal resolution 230 lines Frequency range Normal audio 70 Hz to 10 000 Hz Hi Fi audio 20 Hz to 20 000 Hz Input Output RCA connectors IN x 1 OUT x 1 TUNER Tuning system Frequency synthesized tuner Channel coverage VHF Channels 2 13 UHF Channel...

Reviews: