


Remote control does not work.
It is not aimed at the remote sensor.
Distance too far or too much light in
the room.
There is an obstacle in the path of the
beam.
The batteries are weak.
The +, – polarity of the batteries are
not inserted correctly.
Aim it at the remote sensor.
Operate within 15 feet (5 meters)
reduce the light in the room.
Clear the path of the beam.
Replace the batteries.
Insert correctly.
TV programs cannot be seen
using the TV selector.
No picture on screen when
playing back a recorded tape.
Noise bars on screen.
The TV is not set to the video channel 3
or 4.
Set to the video channel 3 or 4 or
adjust the fine tuning button on your
TV set.
TV recording does not work.
Timer recording does not work.
The erase prevention tab of the video
cassette is broken off.
INPUT is set to the LINE mode.
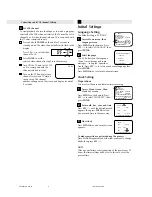
Reset the present time.
Set the start/end time.
Press the TIMER button (The TIMER REC
symbol is lit on the display).
Adjust tracking manually using the SET – or
+ buttons on the remote control.
Have the video heads cleaned.
Try another tape.
Tracking adjustment beyond range of
automatic tracking circuit.
Video heads are dirty.
The tape is worn or damaged.
Place a piece of vinyl tape over the gap.
Press the Number key or CH –/+ button to
select your desired TV program.
The TIMER button has not been
pressed (The TIMER REC symbol is
not lit on the display).
The time is not set correctly.
The recording start/end time is not set
correctly.
Set to TV, or turn off the VCR power
button.
The TV/VCR function is in the VCR
mode.
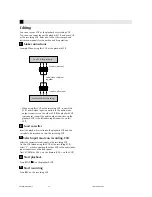
Before Requesting Service
Make sure by first checking the following points.
No power.
TV BROADCAST RECEPTION
Although the power is on, it
does not operate.
A TV program that is selected by
the VCR does not appear on the
screen.
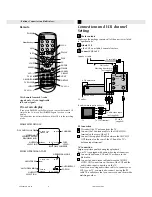
Antenna connection is not correct.
Antenna cable is disconnected.
The video channel is not in the correct
position.
The TV is not set to the video channel
3 or 4.
The TV/VCR selector is set at TV mode
(The TV/VCR indicator is not lit).
SYMPTOM
CAUSE
POSSIBLE SOLUTION
The AC power cord is not connected.
Connect the AC power cord to the AC
outlet.
Connect it correctly.
Reconnect the antenna cable.
Set it to CH 3 or 4.
Set the TV channel selector to the 3 or 4
position.
Press the TV/VCR selector button (The TV/
VCR indicator will light).
Press the Number key or CH –/+ button to
select your desired TV program.
POWER
Cassette is not inserted.
Insert a video cassette.
INPUT is set to the LINE mode.
The TV/CATV menu option setting.
RECORDING
PLAYBACK
REMOTE CONTROL
4F22001AE 08-Back
16/01/2002, 19:07
13


