background image

17

ESP

AÑOL

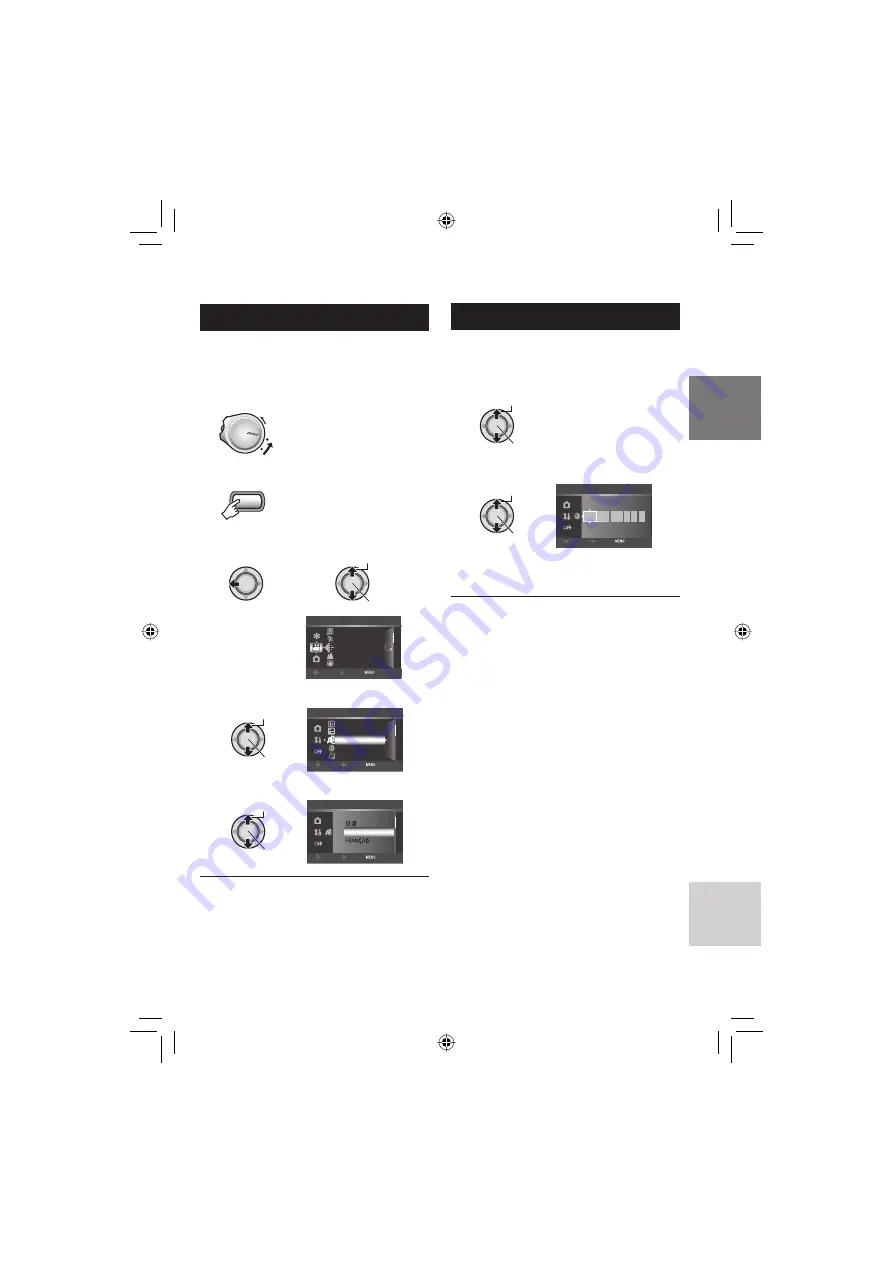
  Ajuste del idioma

El idioma en el que se muestra la información 
de la pantalla puede cambiarse.

1

  Ajuste el interruptor de alimentación/

modo en ON.

ON

2

  Seleccione el modo de menú.

MENU

3

 Seleccione [GENERAL].

¬

Seleccionar

Ajustar

CONTADOR DE ESCENAS 

ZOOM 

CALIDAD 

OIS

VÍDEO 


SELECC. 

AJUSTAR SALIR 

NIVEL MICRO EXTERNO 

SP

4

 Seleccione [LANGUAGE].

Seleccionar

Ajustar

INDICACIÓN
VER EN TV

AJUS.RELOJ

LANGUAGE

ESTILO INDIC. FECHA

GENERAL

SELECC.

AJUSTAR

SALIR

5

  Seleccione un idioma.

Seleccionar

Ajustar

ENGLISH

LANGUAGE

SELECC.

AJUSTAR

SALIR

DEUTSCH

8

 Para volver a la pantalla anterior

Mueva el botón selector hacia 

£

.

8

 Para salir de la pantalla

Pulse el botón 

MENU

.

 Ajuste de la fecha/hora

Después de realizar los pasos 

1-3


(

 columna izquierda)

4

 Seleccione [ 

AJUS.RELOJ].

Seleccionar

Ajustar

5

  Ajuste la fecha y la hora.

Seleccionar

Ajustar

JAN

31

11

AM

07

2007

FECHA

HORA

AJUS.RELOJ

SELECC.

AJUSTAR

SALIR

Repita este paso para introducir el mes, el 
día, el año, la hora y los minutos.

8

 Para volver a la pantalla anterior

Mueva el botón selector hacia 

£

.

8

 Para salir de la pantalla

Pulse el botón 

MENU

.

Summary of Contents for GZ-HD5U

Page 1: ... en la base de la cámara y el número de serie situado en el compartimiento de la batería de la cámara Número de modelo Número de serie GZ HD5 GZ HD6 ENGLISH ESPAÑOL SP EN Read these INSTRUCTIONS to enjoy your CAMCORDER For more details on the operations refer to the GUIDEBOOK and the PC OPERATION GUIDE in the supplied CD ROM NOTE Select your desired language with a single click The model name is i...

Page 2: ... finished set the date time Power OFF Charge lamp blinks Charging goes out Charging finished DC Connector Battery Pack To AC Outlet 110V to 240V AC Adapter CAUTION Charge the battery pack before use Be sure to use JVC battery packs If you use any other battery packs besides JVC battery packs safety and performance can not be guaranteed ...

Page 3: ...o lamp Still image lamp Slide while pressing down the lock button R Select video mode OFF CHARGE ON MODE The mode changes when you slide the switch L Video mode L Still image mode Video lamp lights Still image lamp lights S Select recording or playback mode LWhen recording LWhen playing back VIDEO 8 8 SELECT SET SORT 墌 p 20 21 墌 p 24 25 The mode changes when you press the button PLAY REC SELECT ...

Page 4: ... Remaining space on the hard disk Picture Quality Record standby Recording NOTE Select the mode which suits your purpose Video quality Purpose RFHD To record in full high definition Full high definition 1920 x 1080i SSP To record in higher quality video High definition 1440 x 1080i TLP To record a longer time U1440 CBR To copy and edit the video as high definition images by i LINK output LTo chang...

Page 5: ...down the set lever to start playback and press it again to stop Index screen Playback screen LOperations during Video Playback 墌 p 24 25 LTo view video still image files on TV 墌 p 26 CAUTION Don t forget to make copies after recording To copy files onto DVD discs 墌 p 29 To dub files using a VCR DVD recorder 墌 GUIDEBOOK in the CD ROM To play back a created DVD disc 墌 GUIDEBOOK in the CD ROM ...

Page 6: ...chlorate When the equipment is installed in a cabinet or on a shelf make sure that it has sufficient space on all sides to allow for ventilation 10 cm 3 15 16 or more on both sides on top and at the rear Do not block the ventilation holes If the ventilation holes are blocked by a newspaper or cloth etc the heat may not be able to get out No naked flame sources such as lighted candles should be pla...

Page 7: ...vicing is required when the apparatus has been damaged in any way such as power supply cord or plug is damaged liquid has been spilled or objects have fallen into the apparatus the apparatus has been exposed to rain or moisture does not operate normally or has been dropped Remember that this camera is intended for private consumer use only Any commercial use without proper permission is prohibited...

Page 8: ...ttery Power 22 Manual Recording 23 To Change to Manual Recording Mode 23 Program AE 23 Manual Setting in Function Menu 23 PLAYBACK Playing Back Files 24 Video Playback 24 Still Image Playback 25 Watching Images on TV 26 Connection with TV 26 Playback Operation 27 Managing Files 28 Deleting Protecting Files 28 Copying Files 29 Using a DVD Burner to Copy Files from the Camera 29 PC OPERATION File Ba...

Page 9: ...mmediately and consult your local JVC dealer If a problem occurs when using the microSD card take the card together with the camera for repair If one of them is not included the cause of the malfunction cannot be diagnosed and the camera cannot be repaired Recorded data may be erased while the camera is being repaired or inspected Back up all data before requesting repairs or inspections Because c...

Page 10: ...ra 墌 below Shoulder Strap 墌 p 11 CD ROM 墌 p 32 35 NOTE Make sure to use the provided cables for connections Do not use any other cables Remote Control RM V750U 墌 p 11 Lithium Battery CR2025 Pre installed in the remote control unit Core Filter 墌 p 11 GZ HD6 Attaching Detaching the Lens Hood Guide ridge Place the guide ridge in the groove GETTING STARTED Accessories ...

Page 11: ... when the remote sensor is directly exposed to sunlight or powerful lighting To Reinsert the Battery Pull out the battery holder by pressing the lock tab Eyelet Strap Guide Buckle Effective distance Max 5 m 16 ft Remote Sensor Lock Tab Lithium Battery CR2025 Attaching the Core Filter to the DC Cord Attach the core filter to the DC cord The core filter reduces interference Connect the end of the ca...

Page 12: ...12 NOTES The LCD monitor can rotate 270 Power linked operation You can also turn the camera on off by opening closing the LCD monitor Be careful not to cover sensors 5 and during shooting Index ...

Page 13: ...Button Data Battery Button 0 1 墌 p 22 Set Lever Move to Reverse Skip 墌 p 24 Up Backlight Compensation Button BACK LIGHT Move to Forward Skip 墌 p 24 Down Manual Focus Button FOCUS Move to Reverse Search 墌 p 24 Left Nightalive NIGHT Move to Forward Search 墌 p 24 Right Program AE PROGRAM AE 墌 p 23 Press down Play Pause 墌 p 24 Function Button FUNCTION 墌 p 23 Auto Manual Mode Button AUTO 墌 p 23 Informa...

Page 14: ...t Indicator Backlight Compensation Indicator Spot Exposure Control Indicator C Iris Lock Indicator During Video Recording Only REC 0 0 4 0 1 4 h 5 9 m FHD xvC Mode Indicator 墌 p 20 Wind Cut Indicator x v ColorTM Picture Quality Remaining Time 墌 p 20 41 Counter 7REC Appears during recording 墌 p 20 79 Appears during record standby mode External Microphone Input Level Indicator Event Indicator 墌 p 22...

Page 15: ...arch 9U Forward Slow Motion Y9 Reverse Slow Motion The number on the left shows speed Counter Volume Level Indicator Battery Indicator Date Time Wipe Fader Effect Indicator During Still Image Playback PM 4 5 5 JA N 2 0 2 0 0 8 1 0 1 0 0 9 8 1080p Mode Indicator 墌 p 25 Output with 1080p Folder File Number Slide Show Playback Indicator 墌 p 25 Battery Indicator Date Time Operation guide display The o...

Page 16: ...Recording time BN VF815U Provided 2 hr 40 min GZ HD5 1 hr 25 min GZ HD6 1 hr 20 min BN VF823U 3 hr 50 min GZ HD5 2 hr 05 min GZ HD6 2 hr 00 min 8 To detach the battery pack Slide and hold BATT step 2 then remove the battery pack 8 To check the remaining battery power See page 22 NOTES You can also use the camera with just the AC adapter Please do not pull or bend the AC adapter plug and cable This...

Page 17: ...LECT SET QUIT 5 Select the desired language Select Set ENGLISH LANGUAGE SELECT SET QUIT DEUTSCH 8 To return to the previous screen Move the set lever to 8 To exit the screen Press the MENU button Date Time Setting After performing steps 1 3 墌 left column 4 Select CLOCK ADJUST Select Set 5 Set the date and time Select Set JAN 31 11 AM 07 2007 DATE TIME CLOCK ADJUST SELECT SET QUIT Repeat this step ...

Page 18: ...ANGUAGE DATE DISPLAY STYLE GENERAL SELECT SET QUIT 4 Select the desired setting Select Set ON OFF DEMO MODE SELECT SET QUIT 8 To return to the previous screen Move the set lever to 8 To exit the screen Press the MENU button Grip Adjustment Open the pad and make grip adjustments Tripod Mounting Align the camera stud hole with the tripod stud and the mounting socket with the screw and then rotate th...

Page 19: ...card comes out a little pull it out NOTES Insert and remove the microSD card only while the power is turned off Otherwise data on the card may be corrupted Do not touch the terminal on the reverse side of the label R Change the recording medium The camera is programmed to record on the built in hard disk when it is shipped from the factory You can change the recording medium to microSD card Set RE...

Page 20: ...ed The lamp on the camera lights up NOTES If the camera is not operated for 5 minutes while the power is on it turns itself off automatically to conserve power To turn the camera on again when using the battery pack set the power mode switch to OFF then to ON When using the AC adapter perform any operation such as zooming Video files are given the names MOV001 TOD to MOV009 TOD MOV00A TOD to MOV00...

Page 21: ...on to start recording PHOTO 9 9 9 9 FINE 20 NOTES If the camera is not operated for 5 minutes while the power is on it turns itself off automatically to conserve power To turn the camera on again when using the battery pack set the power mode switch to OFF then to ON When using the AC adapter perform any operation such as zooming The sides of still images recorded in 16 9 size may be cut off when ...

Page 22: ...E EVENT REG OFF 3 Select the event that you want to register the file to To cancel the event registration select NON SECTION Select Set VACATION 1 3 NON SECTION NEXT PAGE SELECT SET QUIT The selected event is displayed on the screen NOTE Once you select a certain event to register a file the setting will remain even if you turn the power off Checking the Remaining Battery Power Preparation Set the...

Page 23: ... may appear too dark when shooting in extremely bright surroundings such as in snow SPOTLIGHT Select this when a spotlight makes a subject appear too bright V TWILIGHT Makes evening scenes look more natural Manual Setting in Function Menu 1 FUNCTION 2 Select the desired menu Select Set ZEBRA WB TELE MACRO CUSTOM SETTING EFFECT APERTURE PRIORITY SHUTTER SPEED ADJUST BRIGHTNESS 3 Select the desired ...

Page 24: ...creen appears The lens cover closes automatically Select the desired file Select Set Video Playback Select video mode MODE The switch returns to the original position when it is released The lamp on the camera lights up Operations during Playback Return to the first scene of the file Reverse search Frame by frame playback during pause Play Pause Forward search Frame by frame playback during pause ...

Page 25: ...SET SORT The index screen appears The lens cover closes automatically Select the desired file Select Set Still Image Playback Select still image mode MODE The switch returns to the original position when it is released The lamp on the camera lights up Rotate 90 degrees counterclockwise Display the previous file Start end the slide show Display the next file Rotate 90 degrees clockwise During the s...

Page 26: ...R SETTING or HDMI ENHANCE SETTING according to the connection 墌 p 18 8 To connect using the COMPONENT connector NOTE Change the settings in COMPONENT OUTPUT according to the connection 墌 p 18 HDMI Connector AC Adapter DC Connector HDMI Connector HDMI Cable optional To AC Outlet AV Cable AC Adapter To AC Outlet Video Connector is not in use AV Connector Component Cable DC Connector COMPONENT Connec...

Page 27: ...hen connecting the camera to the VCR DVD recorder Turn on the VCR DVD recorder and set the VCR DVD recorder to its AUX input mode 4 Start playback on the camera 墌 p 24 25 8 To display camera s on screen display on TV Set DISPLAY ON TV to ON 墌 p 18 NOTE When the video was recorded with x v ColorTM set to ON change the x v ColorTM setting on TV For details refer to the TV s instruction manual AV Cab...

Page 28: ... Select Set DELETE 0008 REMAINING FILES CANCEL EXECUTE SELECT SET 8 To exit the screen Press the FUNCTION button Deleting Protecting Files After performing steps 1 2 墌 left column 3 Select FILE SELECT Select Set DELETE DELETE ALL FILE SELECT CURRENT SELECT SET QUIT 4 Select the desired file Select Set VIDEO DELETE 8 8 SELECT SET QUIT The deletion or x protection mark appears on the file To select ...

Page 29: ... disc must first be finalized on the camera Connection with a DVD Burner Preparation Set the power mode switch to OFF NOTES Turn the DVD burner on then turn the camera on Use the USB cable that came with the DVD burner Types of Copying and Connectable Device The Camera You can copy still images between the HDD and microSD card with this camera alone DVD Burner CU VD40 You can copy video still imag...

Page 30: ...EXECUTE or EXECUTE AND FINALIZE By selecting EXECUTE AND FINALIZE the disc is finalized after the files are copied Select Set DVD DL DVD 3 5 CANCEL EXECUTE EXECUTE AND FINALIZE SELECT SET TOP The files are copied on the disc When COMPLETED appears press down the set lever to complete the operation When COMPLETED CHANGE DISC appears change the disc Remaining files are copied on the second disc To c...

Page 31: ...tor Sound card Direct Sound compatible sound card Display Must be capable of displaying at least 1024 x 768 XGA in high color 16 bit or higher 1280 x 1024 SXGA or higher is recommended Intel nVidia ATI MPEG 2 HD DxVA compatible card Miscellaneous Internet Explorer 5 5 or later DirectX 9 0 or later Supported media BD RE BD R DVD R RW DVD R RW CD R RW For the compatible drives http jp cyberlink com ...

Page 32: ...peration in PowerCinema NE for Everio PowerDirector 6 NE Allows you to edit files on your PC Automatically starts from an operation in PowerCinema NE for Everio NOTE If the recorded video will be edited with the software in the supplied CD ROM set x v ColorTM to OFF before recording Digital Photo Navigator 1 5 Allows you to change the format of still image files backed up on your PC You can find t...

Page 33: ...B cable while the access charge lamp on the camera lights or blinks Do not turn off the camera when the USB cable is connected to prevent malfunctions of the PC Connect the camera directly to the PC not through a hub Do not use an extension USB cable When you copy files from the PC to the recording medium on the camera do not include any other files than those recorded on the camera Do not delete ...

Page 34: ...opy starts automatically When the progress bar disappears the process is complete NOTE When backup is performed folders for each medium HDD or microSD are created in the MyWorks folder and the files are backed up inside those folders If backup is performed from more than one camera HDD individual HDD folders are created File Backup from the specified media Preparation Install the software Connect ...

Page 35: ...es and folders in the camera from the computer DC Connector AC Adapter To AC Outlet USB Cable USB Connector USB Connector For more details on the operations double click the GUIDEBOOK PC OPERATION GUIDE folder in the supplied CD ROM System Requirements Hardware Macintosh 1 25 GHz or faster Power PC G4 G5 or Intel processor Intel CoreTM Duo 1 66 GHz or more recommended USB 2 0 connector is required...

Page 36: ... operation of your PC or questions regarding specifications or performance of the OS other applications or drivers CyberLink Telephone fax support Location Language Office hours Mon to Fri Phone Fax Germany English German French Spanish Italian 9 00 am to 5 00 pm 49 700 462 92375 49 241 70525 25 Taiwan Mandarin 9 00 am to 6 00 pm 886 2 8667 1298 ext 333 886 2 8667 1300 Japan Japanese 10 00 am to 5...

Page 37: ...uous shooting speed will drop after continuous shots Continuous shooting speed may drop depending on the recording media or under certain recording conditions The date time does not appear Set DATE TIME in the general menu to ON A function cannot be activated Check the indication that represents that function If the indication is flashing or off you have selected two functions that cannot be used ...

Page 38: ...ubbing High definition dubbing cannot be performed to a HDV device Check all of the following Record with QUALITY in the video menu set to 1440 CBR Create a playlist then dub the playlist Dubbing cannot be done for each video file When dubbing set i LINK OUTPUT DUB in the output setting menu to 1440 CBR When dubbing the connected video device does not start recording automatically Operate the vide...

Page 39: ...he microSD card has been checked for operability HDD Perform cleanup Do not allow the camera to be subject to impact vibrations RECORDING CANCELLED Select OK and stop recording Use the camera in areas where it will not be subject to impact vibrations PROCESSING CANCELLED DUE TO LACK OF SPACE FOR OPERATION Reduce the number of videos that can be registered to a playlist to less than 99 files MEMORY...

Page 40: ...ed LCD panel TFT active matrix system Speaker Monaural 8 For video audio Format SD VIDEO Recording Playback format Video MPEG 2 TS Audio MPEG 1 Layer 2 Signal format 1080 60i Recording mode video FHD VBR average of 26 6 Mbps SP VBR average of 19 Mbps LP VBR average of 11 1 Mbps 1440 CBR CBR 27 Mbps Recording mode audio 48 kHz 384 kbps 8 For still image Format JPEG Image size 4 modes 1920 x 1080 14...

Page 41: ...5 4 3 1440 x 1080 FINE 9999 9999 705 1405 2785 5565 1440 x 1080 STANDARD 9999 9999 1110 2205 4380 8750 1024 x 768 FINE 9999 9999 1415 2810 5575 9999 1024 x 768 STANDARD 9999 9999 2225 4115 8765 9999 640 x 480 FINE 9999 9999 3465 6870 9999 9999 640 x 480 STANDARD 9999 9999 6235 9999 9999 9999 Remote Control Power supply DC 3 V Battery life Approx 1 year depending on the frequency of use Operating d...

Page 42: ...battery every 6 months when storing the battery pack over a long period of time remove from charger or powered unit when not in use as some machines use current even when switched off Recording Medium Be sure to follow the guidelines below to prevent corruption or damage to your recorded data Do not bend or drop the recording medium or subject it to strong pressure jolts or vibrations Do not splas...

Page 43: ...unit from dropping Attach the shoulder strap securely and fasten the grip belt securely When using the camera with a tripod attach the camera to the tripod securely If the camera drops you may be injured and the camera may be damaged When a child uses the unit there must be parental guidance Declaration of Conformity Model Number GZ HD5U GZ HD6U Trade Name JVC Responsible party JVC AMERICAS CORP A...

Page 44: ...2 External Microphone 13 H Hard Disk 42 HDMI Connection 26 I Image Rotation 25 L Language Setting 17 LCD Monitor 12 14 42 M Macintosh 35 Manual Recording 23 microSD Card 19 P Power Linked Operation 12 Program AE 23 Protecting Files 28 R Recordable Time Number of Images 41 Recording Medium 42 Remote Control 11 13 S Slide Show 25 Speaker Volume 24 Still Image 21 25 T Tripod Mounting 18 TV 26 V Video...

Page 45: ...MEMO ...

Page 46: ...la fecha hora Alimentación OFF Luz de carga parpadea carga en curso se apaga carga terminada Conector de CC Batería A la toma de CA de 110 V a 240 V Adaptador de CA PRECAUCIÓN Cargue la batería antes del uso Asegúrese de utilizar baterías JVC Si utiliza alguna otra batería que no sea de JVC no se pueden garantizar la seguridad ni el rendimiento ...

Page 47: ...n fija Deslice mientras pulsa el botón de bloqueo R Seleccione el modo de vídeo OFF CHARGE ON MODE El modo cambia al deslizar el interruptor L Modo de vídeo L Modo de imagen fija La luz de vídeo se enciende La luz de imagen fija se enciende S Seleccione el modo de grabación o de reproducción LDurante la grabación LDurante la reproducción VÍDEO 8 8 SELECC AJUSTAR ORDENAR 墌 p 20 21 墌 p 24 25 El modo...

Page 48: ...e en el disco duro Calidad de imagen Espera de grabación Grabación NOTA Seleccione el modo que se adecue mejor a su finalidad Calidad de vídeo Finalidad RFHD Para grabar en alta definición completa Alta definición completa 1920 x 1080i SSP Para grabar en vídeo de mayor calidad Alta definición 1440 x 1080i TLP Para grabar durante más tiempo U1440 CBR Para copiar y editar el vídeo como imágenes de a...

Page 49: ... reproducción y vuelva a pulsarlo para detenerla Pantalla de índice Pantalla de reproducción LOperaciones durante la reproducción de vídeo 墌 p 24 25 LPara archivos de vídeo imagen fija en un televisor 墌 p 26 PRECAUCIÓN Recuerde hacer copias tras la grabación Para copiar archivos en discos DVD 墌 p 29 Para copiar archivos mediante una grabadora de vídeo DVD 墌 GUIDEBOOK en el CD ROM Para reproducir u...

Page 50: ...n están bloqueados por un periódico o paño etc el calor no podrá salir No deberá ser colocada en el aparato ninguna fuente de llama sin protección tales como velas encendidas Cuando descarte las pilas deberá considerar los problemas ambientales y respetar estrictamente las normas locales o leyes vigentes para la eliminación de estas pilas La unidad no deberá ser expuesta a goteos ni salpicaduras N...

Page 51: ...nes 5 No utilice este aparato cerca del agua 6 Limpie sólo con paño seco 7 No bloquee ninguna abertura de ventilación Instale de acuerdo con las instrucciones del fabricante 8 No lo instale cerca de ninguna fuente de calor tales como radiadores calefactores cocinas u otros aparatos incluyendo amplificadores que produzcan calor 9 Sólo utilice dispositivos accesorios especificados por el fabricante ...

Page 52: ...ra cambiar al modo de grabación manual 23 Programa AE 23 Ajuste manual en el menú de funciones 23 REPRODUCCIÓN Reproducción de archivos 24 Reproducción de vídeo 24 Reproducción de imágenes fijas 25 Visionado de imágenes en el televisor 26 Conexión con el televisor 26 Operación de reproducción 27 Gestión de archivos 28 Eliminación protección de archivos 28 Copia de archivos 29 Uso de una grabadora ...

Page 53: ...C Si se produce un problema al utilizar la tarjeta microSD lleve la tarjeta junto con la cámara al servicio técnico Si falta alguno de los dos no se podrá diagnosticar la causa del fallo y la cámara no se podrá reparar Durante la reparación o la revisión de la cámara es posible que se borren datos grabados Antes de realizar una reparación o revisión haga una copia de seguridad de todos los datos C...

Page 54: ...a cámara 墌 abajo Correa para hombro 墌 p 11 CD ROM 墌 p 32 35 NOTA Asegúrese de utilizar los cables suministrados para las conexiones No utilice ningún otro cable Mando a distancia RM V750U 墌 p 11 Pila de litio CR2025 Preinstalada en el mando a distancia Filtro de núcleo 墌 p 11 GZ HD6 Acoplamiento y desacoplamiento de la visera del objetivo Arista de guía Coloque la arista de guía en la ranura ...

Page 55: ... está expuesto a la luz directa del sol o a un foco de luz muy potente Para volver a insertar la pila Presione la pestaña de cierre para extraer el soporte de la pila Orificio Guía corredera de la correa Hebilla Distancia efectiva Máx 5 m Sensor remoto Pestaña de cierre Pila de litio CR2025 Colocación del filtro de núcleo en el cable de CC Coloque el filtro de núcleo en el cable de CC El filtro de...

Page 56: ... pantalla LCD puede girar 270 Funcionamiento siempre listo para grabar La cámara también se puede encender y apagar abriendo y cerrando la pantalla LCD Procure no tapar los sensores 5 y durante la filmación Índice ...

Page 57: ... Botón de batería de datos 0 1 墌 p 22 Botón selector Mover hacia Salto hacia atrás 墌 p 24 Arriba Botón de compensación de contraluz BACK LIGHT Mover hacia Salto hacia adelante 墌 p 24 Abajo Botón de enfoque manual FOCUS Mover hacia Búsqueda hacia atrás 墌 p 24 Izquierda Modo nocturno NIGHT Mover hacia Búsqueda hacia adelante 墌 p 24 Derecha Programa AE PROGRAM AE 墌 p 23 Presionar Reproducción pausa 墌...

Page 58: ...e de exposición Indicador de compensación de contraluz Indicador de control de exposición puntual C Indicador de bloqueo del diafragma Sólo durante la grabación de vídeo REC 0 0 4 0 1 4 h 5 9 m FHD xvC Indicador de modo 墌 p 20 Indicador de reducción de viento x v ColorTM Calidad de imagen Tiempo restante 墌 p 20 41 Contador 7REC Aparece durante la grabación 墌 p 20 79 Aparece durante el modo de espe...

Page 59: ... Y9 Cámara lenta hacia atrás El número de la izquierda indica la velocidad Contador Indicador de nivel de volumen Indicador de batería Fecha hora Indicador de efectos de cortinilla fundido Durante la reproducción de imágenes fijas PM 4 5 5 JA N 2 0 2 0 0 8 1 0 1 0 0 9 8 1080p Indicador de modo 墌 p 25 Salida en 1080p Número de carpeta o archivo Indicador de reproducción automática de las imágenes 墌...

Page 60: ...ón BN VF815U suministrada 2 h 40 min GZ HD5 1 h 25 min GZ HD6 1 h 20 min BN VF823U 3 h 50 min GZ HD5 2 h 05 min GZ HD6 2 h 00 min 8 Para extraer la batería Deslice y mantenga presionado BATT paso 2 y extraiga la batería 8 Para comprobar la carga restante de la batería Vea la página 22 NOTAS La cámara también se puede usar con sólo el adaptador de CA No estire ni doble el enchufe o el cable del ada...

Page 61: ...JUSTAR SALIR 5 Seleccione un idioma Seleccionar Ajustar ENGLISH LANGUAGE SELECC AJUSTAR SALIR DEUTSCH 8 Para volver a la pantalla anterior Mueva el botón selector hacia 8 Para salir de la pantalla Pulse el botón MENU Ajuste de la fecha hora Después de realizar los pasos 1 3 墌 columna izquierda 4 Seleccione AJUS RELOJ Seleccionar Ajustar 5 Ajuste la fecha y la hora Seleccionar Ajustar JAN 31 11 AM ...

Page 62: ...er más información sobre las operaciones consulte GUIDEBOOK en el CD ROM suministrado 1 Seleccione el modo de menú MENU 2 Seleccione la primera opción de menú que desee VÍDEO IMAGEN Y GENERAL Q AJUSTE DE SALIDA MEDIOS Seleccionar Ajustar CONTADOR DE ESCENAS NIVEL MICRO EXTERNO ZOOM CALIDAD OIS VÍDEO SELECC AJUSTAR SALIR SP 3 Seleccione la segunda opción de menú que desee Seleccionar Ajustar INDICA...

Page 63: ...o la tarjeta se expulse parcialmente extráigala NOTAS La tarjeta microSD sólo se puede insertar y extraer con la cámara apagada De lo contrario los datos de la tarjeta podrían dañarse No toque el terminal de la parte posterior de la etiqueta R Cambio del soporte de grabación La cámara está preajustada de fábrica para grabar en el disco duro integrado El soporte de grabación se puede cambiar por un...

Page 64: ... La luz de la cámara se enciende NOTAS Si no se realiza ninguna operación durante 5 minutos cuando la cámara está encendida ésta se apaga automáticamente para ahorrar energía Para volver a encender la cámara cuando ésta se utiliza con la batería ajuste el interruptor de alimentación modo en OFF y luego en ON Cuando utilice la cámara con el adaptador de CA realice cualquier operación como utilizar ...

Page 65: ...la grabación PHOTO 9 9 9 9 FINE 20 NOTAS Si no se realiza ninguna operación durante 5 minutos cuando la cámara está encendida ésta se apaga automáticamente para ahorrar energía Para volver a encender la cámara cuando ésta se utiliza con la batería ajuste el interruptor de alimentación modo en OFF y luego en ON Cuando utilice la cámara con el adaptador de CA realice cualquier operación como utiliza...

Page 66: ...LECCIONAR CAMBIAR REG EVENTO OFF 3 Seleccione el evento en el que desea registrar el archivo Para cancelar el registro de un evento seleccione SIN SECCIÓN Seleccionar Ajustar VIAJE 1 3 SIN SECCIÓN PÁG SIGUIENTE SELECC AJUSTAR SALIR El evento seleccionado aparece en la pantalla NOTA Una vez que haya elegido registrar un archivo en un evento determinado el ajuste se conservará aunque apague la cámar...

Page 67: ...erían demasiado oscuros al filmar en ambientes extremadamente claros como en la nieve FOCO Cuando un sujeto aparece demasiado claro iluminado por la luz de un foco V ATARDECER Hace que las escenas de atardecer parezcan más naturales Ajuste manual en el menú de funciones 1 FUNCTION 2 Seleccione el menú que desee Seleccionar Ajustar AJUSTAR BRILLO WB EFECTO VEL DE OBTURACIÓN PRIORIDAD APERTURA ZEBRA...

Page 68: ...a cubierta del objetivo se cierra de forma automática Seleccione el archivo que desee Seleccionar Ajustar Reproducción de vídeo Seleccione el modo vídeo MODE El interruptor vuelve a la posición original cuando se suelta La luz de la cámara se enciende Operaciones durante la reproducción Volver a la primera escena del archivo Búsqueda hacia atrás Reproducción fotograma a fotograma durante la pausa ...

Page 69: ...alla de índice La cubierta del objetivo se cierra de forma automática Seleccione el archivo que desee Seleccionar Ajustar Reproducción de imágenes fijas Seleccione el modo imagen fija MODE El interruptor vuelve a la posición original cuando se suelta La luz de la cámara se enciende Girar 90 grados a la izquierda Ver el archivo anterior Iniciar finalizar la reproducción automática Ver el archivo si...

Page 70: ...tes de SALIDA HDMI AJUSTE DE COLOR HDMI o AJUSTE MEJORADO HDMI de acuerdo con la conexión 墌 p 18 8 Para realizar la conexión con el conector COMPONENT NOTA Cambie los ajustes de SALIDA COMPONENTES de acuerdo con la conexión 墌 p 18 Conector HDMI Adaptador de CA Conector CC Conector HDMI Cable HDMI opcional A la toma de CA Conector CC Cable AV Adaptador de CA A la toma de CA El conector de vídeo no ...

Page 71: ...mara a la grabadora de vídeo DVD Encienda la grabadora de vídeo DVD y ajuste la grabadora de vídeo DVD en el modo de entrada AUX 4 Inicie la reproducción en la cámara 墌 p 24 25 8 Para ver en el televisor la visualización en pantalla de la cámara Ajuste VER EN TV en ON 墌 p 18 NOTA Si el vídeo se grabó con x v ColorTM ajustado en ON cambie el ajuste de x v ColorTM en el televisor Para obtener más in...

Page 72: ...NAR 0008 Nº ACTUAL ARCHIVOS CANCELAR EJECUTAR SELECC AJUSTAR 8 Para salir de la pantalla Pulse el botón FUNCTION Eliminación protección de archivos Después de realizar los pasos 1 2 墌 columna izquierda 3 Seleccione SELECCIÓN ARCHIVOS Seleccionar Ajustar ELIMINAR ELIMINAR TODO SELECCIÓN ARCHIVOS ACTUAL SELECC AJUSTAR SALIR 4 Seleccione el archivo que desee Seleccionar Ajustar ELIMINACIÓN DE VÍDEO 8...

Page 73: ...ara en un disco DVD con una grabadora de DVD Soportes admitidos DVD R DVD RW DVD R DL Puede necesitarse más de un disco dependiendo del tamaño del archivo que se vaya a copiar En tal caso utilice discos nuevos sin utilizar Este disco no se puede reproducir en un reproductor de DVD normal Utilice uno de los siguientes métodos para ver el disco Reproducción del disco mediante la cámara Para reproduc...

Page 74: ...ELECC AJUSTAR ARRIBA CANCELAR CONTINUAR COPIANDO FORMATEAR 4 Seleccione EJECUTAR o EJECUTAR Y FINALIZAR Si se selecciona EJECUTAR Y FINALIZAR el disco se finaliza tras copiarse los archivos Seleccionar Ajustar DVD DL DVD 3 5 CANCELAR EJECUTAR EJECUTAR Y FINALIZAR SELECC AJUSTAR ARRIBA Los archivos se copian en el disco Cuando aparezca HECHO pulse el botón selector para completar la operación Cuand...

Page 75: ...0 Tarjeta de sonido Tarjeta de sonido compatible con Direct Sound Pantalla Debe ser capaz de mostrar al menos 1024 x 768 XGA en color de alta resolución de 16 bits o superior se recomienda 1280 x 1024 SXGA o superior Tarjeta compatible con Intel nVidia ATI MPEG 2 HD DxVA Otros Internet Explorer 5 5 o posterior DirectX 9 0 o posterior Soportes admitidos BD RE BD R DVD R RW DVD R RW CD R RW Para las...

Page 76: ... NE for Everio PowerDirector 6 NE Permite editar los archivos en el PC Se inicia automáticamente desde una operación de PowerCinema NE for Everio NOTA Si el vídeo grabado se va a editar con el software del CD ROM suministrado ajuste x v ColorTM en OFF antes de grabar Digital Photo Navigator 1 5 Permite cambiar el formato de los archivos de imagen fija de los que se ha hecho una copia de seguridad ...

Page 77: ...o desconecte nunca el cable USB mientras la luz de acceso carga esté encendida o parpadee No apague la cámara cuando el cable USB esté conectado para evitar averías en el PC Conecte la cámara directamente al PC no a través de un concentrador No utilice un cable alargador para cable USB Cuando copie archivos del PC al soporte de grabación de la cámara no incluya ningún archivo diferente de los grab...

Page 78: ...chivos automáticamente Cuando desaparezca la barra de progreso el proceso se habrá completado NOTA Cuando se realiza la copia de seguridad se crea una carpeta para cada uno de los soportes HDD o microSD almacenados en la carpeta MyWorks y se hace una copia de seguridad de los archivos en esas carpetas Si se hace una copia de seguridad desde más de un disco duro HDD de cámara se crean carpetas de d...

Page 79: ...Component for Everio 4 Instale el software siguiendo los procedimientos que aparecen en pantalla Copia de archivos de seguridad en Macintosh Conexión de la cámara al Macintosh Preparativos Coloque el interruptor de alimentación modo de la cámara en OFF NOTAS No desconecte nunca el cable USB mientras la luz de acceso carga esté encendida o parpadee No apague la cámara cuando el cable USB esté conec...

Page 80: ...uncionamiento básico de su PC ni a preguntas relacionadas con las especificaciones o prestaciones del sistema operativo otras aplicaciones o controladores CyberLink Asistencia técnica por teléfono fax Ubicación Idioma Horario de oficina de lunes a viernes N º de teléfono N º de fax Alemania Inglés alemán francés español Italiano De 09 00 a m a 5 00 p m 49 700 462 92375 49 241 70525 25 Taiwán Manda...

Page 81: ...uye después de realizar varias tomas seguidas La velocidad de toma continua puede disminuir al utilizar un determinado soporte de grabación o en ciertas condiciones de grabación La fecha hora no aparece Ajuste FECHA HORA en el menú general en ON No se puede activar una función Compruebe la indicación que representa la función Si la indicación parpadea o está desactivada significa que ha selecciona...

Page 82: ...ún convenga Copia La copia de alta definición no se puede realizar en un dispositivo HDV Realice las siguientes comprobaciones La grabación con el ajuste CALIDAD del menú de vídeo se debe establecer en 1440 CBR Cree una lista de reproducción y luego cópiela No se puede copiar cada archivo de vídeo por separado Al realizar la copia establezca el ajuste SALIDA i LINK COPIA del menú de ajustes de sal...

Page 83: ... que se haya comprobado el funcionamiento de la tarjeta microSD HDD Realice una limpieza Evite someter la cámara a vibraciones o golpes GRABACIÓN CANCELADA Seleccione ACEPTAR y detenga la grabación Utilice la cámara en lugares en los que no se vea sometida a vibraciones o golpes PROCESAMIENTO CANCELADO DEBIDO A FALTA DE ESPACIO PARA LA OPERACIÓN Reduzca el número de vídeos que se pueden registrar ...

Page 84: ... 8 Para vídeo audio Formato SD VIDEO Formato de grabación reproducción Vídeo MPEG 2 TS Audio MPEG 1 Layer 2 Formato de señal 1080 60i Modo de grabación vídeo FHD VBR promedio de 26 6 Mbps SP VBR promedio de 19 Mbps LP VBR promedio de 11 1 Mbps 1440 CBR CBR 27 Mbps Modo de grabación audio 48 kHz 384 kbps 8 Para imágenes fijas Formato JPEG Tamaño de imagen 4 modos 1920 x 1080 1440 x 1080 1024 x 768 ...

Page 85: ...1670 3225 6445 4 3 1440 x 1080 FINA 9999 9999 705 1405 2785 5565 1440 x 1080 ESTÁNDAR 9999 9999 1110 2205 4380 8750 1024 x 768 FINA 9999 9999 1415 2810 5575 9999 1024 x 768 ESTÁNDAR 9999 9999 2225 4115 8765 9999 640 x 480 FINA 9999 9999 3465 6870 9999 9999 640 x 480 ESTÁNDAR 9999 9999 6235 9999 9999 9999 Mando a distancia Fuente de alimentación eléctrica CC 3 V Duración de la batería 1 año aproxim...

Page 86: ...y luego descargar totalmente la batería cada seis meses cuando se guarde durante un periodo de tiempo prolongado cuando no se utilice se debe retirar del cargador o dispositivo eléctrico ya que algunas máquinas utilizan corriente incluso estando apagadas Soporte de grabación Asegúrese de seguir las siguientes pautas para evitar corromper o dañar los datos grabados No doble ni tire el soporte de gr...

Page 87: ...rea de mano balancear demasiado la bolsa de la cámara con la cámara dentro deje la cámara en áreas donde haya polvo o arena como en la playa Para evitar que la unidad se caiga Fije bien la correa para hombro y ajuste bien la correa de mano Si utiliza la cámara con un trípode fije bien la cámara en el trípode Si se le cae la cámara puede herirse usted y dañarse la cámara Si un niño utiliza la unida...

Page 88: ...co duro 42 E Eliminación de archivos 28 F Funcionamiento siempre listo para grabar 12 G Giro de las imágenes 25 Grabadora de DVD 29 I Imagen fija 21 25 Instalación en trípode 18 M Macintosh 35 Mando a distancia 13 Micrófono externo 13 P Pantalla LCD 12 14 42 PC con Windows 31 Programa AE 23 Protección de archivos 28 R Registro de eventos 22 Remote Control 11 Reproducción automática 25 S Soporte de...

Reviews: