background image

Operating the Menu

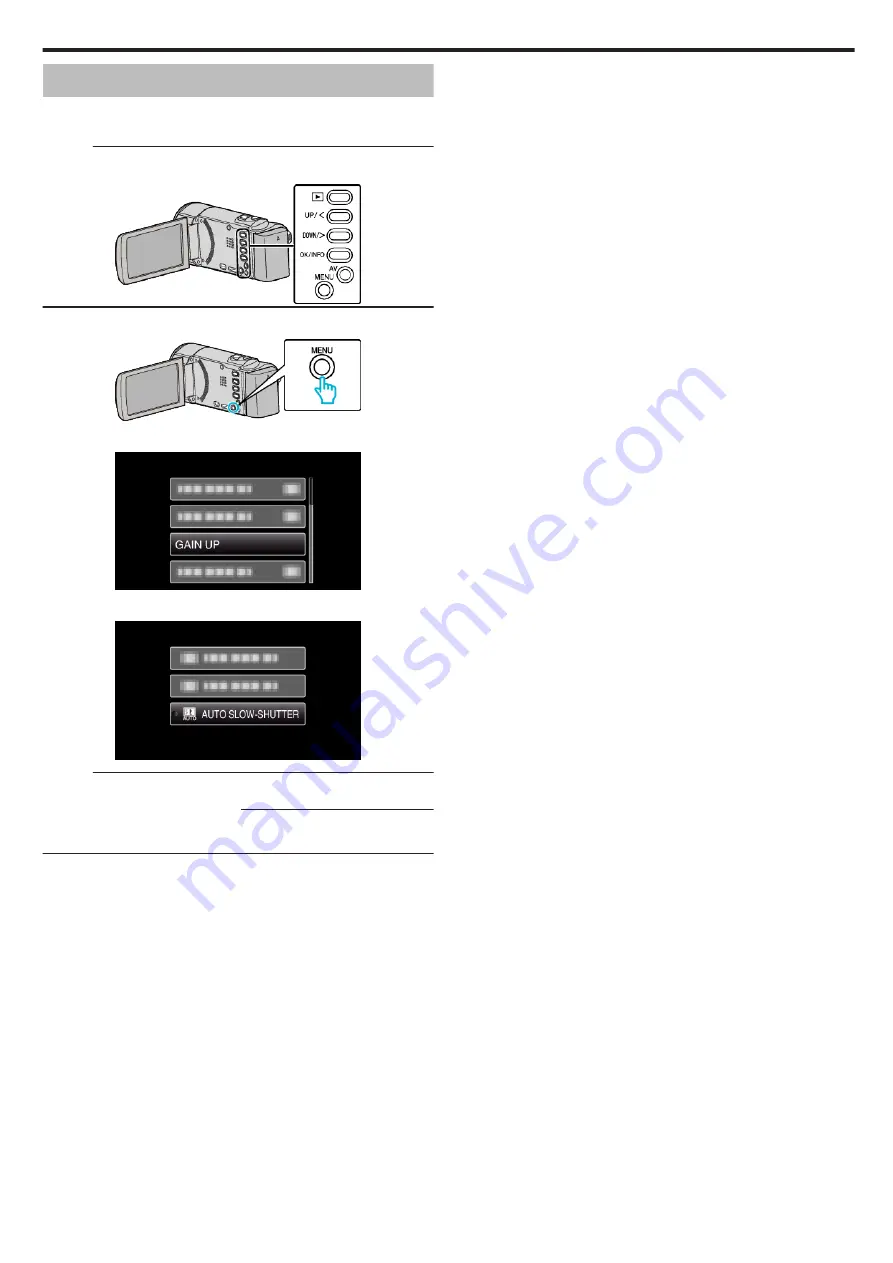
Use the operation buttons to set the menu.

0

The menu differs according to the mode in use.

Memo : 

To select/move cursor towards up/left or down/right, press the button UP/<

or DOWN/>.

.

1

Press MENU.

.

2

Select the desired menu and press OK.

.

3

Select the desired setting and press OK.

.

Memo : 

0

To return to the previous screen, press MENU.

Returning All Settings to Default

0

Set using “FACTORY PRESET” in the basic settings menu.

“ FACTORY PRESET ” (

A

 p. 64)

Menu Settings

57

Summary of Contents for GZ-E105

Page 1: ...CAMCORDER LYT2522 005A Detailed User Guide GZ E105 ...

Page 2: ...arch 37 Connecting to and Viewing on TV 37 Connecting via the HDMI Mini Connector 38 Connecting via the AV Connector 39 Editing Deleting Unwanted Files 41 Deleting the Currently Displayed File 41 Deleting Selected Files 42 Deleting All Files 43 Protecting Files 43 Protecting Releasing Protection of the Currently Displayed File 43 Protecting Releasing Protection of Selected Files 44 Protecting All ...

Page 3: ...o achieve stable images 0 Set to the wide angle as much as possible as the image will be prone to camera shake 0 Be considerate Do not inconvenience the people around you Squatting and Shooting at Eye Level Staying low is a common position to take when shooting small children By recording from the eye level of the child you can capture all his cute expressions clearly o Getting Ready A Kneel down ...

Page 4: ...s as everyone helps to prepare the feast of the night You can film the mother who is cooking the children who are helping and of course the process of making a cake Recording the Christmas Party After all preparations it is finally the Christmas party itself Not only should you record the candle blowing scene but also the smiles of the family while being surrounded by good food or even the father ...

Page 5: ...oth Bride and Groom The main characters of a wedding are of course the bride and groom Record their expressions clearly during the toast speech entertainment programs and other scenes Another recommendation is to capture the face shots of the guests then pan towards the groom Picture composition containing the crowd of guests only lacks fun so be sure to pay attention to the shooting angle and siz...

Page 6: ...r you have to think about what to bring in accordance to the local conditions Here are some suggestions for your consideration o Camcorder Think about how many hours of shooting you will usually perform in a day Be sure to prepare enough recording medium especially for long overseas trips If you are recording in SD cards get ready the sufficient number of cards including some for backup o Battery ...

Page 7: ...when everyone is gathered at the meeting place if you are traveling with your friends For overseas trips taking a shot of the signs and displays at the airport of the flight you are taking may be useful for future reference Using Pan at the Places of Interest Tourists spots with beautiful scenery or historical sites are places that you would certainly want to record To capture the magnificence of ...

Page 8: ...re not only dull when you view them later but also put the capability of the audio recording function of the camcorder to a waste When recording induce more reactions by enthusiastically waving your hands or shouting out Is it fun and the like Advanced Operation with Backlight Compensation It is useful to make use of backlight compensation when the subject s face is in backlight or when the expres...

Page 9: ...telligent Auto Recording Detects 12 types of pre set scenes 3 Digital Image Stabilizer 4 40x Optical Zoom 5 Auto Recording Automatically starts recording when subject enters the detecting area 6 Time lapse Recording Watch long hours of recording in a few seconds 7 HDMI USB and AV Out connectors Getting Started 9 ...

Page 10: ...ck recorded images on the TV 0 Please consult your JVC dealer or the nearest JVC service center when purchasing a new AV cable USB Cable Type A Mini Type B 0 Connects this unit to a computer Basic User Guide 0 Read well and keep in a safe place where it can be accessed easily when necessary Memo 0 SD cards are sold separately Types of Usable SD Card A p 13 0 When using the AC adapter overseas plea...

Page 11: ...y battery manufactured other than JVC is attempted for battery charge charging stops In these cases CHARGE lamp blinks quickly for notification Be sure to use the supplied AC adapter 0 If you use any other AC adapters besides the supplied AC adapter malfunctions may occur 0 You can record or play back videos while the AC adapter is connected Battery charging cannot be performed during recording or...

Page 12: ...ew one The charging time is when the unit is used at 25 C If the battery pack is charged outside the room temperature range of 10 C to 35 C charging may take a longer time or it may not start The recordable and playable time may also be shortened under some usage conditions such as at low temperature Approximate Recording Time Using Battery A p 34 Grip Adjustment A Open the lever on the strap lock...

Page 13: ...from the following manufacturers 0 Panasonic 0 TOSHIBA 0 SanDisk SDHC Card 0 Use a Class 4 or higher compatible SDHC card 4 GB to 32 GB SDXC Card 0 Use a Class 4 or higher compatible SDXC card Max 128 GB Memo 0 Using SD cards including SDHC SDXC cards other than those specified above may result in recording failure or data loss 0 This unit is not guaranteed to operate with all SD cards Some SD car...

Page 14: ... http www microsoft com downloads en details aspx FamilyID 7d54c53f 017c 4ea5 ae08 34c3452ba315 Windows 7 Downloadandinstall the updatingprogram KB976422 from the following URL 0 32 bit version http www microsoft com downloads en details aspx FamilyID 3ee91fc2 a9bc 4ee1 aca3 2a9aff5915ea 0 64 bit version http www microsoft com downloads en details aspx FamilyID 73f766dd 7127 4445 b860 47084587155f...

Page 15: ...ext item 0 Repeat this step to input the day month year hour and minute 0 To cancel and return to the previous screen press MENU 4 Press UP or DOWN to select the region where you live and press OK 0 Time difference between the selected city and the GMT Greenwich Mean Time is displayed 0 To cancel and return to the previous screen press MENU Memo 0 The clock can be reset again later Resetting the C...

Page 16: ...ve the cursor 0 To cancel and return to the previous screen press MENU 4 Set the date and time 0 Press UP or DOWN to adjust the setting value and press OK to confirm it The cursor moves to the next item 0 Repeat this step to input the day month year hour and minute 0 To cancel and return to the previous screen press MENU 5 Press UP or DOWN to select the region where you live and press OK 0 Time di...

Page 17: ...camera for recording Caution 0 Be careful not to drop this unit during transportation 0 Guardians should pay close attention when this unit is being used by children Memo 0 If camera shake is excessive use the image stabilizer Reducing Camera Shake A p 30 Tripod Mounting This unit can be mounted on a tripod or monopod This is useful for preventing camera shake and recording from the same position ...

Page 18: ...me display to the local time by selecting your travel destination in AREA SETTING of CLOCK ADJUST Setting the Clock to Local Time when Traveling A p 19 When ON is selected in DST SETTING of CLOCK ADJUST the time is set 1 hour ahead Setting Daylight Saving Time A p 19 Charging the Battery Pack Overseas The shape of the power outlet varies according to countries and regions To charge the battery pac...

Page 19: ...G changestheclocktimesuchthattimedifference is accounted for After returning to your country re select the region that was set initially to restore the original clock settings Setting Daylight Saving Time When ON is selected in DST SETTING of CLOCK ADJUST the time is set 1 hour ahead Memo To select move cursor towards up left or down right press the button UP or DOWN 1 Press MENU 2 Select CLOCK AD...

Page 20: ... may not be supported in some regions 0 For more information refer to the catalog Approximate Recording Time Using Battery Battery Pack Actual Recording Time Continuous recording time Maximum Recording Time BN VG108E Supplied 40 m 1 h 5 m BN VG114E 1 h 15 m 2 h 10 m BN VG121E 1 h 55 m 3 h 15 m BN VG138E 3 h 20 m 5 h 45 m 0 The above are values when MONITOR BRIGHTNESS is set to 3 standard 0 The act...

Page 21: ...he subject and shooting conditions recording may not be performed properly even in the Intelligent Auto mode Indications During Recording Display Icon Description Recording Mode Pressthei AUTObuttontoswitchtherecordingmode between P Intelligent Auto and H Manual Video Quality Displays the icon of the VIDEO QUALITY setting selected in the recording menu VIDEO QUALITY A p 59 Remaining Recording Time...

Page 22: ...d with the LCD monitor reversed and closed the temperature rises more easily Leave the LCD monitor open when using this unit in places exposed to direct sunlight or high temperatures 0 The power may turn off to protect the circuit if the temperature of this unit rises too much 0 Do not remove the battery pack AC adapter or SD card when the access lamp is lighted The recorded data may become unread...

Page 23: ...set Name Description SCENE SELECT 0 Recordings that suit the shooting conditions can be performed easily Scene Selection A p 24 FOCUS 0 Use manual focus if the subject is not focused automatically Adjusting Focus Manually A p 25 BRIGHTNESS ADJUST 0 Overall brightness on the screen can be adjusted 0 Use this when recording in a dark or bright location Adjusting Brightness A p 26 WHITE BALANCE 0 Ove...

Page 24: ...e mode changes between Intelligent Auto and Manual with every press 2 Press MENU 3 Select MANUAL SETTING and press OK 4 Select SCENE SELECT and press OK 5 Select the scene and press OK 0 After setting press OK The image is only an impression Setting Effect b NIGHTALIVE Increases gain and brightens the scene automatically using a slow shutter when the surrounding is dark To prevent camera shake use...

Page 25: ...NUAL SETTING and press OK 4 Select FOCUS and press OK 5 Select MANUAL and press OK 6 Adjust the focus with the UP and DOWN buttons 0 Press UP to focus on a distant subject If E appears blinking focus cannot be set any further 0 Press DOWN to focus on a near subject If p appears blinking focus cannot be set any nearer 7 Press OK to confirm 0 When focus is confirmed the focusing frame disappears and...

Page 26: ...the i AUTO 2 times to switch The mode changes between Intelligent Auto and Manual with every press 2 Press MENU 3 Select MANUAL SETTING and press OK 4 Select BRIGHTNESS ADJUST and press OK 5 Select MANUAL and press OK 6 Select the brightness value with the UP and DOWN buttons 0 Compensation range during recording 2 0 to 2 0 0 Press UP to increase the brightness 0 Press DOWN to decrease the brightn...

Page 27: ...te balance setting and press OK 0 The White Balance icon appears on the screen upon completing the setting Setting Details AUTO Adjusts automatically to the natural colors MWB Use this when the problem of unnatural colors is not resolved FINE Set this when shooting outdoors on a sunny day CLOUD Set this when shooting on a cloudy day or inside a shade HALOGEN Set this when shooting under illuminati...

Page 28: ... OK 4 Select BACKLIGHT COMP and press OK 5 Select ON and press OK 0 After setting the backlight icon l appears Taking Close up Shots You can take close up shots of an object using the tele macro function The image is only an impression Memo To select move cursor towards up left or down right press the button UP or DOWN 1 Select the Manual recording mode 0 If the mode is P Intelligent Auto press th...

Page 29: ...y be blur Capturing Human Subjects Clearly Face Detection AE AF FACE PRIORITY AE AF automatically adjusts the detected face with appropriate focus and brightness Memo To select move cursor towards up left or down right press the button UP or DOWN 1 Press MENU 2 Select FACE PRIORITY AE AF and press OK 3 Select ON and press OK 4 Point the camera toward the human subject 0 A frame appears around the ...

Page 30: ...ra Shake When the image stabilizer is set camera shake during video recording can be effectively reduced Memo To select move cursor towards up left or down right press the button UP or DOWN 1 Press MENU 2 Select DIS image stabilizer and press OK 3 Select ON or ON AIS to activate the image stabilizer and press OK Setting Details b OFF Deactivates image stabilizer a ON Reduces camera shake under nor...

Page 31: ...VAL or higher this unit switches to the power saving mode between recordings At the next point to record the power saving mode will be turned off and recording will start automatically 0 Press the START STOP button again to stop recording Indications During Time Lapse Recording Display Description Speed Indicator Displays the recording interval that is set Video Quality Displays the icon of the vi...

Page 32: ...ion once more 0 Recording stops automatically 99 hours after it is started 0 Make use of a tripod and AC adapter for time lapse recordings with long intervals It is also recommended to fix the focus and white balance manually Tripod Mounting A p 17 Adjusting Focus Manually A p 25 Setting White Balance A p 27 Recording Automatically by Sensing Movements AUTO REC Thisfunctionenablestheunittorecordau...

Page 33: ... is no movement within the red frame 0 While zooming recording cannot be started Remaining Recording Time Battery Power You can check the remaining recording time on the SD card as well as the remaining battery power Memo To select move cursor towards up left or down right press the button UP or DOWN 1 Press OK INFO 2 Display the remaining recording time 0 To display the remaining battery power pr...

Page 34: ...onment Approximate Recording Time Using Battery Battery Pack Actual Recording Time Continuous recording time Maximum Recording Time BN VG108E Supplied 40 m 1 h 5 m BN VG114E 1 h 15 m 2 h 10 m BN VG121E 1 h 55 m 3 h 15 m BN VG138E 3 h 20 m 5 h 45 m 0 The above are values when MONITOR BRIGHTNESS is set to 3 standard 0 The actual recording time may be shorter if zooming is used or if recording is sto...

Page 35: ...ery power during use Caution 0 Make a backup of important recorded data It is recommended to copy your important recorded data to a DVD or other recording media for storage 0 This unit is a microcomputer controlled device Electrostatic discharge external noise and interference from a TV a radio etc might prevent it from functioning properly In such a case turn off the power then remove the AC adap...

Page 36: ...is created in the EXTMOV folder when management information is corrupted 0 Depending on the condition of the damaged file playback might fail or may not run smoothly Searching for a Specific Video When there is a large number of recorded videos it is difficult to look for the desired file from the index screen Use the search function to find the file you want 0 For videos you can search by SEARCH ...

Page 37: ... cable and connect again 0 Turn off and on this unit again 0 Images may not appear properly when the remaining battery power is low Use an AC adapter Images are projected vertically on the TV 0 Set VIDEO OUTPUT in the CONNECTION SETTINGS menu to 4 3 VIDEO OUTPUT A p 65 Images are projected horizontally on the TV 0 Adjust the TV s screen accordingly HDMI CEC functions do not work properly and the T...

Page 38: ...his unit via the connected connector 4 Play back a file Playing Back Videos A p 35 Memo 0 To play back with date time display set DISPLAY ON TV in the CONNECTION SETTINGS menu to ON DISPLAY ON TV A p 65 0 Change the settings in HDMI OUTPUT according to the connection HDMI OUTPUT A p 65 0 When connected to the TV via the HDMI mini cable images and sounds may not be output properly depending on the ...

Page 39: ...s unit turns off automatically Memo 0 Depending on the TV connected the display language of this unit will automatically switch to the language that is selected for the TV when this unit is turned on This is applicable only if this unit supports the language selected for the TV To use this unit with a language that differs from the display language of the TV set HDMI CONTROL to OFF 0 The display l...

Page 40: ... Playback 40 ...

Page 41: ...e index screen o To delete a video with defective management information 1 Start or pause playback of a file Playing a Video with Defective Management Information A p 35 2 Press MENU 3 Select DELETE and press OK 0 CURRENT cannot be selected Deleting the Currently Displayed File Deletes the currently displayed file Memo To select move cursor towards up left or down right press the button UP or DOWN...

Page 42: ...or DOWN to select files 0 A delete mark appears on the selected file To remove the delete mark press OK again 0 To move to the next page on the index screen slide along the N O zoom lever 6 After selecting all the files to delete press MENU 7 Select EXECUTE and press OK 0 After deleting press OK 0 To cancel the deletion select QUIT and press OK 0 To return to the previous screen select RETURN and ...

Page 43: ... accidently by protecting them Protecting Releasing Protection of the Currently Displayed File A p 43 Protecting Releasing Protection of Selected Files A p 44 Protecting All Files A p 45 Releasing Protection of All Files A p 45 Caution 0 When the recording media is formatted even the protected files will be deleted Protecting Releasing Protection of the Currently Displayed File Protects or release...

Page 44: ...wn right press the button UP or DOWN 1 Select the playback mode 2 Press MENU 3 Select PROTECT CANCEL and press OK 4 Select FILE SELECT and press OK 5 Select the files to protect or release protection of and press OK 0 A protect mark I appears on the selected file To remove the protect mark I press OK again 0 To move to the next page on the index screen slide along the N O zoom lever 0 To exit pres...

Page 45: ...ROTECT ALL and press OK 5 Select YES and press OK 0 After setting press OK Releasing Protection of All Files Releases protection of all files Memo To select move cursor towards up left or down right press the button UP or DOWN 1 Select the playback mode 2 Press MENU 3 Select PROTECT CANCEL and press OK 4 Select CANCEL ALL and press OK 5 Select YES and press OK 0 After protection is released press ...

Page 46: ...R etc into the DVD recorder 6 Prepare this unit for playback 0 Set VIDEO OUTPUT in the CONNECTION SETTINGS menu to the aspect ratio 4 3 or 16 9 of the connecting TV VIDEO OUTPUT A p 65 0 To include the date and time during dubbing set DISPLAY ON TV in the CONNECTION SETTINGS menu to ON Set DISPLAY DATE TIME in the playback menu to ON DISPLAY ON TV A p 65 DISPLAY DATE TIME A p 61 7 Start recording ...

Page 47: ...r to this unit 0 This unit powers on automatically when the AC adapter is connected 0 Be sure to use the supplied AC adapter C The SELECT DEVICE menu appears 4 Select CONNECT TO OTHER and press OK 0 The following screen is displayed after the camera operation is completed 0 Operations are to be performed on the Blu ray recorder after the screen switches 5 Perform dubbing on the Blu ray recorder 0 ...

Page 48: ... to YouTube refer to MediaBrowser Help in the Help menu of Everio MediaBrowser Verifying System Requirements Guideline Right click on Computer or My Computer in the Start menu and select Properties to check the following items Windows Vista Windows 7 0 Refer to the operating instructions found in the animation on the Detailed User Guide Windows XP 0 Refer to the operating instructions found in the...

Page 49: ...en the AC adapter is connected 0 Be sure to use the supplied AC adapter C The SELECT DEVICE menu appears 4 Select CONNECT TO PC and press OK 5 Select PLAYBACK ON PC and press OK 0 Everio Software Setup appears on the computer The subsequent operations are to be performed on the computer 0 The following screen is displayed after the camera operation is completed Memo 0 If Everio Software Setup does...

Page 50: ...right press the button UP or DOWN 1 Remove the AC adapter and battery pack from this unit 2 Open the LCD monitor 3 Connect the USB cable and the AC adapter A Connect using the provided USB cable B Connect the AC adapter to this unit 0 This unit powers on automatically when the AC adapter is connected 0 Be sure to use the supplied AC adapter C The SELECT DEVICE menu appears 4 Select CONNECT TO PC a...

Page 51: ...la User Support Center Telephone USA and Canada English 1 800 458 4029 toll free Europe UK Germany France and Spain English German French Spanish 800 1532 4865 toll free Other Countries in Europe English German French Spanish 44 1489 564 764 Asia Philippines English 63 2 438 0090 China Chinese 10800 163 0014 toll free Homepage http www pixela co jp oem jvc mediabrowser e 0 Delete unwanted videos b...

Page 52: ...ding day 0 The thumbnails of the files recorded on the day are displayed 5 Register files to the created user list Memo 0 If you encounter any problems with the provided software Everio MediaBrowser 4 please consult the Pixela User Support Center Telephone USA and Canada English 1 800 458 4029 toll free Europe UK Germany France and Spain English German French Spanish 800 1532 4865 toll free Other ...

Page 53: ...refer to the Pixela homepage http www pixela co jp oem jvc mediabrowser e 0 Use Everio MediaBrowser 4 Player to play back an AVCHD disc Refer to the help file of the provided Everio MediaBrowser 4 software to operate 0 When copying videos recorded in UXP recording mode to create an AVCHD disc the videos need to be converted to XP recording mode before copying Therefore it may take a longer time th...

Page 54: ...press MENU 0 The following screen is displayed after the camera operation is completed 0 Close the Everio MediaBrowser 4 program if it starts 0 Operations are to be performed on the computer after the screen switches 6 Select Computer Windows 7 Windows Vista or My Computer Windows XP from the Start menu then click on the JVCCAM_SD icon 0 Open the folder with the desired files List of Files and Fol...

Page 55: ...s and Folders Folders and files are created in the SD card as shown below They are created only when necessary Caution 0 When the camera and PC are connected by an USB cable recorded media are read only Copying 55 ...

Page 56: ...ble recorded media are read only 0 MTS files that are copied to a Mac computer cannot be imported to iMovie To use MTS files with iMovie import the files using iMovie Memo 0 To edit view the files use a software that supports AVCHD video files 0 When removing this unit from the computer drag drop the JVCCAM_SD icon on the desktop to the trash bin iMovie You can import files from this unit to a com...

Page 57: ...sor towards up left or down right press the button UP or DOWN 1 Press MENU 2 Select the desired menu and press OK 3 Select the desired setting and press OK Memo 0 To return to the previous screen press MENU Returning All Settings to Default 0 Set using FACTORY PRESET in the basic settings menu FACTORY PRESET A p 64 Menu Settings 57 ...

Page 58: ...ght 0 Use this when shooting against the light Setting Backlight Compensation A p 28 TELE MACRO 0 Use this to take close up macro shots of the subject Taking Close up Shots A p 28 Memo 0 They are displayed only when recording in the manual mode FACE PRIORITY AE AF Detects faces and adjusts the brightness and focus automatically Setting Details OFF Deactivates auto adjustment ON Activates auto adju...

Page 59: ...ack at 500 times speed 40SEC INTERVAL Takes a frame at 40 second intervals Recorded videos will be played back at 1000 times speed 80SEC INTERVAL Takes a frame at 80 second intervals Recorded videos will be played back at 2000 times speed Recording at Intervals TIME LAPSE RECORDING A p 31 AUTO REC This function enables the unit to record automatically by sensing the changes in subject s movement b...

Page 60: ...local time when using this unit overseas Setting Details CLOCK SETTING Resets the current time or changes the settings Resetting the Clock A p 16 AREA SETTING Sets to the local time when using this unit overseas simply by selecting the destination Setting the Clock to Local Time when Traveling A p 19 DST SETTING Sets whether daylight saving time is observed at the travel destination Setting Daylig...

Page 61: ...Releasing Protection of Selected Files A p 44 PROTECT ALL Protects all files Protecting All Files A p 45 CANCEL ALL Releases protection of all files Releasing Protection of All Files A p 45 SEARCH DATE Refines the index screen of videos according to recording date Date Search A p 37 PLAYBACK OTHER FILE Plays videos with defective management information Playing a Video with Defective Management Inf...

Page 62: ...ack Setting Details OFF No display at all ON Displays everything MOBILE USER GUIDE Displays the QR code to access the Mobile User Guide 0 The portal site appears when the QR code has been read correctly Select the model name of your camera to display its Mobile User Guide Memo 0 To read the QR code a relevant application is required Enter the URL in the internet browser manually if the QR code can...

Page 63: ...PLAY SETTINGS by pressing OK after setting the time Items Setting Value DATE DISPLAY STYLE year month day month day year day month year TIME 12h 24h MONITOR BRIGHTNESS Sets the brightness of the LCD monitor Setting Details AUTO Sets the brightness automatically to 4 when using outdoors and to 3 when using indoors 4 Brightens the backlight of the monitor regardless of the surrounding conditions 3 S...

Page 64: ... this unit is not operated for 5 minutes ON Turns off the power automatically if this unit is not operated for 5 minutes Memo 0 When using battery power is turned off automatically if this unit is not operated for 5 minutes 0 When using the AC adapter this unit goes into standby mode QUICK RESTART Reduces the power consumption within 5 minutes after the LCD monitor is closed to 1 3 of that used du...

Page 65: ...TV 4 3 16 9 Select this when connecting to a widescreen TV 16 9 HDMI OUTPUT Sets the definition of the video output from the HDMI mini connector Setting Details AUTO It is recommended to select AUTO usually 576p Select this when the video is not output in AUTO correctly Memo 0 1080p will be displayed on the LCD monitor if a 1080p compatible TV is connected to this unit in playback mode HDMI CONTRO...

Page 66: ...etes all files on the SD card and resets the folder and file numbers to 1 Caution 0 Not available for selection when no SD card is inserted 0 All data on the SD card will be deleted when it is formatted Copy all files on the SD card to a computer before formatting 0 Make sure that the battery pack is fully charged or connect the AC adapter as the formatting process may take some time Menu Settings...

Page 67: ... this unit on a disc by using the BD DVD drive on your computer and the Everio MediaBrowser 4 DIRECT DISC Save videos recorded by this unit on a disc by using the BD DVD drive on your computer UPLOAD Upload videos recorded by this unit to website for sharing files by using the Everio MediaBrowser 4 BACK UP Backup videos recorded by this unit to your computer using the Everio MediaBrowser 4 Backing...

Page 68: ...AC adapter to charge the battery 4 ACCESS Access Lamp 0 Lights up blinks during recording or playback Do not remove the battery pack AC adapter or SD card 5 POWER CHARGE Power Charge Lamp 0 Lights up Power ON 0 Blinks Charging in progress 0 Goes out Charging finished 6 START STOP Button Video Recording d e Play Pause Button Video Playback 0 Starts stops video recording 0 Starts pauses video playba...

Page 69: ...Button 0 UP Scrolls moves cursor on the icons upward 0 Reverse search 4 DOWN Button 0 DOWN Scrolls moves cursor on the icons downward 0 Forward search 5 OK INFO Button 0 Confirms the selection Displays information as follows 0 Recording Displays the remaining time and battery power 0 Playback Displays file information such as recording date 6 AV Connector 0 Connects to a TV etc 7 MENU Menu Button ...

Page 70: ...REC A p 32 3 Backlight Compensation Setting Backlight Compensation A p 28 4 Tele Macro Taking Close up Shots A p 28 5 Scene Select Scene Selection A p 24 6 Date Time Clock Setting A p 15 7 Image Stabilizer Reducing Camera Shake A p 30 8 Media 9 Recording Mode Taking Videos in Auto Mode A p 21 Manual Recording A p 23 10 Wind Cut WIND CUT A p 59 11 Remaining Recording Time 12 Scene Counter 13 Focus ...

Page 71: ... 4 Media 5 Playback Time Playing Back Videos A p 35 When the unit is not working properly Turning Off the Power 1 Turning Off the Power 2 Remove the AC adapter and battery pack from this unit reattach them open the LCD monitor and this unit powers on automatically Reset complete Indications on the LCD monitor 71 ...

Page 72: ...nit is used for long periods of time in high or low temperatures or if the battery pack is repeatedly charged the amount of remaining battery may not be displayed correctly Recording Recording cannot be performed Set to the recording mode with the L Play Record button When there are multiple light sources and depending on the shooting conditions exposure and focus may not be adjusted correctly in ...

Page 73: ...of your PC when using Everio MediaBrowser 4 to play back Verifying System Requirements Guideline A p 48 Cannot find a recorded file Cancel the date search function Searching for a Specific Video A p 36 Select PLAYBACK OTHER FILE in the menu Video files that have damaged management information can be played back Playing a Video with Defective Management Information A p 35 No date time display Set O...

Page 74: ...Built in A p 49 Before making backup make sure that enough free space is left in the computer s hard disk HDD Unable to copy files to DVD with a computer To record to discs a recordable DVD or Blu ray drive is required for the computer in use Cannot upload the file to YouTube Check if you have created an account with YouTube You need a YouTube account to upload files to YouTube Changing videos to ...

Page 75: ...N PC appears Operations are to be performed on the computer after the screen switches The image is grainy When digital zoom is used the image becomes grainy as it is digitally enlarged This unit heats up This is not a malfunction This unit may become warm when used for a long time The language on the display changed ItmayoccurwhenyouconnectthisunittoaTVwithdifferentlanguagesetting using an HDMI mi...

Page 76: ...OTECTED Switch off the PROTECT CANCEL function in the menu Protecting Files A p 43 CHECK CARD S WRITE PROTECTION SWITCH Set the write protect switch of the SD card to off INSUFFICIENT AVAILABLE SPACE Delete files or move files to a computer or other devices Replace the SD card with a new one MAXIMUM QUANTITY RECORDING FOLDERS FILES HAS BEEN REACHED A Move the files or folders to a PC or other devi...

Page 77: ...er commercially available to remove any dust and a cleaning cloth commercially available to wipe off any dirt Mold may form if the lens is left dirty 0 You can use a commercially available anti reflection or protective film on the screen However the screen may appear slightly darker depending on the thickness of the film used Caution 0 Do not use solvents such as benzene thinner or alcohol Doing s...

Page 78: ...amic zoom Up to 70x SD mode Digital zoom Up to 200x LCD monitor 2 7 230 000 pixels color LCD Recording media SDHC SDXC card commercially available Clock battery Rechargeable battery Connectors Item Details HDMI output connector HDMI mini connector AV output connector Video output 1 0 V p p 75 Ω Audio output 300 mV rms 1 KΩ USB connector Mini USB Type B USB 2 0 compliant Video Item Details Recordin...

Page 79: ...rging Dimensions mm 83 x 28 x 40 W x H x D excluding cord and AC plug Mass Approx 77 g Battery Pack BN VG108E Item Details Power voltage 3 5 V 3 6 V Capacity 860 mAh Dimensions mm 31 x 21 5 x 43 W x H x D Mass Approx 30 g Memo 0 The specifications and appearance of this product are subject to changes for further improvement without prior notice Specifications 79 ...

Page 80: ... 2012 JVC KENWOOD Corporation C3A 1212TFR SW VM ...

Reviews: