


4
EN
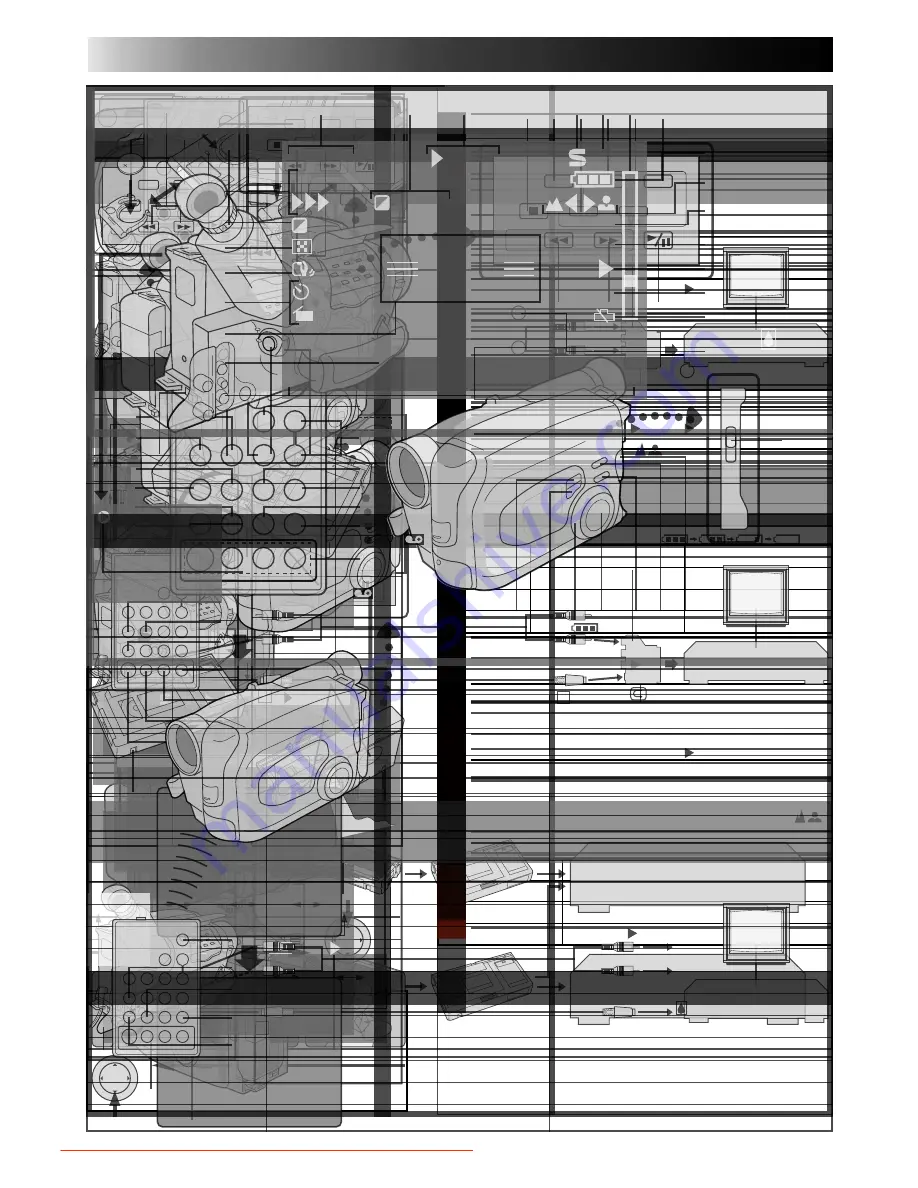
GETTING STARTED
REFRESH indicator
REFRESH switch
CHG. (charge) indicator
Marks
END
indicator
POWER
indicator
ATTENTION:
Before detaching the power source, make
sure that the camcorder’s power is turned
off. Failure to do so can result in a
camcorder malfunction.
Hook on.
Push in.
BATT. RELEASE
Power
This camcorder’s 3-way power supply system lets you
choose the most appropriate source of power.
NOTES:
●
No function is available without power supply.
●
Use only specified power supply.
●
Do not use provided power supply units with other
equipment.
CHARGING THE BATTERY PACK
SUPPLY POWER
1
Connect the charger’s AC power cord to a wall
outlet. The power indicator lights.
ATTACH BATTERY PACK
2
Align the marks and slide the battery pack in the
direction of the arrow until it locks in place.
The CHG. indicator lights.
DETACH BATTERY PACK
3
When charging is completed, the END indicator
lights. Slide the battery pack opposite the direction
of the arrow.
To AC outlet
BATT. PACK
CHARGE
DISCHARGE
BN-V12U
approx. 1 hr. 10 min.
approx. 3 hrs. 30 min.
BN-V22U
approx. 2 hrs. 10 min.
approx. 7 hrs.
BN-V25U
approx. 2 hrs. 40 min.
approx. 10 hrs.
USING THE BATTERY PACK
ATTACH BATTERY PACK
1
Hook its top end to the camcorder and push the
battery pack in until it locks in place.
DETACH BATTERY PACK
2
Slide BATT. RELEASE and pull out the battery pack.
Charge marker
** CHARGE MARKER
A charge marker is provided on
the battery pack to help you
remember whether it has been
charged or not. Two colors are
provided (red and black)—you
choose which one means
charged and which means
discharged.
BATT. PACK
APPROXIMATE RECORDING TIME
BN-V12U
50 min.
BN-V22U
1 hr. 50 min.
BN-V25U
2 hrs. 25 min.
**REFRESH
The AC power adapter features a REFRESH function that
allows you to fully discharge the battery pack before
recharging.
To discharge the battery . . .
..... attach the battery pack to the adapter as shown in the
illustration to the left. Then push REFRESH. The
REFRESH indicator lights when discharging starts,
and goes out when discharging is complete.
Downloaded From CamcorderManual.com JVC Manuals
6
EN
GETTING STARTED
(cont.)
Clock (Lithium) Battery Insertion/Removal
This battery is necessary for clock operation and to
perform date/time settings.
SWITCH OFF POWER
1
Switch off the unit’s power and remove the power
supply unit.
OPEN COVER
2
Open the clock battery compartment cover while
pressing the release tab.
REMOVE BATTERY (when replacing)
3
Insert a pointed, non-metallic object between the
battery and the compartment (
A
) and pull the
battery out.
INSERT BATTERY
4
Ensuring the plus (+) side is up, insert a CR2025
lithium battery and push it in.
CLOSE COVER
5
Close the compartment cover until it clicks in place.
NOTE:
See “SAFETY PRECAUTIONS” (
Z
pg. 2) for information
on safe handling of lithium batteries.
Viewfinder Adjustment
POSITION VIEWFINDER
1
Adjust the viewfinder manually for best viewability
(see illustration at left).
SELECT MODE
2
Set the power switch to CAMERA.
ADJUST DIOPTER
3
Turn the diopter adjustment control until the
indications in the viewfinder are clearly focused.
Set POWER to “CAMERA”.
A
Downloaded From CamcorderManual.com JVC Manuals
8
EN
30
T
GETTING STARTED
(cont.)
Tape Length Setting
Set the tape length according to the length of the tape
used.
SET TAPE LENGTH
1
Press 30•45•60 until the required indication
appears in the veiwfinder. 30 = 30 minutes of
recording time, 45 = 45 minutes, and 60 = 60
minutes.
NOTE:
The tape remaining time (
Z
pg. 11) displayed in the
viewfinder is correct only if the correct tape length has
been selected.
Recording Format Setting
When using an S-VHS-C cassette, set to either of the
recording formats.
SET RECORDING FORMAT
1
Press S-VHS/VHS button until the required
indication appears in the viewfinder.
: Super VHS
T : Regular VHS
NOTE:
Super VHS recordings cannot be made on VHS-C tapes.
S-VHS VCR
Regular VHS VCR
COMPATIBILITY BETWEEN S-VHS AND VHS
Recording
Playback
Recorded tape
Camcorder
Blank tape
Cassette adapter
S-VHS-C cassette
VHS recordings
VHS-C cassette
• The recorded format (S-VHS or
VHS) is automatically detected
when playlback begins.
• S-VHS recorded tapes cannot
be viewed on regular VHS VCRs.
Set POWER to “CAMERA”.
Tape length indicator
30•45•60
tape length
select button
S-VHS/VHS recording
format select button
Recording format
indicator
Playback
The pictures recorded with the camcorder can be viewed in playback by directly connecting it to a TV; and
can also be played back using a VCR.
S-VHS
recordings
Downloaded From CamcorderManual.com JVC Manuals
10
EN
Grip Adjustment
EXPAND LOOP
1
Separate the Velcro strip.
INSERT HAND
2
Pass your right hand through the loop and grasp the
grip.
ADJUST STRAP LENGTH
3
Adjust so your thumb and fingers can easily operate
the Recording Start/Stop button and Power Zoom
lever. Refasten the Velcro strip.
Shoulder Strap Attachment
ATTACH STRAP
1
Following the illustration at left, thread the strap
through the top of the eyelet , then fold it back
and thread it through the keeper , and then
through the buckle . Repeat the procedure to
attach the other end of the strap to the other eyelet,
making sure the strap isn’t twisted.
ADJUST LENGTH
2
Adjust as shown in the illustration at left , then
slide both keepers snug against the eyelets to
prevent slipping .
Tripod Mounting
ALIGN AND TIGHTEN
1
Align the screw and camera direction stud on the
tripod with the camera’s mounting socket and stud
hole. Then tighten the screw.
Recording Start/Stop button
GETTING STARTED
(cont.)
Downloaded From CamcorderManual.com JVC Manuals
12
EN
FEATURE:
Zooming
PURPOSE:
To produce the zoom in/out effect, or
an instantaneous change in image
magnification.
OPERATION:
36X Hyper zoom
Digital circuitry doubles the
maximum 18x magnification offered
by optical zoom.
1) To zoom in, slide the Zoom Lever
toward “T”.
2) To zoom out, slide toward “W”.
NOTES:
●
During Hyper Zoom, the speed
increases the further you slide the
Zoom Lever.
●
Focusing may become unstable
during Hyper Zoom. In this case,
set the zoom while in Record–
Standby, set manual focus or Focus
Lock (
Z
pg. 16, 17), then zoom in
or out in Record mode.
●
The Zoom Level Indicator ( ) only
moves during optical zoom. Once
the Zoom Level indicator reaches
the top of the zoom indicator bar,
all magnification from that point is
through digital processing.
●
During digital image processing,
the quality of the image may suffer.
FEATURE:
Quick Review
PURPOSE:
To check the end of the last
recording.
OPERATION:
1) Press “
” and release quickly
during the Record–Standby mode.
•Tape is rewound for about 2
seconds and played back
automatically, then pauses in
Record–Standby mode for the
next shot.
NOTE:
Distortion may occur at start of
playback. This is normal.
FEATURE:
Retake
PURPOSE:
To re-record certain segments.
OPERATION:
1) Make sure the camcorder is in the
Record–Standby mode.
2) Press either RETAKE button to
reach the start point for new
recording.
Pressing “F” forwards the tape and
pressing “R” reverses it.
3) Press Recording Start/Stop to start
recording.
NOTE:
Noise may appear during Retake.
This is normal.
RECORDING
Basic Features
Zoom-out
Zoom-in
Zoom indicator bar
Zoom level
indicator
RETAKE (R/F)
Power zoom lever
Downloaded From CamcorderManual.com JVC Manuals
14
EN
RECORDING
Advanced Features
Programme AE With Special Effects
All you have to do to access any of the variety of
shooting effects is to turn the PROGRAM AE select dial.
SELECT MODE
1
Turn the PROGRAM AE select dial until the symbol
of the function you want is aligned with the mark.
•The selected mode’s name and its indication are
displayed in the viewfinder for approx.
1 second. Then the name disappears, and only the
indication remains. The mode is activated.
•When Auto Mode Lock or Auto Mode Release
mode is selected, only the mode’s name is
displayed. Then the name disappears and the
mode is activated.
NOTES:
●
Only one effect can be engaged at a time.
●
The screen becomes slightly reddish when the Fade/
Wipe (
Z
pg. 19) is used in the Sepia mode.
●
The screen becomes slightly dark in the High Speed
Shutter mode. Use in well-lighted situations.
●
In the High Speed Shutter or Sports modes, picture
colour may be adversely affected if subject is lit by
alternating discharge-type light sources such as
flourescent or mercury-vapour lights.
Sepia
1
/1
0
0
0
1/
20
00
F
G
N
D
AUTO M
OD
E
LOCK
REL
EA
SE
FAR NEAR
+
–
1 second later, the mode is activated.
Mark
PROGRAM AE
select dial
Viewfinder
After 1 sec.
Downloaded From CamcorderManual.com JVC Manuals
16
EN
RECORDING
Advanced Features (cont.)
Focusing
Auto Focus
The camcorder’s Full Range AF system offers continuous
shooting ability from close-up to infinity. However,
correct focus may not be obtainable in the situations
listed below (in these cases use manual focusing):
•When two subjects overlap in the same scene.
•When illumination is low.*
•When the subject has no contrast (difference in
brightness and darkness), such as a flat, one-colour
wall, or a clear, blue sky.*
•When a dark object is barely visible in the viewfinder.*
•When the scene contains minute patterns or identical
patterns that are regularly repeated.
•When the scene is affected by sunbeams or light
reflecting off the surface of a body of water.
•When shooting a scene with a high-contrast
background.
* The low-contrast warning “
” appears in the
viewfinder.
Focus Lock
This feature locks the focus in place, which is especially
helpful in the following situations:
•When things pass between your subject and the
camcorder. Engage the focus lock function to lock your
subject in before recording.
•When you want your subject to be focused, and to
appear in a corner of the screen. First, center on the
subject and focus using auto focus mode. Then engage
the focus lock function and move the camcorder until
the subject is where you want it.
SELECT MODE
1
Turn the PROGRAM AE select dial to any position
except AUTO LOCK.
LOCK FOCUS
2
Press FAR or NEAR. The focus lock indication “
”
appears in the viewfinder.
RELEASE FOCUS LOCK
3
Press FAR and NEAR simultaneously. The focus lock
indication disappears.
NOTES:
●
If the lens is smeared or blurred, accurate focusing is
not possible. Keep the lens clean, wiping with a piece
of soft cloth if it gets dirty. When condensation occurs,
wipe with a soft cloth or wait for it to dry naturally.
●
When shooting a subject close to the lens, zoom-out
first (
Z
pg. 12). If zoomed-in in the auto focus mode,
the camcorder could automatically zoom out
depending on the distance between the camcorder and
the subject. *When Tele Macro (
Z
pg. 25) is activated,
the camcorder will not zoom out automatically.
NEAR
FAR
PROGRAM AE select dial
Focus detection zone
Downloaded From CamcorderManual.com JVC Manuals
18
EN
RECORDING
Advanced Features (cont.)
+
02
+
06
–
06
+
–
To brighten the image
To darken the image
Picture Stabilizer
This feature compensates for unstable images caused by
camera-shake, particularly noticeable at high
magnification.
ACTIVATE PICTURE STABILIZER
1
Press P.STABILIZER. “
” appears in the viewfinder.
•To switch off the Picture Stabilizer, press
P.STABILIZER. The indicator disappears.
NOTES:
●
Accurate stabilization may not be possible if hand
shake is excessive, or under the following conditions:
•
When shooting subjects with vertical or horizontal
stripes
•
When shooting dark or dim subjects
•
When shooting subjects with excessive backlighting
•
When shooting scenes with movement in various
directions
•
When shooting scenes with low-contrast
backgrounds
●
Switch off Picture Stabilizer when recording with the
camcorder on a tripod.
Exposure Control
This feature automatically adjusts the iris for the best
available picture quality, but you can override and make
the adjustment manually.
SELECT MODE
1
Turn the PROGRAM AE select dial to any position
except AUTO LOCK.
BRIGHTEN IMAGE
2
Press + (m06). The Exposure level
indicator appears in the viewfinder.
OR . . .
DARKEN IMAGE
Press – (maximum –06). The Exposure level
indicator appears in the viewfinder.
When you want to return to the factory setting . . .
RESTORE INITIAL SETTING
3
Press + and – simultaneously. The standard setting is
immediately restored and the Exposure level
indicator disappears.
Exposure level indicator
P. STABILIZER
Downloaded From CamcorderManual.com JVC Manuals
20
EN
Title
RECORDING
Advanced Features (cont.)
Wide
This feature allows you to record black bars at the top
and bottom of the screen to produce a cinema-like
“wide-screen” effect.
SELECT MODE
1
Turn the PROGRAM AE select dial to any position
except AUTO LOCK.
SELECT FUNCTION
2
Press SELECT repeatedly until “
Wide
” appears.
ENGAGE WIDE MODE
3
Press SET.
RESTORE NORMAL SCREEN
4
Press SET again while “
Wide
” appears.
Instant Titles
The camcorder has eight preset titles in memory. You can
superimpose one of them above a previously stored title
as shown in the illustration to the left.
DISPLAY
SELECT MODE
1
Turn the PROGRAM AE select dial to any position
except AUTO LOCK.
SELECT FUNCTION
2
Press SELECT repeatedly until “
Title
” appears.
SELECT PRESET TITLE
3
Engage the Record–Standby mode, then press SET to
cycle through the preset titles until the desired title is
displayed.
NOTES:
●
To delete the Instant Titles during recording, press
SELECT repeatedly until “
Title
” appears then press
SET.
●
To recall a title, press SET again.
Title indication
SELECT
SET
PROGRAM AE select dial
Wide mode
Downloaded From CamcorderManual.com JVC Manuals
22
EN
RECORDING
Advanced Features (cont.)
Date/Time Character Insert
This feature allows you to display date, time and characters
in your viewfinder and on a connected color monitor,
record them manually or automatically, and even make
your own titles.
NOTE:
You should already have performed the Date/Time
Setting procedure (
Z
pg. 7). If you haven’t, do so before
continuing.
DISPLAY
SELECT MODE
1
Turn the PROGRAM AE select dial to any position
except AUTO LOCK.
SELECT DISPLAY
2
Press SELECT repeatedly until “
Disp.
” appears.
CHOOSE DISPLAY MODE
3
Press SET while in Record–Standby to cycle through
the modes as shown in the illustration at left.
NOTES:
●
The selected display can be recorded.
●
If you don’t want to record the display, select Date-off
mode before shooting.
●
If you want to delete the display during shooting, press
SELECT repeatedly until “
Disp.
” appears then press
SET.
●
To recall the display, press SET again.
AUTO DATE RECORD
Your camcorder automatically records the date for about
5 seconds after recording is initiated in the following
situations:
•After changing the date.
•After loading a cassette.
•After Auto Date Record mode is selected by pressing
SET.
In this mode, the date is replaced after 5 seconds with
“Auto Date”.
NOTES:
●
Setting PROGRAM AE to LOCK always engages the
Auto Date Record mode, and disables all other modes.
●
In the Auto Date Record mode, if the date changes
while you’re shooting, the date indication is recorded
for about 5 seconds from that point. It is not recorded
during any other recordings made on that day.
Disp.
10:45:56
Date display
Time display
Date/Time display
25.12.97
25.12.97
25.12.97
Auto Date
Auto Date Record mode
Characters
I LIKE YOU
k
10:45:56
SELECT
SET
PROGRAM AE
select dial
Downloaded From CamcorderManual.com JVC Manuals
24
EN
PAUSE
G a i n U p
N O R M
T e l e M a c r o
O F F
I n t e r v a l T i m e r
O F F
R e c T i m e
O F F
J L I P I D N O .
0 7
T a l l y
O N
S e t C h a r a c t e r
D a t e / T i m e
E N D : M E N U K E Y
G a i n U p
O F F
T e l e M a c r o
O N
I n t e r v a l T i m e r
1 m i n
R e c T i m e
1 / 2 s
J L I P I D N O .
0 7
T a l l y
O N
S e t C h a r a c t e r
D a t e / T i m e
E N D : M E N U K E Y
+
–
Using Menu For Detailed Adjustment
This camcorder is equipped with Program Manager, an
easy-to-use, on-screen menu system that simplifies many
of the more detailed camcorder settings.
SELECT MODE
1
Turn the PROGRAM AE select dial to any position
except AUTO LOCK.
ACCESS MENU SCREEN
2
Press MENU.
SELECT FUNCTION
3
Press + or – to place the highlight bar on the desired
function.
MAKE SETTING
4
The setting procedure depends on the function you
select.
If you select Gain Up, Tele Macro, Interval Timer,
Rec Time, JLIP ID NO. or Tally. . . .
.... press FAR or NEAR to cycle through the choices
until the desired setting appears.
If you select Set Character or Date/Time, . . .
.... press NEAR to access the selection menu for
each function (Set Character –
Z
pg. 21; Date/
Time –
Z
pg. 7).
CLOSE MENU
5
Press MENU. The normal screen reappears.
NOTE:
The menu is available only in the Record-Standby mode.
RECORDING
Advanced Features (cont.)
NEAR
FAR
If “Gain Up” or “Tele Macro” in the Menu
has been changed from the factory settings,
this mark appears in the viewfinder.
MENU
Downloaded From CamcorderManual.com JVC Manuals
EN
You can set the delay between pressing
and the actual start of recording. If you secure the
camcorder, you (or whomever is operating the
camcorder) can enter the scene before recording starts.
Make sure the camcorder is in the Record-Standby mode
before performing the following steps.
Turn the PROGRAM AE select dial to any position
except AUTO LOCK, then press
.
Press or + to move the highlight bar down to
“
”, then press
or
to cycle
through the choices. Stop when the desired time
appears. Choose from “15s”, “30s”, “1min”, “5min”,
or select to turn the function “OFF”.
Press
.
Press
. The tally lamp begins
blinking, and the blinking frequency increases about
5 seconds before recording is to start. Once
recording begins, the lamp stops blinking but stays
lit.
..... while the tally lamp is blinking, press
to stop the blinking, then set “
” to “OFF”.
+
–
Downloaded From CamcorderManual.com JVC Manuals
EN
These are some basic types of connections. When making the connections, refer also to your VCR and TV
instruction manuals.
White to AUDIO
Yellow to VIDEO
Yellow to VIDEO
White to AUDIO
(L/MONO)
A/V cable
(provided)
jack cover*
To -IN
jack cover*
White to AUDIO
Yellow: not connect
White to AUDIO (L/MONO)
Yellow: not connect
To VIDEO OUT
S-VIDEO cable
(provided)
A/V cable
(provided)
White to AUDIO
jack cover*
Yellow to VIDEO in
White to AUDIO in
To S-VIDEO IN
A/V cable
(provided)
S-VIDEO cable
(provided)
To VIDEO OUT
To TV or VCR
*jack cover: When connecting the cables, open the jack cover.
Yellow to VIDEO (
When the S-VIDEO cable is not used.
)
Set to CVBS
Cable Adapter
(provided)
To
TV or VCR
Cable Adapter
(provided)
To
TV or VCR
Set to Y/C
Downloaded From CamcorderManual.com JVC Manuals
EN
Make sure you connect your camcorder as directed in
“Basic Connections” (
Z
pg. 28).
Slide
to open the cassette holder, then insert
the cassette with the label facing out. Press to
ensure the holder is closed and locked.
Set the Power switch to “PLAY”. The Power On
indicator lights.
Press
. The playback picture appears in
the viewfinder and the connected TV.
Press
.
Press
to rewind, or to fast-forward the tape
during Stop mode.
The camcorder shuts off automatically after about 5
minutes in Stop mode or Still Playback mode. To turn on
again, set the Power switch to “POWER OFF”, then to
“PLAY”.
: S-VHS
No indication: regular VHS
4
: Playback
3
: Fast-Forward/
Forward Search
2
: Rewind/Reverse
Search
6
: Still Playback
Downloaded From CamcorderManual.com JVC Manuals
EN
Use this to play back a S-VHS-C/VHS-C video cassette
recorded with this camcorder. It is fully compatible with
any S-VHS/VHS video cassette recorder. The C-P7U
adapter is battery powered and automatically performs
tape loading and unloading.
Slide the battery cover up to remove it, and install
one “R6(AA)” size battery as shown in the
illustration at left. Then reattach the cover.
Slide the latch to open the adapter compartment
door, then insert the cassette and close the
compartment door.
Load the cassette adapter into the VCR and play the
tape back as you would any other.
Slide the latch and the compartment door opens
automatically. Then insert your finger in the hole on
the underside of the adapter as shown in the
illustration at left, push up and remove the cassette.
●
During tape loading and unloading, do not touch the
reels for safety and tape protection.
●
Tapes recorded in S-VHS cannot be played back on
regular VHS VCRs.
●
During special-effect playback (slow motion, still
frame, etc.), the picture may vibrate or noise bars may
appear on the screen.
●
To record on a VCR using a compact cassette and the
adapter, cover the adapter’s recording safety hole with
adhesive tape.
Downloaded From CamcorderManual.com JVC Manuals
EN
VCR BRAND
NAME
BUTTONS
(A) (B)
6 2
6 4
7 7
1 4
3 4
6 6
6 3
6 7
6 8
3 7
3 8
9 1
9 6
9 3
1 3
1 7
1 1
9 4
1 8
9 7
9 8
3 2
1 3
VCR BRAND
NAME
BUTTONS
(A) (B)
1 9
9 5
1 1
9 4
9 1
9 6
1 2
3 3
3 6
3 5
9 1
9 6
6 9
6 1
6 5
6 `
3 9
3 1
1 5
1 `
9 1
9 6
9 7
3 2
Create edited videos easily using your camcorder as the
source player. You can select up to 8 “cuts” for automatic
editing, in any order you like. R.A. Edit is more easily
performed when the MBR (Multi-Brand Remote RM-
V704U or RM-V700U) is set to operate with your brand
of VCR (see VCR CODE LIST), but can also be performed
by operating the VCR manually.
Turn off the power to the VCR and point the remote
toward the VCR’s infrared sensor. Then, referring to
the VCR CODE LIST on the left, press and hold
, and press button (A) and then (B).
•The code is automatically set once you release the
button, and the VCR’s power comes on.
Make sure the VCR’s power is on. Then, while
holding
, press the button on the remote for
the desired function. The functions the remote can
control are PLAY, STOP, PAUSE, FF, REW and VCR
REC STBY (you don't need to press
for this
one).
●
If the VCR’s power doesn’t come on in step
, try
another code from the VCR CODE LIST.
●
Some brands of VCR don’t come on automatically. In
this case, turn the power on manually and try step
.
●
If the RM-V704U/V700U is not able to control the
VCR, use the controls on the VCR.
1
2
3
4
5
6
7
8
9
0
Downloaded From CamcorderManual.com JVC Manuals
EN
Press
, then press
and the
counter display appears in the viewfinder and the
screen of the connected TV.
Press
or to locate the beginning of the scene
you want, then press
to register that point.
The data appears under IN on the display.
Press
or to locate the end of the scene and
press
to register it. The data appears under
OUT on the display. The total time of the registered
scene(s) is displayed at the bottom of the screen.
Repeat steps and for each additional scene (as
many as 8).
Press
during steps and to erase the
most recently registered point.
●
The RM-V704U/V700U can be used to operate other
camcorder functions as well. Point the RM-V704U/
V700U at the camcorder's remote sensor and press any
of the following buttons (function appears in
parentheses):
— ON/OFF (camcorder R.A. EDIT)
— IN/OUT (camcorder IN/OUT)
— CANCEL (camcorder CANCEL)
●
There must be at least one second between an in-point
and its corresponding out-point.
●
To ensure correct operation, leave at least 15 seconds
open between scenes.
●
Blank portions of tape cannot be registered as in-points
or out-points.
●
If it takes more than 5 minutes to search for an in-point,
the VCR's Record-Pause mode is cancelled and editing
doesn't take place.
●
Pressing
clears all in- and out-points from
memory.
●
Leave a small margin for error around each in-point to
ensure the scene is recorded in its entirety.
IN OUT
ç
1 0:00:25 --:-- : --
2
3
4
5
6
7
8
COUNTER 0:00:25
TOTAL 0:00:00
IN OUT
ç
1 0:00:25 0:01:05
2 0:03:18 0:03:31
3 0:02:33 0:02:53
4 0:04:11 --:-- : --
5
6
7
8
COUNTER 0:04:11
TOTAL 0:01:13
Downloaded From CamcorderManual.com JVC Manuals
EN
The Full-Function Remote Control Unit can operate this
camcorder from a distance as well as the basic
operations (PLAY, STOP, PAUSE, FF, and REW) of your
VCR. This remote control unit makes additional
recording functions possible.
Pull out the battery holder according to the type of
remote control unit you have.
Type
: Pull out the battrery holder while sliding
the lock hole.
Type
: Pinch the release tab and pull out the
battery holder.
Making sure the plus (+) side is up, insert the lithium
battery (CR2025)* into the battery holder.
Insert the battery holder into the remote control unit,
and push the holder until it clicks into place.
* Read the caution concerning lithium batteries
(
Z
pg. 2).
1
2
3
4
5
6
7
8
9
0
!
#
@
$
%
^
&
1
—
Z
pg. 35
2
Transmits the beam signal.
3
—
Z
pg. 34
4
Self-Timer/Time-Lapse (
Z
pg. 39)
—
5
Animation/Time-Lapse (
Z
pg. 39)
—
6
Retake (forward) (
Z
pg. 12)
FF/FF Shuttle Search (
Z
pg. 30)
7
Retake (rewind)/Quick Review (
Z
pg. 12)
Rew/Rew Shuttle Search (
Z
pg. 30)
8
—
Pause (
Z
pg. 31)
9
—
Playback start (
Z
pg. 30)
0
Functions same as the Recording Start/Stop button on the camcorder.
!
Index Code marking (
Z
pg. 39)
—
@
Zoom in and out (
Z
pg. 12)
—
#
—
Z
pg. 34
$
—
Audio dubbing (
Z
pg. 41)
%
—
Stop (
Z
pg. 30)
^
—
Insert Editing (
Z
pg. 40)
&
—
Z
pg. 36
Downloaded From CamcorderManual.com JVC Manuals
EN
You can record a new scene into a previously recorded
tape, replacing a section of the original recording with
minimal picture distortion at the in- and out-points. The
original audio remains unchanged.
Use the RM-V704U or RM-V700U remote control unit to
perform this procedure.
Set the Power switch to “PLAY”.
Play back the tape, locate the point and press
on the camcorder or the remote control.
Press and hold
for more than
2 seconds to reset the tape counter, then press for
less than 1 second and make sure “M” appears in
the viewfinder.
Press
to go a little beyond the beginning of the
scene you want to replace, press to view the
recorded tape, and press
at exactly at the
point where the new scene should start.
Press and hold
, and without releasing
, press and release
. The Insert mode
is engaged. When the scene the camcorder is aimed
at appears on the screen, go to the next step.
Press
. When the counter
reaches “0:00:00”, editing stops automatically and
the camcorder enters the Insert-Pause mode.
Press
.
●
After step , Retake (
Z
pg. 12) can be performed.
●
The tape may stop slightly before or after the
designated end point, and noise bars may appear.
Neither indicates a defect in the unit.
●
Only video signals are recorded in the Insert Editing
mode.
Downloaded From CamcorderManual.com JVC Manuals
EN
●
The battery pack has not been attached correctly
(
Z
pg. 4).
●
The battery pack is not charged (
Z
pg. 4).
●
The power supply has not been correctly connected
(
Z
pg. 5).
●
The battery pack has completely discharged.
●
Remove the cassette and disconnect the power source,
then after a few minutes, try turning the power back on. If
it still doesn’t come on, consult your nearest JVC dealer.
●
The recording tape’s Erase Protection tab is missing.
Cover the hole with adhesive tape. (Some tapes have
sliding tabs. In this case, check the position of the tab.)
●
The camcorder Power switch has not been set to
“CAMERA” (
Z
pg. 11).
●
The TV has not been set to its VIDEO mode.
●
If A/V connection is used, the TV’s VIDEO/TV switch has
not been set to VIDEO.
●
The RF unit has not been set to the correct channel.
●
Manual Tracking has not been performed (
Z
pg. 31).
●
This occurs when playing back a blank portion of tape.
●
If this occurs when playing a recorded portion, there is a
possibility that the video heads are dirty or the camcorder
is broken. Consult your nearest JVC dealer.
●
The video heads are dirty or worn out. Consult your
nearest JVC dealer for head cleaning or replacement.
●
This is normal.
●
Tapes recorded in S-VHS cannot be played back on
regular VHS VCRs (
Z
pg. 8).
Connect camcorder directly either to VCR or to TV, then
playback can be performed on camcorder (
Z
pg. 28).
●
The Counter Memory Function has been activated
(
Z
pg. 31).
●
The tape is already fully wound on one reel or the other.
Downloaded From CamcorderManual.com JVC Manuals
EN
#
REW Button .......................................
Z
pg. 30
RETAKE R [Quick Review] Button .......
Z
pg. 12
$
FF Button ...........................................
Z
pg. 30
RETAKE F Button ................................
Z
pg. 12
%
PLAY/PAUSE Button ...........................
Z
pg. 30
^
SELECT Button ...................................
Z
pg. 19
&
SET Button .........................................
Z
pg. 19
*
PROGRAM AE Select Dial ..................
Z
pg. 14
(
Multi-Function Control
• Ex/– ...................................
Z
pg. 18
• Focus FAR/NEAR .............................
Z
pg. 16
• Menu Setting Change .......................
Z
pg. 24
• Tr/– ....................................
Z
pg. 31
)
MENU Button ....................................
Z
pg. 24
q
P. [Picture] STABILIZER Button ............
Z
pg. 18
w
PUSH Button .....................................
Z
pg. 9
e
EJECT Switch ......................................
Z
pg. 9
1
Diopter Adjustment ............................
Z
pg. 6
2
QUICK REC Button ............................
Z
pg. 13
3
Power Zoom Lever ............................
Z
pg. 12
4
BATT. [Battery] RELEASE Switch .........
Z
pg. 4
5
Recording Start/Stop Button ................
Z
pg. 11
6
POWER Switch .............................
Z
pg. 11, 30
7
STOP Button ......................................
Z
pg. 30
8
Tape Length [30•45•60]
Select Button ......................................
Z
pg. 8
COUNTER R [Reset]/M [Memory]
Button ................................................
Z
pg. 31
9
EDIT Button .......................................
Z
pg. 37
0
R.A.EDIT CANCEL Button ...................
Z
pg. 36
!
•S-VHS/VHS Recording Format
Select Button ...................................
Z
pg. 8
•R.A.EDIT Button ..............................
Z
pg. 36
@
•R.A.EDIT IN/OUT Button .................
Z
pg. 36
•AUTO PAUSE Button .......................
Z
pg. 13
9
7
!
@
8
0
#
$
%
5 6
4
1
3
2
(
*
^
) q w
&
e
Downloaded From CamcorderManual.com JVC Manuals
EN
7
8
9
0
1
5
4
6
%
&
^
*
(
)
q
!
#
$
@
w
3
2
1
Cassette Warning/Remaining
Tape Time ..........................................
Z
pg. 11
When no cassette is inserted: the Cassette (
)
Warning blinks.
When Erase Protection tab is not in the position
that allows recording: the Cassette (
) Warning
lights. Otherwise, the Remaining Tape Time is
displayed.
2
,
8
PROGRAM AE Indicator ................
Z
pg. 14
Displayed at
2
for approx. 1 second when the
PROGRAM AE select dial is switched from one
position to another. Then only the indicator
remains at
8
.
2
,
9
Fade/Wipe Standby Indicator ........
Z
pg. 19
Displayed at
2
for approx. 2 seconds when the
Fade/Wipe is switched from one function to
another by pressing the SET button. Then only
the indicator remains at
9
.
3
Program Manager Function
Indication ..........................................
Z
pg. 19
Appears when the PROGRAM AE select dial is
set to any position other than AUTO LOCK.
4
Recording Format Indicator ................
Z
pg. 8
5
Tape Length Display ..........................
Z
pg. 8
6
Zoom Indicator Bar ............................
Z
pg. 12
7
Recording Indicator ...........................
Z
pg. 11
0
Picture Stabilizer Indicator ..................
Z
pg. 18
!
Interval Time/Recording Time
Indicator ............................................
Z
pg. 26
@
•Record–Standby Mode Indicator ......
Z
pg. 11
•Lens Cover Warning:
LENS COVER ..................................
Z
pg. 11
•Auto Pause System Indicator ............
Z
pg. 13
#
Instant Titles Display ..........................
Z
pg. 20
$
Date/Time Character Display ..............
Z
pg. 22
%
Battery Pack Remaining Power Indicator
Changes as follows according to the battery pack’s
remaining power level: “
”.
When the power is almost gone, the indicator
blinks, then the unit shuts off. Replace the
battery pack with a fully charged one.
(
The symbol containing 3 darkened
squares —
— does not necessarily mean
that the battery pack is fully charged.)
^
Focus Indicator ..................................
Z
pg. 16
&
Exposure Level Indicator .....................
Z
pg. 18
*
White Balance Mode Indicator ...........
Z
pg. 23
(
Menu Setting Change Indicator ...........
Z
pg. 24
)
Index Code Marking ..........................
Z
pg. 39
q
Clock Warning
Once the power is turned on and the indicator
blinks for about 10 seconds, perform the date
and time settings (
Z
pg. 7). After setting is
complete, turn the power off and disconnect the
power source. If you re-connect it and turn the
power on and the indicator is blinking, that
means that the clock (lithium) battery is either
not installed or has discharged. Install, or replace
the old battery with, a new one (
Z
pg. 6).
w
• Tape End Display: TAPE END ...........
Z
pg. 11
Appears when the end of the tape is reached
during playback, recording or fast-forward.
• Condensation Warning:
When this indication appears, all functions are
disabled. Turn the unit off (without removing
the power source) for a few hours, and when
you turn it on again the indicator should
disappear.
Downloaded From CamcorderManual.com JVC Manuals
EN
.... open the camcorder’s chassis.
.... disassemble or modify the unit.
.... short-circuit the terminals of the battery pack.
Keep it away from metallic objects when not
in use.
.... allow inflammables, water or metallic objects
to enter the unit.
.... remove the battery pack or disconnect the
power supply while the power is on.
.... leave the battery pack attached when the
camcorder is not in use.
.... in places subject to excessive humidity or
dust.
.... in places subject to soot or steam such as
near a cooking stove.
.... in places subject to excessive shock or
vibration.
.... near a television set.
.... near appliances generating strong magnetic
or electric fields (speakers, broadcasting
antennas, etc.).
.... in places subject to extremely high (over
40°C) or extremely low (under 0°C)
temperatures.
.... in places of over 50°C.
.... in places where humidity is extremely low
(below 35%) or extremely high (above 80%).
.... in direct sunlight.
.... in a closed car in summer.
.... near a heater.
.... allow it to become wet.
.... drop the unit or strike it against hard objects.
.... subject it to shock or excessive vibration
during transportation.
.... keep the lens directed at extremely bright
objects for long periods.
.... direct the eyepiece of the viewfinder at the
sun.
.... carry it by holding the viewfinder.
.... swing it excessively when using the shoulder
strap.
•You have observed that pouring a cold liquid into
a glass will cause drops of water to form on the
glass‘ outer surface. This same phenomenon
occurs on the head drum of a camcorder when it
is moved from a cool place to a warm place, after
heating a cold room, under extremely humid
conditions or in a place directly subjected to the
cool air from an air conditioner.
•Moisture on the head drum can cause severe
damage to the video tape, and can lead to internal
damage to the camcorder itself.
If malfunctioning occurs, stop using the unit
immediately and consult your local JVC dealer.
1
Set the power switch to POWER OFF to turn
off the camcorder.
2
Slide EJECT to open the cassette holder, then
remove the cassette.
3
Close and lock the cassette holder by pressing
PUSH.
4
Press BATT. RELEASE to remove the battery
pack.
5
Slide the LENS COVER open/close switch to
close the lens cover.
1
Wipe gently with a soft cloth.
2
Blow it with a blower brush, then wipe gently
with lens cleaning paper.
3
Turn the eyepiece counterclockwise and pull
it out.
4
Remove dust using a blower brush.
5
Align the marks, re-attach the eyepiece and
turn it clockwise.
●
Avoid using strong cleaning agents such as
benzine or alcohol.
●
Cleaning should be done only after the battery
pack has been removed or other power units have
been disconnected.
●
Mold may form if the lens is left dirty.
Downloaded From CamcorderManual.com JVC Manuals


