68
EN
Master Page: Left-Heading0
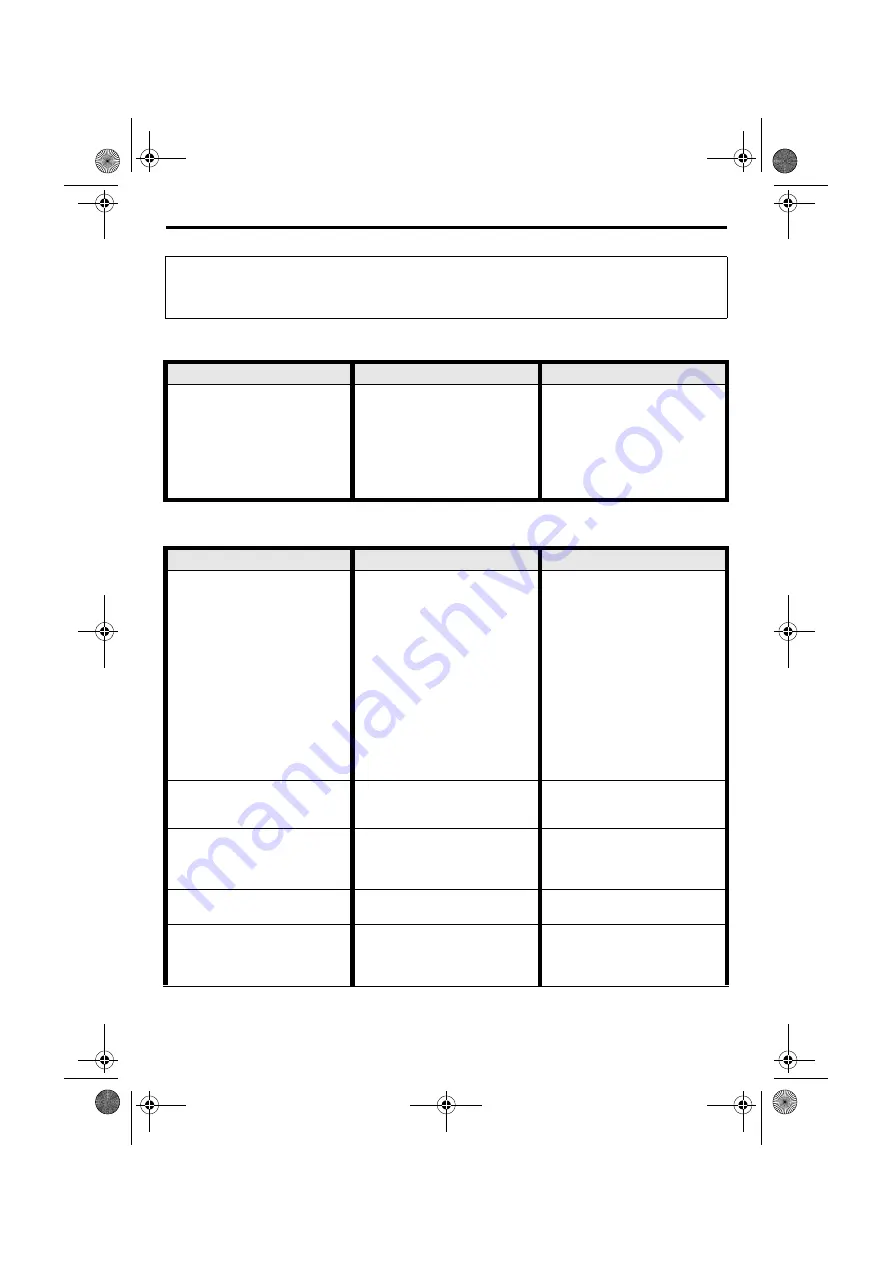
TROUBLESHOOTING
If, after following the steps in the chart below, the problem still exists, please consult your nearest JVC dealer.
Power
Video and D.S.C. Recording
The camcorder is a microcomputer-controlled device. External noise and interference (from a TV, a radio,
etc.) might prevent it from functioning properly. In such cases, first disconnect its power supply unit (battery
pack, AC Power Adapter/Charger, etc.) and wait a few minutes; and then re-connect it and proceed as usual
from the beginning.
SYMPTOM
POSSIBLE CAUSES
CORRECTIVE ACTION
1.
No power is supplied.
1.
• The power is not connected
properly.
• The battery is dead.
• The LCD monitor is not open
fully or the viewfinder is not
pulled out when recording.
1.
• Connect the AC Power
Adapter/Charger securely.
(
• Replace the dead battery
with a fully charged one.
(
• Open the LCD monitor fully
or pull out the viewfinder.
SYMPTOM
POSSIBLE CAUSES
CORRECTIVE ACTION
2.
Recording cannot be
performed.
2.
• The Power Switch is set to
“PLAY” or “OFF”.
— For Video Recording —
• The tape’s erase protection
tab is set to “SAVE”.
• The
VIDEO/MEMORY
Switch is set to “MEMORY”.
• “TAPE END” appears.
• The cassette holder cover is
open.
— For D.S.C. Recording —
• The
VIDEO/MEMORY
Switch is set to “VIDEO”.
2.
• Set the Power Switch to “
A
”
or “
M
— For Video Recording —
• Set the tape’s erase
protection tab to “REC”.
(
• Set the
VIDEO/MEMORY
Switch to “VIDEO”.
• Replace with new cassette.
• Close the cassette holder
cover.
— For D.S.C. Recording —
• Set the
VIDEO/MEMORY
Switch to “MEMORY”.
3.
When shooting a subject
illuminated by bright light,
vertical lines appear.
3.
• This is a result of exceedingly
high contrast, and is not a
malfunction.
3.
—
4.
When the screen is under
direct sunlight during shooting,
the screen becomes red or
black for an instant.
4.
• This is not a malfunction.
4.
—
5.
During recording, the date/
time does not appear.
5.
• “DATE/TIME” is set to “OFF”.
5.
• Set “DATE/TIME” to “ON”.
6.
During recording, sound
cannot be heard.
6.
• The optional headphones are
not connected to the
headphones connector.
6.
• Connect the optional
headphones to the
headphone connector.
(
GR-DV4000PAL.book Page 68 Friday, February 14, 2003 10:30 PM


