background image

CAUTIONS

38 

EN

MasterPage: Left

Serious malfunctioning 

About moisture condensation

You have observed that pouring a cold liquid 
into a glass will cause drops of water to form 
on the glass’ outer surface. This same 
phenomenon occurs on the head drum of a 
camcorder when it is moved from a cool place 
to a warm place, after heating a cold room, 
under extremely humid conditions or in a place 
directly subjected to the cool air from an air 
conditioner.

Moisture on the head drum can cause severe 
damage to the video tape, and can lead to 
internal damage to the camcorder itself.

If malfunctioning occurs, stop using the unit 
immediately and consult your local JVC 
dealer.

The camcorder is a microcomputer-controlled 
device. External noise and interference (from 
a TV, a radio, etc.) might prevent it from 
functioning properly. In such cases, first 
disconnect its power supply unit (battery 
pack, AC Adapter, etc.) and wait a few 
minutes and then re-connect it and proceed 
as usual from the beginning.

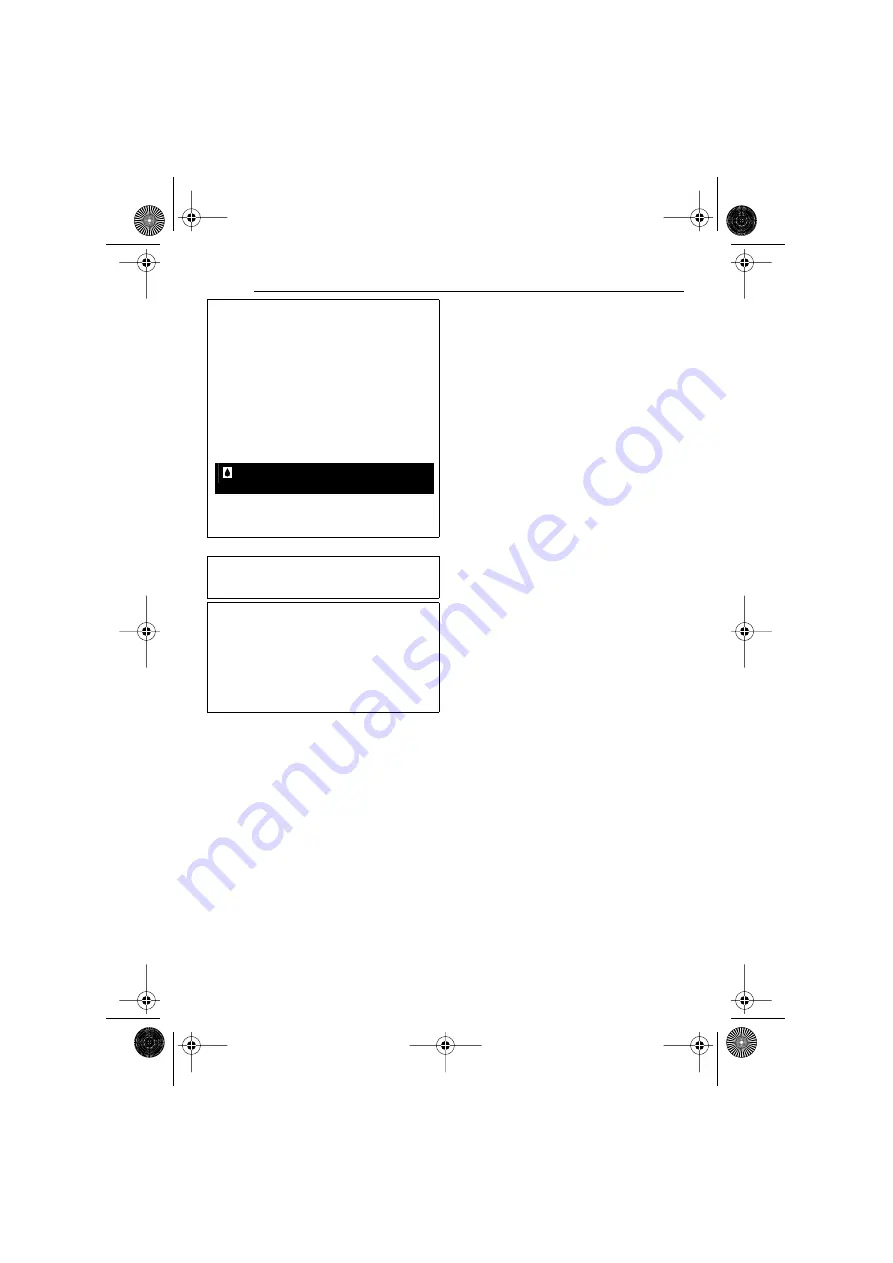
Appears if condensation occurs. When this 
indication is displayed, wait more than 1 
hour until condensation disappears. 

CONDENSATION, OPERATION 

PAUSED PLEASE WAIT

GR-D750AS_EN.book  Page 38  Tuesday, January 23, 2007  5:33 PM

Summary of Contents for GR-D750AS

Page 1: ...safety information and precautions contained in the pages 3 4 to ensure safe use of this product INSTRUCTIONS DIGITAL VIDEO CAMERA GETTING STARTED 7 RECORDING PLAYBACK 16 ADVANCED FEATURES 22 REFERENCES 34 TERMS 40 To deactivate the demonstration set DEMO MODE to OFF pg 22 24 GR D750AS_EN book Page 1 Tuesday January 23 2007 5 33 PM ...

Page 2: ...nsation Simply pressing the button brightens the image darkened by backlight pg 28 Data Battery You can check the battery status by simply pressing the DATA button pg 13 Auto Button You can change the recording mode between manual setting to the standard mode setting of the camcorder by pressing the AUTO button pg 18 Major Features of this Camcorder Fade in Fade out MAX TIME LEVEL LCD 110min 135mi...

Page 3: ...8U VF815U VF823U battery packs Using generic non JVC batteries can cause damage to the internal charging circuitry Remember that this camcorder is not compatible with other digital video formats It is recommended that you use JVC brand cassette tapes Your camcorder is compatible with all brands of commercially available cassette tapes complying with the MiniDV standard but JVC brand cassette tapes...

Page 4: ...equipment is installed in a cabinet or on a shelf make sure that it has sufficient space on all sides to allow for ventilation 10 cm or more on both sides on top and at the rear Do not block the ventilation holes If the ventilation holes are blocked by a newspaper or cloth etc the heat may not be able to get out No naked flame sources such as lighted candles should be placed on the apparatus When ...

Page 5: ...er To clean the viewfinder lens Remove dust from the viewfinder using a blower brush NOTES Avoid using strong cleaning agents such as benzine or alcohol Cleaning should be done only after the battery pack has been removed or other power units have been disconnected Mould may form if the lens is left dirty When using a cleaner or chemically treated cloth refer to the cautions of each product To cle...

Page 6: ... 19 Variable Shuttle Search 20 Blank Search 20 Playback Snapshot 20 Connections To A TV Or VCR 21 ADVANCED FEATURES 22 MENUS FOR DETAILED ADJUSTMENT 22 Changing The Menu Settings 22 Recording Menus 23 Playback Menus 25 FEATURES FOR RECORDING 26 Snapshot Record Still Image On Tape 26 Manual Focus 26 Exposure Control 27 Iris Lock 27 Backlight Compensation 28 Spot Exposure Control 28 White Balance Ad...

Page 7: ...ped with one or more core filter If a cable has only one core filter the end that is closest to the filter should be connected to the camcorder Make sure to use the provided cables for connections Do not use any other cables Regarding This Manual Operation To select 3 6 FOCUS Move the control lever up 4 7 Move the control lever down 2 Move the control lever right 1 1 QUICK REVIEW Move the control ...

Page 8: ...r on off by opening closing the LCD monitor or pulling out pushing in the viewfinder NOTES The image will not appear simultaneously on the LCD monitor and the viewfinder When the viewfinder is pulled out while the LCD monitor is opened you can select which one to use Set PRIORITY to the desired mode in SYSTEM Menu pg 24 Coloured bright spots may appear all over the LCD monitor or the viewfinder Ho...

Page 9: ...ors Digital Video Connector DV IN OUT i LINK pg 32 33 i LINK refers to the IEEE1394 1995 industry specification and extensions thereof The logo is used for products compliant with the i LINK standard S Video Output Connector S pg 21 The connectors are located beneath the covers Audio Video Output Connector AV pg 21 DC Input Connector DC pg 12 Indicators àPOWER CHARGE Lamp pg 12 Other Parts âLCD Mo...

Page 10: ...napshot pg 20 26 Spot Exposure Control Indicator pg 28 Backlight Compensation Indicator pg 28 Exposure Adjustment Indicator pg 27 Iris Lock Indicator pg 27 Selected Wipe Fader Effect Indicator pg 30 Wind Cut Indicator pg 23 Tape Running Indicator Rotates while tape is running Date Time pg 24 Manual Focus Adjustment Indicator pg 26 Time Code pg 24 During Video Playback 1Battery Remaining Power Indi...

Page 11: ...ulder Strap Open the pad and make grip adjustments Before making the adjustment remove any security tags that may be attached to the velcro 1 Peel off the pad and thread the end of the strap through the eyelet 2 Thread the strap through the buckle adjust its length and use the strap guide to fix it in place 3 Position the buckle near the eyelet and reattach the pad Place here during shooting Eyele...

Page 12: ...harged the battery is worn out and needs to be replaced Please purchase a new one Since the AC Adapter processes electricity internally it becomes warm during use Be sure to use it only in well ventilated areas After 5 minutes have elapsed in Record Standby mode with the cassette inserted and no operation is performed the camcorder will automatically turn off its power supplied from the AC adapter...

Page 13: ...cording is in progress If COMMUNICATION ERROR appears instead of the battery status even though you tried to press DATA several times there may be a problem with your battery In such a case consult your nearest JVC dealer Using AC Power Perform step 4 6 in Charging The Battery Pack pg 12 NOTE The provided AC Adapter features automatic voltage selection in the AC range from 110 V to 240 V INFORMATI...

Page 14: ...tions in the viewfinder are clearly focused CAUTION When retracting the viewfinder take care not to pinch your fingers Perform steps 1 3 in Language Settings pg 13 To adjust the brightness of the viewfinder pull out the viewfinder fully and set PRIORITY to FINDER pg 24 1 Select DISPLAY press SET or 2 2 Select BRIGHT press SET or 2 3 Select the appropriate brightness press SET or 2 4 Press MENU Pre...

Page 15: ...the cassette holder still does not open turn the camcorder off then on again If the tape does not load properly open the cassette holder cover fully and remove the cassette A few minutes later insert it again When the camcorder is suddenly moved from a cold place to a warm environment wait a short time before opening the cassette holder cover Appears if a tape is loaded while the Power Switch is s...

Page 16: ...he tape To avoid this refer to Recording From The Middle Of A Tape pg 18 To record in LP Long Play mode pg 24 Tape Remaining Time Approximate tape remaining time appears on the display min means the camcorder is calculating the remaining time When the remaining time reaches 2 minutes the indication starts blinking The time required to calculate and display the remaining tape length and the accurac...

Page 17: ... in the most convenient direction It can rotate 270 90 downward 180 upward Interface Shooting The person you shoot can view himself herself in the LCD monitor and you can even shoot yourself while viewing your own image in the LCD monitor 1 Open the LCD monitor and tilt it upward to 180 so that it faces forward Then pull out the viewfinder fully 2 Point the lens toward the subject yourself when se...

Page 18: ... and re inserted during shooting When shooting using a partially recorded tape When shooting on a blank portion located partway through the tape When shooting again after shooting a scene then opening closing the cassette holder cover NOTES The time code cannot be reset During fast forwarding and rewinding the time code indication does not move smoothly The time code is displayed only when TIME CO...

Page 19: ...utes when power is supplied from a battery the camcorder shuts off automatically To turn the camcorder on again push back and pull out the viewfinder again or close and re open the LCD monitor When a cable is connected to the AV connector the sound is not heard from the speaker Appears when pictures recorded in the HDV format are detected The pictures in the HDV format cannot be played back with t...

Page 20: ...e before the beginning of the detected blank portion To cancel Blank Search press 7 or BLANK NOTES Before starting Blank Search if the current position is at a blank portion the camcorder searches in the reverse direction If the current position is at a recorded portion the camcorder searches in the forward direction If the beginning or end of the tape is reached during Blank Search the camcorder ...

Page 21: ...struction manual 4 Turn on the camcorder the VCR and the TV 5 Set the VCR to its AUX input mode and set the TV to its VIDEO mode 6 Start playback on the camcorder pg 19 Please set 16 9 OUTPUT of Playback Menus so that the image may suit your TV 16 9 TV or 4 3 TV pg 24 25 To choose whether or not the following displays appear on the connected TV Date Time Set DATE TIME to ON or OFF pg 25 Time Code ...

Page 22: ...ed function menu appears Example FUNCTION menu 5 Select the desired selection press SET or 2 Example WIPE FADER menu 6 Select the desired setting press SET or 2 Selection is completed 7 Press MENU The Menu Screen closes Press 1 whenever you want to cancel or return to the previous menu screen Repeat the procedure if you wish to set other function menus Changing The Menu Settings Power Switch Lock ...

Page 23: ...t as large as possible at a distance of approx 40 cm 1 4 ft Depending on the zoom position the lens may go out of focus OFF Disables the function DIS disable icon appears ON To compensate for unstable images caused by camera shake particularly at high magnification NOTES Accurate stabilisation may not be possible if hand shake is excessive or depending on the shooting condition Switch off this mod...

Page 24: ...of 4 3 16 9 TV For TV with an aspect ratio of 16 9 pg 14 Brightness Adjustment Of The Display SYSTEM The SYSTEM functions which are set when the Power Switch is set to REC are also applied when the Power Switch is set to PLAY ENGLISH РУССКИЙ The language setting can be changed pg 13 OFF Even though not heard while shooting shutter sound is recorded on the tape ON A melody sounds when any operation...

Page 25: ...tion OFF Original sound is output on both L and R channels in stereo ON Dubbed sound is output on both L and R channels in stereo MIX Original and dubbed sounds are combined and output in stereo on both L and R channels STEREO Sound is output on both L and R channels in stereo SOUND L Sound from the L channel is output SOUND R Sound from the R channel is output DISPLAY Each setting except OFF in O...

Page 26: ...s case use the manual focus mode 1 Set the Power Switch to REC 2 Set the recording mode to M pg 18 3 Press FOCUS The manual focus indicator appears 4 Press 1 or 2 to focus on a subject When the focus level cannot be adjusted any further or closer or will blink 5 Press SET Focus adjustment is complete To reset to Auto Focus Press FOCUS twice Manual focus is recommended in situations listed below Wh...

Page 27: ...nual exposure control at the same time when PROGRAM AE is set to SPOTLIGHT or SNOW pg 30 or with the backlight compensation Like the pupil of the human eye the iris contracts in well lit environments to keep too much light from entering and dilates in dim environments to allow in more light Use this function in the following situations When shooting a moving subject When the distance to the subjec...

Page 28: ...exposure compensation 1 Set the Power Switch to REC 2 Set the recording mode to M pg 18 3 Press twice so that the Spot Exposure Control indicator appears A spot metering area frame appears at the centre of the LCD monitor viewfinder 4 Press SET Spot Exposure Control is engaged Exposure is adjusted to make the brightness of the selected area most appropriate To lock the iris After step 3 press and ...

Page 29: ...of lighting 1 Set the Power Switch to REC 2 Set the recording mode to M pg 18 3 Hold a sheet of plain white paper in front of the subject Adjust zoom or position yourself so that the white paper fills the screen 4 Select MWB in W BALANCE menu pg 23 then press and hold SET or 2 until begins blinking When the setting is completed stops blinking 5 Press SET or 2 to engage the setting 6 Press MENU The...

Page 30: ...ar smear phenomenon Smear phenomenon tends to occur when SPORTS or any mode of SHUTTER 1 500 1 4000 is selected PROGRAM AE OFF Disables the function Factory preset SPORTS Variable Shutter Speed 1 250 1 4000 This setting allows fast moving images to be captured one frame at a time for vivid stable slow motion playback The faster the shutter speed the darker the picture becomes Use the shutter funct...

Page 31: ...ooting under a fluorescent light or mercury vapour lamp is reduced SHUTTER 1 500 SHUTTER 1 4000 Refer to PROGRAM AE SPORTS mode To use this camcorder as a player 1 Following the illustration pg 21 Connections To A TV Or VCR connect the camcorder and the VCR s input connectors 2 Perform steps 1 6 pg 21 3 At the point you want to start dubbing start recording on the VCR Refer to the VCR s instructio...

Page 32: ...l playback image recorded on the tape is output from the DV IN OUT connector When using a DV cable be sure to use the optional JVC VC VDV204U or VC VDV206U DV cable To use this camcorder as a recorder 1 Make sure all units are turned off 2 Connect this camcorder to a video unit equipped with a DV output connector using a DV cable as shown in the illustration 3 Set the camcorder s Power Switch to P...

Page 33: ... information cannot be captured into the PC Refer to the instruction manuals of the PC and Software The still images can also be transferred to a PC with a DV connector equipped capture board The system may not work properly depending on the PC or capture board you are using If after connecting a DV cable to the camcoder and it doesn t work restart the camcoder Connection To A Personal Computer Wh...

Page 34: ...so that it also appears in the frame pg 26 29 Charging is difficult in places subject to extremely high low temperatures To protect the battery it is recommended to charge it in places with a temperature of 10 C to 35 C 50 F to 95 F pg 36 The battery pack is not attached firmly Detach the battery pack once again and re attach it firmly pg 12 When shooting in the dark the unit becomes highly sensit...

Page 35: ...fter power is turned on if the lens cap is attached or when it is dark Appears when the date time is not set pg 14 The built in clock battery has run out and the previously set date time has been erased Consult your nearest JVC dealer for replacement Error indications 01 02 or 06 Remedy Remove and reattach the power supply or battery Error indications 03 or 04 Remedy Eject the cassette and reinser...

Page 36: ...pack Cassettes To properly use and store your cassettes be sure to read the following cautions During use make sure the cassette bears the Mini DV mark be aware that recording onto prerecorded tapes automatically erases the previously recorded video and audio signals make sure the cassette is positioned properly when inserting do not load and unload the cassette repeatedly without allowing the tap...

Page 37: ...o shock or excessive vibration during transportation keep the lens directed at extremely bright objects for long periods expose the lens and viewfinder s lens to direct sunlight carry it by holding the LCD monitor or the viewfinder swing it excessively when using the hand strap or the grip swing the soft camera case excessively when the camcorder is inside it Dirty heads can cause the following pr...

Page 38: ...to the video tape and can lead to internal damage to the camcorder itself If malfunctioning occurs stop using the unit immediately and consult your local JVC dealer The camcorder is a microcomputer controlled device External noise and interference from a TV a radio etc might prevent it from functioning properly In such cases first disconnect its power supply unit battery pack AC Adapter etc and wa...

Page 39: ... matrix system Viewfinder Electronic viewfinder with 0 33 colour LCD Speaker Monaural Format DV format SD mode Signal format PAL standard Recording Playback format Video Digital component recording Audio PCM digital recording 32 kHz 4 channel 12 BIT 48 kHz 2 channel 16 BIT Cassette Mini DV cassette Tape speed SP 18 8 mm s LP 12 5 mm s Maximum recording time using 80 min cassette SP 80 min LP 120 m...

Page 40: ...Gain Up 23 I Interface Shooting 17 Iris Lock 27 J Journalistic Shooting 17 L Language 24 LCD Monitor and Viewfinder 8 14 Loading A Cassette 15 M Manual Focus 26 Melody 24 Motor Drive Mode 26 N Narration 25 Night Scope 30 O On Screen 24 25 P Playback Sound 25 Power linked operation 8 Priority 24 Program AE 30 Q Quick Review 16 R Rec Mode 24 25 Recording Capacity Tape 16 S Shutter Effects 30 31 Snap...

Reviews: