background image

G

ETT

ING

 ST

AR

TE

D

GETTING STARTED

EN

 11

MasterPage: Start_Right

S/AV/Editing cable 

3

Close the core filter until it clicks shut. 

NOTES:

Take care not to damage the cable.

When connecting a cable, attach the end with the core filter 
to the camcorder. 

This camcorder’s 2-way power supply system lets you 
choose the most appropriate source of power. Do not use 
provided power supply units with other equipment.

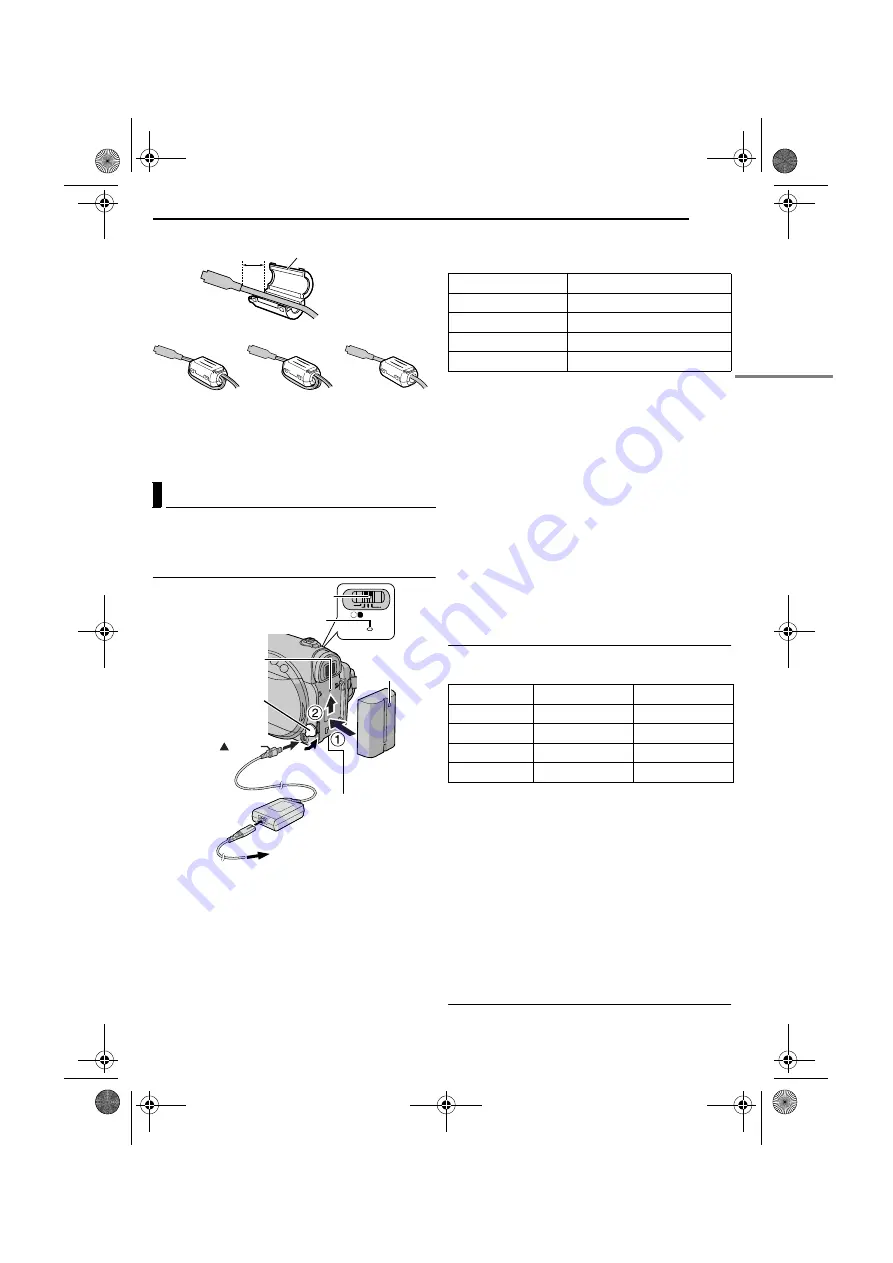
Charging The Battery Pack

1

Set the Power Switch to “OFF”.

2

With the arrow on the battery pack pointing upward, 

push the battery pack slightly against the battery pack 
mount 

a

.

3

Slide up the battery pack until it locks in place 

b

.

4

Connect the AC Adapter to the camcorder, then 

connect the Power Cord to the AC Adapter.

5

Plug the Power Cord into an AC outlet. The POWER/

CHARGE lamp on the camcorder blinks to indicate 
charging has started.

6

When the POWER/CHARGE lamp goes out, charging 

is finished. Unplug the Power Cord from the AC outlet. 
Disconnect the AC Adapter from the camcorder.

To detach the battery pack

Slide the battery pack down slightly while sliding 

BATT.


to detach it.

* Provided

NOTES:

If the protective cap is attached to the battery pack, remove 
it first.

During charging, the camcorder cannot be operated.

Charging is not possible if the wrong type of battery is used.

When charging the battery pack for the first time or after a 
long storage period, the POWER/CHARGE lamp may not 
light. In this case, remove the battery pack from the 
camcorder, then try charging again.

If the battery operation time remains extremely short even 
after having been fully charged, the battery is worn out and 
needs to be replaced. Please purchase a new one.

Since the AC Adapter processes electricity internally, it 
becomes warm during use. Be sure to use it only in well-
ventilated areas.

Using the optional AA-V40 AC Power Adapter/Charger, you 
can charge the BN-V408U/V416U/V428U/V438U battery 
pack without the camcorder. However, it cannot be used as 
an AC Adapter.

Using The Battery Pack

Perform steps 

2

 – 

3

 in “Charging The Battery Pack”.

Maximum continuous recording time

* Provided

NOTES:

Recording time is reduced significantly under the following 
conditions: 

Zoom or Record-Standby mode is engaged repeatedly.

The LCD monitor is used repeatedly.

The playback mode is engaged repeatedly.

The LED Light is used.

Before extended use, it is recommended that you prepare 
enough battery packs to cover 3 times the planned 
shooting time.

ATTENTION:

Before detaching the power source, make sure that the 
camcorder’s power is turned off. Failure to do so can result in 
a camcorder malfunction.

Using AC Power

Connect the AC Adapter to the camcorder, then connect 
the Power Cord to the AC Adapter as shown in the 
illustration.

Power

3 cm

Core filter (small)

USB cable and AC 
Adapter’s cord

Audio Extension 
cable

S/AV/Editing 
cable

POWER/

CHARGE

PLAY

OFF

M

A

To AC outlet

POWER/CHARGE lamp

Battery pack

BATT.

AC Adapter

Open the cover.

Power cord

Power switch

To DC connector

mark

Arrow

Battery pack mount

Battery pack

Charging time

BN-V408U*

Approx. 1 hr. 30 min.

BN-V416U

Approx. 3 hr.

BN-V428U

Approx. 5 hr.

BN-V438U

Approx. 6 hr. 30 min.

Battery pack

LCD monitor on 

Viewfinder on

BN-V408U*

1 hr. 20 min.

1 hr. 40 min.

BN-V416U

2 hr. 40 min.

3 hr. 15 min.

BN-V428U

4 hr. 40 min.

5 hr. 50 min.

BN-V438U

6 hr. 20 min.

7 hr. 50 min.

CONTINUED ON NEXT PAGE

GR-D231PAL_04Start.fm  Page 11  Wednesday, January 28, 2004  8:57 AM

Summary of Contents for GR-D220

Page 1: ...de Web for Digital Video Camera For Accessories http www jvc co jp english cyber http www jvc co jp english accessory INSTRUCTIONS GETTING STARTED 6 VIDEO RECORDING PLAYBACK 15 DIGITAL STILL CAMERA D S C RECORDING PLAYBACK 21 ADVANCED FEATURES 27 REFERENCES 45 TERMS Back cover DIGITAL VIDEO CAMERA To deactivate the demonstration set DEMO MODE to OFF 墌 pg 27 29 The camcorder illustrations appearing...

Page 2: ...e BACK LIGHT button brightens the image darkened by backlight 墌 pg 33 You can also select a spot metering area so that more precise exposure compensation is available 墌 pg 33 Spot Exposure Control Navigation Function The Navigation Function helps you check tape contents by making thumbnail images on a memory card 墌 pg 35 E Mail Clip Recording You can record video clips on the memory card as files ...

Page 3: ...ry used in this device may present a fire or chemical burn hazard if mistreated Do not recharge disassemble heat above 100 C or incinerate Replace battery with Panasonic Matsushita Electric Sanyo Sony or Maxell CR2025 Danger of explosion or Risk of fire if the battery is incorrectly replaced Dispose of used battery promptly Keep away from children Do not disassemble and do not dispose of in fire N...

Page 4: ...o headphones at high volume as such use can permanently damage your hearing DON T obstruct the ventilation of the equipment for example with curtains or soft furnishings Overheating will cause damage and shorten the life of the equipment DON T use makeshift stands and NEVER fix legs with wood screws to ensure complete safety always fit the manufacturer s approved stand or legs with the fixings pro...

Page 5: ...mation 23 Removing On Screen Display 23 ADDITIONAL FEATURES FOR D S C 24 E Mail Clip Recording 24 Dubbing Still Images Recorded On A Tape To A Memory Card 24 Resetting The File Name 24 Protecting Files 25 Deleting Files 25 Setting Print Information DPOF Setting 26 Initialising A Memory Card 26 ADVANCED FEATURES 27 MENUS FOR DETAILED ADJUSTMENT 27 Changing The Menu Settings 27 Recording Menus 27 Pl...

Page 6: ...TING STARTED Index a 1 2 3 4 5 6 7 8 9 J K L M N OP R S T U V Q W X Y Z a b c d e f g h i j k l m no p q r s To open the connector cover pull the bottom of the cover then open it GR D231PAL book Page 6 Thursday January 22 2004 2 57 PM ...

Page 7: ... AV 墌 pg 18 37 42 GR D231 230 only i Link refers to the IEEE1394 1995 industry specification and extensions thereof The logo is used for products compliant with the i Link standard Indicators b POWER CHARGE Lamp 墌 pg 11 15 c Tally Lamp 墌 pg 15 29 Other Parts d Monitor Latch 墌 pg 15 e LCD Monitor 墌 pg 15 16 f Viewfinder 墌 pg 13 g Shoulder Strap Eyelet 墌 pg 10 h Battery Pack Mount 墌 pg 11 i Speaker ...

Page 8: ...Mail Clip Recording Indicator 墌 pg 24 D Memory Card Remaining Time For E Mail Clip Recording 墌 pg 24 E E Mail Clip Recording Time 墌 pg 24 F Auxiliary Microphone Level Indicator Appears when an optional microphone is connected 墌 pg 29 AUX MIC During Both Video And D S C Recording a Operation Mode 墌 pg 12 B Night Scope Indicator 墌 pg 32 Gain Up Mode 墌 pg 28 C LED Light Indicator 墌 pg 31 D White Bala...

Page 9: ...B Cable h Core Filter large for USB cable 墌 pg 10 for attachment i Core Filter small x 3 for S AV Editing cable Audio extension cable and AC Adapter s cord 墌 pg 10 for attachment j CD ROM k Cable Adapter l Remote Control Unit RM V719U m Lithium Battery CR2025 for remote control unit n Memory Card 8 MB Already inserted in the camcorder o Shoulder Strap 墌 pg 10 for attachment p Lens Cap 墌 pg 10 for ...

Page 10: ...cable to the camcorder The core filter reduces interference See below How To Attach The Core Filter Attach the core filters to the cables The core filter reduces interference 1 Release the stoppers on both ends of the core filter 2 Run the cable through the core filter leaving approx 3 cm of cable between the cable plug and the core filter USB cable and AC Adapter s cord Wind the cable cord once a...

Page 11: ...tery is worn out and needs to be replaced Please purchase a new one Since the AC Adapter processes electricity internally it becomes warm during use Be sure to use it only in well ventilated areas Using the optional AA V40 AC Power Adapter Charger you can charge the BN V408U V416U V428U V438U battery pack without the camcorder However it cannot be used as an AC Adapter Using The Battery Pack Perfo...

Page 12: ... input the day and press SET Repeat to input the month year hour and minute 7 Press or to select BRETURN and press SET twice The Menu Screen closes Built in Clock s Rechargeable Lithium Battery If the camcorder is not used for approx 3 months the clock s lithium battery will become discharged and the date time stored in memory will be lost When this occurs first connect the camcorder to an AC outl...

Page 13: ...ocused CAUTION When retracting the viewfinder take care not to pinch your fingers 1 Set the Power Switch to M or PLAY while pressing down the Lock Button located on the switch 2 Open the LCD monitor fully 墌 pg 15 To adjust the brightness of the viewfinder pull out the viewfinder fully and set PRIORITY to FINDER 墌 pg 27 29 3 Press or until the brightness control indicator on the display moves and t...

Page 14: ...move the cassette A few minutes later insert it again When the camcorder is suddenly moved from a cold place to a warm environment wait a short time before opening the cassette holder cover The provided memory card is already inserted in the camcorder at the time of purchase 1 Make sure the camcorder s power is off 2 Open the card cover MEMORY CARD 3 To load a memory card firmly insert it with its...

Page 15: ...p sounds off 墌 pg 27 29 Tape Remaining Time Approximate tape remaining time appears on the display h m means the camcorder is calculating the remaining time When the remaining time reaches 2 minutes the indication starts blinking The time required to calculate and display the remaining tape length and the accuracy of the calculation may vary according to the type of tape used LCD Monitor And Viewf...

Page 16: ...g 28 Journalistic Shooting In some situations different shooting angles may provide more dramatic results Hold the camcorder in the desired position and tilt the LCD monitor in the most convenient direction It can rotate 270 90 downward 180 upward Interface Shooting The person you shoot can view himself herself in the LCD monitor and you can even shoot yourself while viewing your own image in the ...

Page 17: ...moothly The time code is displayed only when TIME CODE is set to ON 墌 pg 29 Recording From The Middle Of A Tape 1 Play back a tape or use Blank Search 墌 pg 18 to find the spot at which you want to start recording then engage the Still Playback mode 墌 pg 17 2 Set the Power Switch to A or M while pressing down the Lock Button located on the switch then start recording 12 34 24 Minutes Seconds Frames...

Page 18: ...s at a recorded portion the camcorder searches in the forward direction If the beginning or end of the tape is reached during Blank Search the camcorder stops automatically A blank portion which is shorter than 5 seconds of tape may not be detected The detected blank portion may be located between recorded scenes Before you start recording make sure there is no recorded scene after the blank porti...

Page 19: ... use is 5 m NOTE The transmitted beam may not be effective or may cause incorrect operation when the remote sensor is directly exposed to sunlight or powerful lighting Buttons And Functions A Infrared beam transmitting window Transmits the beam signal The following buttons are available only when the camcorder s Power Switch is set to PLAY B PAUSE Button Pauses the tape 墌 pg 20 C SLOW Rewind Butto...

Page 20: ...press the Zoom Button W 3 You can move the image on the screen around to find a particular portion of the picture While holding down SHIFT press Left Right Up and Down To end zoom press and hold W until magnification returns to normal Or press STOP 8 and then press PLAY U during video playback NOTES Zoom can also be used during slow motion and still playback Due to digital image processing the qua...

Page 21: ...27 30 INTERVAL and appears 2 Set INT TIME to the desired shooting interval 墌 pg 27 30 3 Set the Power Switch to A or M while pressing down the Lock Button located on the switch 4 Press SNAPSHOT First shot is taken after 2 seconds The O indicator appears while the snapshot is being taken The clock icon turns while waiting for the next shot is being taken The next shot is being taken automatically w...

Page 22: ...Playback files are displayed in descending order If you press 5 during Auto Playback files are displayed in ascending order 3 To end Auto Playback press 8 You can view video clips 墌 pg 24 stored in the memory card 1 Perform steps 1 3 in Normal Playback Of Images 2 If the image playback IMAGE screen appears press SELECT The MEMORY SELECT screen appears 3 Press or to select E MAIL CLIP and press SET...

Page 23: ...ZE Image size QUALITY Picture quality IMAGE only TIME Playback time E MAIL CLIP only PROTECT When set to ON the file is protected from accidental erasure 墌 pg 25 Press the INFO Button again to close the Information Screen NOTE With images shot with other devices or processed on a PC QUALITY will be displayed 1 Display the playback screen of normal images 墌 pg 22 2 Press MENU The Menu Screen appear...

Page 24: ...stored with this camcorder are compatible with MPEG4 Some MPEG4 files stored with other devices cannot be played back with this camcorder Still images can be dubbed from a tape to a memory card 1 Load a cassette 墌 pg 14 2 Load a memory card 墌 pg 14 3 Set the VIDEO MEMORY Switch to VIDEO 4 Set the Power Switch to PLAY while pressing down the Lock Button located on the switch 5 Set COPY to ON 墌 pg 2...

Page 25: ...files stored in the memory card 4 Press or to select CANC ALL and press SET The PROTECT screen appears 5 Press or to select EXECUTE and press SET To cancel selection select RETURN Previously stored files can be deleted either one at a time or all at once 1 To delete the file for images display its playback screen 墌 pg 22 for video clips display its playback screen 墌 pg 22 2 Press MENU The Menu Scr...

Page 26: ...VE appears If you did not change any settings in step 3 through 5 the Menu Screen reappears 7 Press or to select EXECUTE to save the setting you have just made and press SET To cancel selection select CANCEL To Reset The Number Of Prints 1 Perform steps 1 3 in To Print All Still Images One Print For Each 2 Press or to select RESET and press SET The DPOF screen appears 3 Press or to select EXECUTE ...

Page 27: ...changed only when the Power Switch is set to M Factory preset SP To record in the SP Standard Play mode LP Long Play more economical providing 1 5 times the recording time NOTES Audio Dubbing 墌 pg 40 and Insert Editing 墌 pg 40 are possible on tapes recorded in the SP mode If the recording mode is switched the playback picture will be blurred at the switching point It is recommended that tapes reco...

Page 28: ...ke particularly at high magnification NOTES Accurate stabilisation may not be possible if hand shake is excessive or depending on the shooting condition The indicator blinks or goes out if the Stabiliser cannot be used Switch off this mode when recording with the camcorder on a tripod 墌 pg 31 Self Timer OFF Disables 5 Second Recording 5S Enables 5 Second Recording 墌 pg 32 Anim Allows you to record...

Page 29: ...e turned on DEMO MODE remains ON even if the camcorder power is turned off If DEMO MODE remains ON some functions will not be available After viewing demo set to OFF LCD The image is displayed on the LCD monitor when the viewfinder is pulled out while the LCD monitor is opened FINDER The image is displayed in the viewfinder when the viewfinder is pulled out while the LCD monitor is opened EXECUTE ...

Page 30: ... the type of sound to accompany your playback picture According to the menu access explanation on page 27 select SOUND MODE or NARRATION from the Menu Screen and set it to the desired parameter STEREO Sound is output on both L and R channels in stereo SOUND L Sound from the L channel is output SOUND R Sound from the R channel is output OFF Original sound is output on both L and R channels in stere...

Page 31: ...ight does not reach the subject the Night Scope function will be activated and makes it possible to shoot the subject brighter There is a difference in the brightness of the images shot between the centre area which is illuminated by the LED Light and the surrounding areas which will be darker Since subjects are shot at a reduced shutter speed when the LED Light setting is ON they will appear slig...

Page 32: ... a tape 1 Set the VIDEO MEMORY Switch to VIDEO 2 Set the Power Switch to M 3 Set SNAP MODE to the desired mode 墌 pg 27 28 4 Press SNAPSHOT There is the sound effect of a shutter closing The O indication appears and a still image will be recorded for approx 6 seconds then the camcorder re enters the Record Standby mode You can perform Snapshot also during recording A still image will be recorded fo...

Page 33: ...ication changes to and the iris is locked To return to automatic iris control Press EXPOSURE twice Or set the Power Switch to A The exposure control indicator and disappear To lock the exposure control and the iris After step 2 adjust the exposure by pressing or Then lock the iris in steps 3 and 4 For automatic locking press EXPOSURE twice in step 2 The exposure control and the iris become automat...

Page 34: ...ed off or the battery removed These effects let you make pro style scene transitions Use them to spice up the transition from one scene to the next Wipe or Fader works when video recording is started or stopped 1 Set the VIDEO MEMORY Switch to VIDEO 2 Set the Power Switch to M 3 Set v to the desired mode 墌 pg 27 The WIPE FADER menu disappears and the effect is reserved The selected effect indicato...

Page 35: ...dark when shooting in extremely bright surroundings such as in the snow SPOTLIGHT Compensates for subjects that may otherwise appear too bright when shooting under extremely strong direct lighting such as spotlights TWILIGHT Makes evening scenes look more natural White Balance 墌 pg 34 is automatically set to but can be changed to your desired setting When Twilight is chosen the camcorder automatic...

Page 36: ...tly displayed image Select ALL to delete all thumbnail images stored in the memory card at once 6 Press SET The NAVIGATION screen appears 7 Press or to select EXECUTE and press SET Press 3 to display the previous image Press 5 to display the next image To cancel deletion select RETURN Thumbnail images cannot be deleted during video playback CAUTION Do not remove the memory card or perform any othe...

Page 37: ... 墌 pg 11 To choose whether or not the following displays appear on the connected TV Date time Set DATE TIME to AUTO ON or OFF 墌 pg 27 31 Or press DISPLAY on the remote control to turn on off the date indication Time code Set TIME CODE to OFF or ON 墌 pg 27 31 Indications other than date time and time code Set ON SCREEN to OFF LCD or LCD TV 墌 pg 27 31 To use this camcorder as a recorder GR D231 230 ...

Page 38: ...Effects 墌 pg 20 is attempted or SNAPSHOT is pressed during playback only the original playback image recorded on the tape is output from the DV IN OUT connector When using a DV cable be sure to use the optional JVC VC VDV204U DV cable To use this camcorder as a recorder GR D231 230 only 1 Make sure all units are turned off 2 Connect this camcorder to a video unit equipped with a DV output connecto...

Page 39: ...ng a DV cable be sure to use the optional JVC VC VDV206U or VC VDV204U DV cable depending on the type of DV connector 4 or 6 pins on the PC If the PC connected to the camcorder via the USB cable is not powered the camcorder does not enter the USB mode The date time information cannot be captured into the PC Refer to the instruction manuals of the PC and Software The still images can also be transf...

Page 40: ...or first set S AV INPUT to A V IN or S IN in VIDEO Menu GR D231 230 only 墌 pg 27 30 The AUX indication appears instead of MIC You can record a new scene into a previously recorded tape replacing a section of the original recording with minimal picture distortion at the in and outpoints The original audio remains unchanged Use the provided remote control NOTES Before performing the following steps ...

Page 41: ...Rs and those of many other makers it may not work with yours or may offer limited functions NOTES If the VCR s power does not come on in step 1 try another code from the VCR CODE LIST Although the VCR code is set for some JVC s VCR the remote control may not work properly For example recording may not start or stop properly on the VCR during Random Assemble Editing In this case try another code fr...

Page 42: ...e indication Time code Set TIME CODE to OFF or ON 墌 pg 27 31 Indications other than date time and time code Set ON SCREEN to OFF LCD or LCD TV 墌 pg 27 31 When editing on a VCR equipped with a DV input connector an optional DV cable can be connected instead of the S AV Editing cable However it is necessary to connect the editing cable of the S AV Editing cable to the VCR For details see step 1 A Bl...

Page 43: ...by mode will be cancelled and editing will not take place If there are blank portions before or after the Edit In and Edit Out points a blue screen may be included in the edited version Turning off the camcorder s power erases all registered Edit In and Edit Out points If you select Sepia or Monotone mode from Program AE with special effects you cannot use the Dissolve or Black White Fader In this...

Page 44: ...adjust the timing of the camcorder against your VCR Diagnosing VCR Camcorder Timing 1 Play back the tape in the camcorder then point the remote control at the camcorder s remote sensor and press R A EDIT ON OFF Random Assemble Editing Menu appears 2 Perform Random Assemble Editing on Program 1 only In order to check VCR and camcorder timing select the beginning of a scene transition as your Edit I...

Page 45: ... with condensation HClean the lens and check the focus again 墌 pg 48 The 5 Second mode is set to Anim in MANUAL Menu HSet 5S to 5S in MANUAL Menu 墌 pg 27 32 The Squeeze mode SQUEEZE is selected HDisengage the Squeeze SQUEEZE mode 墌 pg 27 28 The light source or the subject does not include white Or there are various different light sources behind the subject HFind a white subject and compose your s...

Page 46: ...ith high precision technology However black spots or bright spots of light red green or blue may appear constantly on the LCD monitor or the viewfinder These spots are not recorded on the tape This is not due to any defect of the unit Effective dots more than 99 99 The battery s charge is low HInstall a fully charged battery 墌 pg 11 HPush in the memory card a few more times 墌 pg 14 The viewfinder ...

Page 47: ...et to SAVE 墌 pg 40 Appears if Insert Editing is attempted on a blank portion of a tape 墌 pg 40 Appears if Insert Editing is attempted on a blank portion of a tape Appears if Insert Editing is attempted on a tape recorded in the LP mode 墌 pg 40 Appears if INSERT I on the remote control is pressed when the erase protection tab is set to SAVE 墌 pg 40 Appears when the memory card s memory is full and ...

Page 48: ... indication appears the camcorder turns off automatically Eject the cassette once and re insert it then check if the indication clears When it does you can resume using the camcorder If the indication remains consult your nearest JVC dealer NO E MAIL CLIP STORED CARD ERROR UNSUPPORTED FILE CHECK CARD S WRITE PROTECTION SWITCH E01 E02 or E06 UNIT IN SAFEGUARD MODE REMOVE AND REATTACH BATTERY E03 or...

Page 49: ...s the Mini DV mark be aware that recording onto prerecorded tapes automatically erases the previously recorded video and audio signals make sure the cassette is positioned properly when inserting do not load and unload the cassette repeatedly without allowing the tape to run at all This slackens the tape and can result in damage do not open the front tape cover This exposes the tape to fingerprint...

Page 50: ... the video heads may result After the camcorder plays back for about 20 seconds it stops automatically Also refer to the cleaning cassette s instructions If after using the cleaning cassette the problems still exist consult your nearest JVC dealer Mechanical moving parts used to move the video heads and video tape tend to become dirty and worn out over time In order to maintain a clear picture at ...

Page 51: ...z 2 channel 16 BIT Cassette Mini DV cassette Tape speed SP 18 8 mm s LP 12 5 mm s Maximum recording time using 80 min cassette SP 80 min LP 120 min Storage media SD Memory Card MultiMediaCard Compression system Still image JPEG compatible Moving image MPEG4 compatible File size Still image 4 modes 1600 x 1200 pixels 1280 x 960 pixels 1024 x 768 pixels 640 x 480 pixels Moving image 1 mode 160 x 120...

Page 52: ... Light 31 Loading A Cassette 14 Loading A Memory Card 14 M Manual Focus 32 Memory Card 14 49 Motor Drive Mode 32 N Navigation 28 35 Night Scope 32 P Picture Quality 30 Playback Sound 30 Playback Special Effects 20 Power Linked Operation 12 Program AE With Special Effects 35 R Random Assemble Editing 41 44 Recording Capacity Memory Card 21 24 Tape 15 Recording Media Selection 30 Remote Control 19 R...

Reviews: