background image

EN

EN

EN

EN

'

'

'

'

Master Page: Right

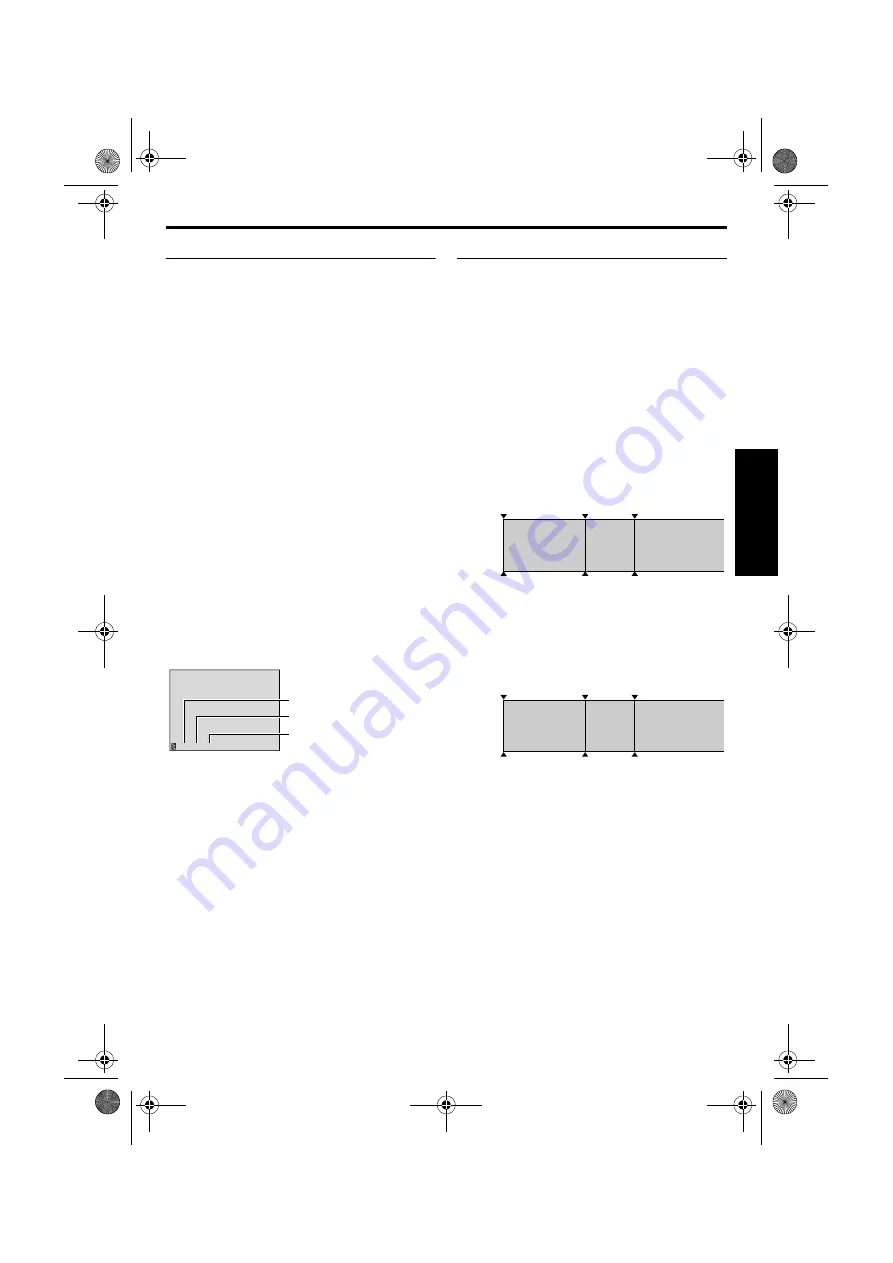
Time Code

During recording, a time code is recorded on the 
tape. This code is to confirm the location of the 
recorded scene on the tape during playback.
If recording starts from a blank portion, the time 
code begins counting from “00:00:00” 
(minute:second:frame). If recording starts from the 
end of a previously recorded scene, the time code 
continues from the last time code number.
To perform Random Assemble Editing (

pg. 60 –

65), time code is necessary. If during recording a 

blank portion is left partway through the tape, the 
time code is interrupted. When recording is 
resumed, the time code starts counting up again 
from “00:00:00”. This means the camcorder may 
record the same time codes as those existing in a 
previously recorded scene. To prevent this, perform 
“Recording From The Middle Of A Tape” (

pg. 19) 

in the following cases;

When shooting again after playing back a 
recorded tape.

When power shuts off during shooting. 

When a tape is removed and re-inserted during 
shooting.

When shooting using a partially recorded tape. 

When shooting on a blank portion located 
partway through the tape.

When shooting again after shooting a scene then 
opening/closing the cassette holder cover.

Recording From The Middle Of A Tape

1)

Play back a tape or use Blank Search (

pg. 21) 

to find the spot at which you want to start 
recording, then engage the Still Playback mode. 
(

pg. 20)

2)

Set the Power Switch to “

A

” or “

M

” while 

pressing down the Lock Button located on the 
switch, then start recording.

NOTES:

The time code cannot be reset.

During fast-forwarding and rewinding, the time 
code indication does not move smoothly.

The time code is displayed only when “TIME 
CODE” is set to “ON”. (

pg. 38, 41)

When a blank portion is recorded on a tape

Proper recording

12 : 34 : 24

Frames are not displayed 

during recording.

Minutes
Seconds

Frames

(30 frames = 1 second)

Display

Time code

00:00:00

Tape

Already 

recorded scene

Blank

Newly recorded 

scene

Time code

05:43:21

Time code

00:00:00

Shooting start

point

Shooting stop

point

Shooting start 

point

Time code

00:00:00

Tape

Already 

recorded scene

New 

scene

Latest scene

Time code

05:43:21

Time code

05:44:00

Shooting start

point

Shooting start

point

Shooting start 

point

VIDEO

 RECORDING

 & PLA

YB

ACK

GR-D200US.book  Page 19  Friday, April 11, 2003  1:05 PM

Summary of Contents for GR-D201

Page 1: ...se visit our Homepage on the World Wide Web for Digital Video Camera For Accessories http www jvc victor co jp english cyber http www jvc victor co jp english accessory INSTRUCTIONS For Customer Use Enter below the Model No and Serial No which is located on the bottom of the camcorder Retain this information for future reference Model No Serial No DIGITAL VIDEO CAMERA GR D200US book Page 1 Wednesd...

Page 2: ...ER SERVICING TO QUALIFIED SERVICE PERSONNEL The lightning flash with arrowhead symbol within an equilateral triangle is intended to alert the user to the presence of uninsulated dangerous voltage within the product s enclosure that may be of sufficient magnitude to constitute a risk of electric shock to persons The exclamation point within an equilateral triangle is intended to alert the user to t...

Page 3: ...l considerations For disposal or recycling information please contact your local authorities or the Electronics Industries Alliance http www eiae org IMPORTANT SAFTY INSTRUCTIONS 1 Read these instructions 2 Keep these instructions 3 Heed all warnings 4 Follow all instructions 5 Do not use this apparatus near water 6 Clean only with dry cloth 7 Do not block any ventilation openings Install in accor...

Page 4: ... over causing serious damage to the camcorder CAUTION Connecting cables Audio Video S Video etc to the camcorder and leaving it on top of the TV is not recommended as tripping on the cables will cause the camcorder to fall resulting in damage 䡲 This camcorder is designed exclusively for the digital video cassette SD Memory Card and MultiMediaCard Only cassettes marked and memory cards marked or ca...

Page 5: ...iting Cable S AV Editing cable USB Cable CD ROM Remote Control Unit RM V718U Memory Card 8 MB Already inserted in the camcorder Lens Cap 墌 pg 7 for attachment Lithium Battery CR2025 for remote control unit A lithium battery is pre installed in the Remote Control Unit at time of shipment with insulation sheet To use the Remote Control Unit remove the insulation sheet Shoulder Strap 墌 pg 7 for attac...

Page 6: ... cable plug and the core filter If using the AC Adapter s cord or USB cable be sure to wind the cable once around the outside of the core filter as shown in the illustration Wind the cable so that it is not slack 3 Close the core filter until it clicks shut NOTES Take care not to damage the cable When connecting cables attach the end with the core filter to the camcorder For the AC Adapter s cord ...

Page 7: ... make sure the cap is flush to the camcorder During shooting How To Attach The Strap 1 Following the illustration thread the strap through the eyelet a 2 Fold it back and thread it through the buckle b 3 Repeat the procedure to attach the other end of the strap to the other eyelet c located under the Grip Strap 4 Confirm the strap is not twisted GR D200US book Page 7 Friday April 11 2003 1 05 PM ...

Page 8: ...e 29 Setting Print Information DPOF Setting 29 Initializing A Memory Card 30 ADVANCED FEATURES 31 MENUS FOR DETAILED ADJUSTMENT 31 Changing The Menu Settings 31 RECORDING MENUS 32 Wipe Or Fader Effects 32 Program AE With Special Effects 33 White Balance Adjustment 34 PLAYBACK MENUS 40 FEATURES FOR RECORDING 42 Night Alive 42 Snapshot For Video Recording 42 Snapshot Flash 43 Flash Brightness Adjust...

Page 9: ...onstration 1 Set the Power Switch to M while pressing down the Lock Button located on the switch 2 Open the LCD monitor fully or pull out the viewfinder fully 3 Press MENU The Menu Screen appears 4 Press or to select s and press SELECT SET The SYSTEM Menu appears 5 Press or to select DEMO MODE and press SELECT SET The Sub Menu appears 6 Press or to select OFF and press SELECT SET 7 Press or to sel...

Page 10: ...corder cannot be operated Charging is not possible if the wrong type of battery is used When charging the battery pack for the first time or after a long storage period the POWER CHARGE lamp may not light In this case remove the battery pack from the AC Adapter then try charging again If the battery operation time remains extremely short even after having been fully charged the battery is worn out...

Page 11: ...110 V to 240 V For other notes 墌 墌 墌 墌 pg 68 About Batteries Lithium ion is vulnerable in colder temperatures DANGER Do not attempt to take the batteries apart or expose them to flame or excessive heat as it may cause a fire or explosion WARNING Do not allow the battery or its terminals to come in contact with metals as this can result in a short circuit and possibly start a fire The Benefits Of L...

Page 12: ...LCD monitor fully It can rotate 270º 90º downward 180º upward While using the viewfinder Make sure the LCD monitor is closed and locked Pull out the viewfinder fully Be sure to pull out the viewfinder until you hear a click otherwise it may be pushed back in during use NOTES Push b towards the camcorder to close the LCD monitor The image will not appear simultaneously on the LCD monitor and the vi...

Page 13: ...Y Switch Power Switch Lock Button Power Switch Position A Full Auto Recording Allows you to record using NO special effects or manual adjustments Suitable for standard recording The A indicator appears on the display M Manual Recording Allows you to set various recording functions using the Menus 墌 pg 31 If you want more creative capabilities than Full Auto Recording try this mode There is no indi...

Page 14: ... the camcorder is not used for approx 3 months the clock s lithium battery will become discharged and the date time stored in memory will be lost When this occurs first connect the camcorder to an AC outlet using the AC Adapter for over 24 hours to charge the clock s rechargeable lithium battery Then perform the date time setting before using the camcorder Note that the camcorder can be used witho...

Page 15: ... takes a few seconds for the cassette holder to open Do not apply force If you wait a few seconds and the cassette holder does not open close the cassette holder cover and try again If the cassette holder still does not open turn the camcorder off then on again If the tape does not load properly open the cassette holder cover fully and remove the cassette A few minutes later insert it again When t...

Page 16: ...memory card from being recorded over To record on this memory card slide the tab back to the position opposite to LOCK before loading it NOTES Be sure to use only SD Memory Cards marked or MultiMediaCards marked Some brands of memory cards are not compatible with this camcorder Before purchasing a memory card consult its manufacturer or dealer Before using a new memory card it is necessary to FORM...

Page 17: ...off automatically To turn the camcorder on again push back and pull out the viewfinder again or close and re open the LCD monitor LCD monitor viewfinder indications When power is supplied from a battery the battery indicator is displayed 墌 pg 84 When power is supplied from an AC outlet the battery indicator does not appear When a blank portion is left between recorded scenes on the tape the time c...

Page 18: ...set all the way to W Also see TELE MACRO in MANUAL Menu on page 36 For other notes 墌 墌 墌 墌 pg 68 Journalistic Shooting In some situations different shooting angles may provide more dramatic results Hold the camcorder in the desired position and tilt the LCD monitor in the most convenient direction It can rotate 270º 90º downward 180º upward Interface Shooting The person you shoot can view himself ...

Page 19: ...ded tape When shooting on a blank portion located partway through the tape When shooting again after shooting a scene then opening closing the cassette holder cover Recording From The Middle Of A Tape 1 Play back a tape or use Blank Search 墌 pg 21 to find the spot at which you want to start recording then engage the Still Playback mode 墌 pg 20 2 Set the Power Switch to A or M while pressing down t...

Page 20: ...pushed against the camcorder body LCD monitor viewfinder indications When power is supplied from a battery the battery indicator is displayed 墌 pg 84 When power is supplied from an AC outlet the battery indicator does not appear When a cable is connected to the S AV connector the sound is not heard from the speaker To control the speaker volume Slide the Power Zoom Lever VOL towards to turn up the...

Page 21: ...nu appears 7 Press or to select EXECUTE and press SELECT SET The BLANK SEARCH indication appears and the camcorder automatically starts reverse or forward search then stops at the spot which is about 3 seconds of tape before the beginning of the detected blank portion To cancel Blank Search midway press STOP 8 NOTES Before starting Blank Search if the current position is at a blank portion the cam...

Page 22: ...Y on the remote control to turn on off the date indication Time Code Set TIME CODE to ON or OFF 墌 pg 31 41 Indications other than date time and time code Set ON SCREEN to OFF LCD or LCD TV 墌 pg 31 41 NOTES It is recommended to use the AC Adapter as the power supply instead of the battery pack 墌 墌 墌 墌 pg 11 To monitor the picture and sound from the camcorder without inserting a tape or memory card ...

Page 23: ...g Number Of Shots 墌 墌 墌 墌 pg 82 NOTES Even if DIS is set to ON 墌 pg 36 the Stabilizer will be disabled If Snapshot recording is not possible O blinks when SNAPSHOT is pressed If Program AE with special effects 墌 pg 33 is engaged certain modes of Program AE with special effects are disabled during Snapshot recording In such a case the icon blinks If shooting is not performed for approx 5 minutes wh...

Page 24: ...ile Pressing INFO gives you details on the displayed file 墌 pg 26 You can also look for the desired file using Index Screen 墌 pg 26 You can turn off the on screen playback display 墌 pg 26 NOTES Even if you shoot a new image after playing back a low numbered one this will not overwrite an existing image because new images are automatically stored after the last recorded one Images shot in a file si...

Page 25: ...of file IMAGE or E MAIL CLIP which has been played back at the last time is displayed 5 If the image playback IMAGE screen appears press SELECT SET The MEMORY SELECT screen appears 6 Press or to select E MAIL CLIP and press SELECT SET The video clip playback screen E MAIL CLIP appears 7 Press REW 3 to select the previous file Press FF 5 to select the next file Pressing INFO gives you details on th...

Page 26: ...ocessed on a PC QUALITY will be displayed 1 Perform steps 1 6 in Normal Playback Of Images 墌 pg 24 2 Press MENU The Menu Screen appears 3 Press or to select DISPLAY and press SELECT SET The Sub Menu appears 4 Press or to select OFF and press SELECT SET The operation mode indicator folder file number and battery indicator disappear To display the indicators again select ON Index Playback Of Files V...

Page 27: ...red in the memory card 9 Press or to select PROT ALL and press SELECT SET The PROTECT screen appears 10 Press or to select EXECUTE and press SELECT SET To cancel protection select RETURN NOTES If the mark appears the currently displayed file is protected When the memory card is initialized or corrupted even protected files are deleted If you do not want to lose important files transfer them to a P...

Page 28: ...he DELETE screen appears 10 Press REW 3 or FF 5 to select the desired file 11 Press or to select EXECUTE and press SELECT SET To cancel deletion select RETURN Repeat steps 10 and 11 for all files you want to delete NOTE If the mark appears the selected file is protected and cannot be deleted To delete all files stored in the memory card 9 Press or to select ALL and press SELECT SET The DELETE scre...

Page 29: ... start again from DVC00001 This camcorder is compatible with the DPOF Digital Print Order Format standard in order to support future systems such as automatic printing You can select one of the 2 print information settings for images stored in the memory card To Print All Still Images One Print For Each or To Print By Selecting Still Images And Number Of Prints NOTES If you load a memory card alre...

Page 30: ...elect RETURN The number of prints is reset to 0 for all still images You can initialize a memory card anytime After initializing all files and data stored in the memory card including those which have been protected are cleared 1 Set the VIDEO MEMORY Switch to MEMORY 2 Set the Power Switch to PLAY while pressing down the Lock Button located on the switch 3 Open the LCD monitor fully or pull out th...

Page 31: ...select the desired function and press SELECT SET The Sub Menu appears Example m CAMERA Menu 2 Press or to select the desired parameter 3 Press SELECT SET Selection is complete Repeat the procedure if you wish to set other function menus Changing The Menu Settings Power Switch Lock Button VIDEO MEMORY Switch MENU Button SELECT SET Button Button I D O V E SO OD b t M 12 i E D N U 1 0 N HRO SY C 0 E ...

Page 32: ... cannot be used with certain modes of Program AE with special effects 墌 pg 33 If an unusable Wipe Fader Effect is selected its indicator blinks in blue or goes out These effects let you make pro style scene transitions Use them to spice up the transition from one scene to the next Wipe or Fader works when video recording is started or stopped 1 Set the VIDEO MEMORY Switch to VIDEO 2 Set the Power ...

Page 33: ...cial effects can be changed during recording or during Record Standby Some modes of Program AE with special effects cannot be used during Night Alive PROGRAM AE Factory preset OFF OFF Disables effects SHUTTER 1 60 The shutter speed is fixed at 1 60th of a second Black bands that usually appear when shooting a TV screen become narrower SHUTTER 1 100 The shutter speed is fixed at 1 100th of a second...

Page 34: ...of lighting is used CAMERA Recording mode Allows you to set the recording mode SP or LP depending on your preference REC MODE Factory preset SP SP Standard Play LP Long Play more economical providing 1 5 times the recording time NOTES Audio Dubbing 墌 pg 59 and Insert Editing 墌 pg 60 are possible on tapes recorded in the SP mode If the recording mode is switched during playback the playback picture...

Page 35: ...mode with frame Gain up GAIN UP Factory preset AGC OFF Allows you to shoot dark scenes with no picture brightness adjustment AGC The overall appearance may be grainy but the image is bright AUTO The shutter speed is automatically adjusted Shooting a subject in low or poor lighting at slow shutter speed provides a brighter image than in the AGC mode but the subject s movements are not smooth or nat...

Page 36: ... Button again within 5 seconds after recording starts Record Standby mode is not engaged 3 To exit the 5S mode select OFF in step 1 To take a snapshot in the 5 second recording mode Instead of pressing the Recording Start Stop Button in step 2 select the desired Snapshot mode in CAMERA Menu 墌 pg 35 then press SNAPSHOT The camcorder records a 5 second still When 5S is set to Anim this function is n...

Page 37: ...tch is set to VIDEO Wind cut WIND CUT Factory preset OFF OFF Disengages the function ON Helps cut down on noise created by wind The indicator appears The quality of the sound will change This is normal Snapshot flash FLASH Factory preset AUTO OFF Will not fire AUTO Fires automatically if it is dark appears AUTO C Fires automatically if it is dark appears and reduces the Red Eye effect in the subje...

Page 38: ... to OFF Priority setting When the viewfinder is pulled out while the LCD monitor is opened you can select which one to use PRIORITY Factory preset LCD LCD Allows you to use the LCD monitor FINDER Allows you to use the viewfinder Resetting menu settings CAM RESET EXECUTE Resets all settings to the factory preset RETURN Does not reset all settings to the factory preset CAMERA DISPLAY Display setting...

Page 39: ...tch set to VIDEO still images are recorded only onto the tape When Snapshot recording is performed with the VIDEO MEMORY Switch set to VIDEO still images are recorded not only onto the tape but also in the memory card 640 x 480 pixels In this mode the SNAP MODE selection in CAMERA Menu is also applicable to memory card recording DSC Menu Image Size Picture Quality SD Memory Card 8 MB 16 MB 32 MB 6...

Page 40: ...d During playback the sound mode is displayed in the upper left corner Synchro adjustment For details refer to For More Accurate Editing 墌 pg 65 SYNCHRO Factory preset 0 0 Recording mode Allows you to set the video recording mode SP or LP depending on your preference It is recommended you use REC MODE in VIDEO Menu when using this camcorder as a recorder during dubbing 墌 pg 52 54 REC MODE Factory ...

Page 41: ...rder s display disappears DATE TIME Factory preset OFF OFF AUTO ON When set to AUTO the date time are displayed in the following cases When playback starts The camcorder displays the date time when scenes are recorded When the date is changed during playback TIME CODE Factory preset OFF OFF ON NOTE The date indication can also be turned on off by pressing the DISPLAY Button on the remote control p...

Page 42: ...g Night Alive it may be difficult to bring the camcorder into focus To prevent this use of a tripod is recommended This feature lets you record still images that look like photographs onto a tape 1 Set the VIDEO MEMORY Switch to VIDEO 2 Set the Power Switch to M while pressing down the Lock Button located on the switch 3 Open the LCD monitor fully or pull out the viewfinder fully 4 Set SNAP MODE t...

Page 43: ... Night Alive mode 墌 pg 42 is engaged and also when the battery remaining power is low The flash does not fire even when it is set to ON if Program AE with special effects is set to SPORTS or SNOW Although images shot with a flash tend to look whiter than they actually are to compensate for this the camcorder automatically darkens the picture when using the flash When shooting a subject at a distan...

Page 44: ... Timer recording press the Recording Start Stop Button again The camcorder re enters Record Standby mode OR 5 Press SNAPSHOT After 15 seconds the beep sounds and snapshot recording starts After that the camcorder re enters Record Standby mode 6 To end Self Timer recording select OFF in step 3 NOTE If BEEP and TALLY are set to OFF 墌 pg 37 the beep does not sound and the tally lamp does not light Se...

Page 45: ...pg 18 If zoomed in in the auto focus mode the camcorder may automatically zoom out depending on the distance between the camcorder and the subject This will not occur when TELE MACRO is set to ON 墌 pg 36 NOTE If you are using the viewfinder you should already have performed Viewfinder Adjustment 墌 pg 12 1 Set the Power Switch to M while pressing down the Lock Button located on the switch 2 Press F...

Page 46: ...se this function in the following situations When shooting a moving subject When the distance to the subject changes so its size in the LCD monitor or the viewfinder changes such as when the subject is backing away When shooting on a reflective natural background such as at the beach or when skiing When shooting objects under a spotlight When zooming When the subject is close keep the iris locked ...

Page 47: ...34 Or set the Power Switch to A NOTE White balance cannot be used when r is set to SEPIA or MONOTONE 墌 pg 34 Adjust the white balance manually when shooting under various types of lighting 1 Set the Power Switch to M while pressing down the Lock Button located on the switch 2 Open the LCD monitor fully or pull out the viewfinder fully 3 Set u to MWB 墌 pg 31 34 The indication blinks slowly 4 Remove...

Page 48: ...AL 墌 pg 31 35 3 After the recording press NAVI STORE The indicator appears briefly and the captured image is stored in the memory card as a thumbnail image NOTES The remaining number of storable thumbnail images also appears on the screen when it reaches 10 or less If REC SELECT is set to in DSC Menu the number shows how many 640 x 480 pixel images can be stored If 5S is set to 5S or Anim in MANUA...

Page 49: ...o not remove the memory card or perform any other operation such as turning off the camcorder during deletion Also be sure to use the provided AC Adapter as the memory card may be corrupted if the battery becomes exhausted during deletion If the memory card becomes corrupted initialize it NOTE Once images are deleted they cannot be restored Check images before deleting IMPORTANT Be sure to always ...

Page 50: ...l Clip Recording The normal screen reappears To view video clips stored in a memory card Refer to Playback Of Video Clips 墌 pg 25 To delete unwanted video clips stored in a memory card Refer to Deleting Files 墌 pg 28 Approximate recording time Optional Provided E Mail Clip Recording I L C E P 00 15 160 0 00 STANDBY 1 0 6 I L C E P I L C E P I L C E P 00 15 160 160 0 00 00 0h 5m 0h 5m STANDBY REC R...

Page 51: ... a memory card Refer to Deleting Files 墌 pg 28 NOTES Approximate maximum recording time per video clip is 3 minutes Playback operation cannot be performed during E Mail Clip Recording If the end of the tape is reached during E Mail Clip Recording that portion will be automatically stored in the memory card If the end of the tape is reached in step 6 the E Mail Clip Record Standby mode will be auto...

Page 52: ...bbing purposes Before you start dubbing make sure that the indications do not appear on the connected TV If they do they are being recorded onto the new tape To choose whether or not the following displays appear on the connected TV Date time Set DATE TIME to AUTO ON or OFF 墌 pg 31 41 Or press DISPLAY on the remote control to turn on off the date indication Time code Set TIME CODE to OFF or ON 墌 p...

Page 53: ...or additional editing Stop the video unit and camcorder NOTES It is recommended to use the AC Adapter as the power supply instead of the battery pack 墌 墌 墌 墌 pg 11 If the remote control is used when both the player and recorder are JVC video units both units will perform the same operation To prevent this from happening press the buttons on both units If a blank portion or disturbed image is playe...

Page 54: ...stops rotating 12 Repeat steps 10 11 for additional editing Stop the video unit and camcorder NOTES It is recommended to use the AC Adapter as the power supply instead of the battery pack 墌 墌 墌 墌 pg 11 If no image is displayed on the LCD monitor set S AV INPUT to OFF 墌 pg 31 40 If the remote control is used when both the player and recorder are JVC video units both units will perform the same oper...

Page 55: ...ring dubbing The selected image is stored in the memory card NOTES If SNAPSHOT is pressed in step 8 when a memory card is not loaded the message COPYING FAILED is displayed If an image recorded on the tape using WIDE MODE 墌 pg 37 is dubbed to a memory card the WIDE mode identifying signal is not dubbed with it To use Playback Special effects with a video image you wish to dub perform up to step 8 ...

Page 56: ...inserting a pointed instrument into the slot 2 Insert the battery in the holder and be sure to have the mark visible 3 Slide the holder back in until you hear a click Installing The Batteries RM V717U optional The remote control uses two AAA R03 size batteries 1 Remove the battery compartment cover while pushing up the tab as illustrated 2 Insert two AAA R03 size batteries in the correct direction...

Page 57: ...itting window The following buttons are available only when the camcorder s Power Switch set to PLAY B DISPLAY Button 墌 墌 墌 墌 pg 22 52 62 C SHIFT Button 墌 墌 墌 墌 pg 58 61 D SLOW Rewind Forward Buttons 墌 墌 墌 墌 pg 58 Left Right Buttons 墌 墌 墌 墌 pg 58 E REW Button 墌 墌 墌 墌 pg 21 24 F FADE WIPE Button 墌 墌 墌 墌 pg 63 G EFFECT ON OFF Button 墌 墌 墌 墌 pg 58 H EFFECT Button 墌 墌 墌 墌 pg 58 I PAUSE IN Connector 墌 ...

Page 58: ...ed image up to 20X at any time during video playback and D S C playback 1 Press PLAY U to start video playback Or perform normal playback of images 2 At the point you want to zoom in press the Zoom Button T To zoom out press the Zoom Button W 3 You can move the image on the screen around to find a particular portion of the picture While holding down SHIFT press Left L w Right F e Up U r and Down E...

Page 59: ... sound during playback Set 12bit MODE to SOUND 2 or MIX 墌 pg 31 40 NOTES Sound is not heard from the speaker during Audio Dubbing When editing onto a tape that was recorded at 12 bit the old and new soundtracks are recorded separately If you dub onto a blank space on the tape the sound may be disrupted Make sure you only edit recorded areas If feedback or howling occurs during TV playback move the...

Page 60: ...an be used to spice up the scenes being edited during Insert Editing During Insert Editing the date and time information changes If you perform Insert Editing onto a blank space on the tape the audio and video may be disrupted Make sure you only edit recorded areas During Insert Editing when the tape moves to scenes recorded in the LP mode or a blank portion Insert Edting stops 墌 pg 84 85 If a mem...

Page 61: ...r may offer limited functions NOTES If the VCR s power does not come on in step 1 try another code from the VCR CODE LIST Some brands of VCR do not come on automatically In this case turn the power on manually and try step 2 If the remote control is not able to control the VCR use the controls on the VCR When the remote control s batteries run out the VCR brand you have set will be erased In that ...

Page 62: ...insert a recordable tape and engage the AUX mode Refer to the VCR s instructions NOTES Before Random Assemble Editing make sure the indications do not appear on the TV monitor If they do they will be recorded onto the new tape To choose whether or not the following displays appear on the connected TV Date time Set DATE TIME to AUTO ON or OFF 墌 pg 31 41 Or press DISPLAY on the remote control to tur...

Page 63: ...disappear one at a time from the most recently registered point If you are not using Wipe Fader or Program AE with special effects repeat steps 8 and 9 only NOTES When choosing a scene set Edit In and Edit Out points so that there is a relatively large difference between them If the search time for an in point exceeds 5 minutes the recording deck s Record Standby mode will be cancelled and editing...

Page 64: ...AUSE 9 14 Press VCR REC STBY 79 or manually engage the VCR s Record Pause mode 15 Press the Recording Start Stop Button on the camcorder Editing proceeds as programmed right through to the end of the last registered scene When dubbing is complete the camcorder enters the Pause mode and the VCR enters its Record Pause mode If you do not register an Edit Out point the tape will be dubbed all the way...

Page 65: ...ress the VCR is slow to start recording Adjustment Of VCR Camcorder Timing 4 Press R A EDIT ON OFF to make the Random Assemble Editing menu disappear then press MENU The Menu Screen appears 5 Press or to select t VIDEO and press SELECT SET The VIDEO Menu appears 6 Press or to select SYNCHRO and press SELECT SET The value for SYNCHRO is highlighted 7 Based on the diagnostics performed you can now a...

Page 66: ...se to the camcorder When using a DV cable be sure to use the optional JVC VC VDV206U or VC VDV204U DV cable depending on the type of DV connector 4 or 6 pins on the PC If the PC connected to the camcorder via the USB cable is not powered the camcorder does not enter the USB mode The date time information cannot be captured into the PC Refer to the instruction manuals of the PC and Software The sti...

Page 67: ...hen the camcorder Disconnect the USB cable from the camcorder and PC NOTES It is recommended to use the AC Adapter as the power supply instead of the battery pack 墌 墌 墌 墌 pg 11 Use the provided software PIXELA ImageMixer to capture video in real time You can also use the camcorder for web conference by using Microsoft Windows NetMeeting and signing up for MSN Hotmail In the Web Camera mode the fol...

Page 68: ...IDEO RECORDING 墌 pg 17 When you use the LCD monitor outdoors in direct sunlight the LCD monitor may be difficult to see If this happens use the viewfinder instead The cassette holder cannot be opened unless a power supply is attached There may be a delay after you open the cassette holder cover until the cassette holder opens Do not use force Once the cassette holder is closed it recedes automatic...

Page 69: ...MORY Switch is set to MEMORY TAPE END appears The cassette holder cover is open For D S C Recording The VIDEO MEMORY Switch is set to VIDEO 2 Set the Power Switch to A or M 墌 pg 17 23 For Video Recording Set the tape s erase protection tab to REC 墌 pg 15 Set the VIDEO MEMORY Switch to VIDEO Replace with new cassette 墌 pg 15 Close the cassette holder cover For D S C Recording Set the VIDEO MEMORY S...

Page 70: ...moving but there is no picture 10 Your TV has AV input terminals but is not set to its VIDEO mode The cassette holder cover is open 10 Set the TV to the mode or channel appropriate for video playback 墌 pg 22 Close the cassette holder cover 墌 pg 15 11 Blocks of noise appear during playback or there is no playback picture and the screen becomes blue 11 11 Clean the video heads with an optional clean...

Page 71: ...Disengage the Sepia SEPIA and Monotone MONOTONE 墌 pg 31 34 17 The image taken using Snapshot is too dark 17 Shooting was performed under backlit conditions 17 Press BACK LIGHT 墌 pg 47 18 The image taken using Snapshot is too bright 18 The subject is too bright 18 Set r to SPOTLIGHT 墌 pg 33 19 White Balance cannot be activated 19 The Sepia SEPIA or Monotone MONOTONE mode is activated 19 Disengage t...

Page 72: ...ted 28 Remove protection from the files stored in the memory card and delete them 墌 pg 27 28 29 When the image is printed from the printer a black bar appears at the bottom of the screen 29 This is not a malfunction 29 By recording with DIS activated 墌 pg 31 36 this can be avoided 30 When the camcorder is connected via the DV connector the camcorder does not operate 30 The DV cable was plugged unp...

Page 73: ...D 墌 pg 12 31 38 Adjust the brightness of the LCD monitor 墌 pg 13 If the monitor is tilted upward 180 degrees open the monitor fully 墌 pg 12 38 Images on the LCD monitor are jittery 38 The speaker volume is too great 38 Turn the speaker volume down 墌 pg 20 39 The LCD monitor the viewfinder and the lens have become dirty ex fingerprints 39 39 Wipe them gently with soft cloth Wiping strongly can caus...

Page 74: ... is a chemical reaction type battery cooler temperatures impede chemical reaction while warmer temperatures can prevent complete charging store in a cool dry place Extended exposure to high temperatures will increase natural discharge and shorten service life fully charge and then fully discharge the battery every 6 months when storing the battery pack over a long period time remove from charger o...

Page 75: ... generating strong magnetic or electric fields speakers broadcasting antennas etc in places subject to extremely high over 40 C or 104 F or extremely low under 0 C or 32 F temperatures 3 DO NOT leave the unit in places of over 50 C 122 F in places where humidity is extremely low below 35 or extremely high above 80 in direct sunlight in a closed car in summer near a heater 4 To protect the unit DO ...

Page 76: ...rty JVC AMERICAS CORP Address 1700 Valley Road Wayne N J 07470 Telephone Number 973 317 5000 This device complies with Part 15 of FCC Rules Operation is subject to the following two conditions 1 This device may not cause harmful interference and 2 this device must accept any interference received including interference that may cause undesired operation Change or modifications not approved by the ...

Page 77: ...ff heavy dirt Then wipe again with a dry cloth 2 Open the LCD monitor Wipe gently with a soft cloth Be careful not to damage the monitor Close the LCD monitor 3 To clean the lens blow it with a blower brush then wipe gently with lens cleaning paper NOTES Avoid using strong cleaning agents such as benzine or alcohol Cleaning should be done only after the battery pack has been removed or other power...

Page 78: ... F to 104 F Operating humidity 35 to 80 Storage temperature 20 C to 50 C 4 F to 122 F Pickup 1 4 CCD Lens F 1 8 f 3 8 mm to 38 mm 10 1 power zoom lens Filter diameter ø27 mm LCD monitor 2 5 diagonally measured LCD panel TFT active matrix system Viewfinder Electronic viewfinder with 0 24 color LCD Speaker Monaural For Digital Video Camera Format DV format SD mode Signal format NTSC standard Recordi...

Page 79: ...es FINE STANDARD Approximate number of storable images 墌 pg 39 For Connectors S AV S Video input Y 0 8 V to 1 2 V p p 75 Ω analog C 0 2 V to 0 4 V p p 75 Ω analog S Video output Y 1 0 V p p 75 Ω analog C 0 29 V p p 75 Ω analog Video input 0 8 V to 1 2 V p p 75 Ω analog Video output 1 0 V p p 75 Ω analog Audio input 300 mV rms 50 kΩ analog stereo Audio output 300 mV rms 1 kΩ analog stereo Edit ø3 5...

Page 80: ...Master Page Left start EN EN EN EN INDEX INDEX Controls Connectors And Indicators GR D200US book Page 80 Friday April 11 2003 1 05 PM ...

Page 81: ...ayback Select Button SELECT 墌 墌 墌 墌 pg 24 29 Set Button SET 墌 墌 墌 墌 pg 31 t Cassette Open Eject Switch OPEN EJECT 墌 墌 墌 墌 pg 15 Connectors The connectors are located beneath the covers U USB Universal Serial Bus Connector 墌 墌 墌 墌 pg 66 V Digital Video Input Output Connector DV i Link 墌 墌 墌 墌 pg 53 54 66 i Link refers to the IEEE1394 1995 industry specification and extensions thereof The logo is us...

Page 82: ... b Shooting Icon 墌 墌 墌 墌 pg 23 Appears and blinks during shooting c Card Icon 墌 墌 墌 墌 pg 23 Appears during shooting Blinks in white when a memory card is not loaded Blinks in yellow while the camcorder is reading the data in the memory card such as NAVIGATION thumbnail images video clips still images etc d Picture Quality FINE and STANDARD in order of quality 墌 墌 墌 墌 pg 39 e Remaining Number Of Sh...

Page 83: ...g Video Playback a Sound Mode Indicator 墌 墌 墌 墌 pg 40 b Blank Search Indicator 墌 墌 墌 墌 pg 21 c Thumbnail Storing Indicator 墌 墌 墌 墌 pg 49 Appears while the captured image is being stored as a thumbnail image in the memory card d Tape Speed 墌 墌 墌 墌 pg 34 e U Playback 5 Fast Forward Shuttle Search 3 Rewind Shuttle Search 9 Pause 9 U Forward Frame By Frame Playback Slow Motion Y 9 Reverse Frame By Fra...

Page 84: ...ded when the Recording Start Stop Button or SNAPSHOT Button is pressed while the Power Switch is set to A or M and the VIDEO MEMORY Switch is set to VIDEO TAPE END Appears when the tape ends during recording or playback 墌 pg 68 SET DATE TIME Appears when the date time is not set 墌 pg 14 Appears when the built in clock lithium battery is discharged and the previously set date time is erased 墌 pg 14...

Page 85: ...ayback CARD ERROR Appears when the camcorder does not recognise the loaded memory card Remove the memory card once and insert it again Repeat these procedures until no indication appears If the indication still appears the memory card is corrupted UNSUPPORTED FILE Appears when playing back a file that is not compatible with DCF or a file with a size that is not compatible with this camcorder CHECK...

Page 86: ...ing ON SCREEN 38 41 DPOF Setting Digital Print Order Format 29 30 Dubbing 52 55 Dubbing from tape to memory card COPY 40 55 E E Mail Clip Recording E CLIP REC 50 51 Erase Protection 15 16 Exposure Control EXPOSURE 46 F Fade In Out 32 Fast Forward The Tape 20 Flash Brightness Adjustment FLASH ADJ 37 43 Flash FLASH 37 43 Frame By Frame Playback 58 G Gain Up GAIN UP 35 Grip Adjustment 12 I Image Size...

Page 87: ...ting Menu Settings CAM RESET 38 Resetting The File Name 29 Rewind The Tape 20 S SD Memory Card 16 74 Self Timer SELF TIMER 36 44 Set Remote VCR Code 61 Shuttle Search 21 Slow Motion Playback 58 Snapshot 23 42 Snapshot Mode SNAP MODE 35 Sound Mode SOUND MODE 34 40 Speaker Volume 20 Specifications 78 79 Still Playback 20 S Video AV input S AV INPUT 40 52 Synchro adjustment SYNCHRO 65 T Tally Lamp TA...

Page 88: ...COPYRIGHT 2003 VICTOR COMPANY OF JAPAN LTD EN GR D201 Master Page Cover4 US Printed in Japan 1103 HO IB VP GR D200US book Page 88 Wednesday July 16 2003 6 17 PM ...

Reviews: