background image

EN 

53

General Battery Precautions

• When the C-P6U or C-P7U (cassette adapter) is not

functioning even when correctly operated, the battery
is exhausted. Replace it with fresh one.

• Use only the following batteries:

C-P6U or C-P7U ........................ AA (R6) size

Please make note of the following rules for battery use.
When misused, battery can leak or explode.
1. Refer to the C-P6U/C-P7U instructions when

replacing the battery.

2. Do not expose the battery to excessive heat as it can

leak or explode.

3. Do not dispose of battery in a fire.
4. Remove battery from the unit if it is to be stored for

an extended period to avoid battery leakage which
can cause malfunctions.

Battery Packs

The supplied battery pack is a
nickel-cadmium battery. Before using
the supplied battery pack or an optional
battery pack, be sure to read the
following cautions:

1. To avoid hazard . . .

..... do not burn.
..... do not short-circuit the terminals.
..... do not modify or disassemble.
..... use only specified chargers.

2. To prevent damage and prolong service life . . .

..... do not subject to unnecessary shock.
..... avoid repeated charging without fully discharg-

ing.

..... charge in an environment where

temperatures are within the tolerances shown in
the chart below. This is a chemical reaction type
battery—cooler temperatures impede chemical
reaction, while warmer temperatures can
prevent complete charging.

..... store in a cool, dry place. Extended exposure to

high temperatures will  increase natural
discharge and shorten service life.

..... avoid prolonged uncharged storage.
..... remove from charger or powered unit when not

in use, as some machines use current even
when switched off.

3. To prevent damage to the camcorder . . .

..... replace the battery pack when it begins to

deliver less recording time per charge.

NOTE:

It is normal for the battery pack to be warm after
charging, or after use.

Temperature Range Specifications
Charging ...................................... 10°C to 35°C
Operation .................................... 0°C to 40°C
Storage ......................................... –10°C to 30°C

NOTES:

Recharging time is based on room temperature of
20°C.

The lower the temperature, the longer recharging
takes.

CAUTIONS

DANGER:
Video Light

• The video light becomes extremely hot. Do not touch

it either while in operation or soon after turning it off,
otherwise serious injury may result.

• Do not place the camcorder into the carrying case

immediately after using the video light, since it
remains extremely hot.

• When operating, keep a distance of about 30 cm

(1 ft.) between the video light and people or object.

• Do not use near flammable or explosive materials.

When using the AC Power Adapter/Charger in
areas other than the USA

n

The provided AC Power Adapter/Charger features
automatic voltage selection in the AC range from 110
V to 240 V.

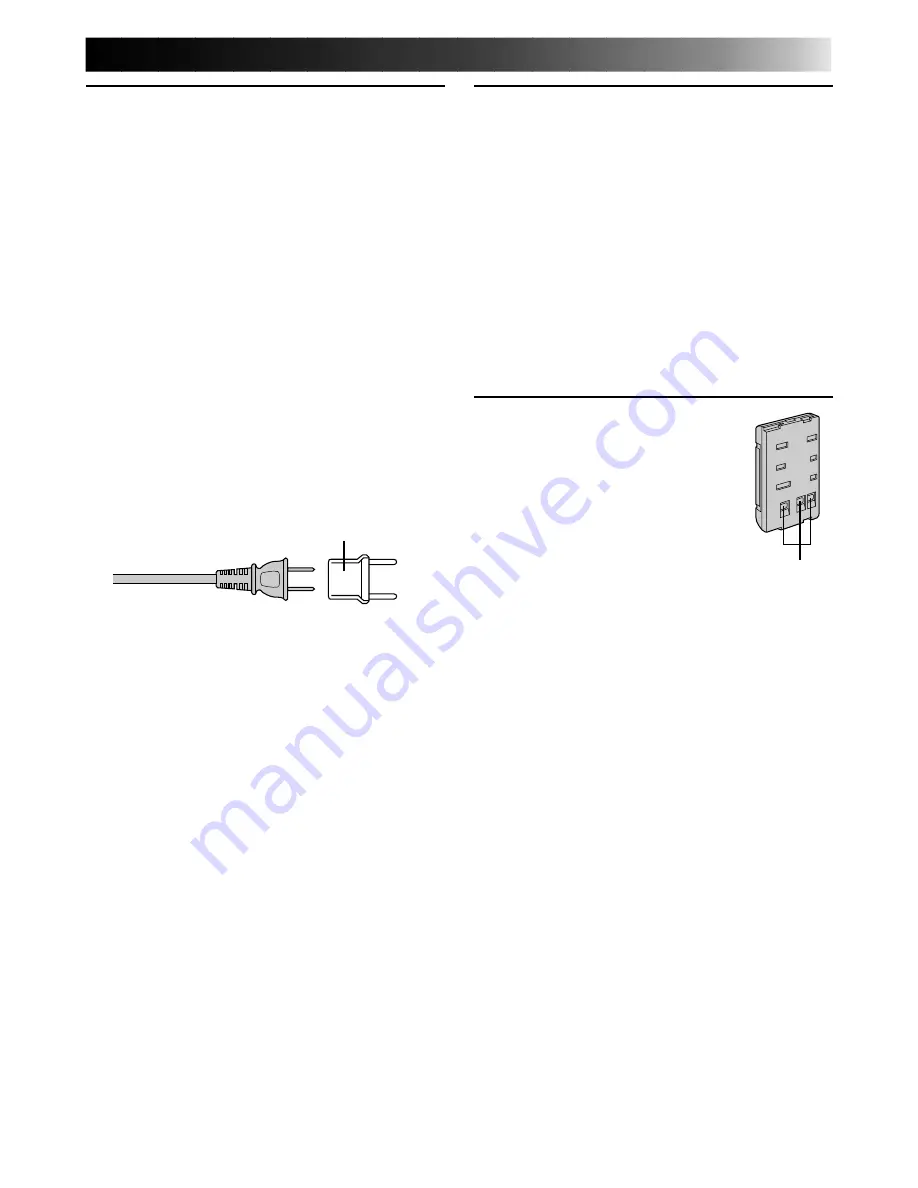
USING HOUSEHOLD AC PLUG ADAPTER

In case of connecting the unit’s power cord to an AC
wall outlet other than American National Standard C73
series type use an AC plug adapter, called a “Siemens
Plug”, as shown.
For this AC plug adapter, consult your nearest JVC
dealer.

INFORMATION

This device complies with Part 15 of FCC Rules.
Operation is subject to the following two conditions:
(1) This device may not cause harmful interference, and
(2) this device must accept any interference received,
including interference that may cause undesired
operation. Change or modifications not approved by
the party responsible for compliance could void the
user’s authority to operate the equipment. This
equipment has been tested and found to comply with
the limits for a Class B digital device, pursuant to Part
15 of the FCC Rules. These limits are designed to
provide reasonable protection against harmful
interference in a residential installation. This equipment
generates, uses, and can radiate radio frequency energy
and, if not installed and used in accordance with the
instructions, may cause harmful interference to radio
communications. However, there is no guarantee that
interference will not occur in a particular installation. If
this equipment does cause harmful interference to radio
or television reception, which can be determined by
turning the equipment off and on, the user is encour-
aged to try to correct the interference by one or more of
the following measures:

Reorient or relocate the receiving antenna.
Increase the separation between the
equipment and receiver.
Connect the equipment into an outlet on a circuit
different from that to which the receiver is
connected.
Consult the dealer or an experienced radio/TV
technician for help.

Plug adapter

Terminals

Summary of Contents for GR-AXM50

Page 1: ...CT VHS CAMCORDER INSTRUCTIONS LYT0002 0L1A Compact VHS For Customer Use Enter below the Model No and Serial No which is located on the bottom of cabinet Retain this information for future reference Model No Serial No ...

Page 2: ...portant operating and maintenance servicing instructions in the literature accompanying the appliance WARNING TO PREVENT FIRE OR SHOCK HAZARD DO NOT EXPOSE THIS UNIT TO RAIN OR MOISTURE Warning on lithium battery The battery used in this device may present a fire or chemical burn hazard if mistreated Do not recharge disassemble heat above 100 C 212 F or incinerate Replace the battery with Panasoni...

Page 3: ...ersonal safety In order not to defeat the built in safeguards observe the following basic rules for its installation use and servicing ATTENTION Follow and obey all warnings and instructions marked on your product and its operating instruc tions For your safety please read all the safety and operating instructions before you operate this product and keep this manual for future reference INSTALLATI...

Page 4: ...ding amplifiers that produce heat SERVICING 1 Servicing If your product is not operating correctly or exhibits a marked change in performance and you are unable to restore normal operation by following the detailed procedure in its operating instructions do not attempt to service it yourself as opening or removing covers may expose you to dangerous voltage or other hazards Refer all servicing to q...

Page 5: ...ypak Z pg 37 1 Slide the LENS COVER open close knob to open the lens cover 2 Set the power switch to CAMERA The power indicator will light and an image will appear in the LCD monitor or the viewfinder 3 Press the Recording Start Stop button Recording starts To stop recording temporarily momentarily press the Recording Start Stop button once again For more details Z pg 15 16 The viewfinder switches...

Page 6: ...CCESSORIES AC Power Adapter Charger AA V11U Digital Hyper Zoom Z pg 18 Zoom in Zoom out The Logical Choice The only compact video cassettes that can be used with your VHS VCR 8 8 2 2 5 5 4 4 1 1 6 6 3 3 7 7 Battery Pack BN V11U Remote Control Unit RM V705U Cassette Adapter VHS PlayPak C P7U Cassettes marked can be used with this camcorder Picture Stabilizer Z pg 24 Lithium Battery CR2025 x 2 Shoul...

Page 7: ...res 18 Advanced Features 20 PLAYBACK 34 Basic Playback 34 Features 35 Basic Connections 36 Using The Cassette Adapter 37 EDITING 38 Tape Dubbing 38 Random Assemble Editing R A Edit 39 USING REMOTE CONTROL UNIT 42 Insert Editing 44 Audio Dubbing 45 USER MAINTENANCE 46 TROUBLESHOOTING 47 INDEX 49 LCD monitor Viewfinder 49 Controls 50 Connectors 50 Indicators 50 Other Parts 50 Terms 52 CAUTIONS 53 SP...

Page 8: ...ndicator lights DETACH BATTERY PACK 3 When charging is completed the END indicator lights Slide the battery pack opposite the direction of the arrow Approximate recording time unit min USING THE BATTERY PACK ATTACH BATTERY PACK 1 Hook its top end to the camcorder and push the battery pack in until it locks in place DETACH BATTERY PACK 2 Slide BATT RELEASE and pull out the battery pack BATT PACK CH...

Page 9: ...ng To avoid interference with reception do not use the AC Power Adapter Charger near a radio Make sure you unplug the DC cord before charging or discharging the battery pack A blinking CHG indicator means that the battery pack has become hot Wait until it cools down to continue The CHG indicator may not light properly with a brand new battery pack or with one that s been stored for an extended per...

Page 10: ...d the compartment A and pull the battery out INSERT BATTERY 4 Ensuring the plus side is up insert a CR2025 lithium battery and push it in CLOSE COVER 5 Close the compartment cover until it clicks in place NOTE See SAFETY PRECAUTIONS Z pg 2 for information on safe handling of lithium batteries Viewfinder Adjustment POSITION VIEWFINDER 1 Adjust the viewfinder manually for best viewability see illust...

Page 11: ...return the date and time to the previous settings press FAR or NEAR to move the highlight bar to Cancel then press MENU If you re satisfied with the settings go on to step 5 START CLOCK OPERATION 5 Once you ve set the date and time press FAR or NEAR until Set begins to blink then press MENU The Menu screen reappears CLOSE MENU 6 Press MENU NOTES To display the date and time in the LCD monitor or t...

Page 12: ...nder is correct only if the correct tape length has been selected Recording Mode Setting Set depending on your preference SET RECORDING MODE 1 Press SP EP button SP Standard Play provides higher picture and sound quality and is better for dubbing while EP Extended Play is more economical recording at 1 3 the speed of SP NOTE If the recording mode is switched during recording the playback picture w...

Page 13: ...r NOTES Closing the LCD monitor while the cassette holder is still open may cause damage to the LCD monitor A cassette holder can t be opened unless a power supply is attached Make sure that the tape is not slack when loading the cassette If there is any slack turn the gear on the cassette in the direction of the arrow to take up the slack Make sure the Erase Protection tab is in the position that...

Page 14: ...the keeper 2 and then through the buckle 3 Repeat the procedure to attach the other end of the strap to the other eyelet making sure the strap isn t twisted ADJUST LENGTH 2 Adjust as shown in the illustration at left 1 then slide both keepers snug against the eyelets to prevent slipping 2 Tripod Mounting ALIGN AND TIGHTEN 1 Align the screw and camera direction stud on the tripod with the camera s ...

Page 15: ...hes off automatically to save power A cassette holder can t be opened unless a power supply is attached There may be a delay after you press EJECT until the holder opens Do not use force The tape s remaining time is displayed in the LCD monitor or the viewfinder as shown The indicated remaining time is approximate The time required to calculate the remaining tape length and the accuracy of the cal...

Page 16: ...itor upward downward for best viewability Z pg 17 and press the Recording Start Stop button The tally lamp lights while recording is in progress and REC appears in the LCD monitor STOP RECORDING 4 Press the Recording Start Stop button again to stop recording The camcorder re enters the Record Standby mode NOTES When you use the LCD monitor outdoors in direct sunlight the LCD monitor may be difficu...

Page 17: ... brightness of the LCD monitor by turning the BRIGHT dial ADJUST BRIGHTNESS 1 If you want to brighten the image Turn the dial toward If you want to darken the image Turn the dial toward Self recording You can shoot yourself while viewing your own image in the LCD monitor TILT LCD MONITOR UPWARD 1 Open the LCD monitor and tilt it upward to 180 degrees so that it faces forward START RECORDING 2 Poin...

Page 18: ...ves during optical zoom Once the Zoom Level indicator reaches the top of the zoom indicator bar all magnification from that point is through digital processing During digital image processing the quality of the image may suffer FEATURE Quick Review PURPOSE To check the end of the last recording OPERATION 1 Press and release quickly during the Record Standby mode Tape is rewound for about 2 seconds...

Page 19: ...light or when you start recording with the video light turned on When the LIGHT OFF AUTO ON switch is set to AUTO Depending on the lighting conditions the video light may keep turning on and off In this case manually switch the light on or off using the LIGHT OFF AUTO ON switch While the Sports or High Speed Shutter mode Z pg 21 is engaged the light is likely to stay on While the Twilight mode Z p...

Page 20: ...ayed in the LCD monitor or the viewfinder for approx 1 second Then the name disappears and only the indication remains The mode is activated When Auto Mode Lock or Auto Mode Release mode is selected only the mode s name is displayed Then the name disappears and the mode is activated NOTES Only one effect can be engaged at a time The screen becomes slightly reddish when the Fade Wipe Z pg 25 is use...

Page 21: ... giving the effect of an older movie Use together with Wide Z pg 26 for the authentic look of a classic Hollywood movie Dial LCD monitor Mode symbol Viewfinder indication Twilight Dusk twilight scenery fireworks etc look more natural and dramatic The following happens when Twilight mode is selected Auto gain control is turned off White Balance is set to outdoor mode but can also be manually change...

Page 22: ... the camcorder Engage the focus lock function to lock your subject in before recording When you want your subject to be focused and to appear in a corner of the screen First center on the subject and focus using auto focus mode Then engage the focus lock function and move the camcorder until the subject is where you want it SELECT MODE 1 Turn the PROGRAM AE select dial to any position except AUTO ...

Page 23: ...AR The focus indication is replaced by the focus lock indication and the adjusted focus is locked in RELEASE MANUAL FOCUS MODE 4 Press FAR and NEAR simultaneously The Manual Focus mode is immediately released and the focus lock indication disappears NOTES Be sure to focus the lens in the maximum telephoto position when you use the Manual Focus mode If you focus in on a certain subject in the wide ...

Page 24: ...ture Stabilizer This feature compensates for unstable images caused by camera shake particularly noticeable at high magnifica tion ACTIVATE PICTURE STABILIZER 1 Press PICTURE STABILIZER appears in the LCD monitor or the viewfinder To switch off the Picture Stabilizer press PICTURE STABILIZER The indicator disappears NOTES Accurate stabilization may not be possible if hand shake is excessive or und...

Page 25: ...ecording and activate fade or wipe in OR END RECORDING Press Recording Start Stop to end recording and engage fade or wipe out TO CANCEL FADE OR WIPE STANDBY MODE 5 While Fade Wipe is displayed press SET twice OFF is displayed for approx 2 seconds and the reserved fade or wipe is cancelled BK Black Fader Fades in out to a black screen Mosaic Fader Gradually turns returns the picture into from a mo...

Page 26: ...to the left DISPLAY SELECT MODE 1 Turn the PROGRAM AE select dial to any position except AUTO LOCK SELECT FUNCTION 2 Press SEL repeatedly until Title appears SELECT PRESET TITLE 3 Engage the Record Standby mode then press SET to cycle through the preset titles until the desired title is displayed NOTES To delete the Instant Title during recording press SEL repeatedly until Title appears then press...

Page 27: ...om of the screen Repeat as many times as desired max 18 To select the location of the next character press FAR or NEAR to make the row of squares blink at the bottom of the screen then press FAR or NEAR to move the blinking cursor underneath the desired location Press when you re done and the blinking cursor returns to the character grid END CHARACTER SETTING 4 Press FAR or NEAR to make End blink ...

Page 28: ...the display press SET again AUTO DATE RECORD Your camcorder automatically records the date for about 5 seconds after recording is initiated in the following situations After changing the date After loading a cassette After Auto Date Record mode is selected by pressing SET In this mode the date is replaced after 5 seconds with Auto Date NOTES Setting PROGRAM AE to LOCK always engages the Auto Date ...

Page 29: ...gs even when there are multiple subjects with different color temperatures SELECT MODE 1 Turn the PROGRAM AE select dial to any position except AUTO LOCK ADJUST FOCUS 2 Point the camcorder at a white flat object such as a sheet of white paper and adjust focus manually Z pg 23 ADJUST WHITE BALANCE 3 Press SET until MWB appears then press and hold SET for more than 3 seconds MWB blinks in the LCD mo...

Page 30: ...settings SELECT MODE 1 Turn the PROGRAM AE select dial to any position except AUTO LOCK ACCESS MENU SCREEN 2 Press MENU SELECT FUNCTION 3 Press or to place the highlight bar on the desired function MAKE SETTING 4 The setting procedure depends on the function you select If you select Gain Up Tele Macro Interval Timer Rec Time JLIP ID NO or Tally press FAR or NEAR to cycle through the choices until ...

Page 31: ... focus at the maximum telephoto setting When set to ON you can shoot a subject as large as possible at a distance of approx 60 cm Depending on the zoom position the lens may go out of focus This feature allows you to set the parameters for Self Timer Z pg 32 and Time Lapse recording Z pg 33 This feature allows you to set the parameters for Animation and Time Lapse recording Z pg 33 This number is ...

Page 32: ...y position except AUTO LOCK then press MENU SET INTERVAL TIME 2 Press or to move the highlight bar down to Interval Timer then press FAR or NEAR to cycle through the choices Stop when the desired time appears Choose from 15s 30s 1min 5min or select to turn the function OFF CLOSE MENU 3 Press MENU START DELAYED RECORDING 4 Press the Recording Start Stop button The tally lamp begins blinking and the...

Page 33: ...ng Animation or Time Lapse recording make sure the Animation or Time Lapse mode is deactivated Time Lapse You can record sequentially at preset time spans Leaving the camcorder aimed at a specific subject you can record subtle changes over an extended period of time NOTE Make sure the camcorder is in the Record Standby mode and the recording mode is set to SP before performing the following steps ...

Page 34: ... toward If you want to turn down the volume Turn the dial toward NOTES The camcorder shuts off automatically after about 5 minutes in Stop mode To turn on again set the power switch to POWER OFF then to PLAY When the power switch is set to CAMERA and the LCD monitor is opened at an angle of 45 degrees or more the LCD monitor switches on and the viewfinder switches off automatically to save power W...

Page 35: ...OSE To allow high speed search in either direction OPERATION Forward Search 1 Press FF during playback Reverse Search 1 Press REW during playback NOTE Noise bars appear and pictures may become monochrome or darken in Shuttle Search This is normal FEATURE Counter Memory Function PURPOSE To make it easier to locate a specific tape segment OPERATION 1 Press COUNTER R M and hold for more than 2 second...

Page 36: ...nectors on the camcorder and those on the TV SELECT MODE 2 Set the TV to its VIDEO or AV mode as specified in its instructions Connection To A TV With NO A V Input Connectors Playback ONLY NOTE Use the optional RF V5U RF unit Refer to the RF V5U instruction manual for connection procedure NOTES It is recommended to use the AC Power Adapter Charger as the power supply instead of the battery pack To...

Page 37: ...rtment door PLAY BACK ON CONNECTED VCR 3 Load the cassette adapter into the VCR and play the tape back as you would any other REMOVE CASSETTE FROM ADAPTER 4 Slide the latch and the compartment door opens automatically Then insert your finger in the hole on the underside of the adapter as shown in the illustration at left push up and remove the cassette NOTES During tape loading and unloading do no...

Page 38: ...der s Play mode to find a spot just before the edit in point Once it s reached press PAUSE on the camcorder START EDITING 5 Press PLAY on the camcorder and engage the VCR s Record mode STOP EDITING TEMPORARILY 6 Engage the VCR s Record Pause mode and press PAUSE on the camcorder EDIT MORE SEGMENTS 7 Repeat steps 4 through 6 for additional editing then stop the VCR and camcorder when finished VCR R...

Page 39: ...e the controls on the VCR MAKE CONNECTIONS CONNECT TO 1 A JVC VCR EQUIPPED WITH REMOTE PAUSE TERMINAL Connect the editing cable to the Remote PAUSE terminal B JVC VCR NOT EQUIPPED WITH REMOTE PAUSE TERMINAL Connect the editing cable to the R A EDIT connector C NON JVC VCR WITH NEITHER Connect the editing cable to the RM V700U s Pause In jack All other connections are as shown in the illustration o...

Page 40: ...der IN on the display REGISTER END OF SCENE 3 Press REW or FF to locate the end of the scene and press IN OUT to register it The data appears under OUT on the display The total time of the registered scene s is displayed at the bottom of the screen REGISTER ADDITIONAL SCENES 4 Repeat steps 2 and 3 for each additional scene as many as 8 MAKE CORRECTIONS 5 Press CANCEL during steps 2 and 3 to erase ...

Page 41: ...which is beging copied is shown with a blinking highlight END AUTOMATIC EDITING 3 When all selected scenes have been copied the camcorder and VCR enter the still or pause mode Press STOP on both units To make the R A Edit counter display disappear press R A EDIT When finished editing be sure to disconnect the editing cable and the audio video cable NOTES If you performed step 1 C on page 39 MAKE C...

Page 42: ...he Recording Start Stop button on the camcorder 8 INT TIME Button Self Timer Time Lapse Z pg 43 9 REC TIME Button Animation Time Lapse Z pg 43 0 PAUSE Button Pause Z pg 35 FF Button Retake forward Z pg 18 FF FF Shuttle Search Z pg 35 A DUB Button Audio dubbing Z pg 45 PAUSE IN Connector Z pg 40 MBR SET Button Z pg 39 VISS Button Index Code marking Z pg 43 VCR CTL Button Z pg 39 R A EDIT Buttons Z ...

Page 43: ...rol Each time INT TIME is pressed the Interval Timer indicator appears changing in the following order 15s 30s 1min 5min and No indication off Each time REC TIME is pressed the Rec Time indicator appears changing in the following order 1 4s 1 2s 1s 5s and No indication off 2 Release Instead of using the Menu in step 5 on pg 33 press INT TIME and REC TIME on the remote control until the indicators ...

Page 44: ...w the recorded tape and press PAUSE at exactly at the point where the new scene should start ENGAGE INSERT EDITING MODE 5 Press and hold INSERT and without releasing INSERT press and release PAUSE The Insert mode is engaged When the scene the camcorder is aimed at appears on the screen go to the next step BEGIN INSERT EDITING 6 Press START STOP When the counter reaches 0 00 00 editing stops automa...

Page 45: ...ode END AUDIO DUBBING 4 Press STOP NOTES Do not press FF or REW during Audio Dub Standby or the edit points will not be accurate If the microphone is too close to the TV or if the TV s volume is too high whistling or howling may occur NOTES for Insert Editing and Audio Dubbing Insert Editing and audio Dubbing may not work correctly if the tape contains blank segments or if the recording speed was ...

Page 46: ... and wipe gently with soft cloth Be careful not to damage the monitor Close the LCD monitor CLEAN LENS 3 Blow it with a blower brush then wipe gently with lens cleaning paper REMOVE EYEPIECE 4 Turn the eyepiece counterclockwise and pull it out CLEAN VIEWFINDER 5 Remove dust using a blower brush RE ATTACH EYEPIECE 6 Align the marks re attach the eyepiece and turn it clockwise NOTES Avoid using stro...

Page 47: ...bs In this case check the position of the tab The camcorder Power switch has not been set to CAM ERA Z pg 15 PLAYBACK The tape is running but there s no playback picture Noise bars appear in the playback picture Playback picture is blurred or interrupted The counter indication is blurred during Still playback The TV has not been set to its VIDEO mode or channel If A V connection is used the TV s V...

Page 48: ... Sunlight is directly entering the lens This is not a defect of the camcorder The light used to illuminate the LCD monitor causes it to be hot Close the LCD monitor to turn it off or set the power switch to OFF and let the unit cool down The LCD monitor is made with high precision technology However black spots or bright spots of light red green or blue may appear constantly on the LCD monitor The...

Page 49: ...cording or fast forward Condensation Warning When this indication appears all functions are disabled Turn the unit off without removing the power source for a few hours and when you turn it on again the indicator should disappear 1 Cassette Warning Remaining Tape Time Z pg 15 When no cassette is inserted the Cassette Warning blinks When Erase Protection tab is not in the position that allows recor...

Page 50: ...50EN INDEX Controls T u i U E Y r 2 4 6 0 3 5 7 9 q e w t y h Q o p a R d s f W O P I 8 1 g ...

Page 51: ...GRAM AE Select Dial Z pg 20 t BRIGHT Dial Z pg 34 y VOLUME Dial Z pg 34 Connectors u J terminal JLIP Joint Level Interface Protocol Connector Located beneath the jack cover Connect the Editing Cable when performing Random Assemble Editing Z pg 40 It is used to connect the camcorder to a device such as a personal computer For further detail consult your nearest JVC dealer i External MIC jack capped...

Page 52: ... pg 43 Insert Cassette pg 13 Insert Editing pg 44 Instant Titles pg 26 L LCD monitor Viewfinder indications pg 49 J Journalistic shooting pg 17 M Manual Focus pg 23 MBR Code Setting pg 39 N ND Effect Mode pg 21 P Picture Stabilizer pg 24 Playback pg 34 Program AE with Special Effects pg 20 Provided Accessories pg 6 Q Quick Review pg 18 R Random Assemble Editing pg 39 41 Recording Advanced Features...

Page 53: ...in operation or soon after turning it off otherwise serious injury may result Do not place the camcorder into the carrying case immediately after using the video light since it remains extremely hot When operating keep a distance of about 30 cm 1 ft between the video light and people or object Do not use near flammable or explosive materials When using the AC Power Adapter Charger in areas other t...

Page 54: ...5 or extremely high above 80 in direct sunlight in a closed car in summer near a heater 4 To protect the unit DO NOT allow it to become wet drop the unit or strike it against hard objects subject it to shock or excessive vibration during transportation keep the lens directed at extremely bright objects for long periods direct the eyepiece of the viewfinder at the sun carry it by holding the viewfi...

Page 55: ...DEO out connector SPECIFICATIONS AUDIO Output 8 dBs 1 k ohm via AUDIO out connector Speaker 20 mm round x 1 monaural External microphone input 68 dBs high impedance unbalanced with ø3 5 mm MONO AC POWER ADAPTER BATTERY CHARGER AA V11U Power requirement U S A and Canada AC 120 V 60 HZ Other countries AC 110 V to 240 V 50 60 Hz Power consumption 23 W Output Charge DC 8 5 V 1 3 A VTR DC 6 3 V 1 8 A C...

Page 56: ... hasta que se bloquee en su lugar EXTRACCION DE LA BATERIA 2 Deslice BATT RELEASE y extraiga la batería cuando el foco de video está encendido Alimentación Esta videocámara posee un sistema de alimentación de 3 vías que le permite seleccionar la fuente de alimentación más apropiada NOTAS Sin alimentación no hay ninguna función disponible Utilice exclusivamente la alimentación indicada No utilice l...

Page 57: ... se lo abre cierre a 45 grados aprox O simplemente reproduzca la cinta en un VCR de VHS utilizando el adaptador de cassette VHS Playpak Z P 37 2 1 Si la unidad comienza a funcionar mal deje de usarla inmediatamente y consulte a su concesionario local de JVC 1 Deslice la perilla de abertura cierre LENS COVER para abrir la tapa del objetivo 2 Adjuste el interruptor de alimentación en CAMERA El indic...

Page 58: ...may require occasional service Just as quality is a keyword in the engineering and production of the wide array of JVC products service is the key to maintaining the high level performance for which JVC is world famous The JVC service and engineering organization stands behind our products NATIONAL HEADQUARTERS JVC SERVICE ENGINEERING COMPANY OF AMERICA DIVISION OF US JVC CORP 107 Little Falls Roa...

Page 59: ...chment not provided with the products or if the model or serial number has been altered tampered with defaced or removed 2 Initial installation and installation and removal for repair 3 Operational adjustments covered in the Owner s Manual normal maintenance video and audio head cleaning 4 Damage that occurs in shipment due to act of God and cosmetic damage 5 Signal reception problems and failures...

Page 60: ...GR AXM50 COPYRIGHT 1997 VICTOR COMPANY OF JAPAN LTD U Printed in Japan 0597TOV UN YP JVC COMPANY OF AMERICA DIVISION OF US JVC CORP 41 Slater Drive Elmwood Park N J 07407 ...

Reviews: