background image

28

 EN

M-1:23:45

LP

PLAYBACK

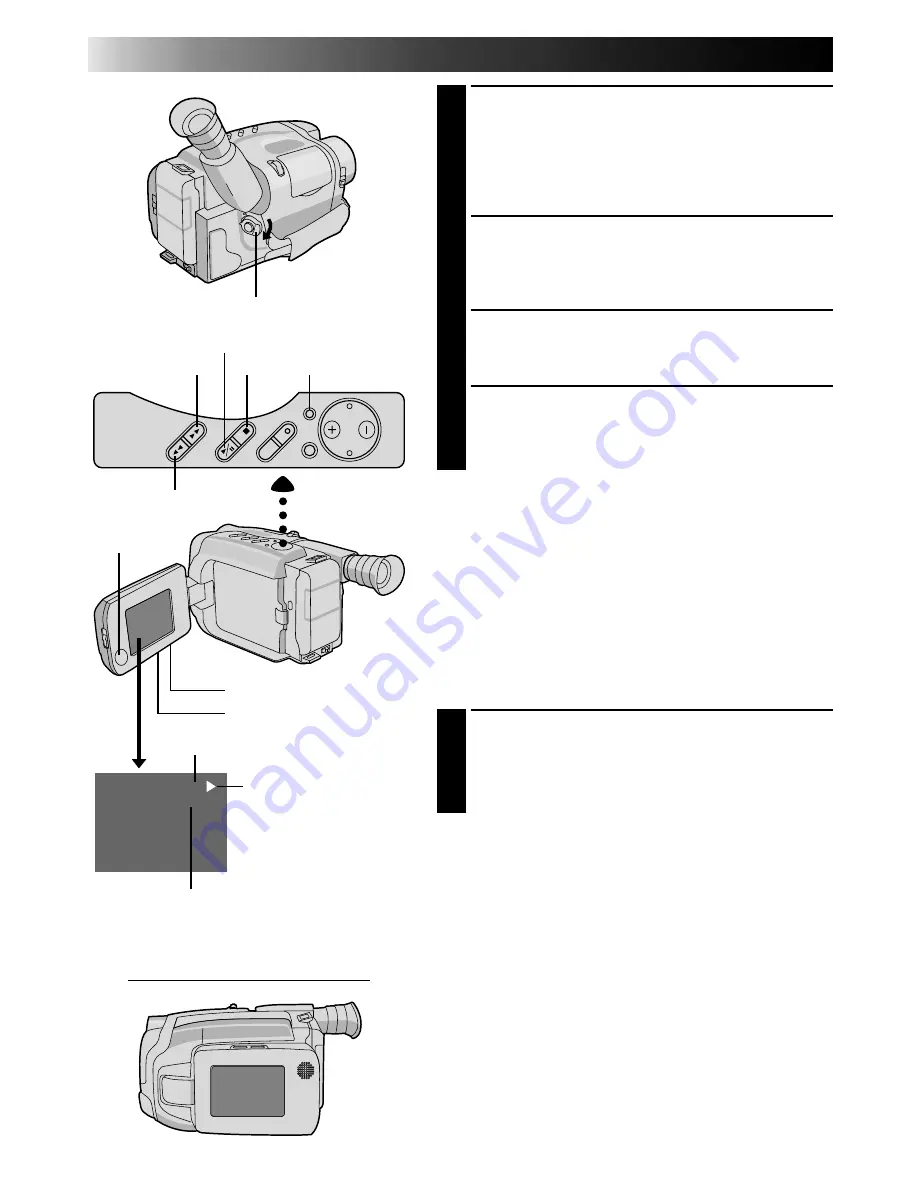
  Basic Playback

LOAD A CASSETTE

1

First slide MONITOR OPEN and open the LCD
monitor to an angle of over 45 degrees. Press EJECT
to open the cassette holder, then insert the cassette
with the label facing out. Press PUSH to ensure the
holder is closed and locked.

SELECT MODE

2

Make sure the LCD monitor is fully open. Then set
the power switch to PLAY. The Power On indicator
lights.

PLAYBACK

3

Press PLAY/PAUSE. The playback picture appears in
the LCD monitor.

STOP PLAYBACK

4

Press STOP.

Rewind or Fast-forward the tape

Press REW to rewind, or FF to fast-forward the tape
during Stop mode.

Adjust the brightness of the LCD monitor

To brighten the image, turn the BRIGHT dial toward “+”.
To darken the image, turn the dial toward “”.

Speaker volume control

You can adjust the speaker volume by turning the
VOLUME dial.

ADJUST VOLUME

1

If you want to turn up the volume . . .

Turn the dial toward “+”.

If you want to turn down the volume . . .

Turn the dial toward “”.

NOTES:

The camcorder shuts off automatically after about 5
minutes in Stop mode. To turn on again, set the power
switch to POWER OFF, then to PLAY.

When the power switch is set to PLAY and the LCD
monitor is opened at an angle of 45 degrees or more,
the LCD monitor switches on and the viewfinder
switches off automatically to save power.

When the LCD monitor is turned off, sound is not
heard from the speaker.

The playback picture can also be viewed in the
viewfinder (with the LCD monitor shut) or on a
connected TV (

Z

 pg. 30). Camcorder operation is the

same as described in this section.

You can also view the playback picture on the LCD
moitor with it flipped over and retracted.

During playback, pressing DISPLAY lets you remove all
indications from the screen.

FF

STOP

DISPLAY

POWER

PLAY/PAUSE

REW

Speaker

VOLUME

BRIGHT

Recording mode indicator

Tape counter

Tape running indicator

4

: Playback

3

: Fast-Forward/

Forward Search

2

: Rewind/Reverse

Search

6

: Still Playback

LCD Monitor in Retracted Position

Summary of Contents for GR-AXM307EG

Page 1: ...mains plug then follow the instructions given below DO NOT make any connection to the Larger Terminal coded E or Green The wires in the mains lead are coloured in accordance with the following code Blue to N Neutral or Black Brown to L Live or Red If these colours do not correspond with the terminal identifications of your plug connect as follows Blue wire to terminal coded N Neutral or coloured b...

Page 2: ...9 RECORDING 10 Basic Recording 10 Basic Features 14 Advanced Features 16 PLAYBACK 28 Basic Playback 28 Features 29 Basic Connections 30 Using The Cassette Adapter 31 EDITING 32 Tape Dubbing 32 Random Assemble Editing R A Edit 33 USING REMOTE CONTROL UNIT 36 Insert Editing 38 Audio Dubbing 39 TROUBLESHOOTING 40 INDEX 42 Controls 42 Connectors 42 Indicators 42 Other Parts 42 LCD monitor Viewfinder 4...

Page 3: ...off Viewfinder off Viewfinder on BN V12U 50 35 55 35 BN V22U 110 75 120 80 BN V25U 150 100 160 105 when the video light is on USING THE BATTERY PACK ATTACH BATTERY PACK 1 Hook its top end to the camcorder and push the battery pack in until it locks in place DETACH BATTERY PACK 2 Slide BATT RELEASE and pull out the battery pack CHARGE MARKER A charge marker is provided on the battery pack to help y...

Page 4: ... AC Power Adapter Charger near a radio Make sure you unplug the DC cord before charging or discharging the battery pack A blinking CHG indicator means that the battery pack has become hot Wait until it cools down to continue The CHG indicator may not light properly with a brand new battery pack or with one that s been stored for an extended period In this case remove and reattach the battery pack ...

Page 5: ... the compartment A and pull the battery out INSERT BATTERY 4 Ensuring the plus side is up insert a CR2025 lithium battery and push it in CLOSE COVER 5 Close the compartment cover until it clicks in place NOTE See SAFETY PRECAUTIONS Z pg 2 for information on safe handling of lithium batteries Viewfinder Adjustment POSITION VIEWFINDER 1 Adjust the viewfinder manually for best viewability see illustr...

Page 6: ...urn the date and time to the previous settings press FAR or NEAR to move the highlight bar to CANCEL then press MENU If you re satisfied with the settings go on to step 5 START CLOCK OPERATION 5 Once you ve set the date and time press FAR or NEAR until SET begins to blink then press MENU The Menu screen reappears CLOSE MENU 6 Press MENU NOTES To display the date and time in the LCD monitor or the ...

Page 7: ...rees OPEN CASSETTE HOLDER 2 Press EJECT until the holder opens Do not use force to open INSERT REMOVE CASSETTE 3 Make sure the label is facing outward CLOSE CASSETTE HOLDER 4 Press PUSH and make sure the holder is closed and locked CLOSE LCD MONITOR 5 First make sure the holder is closed Then close the LCD monitor NOTES Closing the LCD monitor while the cassette holder is still open may cause dama...

Page 8: ...en through the buckle 3 Repeat the procedure to attach the other end of the strap to the other eyelet making sure the strap isn t twisted ADJUST LENGTH 2 Adjust as shown in the illustration at left 1 then slide both keepers snug against the eyelets to prevent slipping 2 Tripod Mounting ALIGN AND TIGHTEN 1 Align the screw and camera direction stud on the tripod with the camera s mounting socket and...

Page 9: ...e the holder is closed and locked Shooting while watching the viewfinder ENTER RECORD STANDBY MODE 2 Make sure the LCD monitor is closed and locked Slide the LENS COVER open close switch to open the lens cover then set the power switch to CAMERA The power indicator lights and the camcorder enters the Record Standby mode The scene you re aimed at appears on the viewfinder screen with the word PAUSE...

Page 10: ...APE END appears when the tape reaches its end and the power goes off automatically if left in this condition for 5 minutes TAPE END also appears when a cassette whose tape is already at its end is loaded While shooting pressing DISPLAY lets you remove some indiations from the screen Z pg 44 If the Record Standby mode continues for 5 minutes without performing Zoom or any other operations the camco...

Page 11: ...pon it START SHOOTING 3 Tilt the LCD monitor upward downward for best viewability Z pg 13 and press the Recording Start Stop button The tally lamp lights while recording is in progress and REC appears in the LCD monitor STOP RECORDING 4 Press the Recording Start Stop button again to stop recording The camcorder re enters the Record Standby mode NOTES When you use the LCD monitor outdoors in direct...

Page 12: ... brightness of the LCD monitor by turning the BRIGHT dial ADJUST BRIGHTNESS 1 If you want to brighten the image Turn the dial toward If you want to darken the image Turn the dial toward Self recording You can shoot yourself while viewing your own image in the LCD monitor TILT LCD MONITOR UPWARD 1 Open the LCD monitor and tilt it upward to 180 degrees so that it faces forward START RECORDING 2 Poin...

Page 13: ... To check the end of the last record ing OPERATION 1 Press and release quickly during the Record Standby mode Tape is rewound for about 2 seconds and played back automatically then pauses in Record Standby mode for the next shot NOTE Distortion may occur at start of playback This is normal FEATURE Retake PURPOSE To re record certain segments OPERATION 1 Make sure the camcorder is in the Record Sta...

Page 14: ...eo light or when you start recording with the video light turned on When the LIGHT OFF AUTO ON switch is set to AUTO Depending on the lighting conditions the video light may keep turning on and off In this case manually switch the light on or off using the LIGHT OFF AUTO ON switch While the Sports or High Speed Shutter mode Z pg 17 is engaged the light is likely to stay on While the Twilight mode ...

Page 15: ...ht sources such as flourescent or mercury vapour lights 1 second later the mode is activated Dial LCD monitor Mode symbol Viewfinder indication Auto Mode Lock Locks the camcorder in Full Auto mode preventing incorrect operation due to accidental button pressing during shooting In this mode the following controls are disabled FADE WIDE TITLE DISPLAY M W B Manual White Balance Manual Focus Focus Loc...

Page 16: ...ilight TWILIGHT Sports SPORTS Exposure Control This feature automatically adjusts the iris for the best available picture quality but you can override and make the adjustment manually SELECT MODE 1 Turn the PROGRAM AE select dial to any position except AUTO LOCK BRIGHTEN IMAGE 2 Press maximum 06 The Exposure level indicator appears in the LCD monitor or the viewfinder OR DARKEN IMAGE Press maximum...

Page 17: ... the camcorder Engage the focus lock function to lock your subject in before recording When you want your subject to be focused and to appear in a corner of the screen First center on the subject and focus using auto focus mode Then engage the focus lock function and move the camcorder until the subject is where you want it SELECT MODE 1 Turn the PROGRAM AE select dial to any position except AUTO ...

Page 18: ...AR The focus indication is replaced by the focus lock indication and the adjusted focus is locked in RELEASE MANUAL FOCUS MODE 4 Press FAR and NEAR simultaneously The Manual Focus mode is immediately released and the focus lock indication disappears NOTES Be sure to focus the lens in the maximum telephoto position when you use the Manual Focus mode If you focus in on a certain subject in the wide ...

Page 19: ...cording and engage fade out NOTES Pressing and holding the Recording Start Stop button allows you to record a black blank screen The screen becomes slightly reddish when the Fader is used with Sepia Z pg 16 With the Electronic fog filter mode Z pg 16 engaged the image fades in out to a white screen Wide This feature allows you to record black bars at the top and bottom of the screen to produce a c...

Page 20: ...TO LOCK then press MENU ACCESS CHARACTER SET MENU 2 Press or to move the highlight bar to SET CHARACTER then press NEAR The Character Set menu appears INPUT CHARACTERS 3 Press FAR or NEAR to move the pointer to the desired character then press MENU The selected characters appear at the bottom of the screen Repeat as many times as desired max 18 To select the location of the next character press FA...

Page 21: ...AY MODE 3 Press SET while in Record Standby to cycle through the modes as shown in the illustration at left NOTES The selected display can be recorded If you don t want to record the display select Date off mode before shooting If you want to delete the display during shooting press SET If you want to call back a deleted display engage the Record Standby mode and then select the desired display mo...

Page 22: ... are multiple subjects with different colour temperatures SELECT MODE 1 Turn the PROGRAM AE select dial to any position except AUTO LOCK ADJUST FOCUS 2 Point the camcorder at a white flat object such as a sheet of white paper and adjust focus manually Z pg 19 ADJUST WHITE BALANCE 3 Press SET until MWB appears then press and hold SET for more than 3 seconds MWB blinks in the LCD moitor or the viewf...

Page 23: ...le through the choices until the desired setting appears If you select SET CHARACTER or DATE TIME press NEAR to access the selection menu for each function SET CHARACTER Z pg 21 DATE TIME Z pg 7 CLOSE MENU 5 Press MENU The normal screen reappears NOTE The menu is available only in the Record Standby mode RECORDING Advanced Features cont PAUSE GAIN UP S LX TELE MACRO OFF INTERVAL TIMER OFF REC TIME...

Page 24: ... the maximum telephoto setting When set to ON you can shoot a subject as large as possible at a distance of approx 60 cm Depending on the zoom position the lens may go out of focus INTERVAL TIMER This feature allows you to set the parameters for Self Timer Z pg 26 and Time Lapse recording Z pg 27 REC TIME This feature allows you to set the parameters for Animation and Time Lapse recording Z pg 27 ...

Page 25: ...tion except AUTO LOCK then press MENU SET INTERVAL TIME 2 Press or to move the highlight bar down to INTERVAL TIMER then press FAR or NEAR to cycle through the choices Stop when the desired time appears Choose from 15S 30S 1MIN 5MIN or select to turn the function OFF CLOSE MENU 3 Press MENU START DELAYED RECORDING 4 Press the Recording Start Stop button The tally lamp begins blinking and the blink...

Page 26: ...Animation or Time Lapse recording make sure the Animation or Time Lapse mode is deactivated Time Lapse You can record sequentially at preset time spans Leaving the camcorder aimed at a specific subject you can record subtle changes over an extended period of time NOTE Make sure the camcorder is in the Record Standby mode and the recording mode is set to SP before performing the following steps ACC...

Page 27: ...lume Turn the dial toward If you want to turn down the volume Turn the dial toward NOTES The camcorder shuts off automatically after about 5 minutes in Stop mode To turn on again set the power switch to POWER OFF then to PLAY When the power switch is set to PLAY and the LCD monitor is opened at an angle of 45 degrees or more the LCD monitor switches on and the viewfinder switches off automatically...

Page 28: ...OSE To allow high speed search in either direction OPERATION Forward Search 1 Press FF during playback Reverse Search 1 Press REW during playback NOTE Noise bars appear and pictures may become monochrome or darken in Shuttle Search This is normal FEATURE Counter Memory Function PURPOSE To make it easier to locate a specific tape segment OPERATION 1 Press COUNTER R M and hold for more than 2 second...

Page 29: ...e AUDIO and VIDEO connectors on the camcorder and those on the TV SELECT MODE 2 Set the TV to its VIDEO or AV mode as specified in its instructions Connection To A TV With NO A V Input Connectors Playback ONLY NOTE Use the optional RF V5E RF unit Refer to the RF V5E instruction manual for connection procedure NOTES It is recommended to use the AC Power Adapter Charger as the power supply instead o...

Page 30: ... door PLAY BACK ON CONNECTED VCR 3 Load the cassette adapter into the VCR and play the tape back as you would any other REMOVE CASSETTE FROM ADAPTER 4 Slide the latch and the compartment door opens automatically Then insert your finger in the hole on the underside of the adapter as shown in the illustration at left push up and remove the cassette NOTES During tape loading and unloading do not touc...

Page 31: ...Play mode to find a spot just before the edit in point Once it s reached press PAUSE on the camcorder START EDITING 5 Press PLAY on the camcorder and engage the VCR s Record mode STOP EDITING TEMPORARILY 6 Engage the VCR s Record Pause mode and press PAUSE on the camcorder EDIT MORE SEGMENTS 7 Repeat steps 4 through 6 for additional editing then stop the VCR and camcorder when finished VCR Recordi...

Page 32: ...tton A and then B The code is automatically set once you release the MBR SET button and the VCR s power comes on OPERATE THE VCR 2 Make sure the VCR s power is on Then while holding VCR CTL press the button on the remote for the desired function The functions the remote can control are PLAY STOP PAUSE FF REW and VCR REC STBY you don t need to press VCR CTL for this one You re now ready to try Rand...

Page 33: ... as many as 8 MAKE CORRECTIONS 5 Press CANCEL during steps 2 and 3 to erase the most recently registered point NOTES The RM V704U V700U can be used to operate other camcorder functions as well Point the RM V704U V700U at the camcorder s remote sensor and press any of the following buttons function appears in parentheses ON OFF camcorder R A EDIT IN OUT camcorder IN OUT CANCEL camcorder CANCEL Ther...

Page 34: ... VCR SUPPLEMENTAL INFORMATION ON THE REMOTE CONTROL Using the RM V704U V700U it is also possible to perform deck to deck Random Assemble Editing The playback deck must be an R A Edit capable JVC VCR The recording deck can be n a VCR other than JVC or n a JVC VCR which has neither a Remote PAUSE nor an R A EDIT connector How to use Connect the playback deck and RM V704U V700U as shown on the left S...

Page 35: ...icks into place Read the caution concerning lithium batteries Z pg 2 BUTTONS FUNCTIONS With the camcorder s power switch With the camcorder s power switch set to CAMERA set to PLAY 1PAUSE IN Connector Z pg 34 2Infrared beam Transmits the beam signal transmitting window 3MBR SET Button Z pg 33 4INT TIME Button Self Timer Time Lapse Z pg 37 5REC TIME Button Animation Time Lapse Z pg 37 6FF Button Re...

Page 36: ...ress INT TIME and REC TIME on the remote control Each time INT TIME is pressed the Interval Timer indicator appears changing in the following order 15S 30S 1MIN 5MIN and No indication off Each time REC TIME is pressed the Rec Time indicator appears changing in the following order 1 4S 1 2S 1S and No indication off 2 Release Instead of using the Menu in step 5 on pg 27 press INT TIME and REC TIME o...

Page 37: ...Y to view the recorded tape and press PAUSE at exactly at the Edit in point where the new scene should start ENGAGE INSERT EDITING MODE 5 Press and hold INSERT and without releasing INSERT press and release PAUSE The Insert mode is engaged and the scene the camcorder is aimed at appears on the screen BEGIN INSERT EDITING 6 Press START STOP When the counter reaches 0 00 00 editing stops automatical...

Page 38: ...D AUDIO DUBBING 4 Press STOP NOTES Do not press FF or REW during Audio Dub Standby or the edit points will not be accurate If the microphone is too close to the TV or if the TV s volume is too high whistling or howling may occur NOTES for Insert Editing and Audio Dubbing Insert Editing and Audio Dubbing may not work correctly if the tape contains blank segments or if the recording speed was change...

Page 39: ...ove the cassette and disconnect the power source then after a few minutes try turning the power back on If it still doesn t come on consult your nearest JVC dealer The recording tape s Erase Protection tab is missing Cover the hole with adhesive tape Some tapes have sliding tabs In this case check the position of the tab The camcorder Power switch has not been set to CAMERA Z pg 10 The TV has not ...

Page 40: ... it off or set the power switch to OFF and let the unit cool down The LCD monitor is made with high precision technology However black spots or bright spots of light red green or blue may appear constantly on the LCD monitor These spots are not recorded on the tape This is not due to any defect of the unit Effective dots more than 99 99 This may occur when the surface or the edge of the LCD monito...

Page 41: ...42EN INDEX Controls E y T Q R e 2 4 6 0 3 5 7 9 q w r t f o u i O W a P s p U I Y 8 1 d ...

Page 42: ...RAM AE Select Dial Z pg 16 r BRIGHT Dial Z pg 28 t VOLUME Dial Z pg 28 Connectors y J terminal JLIP Joint Level Interface Protocol Connector Located beneath the jack cover Connect the Editing Cable when performing Random Assemble Editing Z pg 34 It is used to connect the camcorder to a device such as a personal computer For further detail consult your nearest JVC dealer u DC IN Jack Z pg 5 The jac...

Page 43: ...Z pg 21 Date Time Character Display Z pg 22 Battery Pack Remaining Power Indicator Changes as follows according to the battery pack s remaining power level When the power is almost gone the indicator blinks then the unit shuts off Replace the battery pack with a fully charged one Note The symbol containing 3 darkened squares does not necessarily mean that the battery pack is fully charged Focus In...

Page 44: ...ut fully discharging charge in an environment where temperatures are within the tolerances shown in the chart below This is a chemical reaction type battery cooler temperatures impede chemical reaction while warmer temperatures can prevent complete charging store in a cool dry place Extended exposure to high temperatures will increase natural discharge and shorten service life avoid prolonged unch...

Page 45: ...C or extremely low under 0 C temperatures 3 DO NOT leave the unit in places of over 50 C in places where humidity is extremely low below 35 or extremely high above 80 in direct sunlight in a closed car in summer near a heater 4 To protect the unit DO NOT allow it to become wet drop the unit or strike it against hard objects subject it to shock or excessive vibration during transportation keep the ...

Page 46: ...TFT active matrix system VIDEO Output 1 Vp p 75 ohms unbalanced via VIDEO out connector AUDIO Output 8 dBs 1 k ohm via AUDIO out connector Speaker 20 mm round x 1 monaural AC POWER ADAPTER BATTERY CHARGER AA V11EG EK Power requirement AC 110 to 240 V 50 60 Hz Power consumption 23 W Output DC 8 5 V 1 3 A CHARGE DC 6 3 V 1 8 A VTR Charging system Constant current peak detection timer controlled Dime...

Reviews: