background image

30

MENU/EXIT

VOLUME –

2

 / 

3

5

 /  

5

DISPLAY

ASPECT

POWER

RGB

COMPO.

VIDEO B

VOLUME

MULTIPLE

MODE

ID SET

MONITOR ADJUSTMENT

VIDEO A

MUTING

MENU/EXIT

RM-C575 REMOTE CONTROL UNIT

ID

Other Convenient Functions 

(Continued)

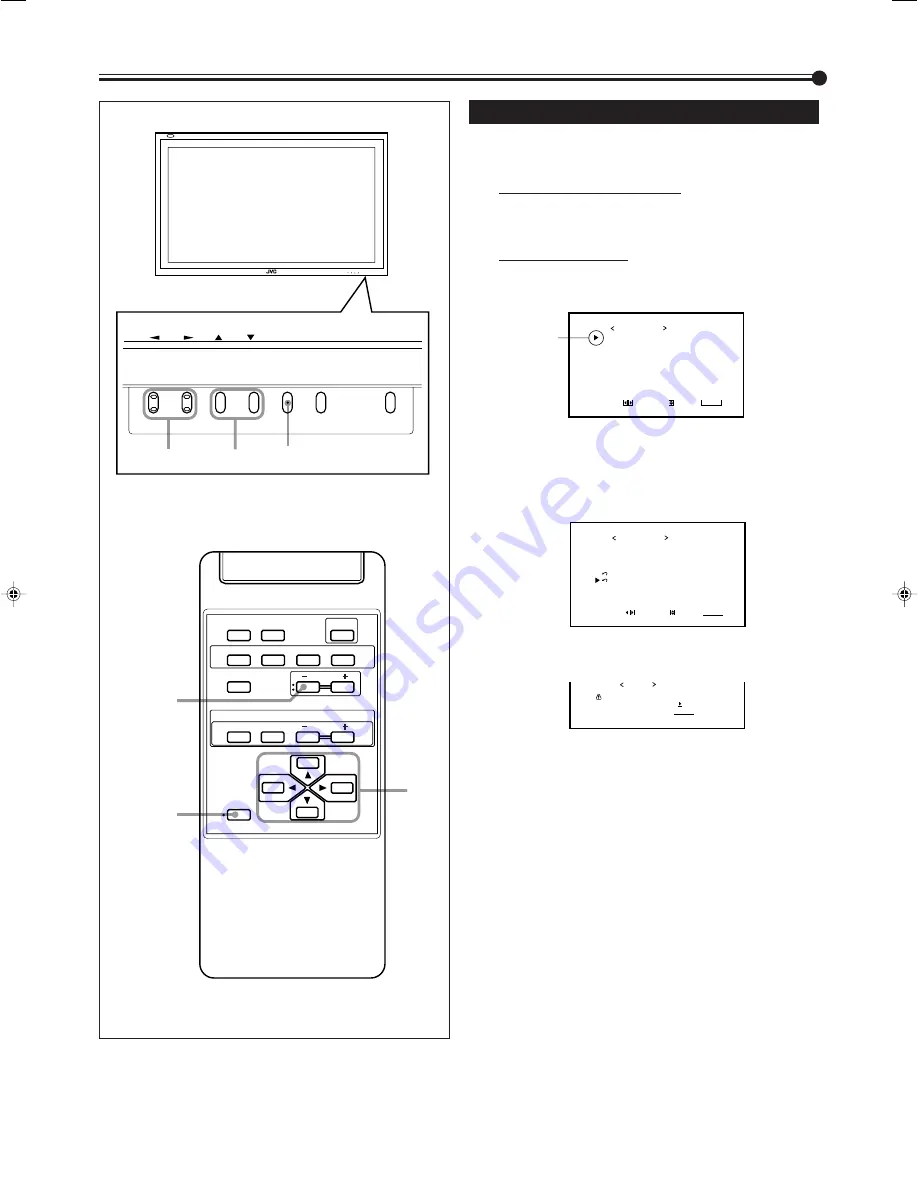
Resetting All the Menu Settings

You can reset all the Menu settings and adjustments at a time,
except the use time of the source lamp (HOUR METER).

1

On the remote control:
Press MENU/EXIT while holding
VOLUME – to display the Setup Menu.

On the Monitor:
Press MENU while holding 

2

 to display

the Setup Menu.

2

Press 

5

/

 to move the cursor (

3

) to “all

reset” (on the second page).

• The Setup Menu consists of two pages. If you keep

pressing 

5

/

, you can move to the other page from

the current page.

3

Press 

3

.

The confirmation screen appears.

4

Press 

3

 again to reset all the Menu

settings and adjustments.

To cancel the reset,

 press MENU/EXIT (or MENU on

the Monitor).

Cursor (

3

)

A U T O   S L E E P
C O N T R O L   L O C K
S T A T U S   D I S P L A Y
V E N T I L A T I O N   M O D E
H D   S I G N A L   M O D E
W H I T E   B A L A N C E

S E T - U P   M E N U           1 / 2

A D J U S T :

S E L E C T :

E X I T :

M E N U

:   1 M I N .
:   O N
:   O N
:   H
:   1 0 8 0 i

MENU INPUT

POWER

MENU INPUT

POWER

MENU

2

 / 

3


5

5

 / 

P I X E L   S H I F T
P O W E R   S A V E
C O L O R - R E V E R S E
R E F R E S H
      r e s e t
      a l l   r e s e t
H O U R   M E T E R   x 1 0 0 0

S E T - U P   M E N U           2 / 2

A D J U S T :

S E L E C T :

E X I T :

M E N U

:   O N
:   O N
:   O N
:   O N

:   0 0 1

A r e   y o u   s u r e ?
" Y E S "   t h e n   p r e s s               k e y .
" N O "       t h e n   p r e s s                     k e y

M E N U

a l l   r e s e t

24-30.GD-V4210PZW[EN]/f

00.9.29, 5:56 PM

30

Summary of Contents for GD-V4210PCE

Page 1: ... Front View 5 Monitor Rear Views 6 Preparations 9 Checking the Accessories 9 Installing the Batteries 9 Installation 10 Precautions 10 Connections 11 Precautions 11 Available Signals 11 Connection Examples 12 Basic Operations 14 Daily Operations 14 Changing the Aspect Ratio 15 Video Adjustments 16 Adjusting the Picture Quality 16 Adjusting the Screen Size and Position 17 Adjusting the Color Temper...

Page 2: ...aration between the equipment and receiver Connect the equipment into an outlet on a circuit different from that to which the receiver is connected Consult the dealer or an experienced radio TV technician for help EUROPE EMC STANDARD NOTICE GD V4210PZW GD V4210PZW G GD V4210PCE GD V4210PCE G Warning This is a class A product In a domestic environment this product may cause radio interference in wh...

Page 3: ...ic shock Never push objects of any kind into this product through openings as they may touch dangerous voltage points or short out parts that could result in a fire or electric shock Never spill liquid of any kind on the product Do not attempt to service this product yourself as opening or removing covers may expose you to dangerous voltages and other hazards Refer all service to qualified service...

Page 4: ...tons to select menu items or make adjustments REGULAR FULL ZOOM PANORAMIC 1 Remote signal transmission window 2 DISPLAY button page 14 Use this button to display the input terminal color system for VIDEO A or B input scan system for COMPONENT input and horizontal vertical frequency for RGB input Pressing the button again will make the display disappear 3 VIDEO A VIDEO B COMPO and RGB buttons page ...

Page 5: ...ume level 4 MENU button Use this button to display or erase menus While a sub menu is displayed pressing this button will move you one screen back to the preceding menu 5 INPUT button page 14 Use this button to switch between inputs To select the correct RGB input you have to set RGB INPUT correctly on the menu see page 23 Only for GD V4210PCE GD V4210PCE G and GD V4211PCE Only RGB input can be re...

Page 6: ...into standby mode allowing you to turn on and off the power using the POWER button either on the remote control or on the Monitor 5 SPEAKER OUT terminals page 12 Connect external speakers 6 INTERNAL EXTERNAL built in speaker external speaker selecting switch page 12 INTERNAL To use built in speakers EXTERNAL To use external speakers 7 REMOTE 2 JVC CODE terminals mini jack page 31 IN For Master Mon...

Page 7: ...ync and composite Cs sync are connected HD VD sync signals will be used R G B HD Cs VD output terminals BNC Connect these terminals to the following input terminals of another monitor Analog RGB signal input terminals Horizontal sync HD signal or composite Cs signal input terminal Vertical sync VD signal input terminal 8 9 p 9 RGB A input terminal D sub 15 pin page 12 Connect this terminal to the ...

Page 8: ...o output terminal of a VCR etc Video input terminal pin jack Connect this terminal to the video output terminal of a VCR etc Audio input terminals pin jack Connect these terminals to the audio output terminals of a VCR etc Note GD V4210PCE GD V4210PCE G and GD V4211PCE do not have the following input terminals VIDEO A VIDEO B and COMPONENT To input video S video and component signals you need to i...

Page 9: ...e vicinity Take notice of the following Do not mix old and new batteries Do not mix different types of battery as different types may have different characteristics Place the batteries according to the ª and markings indicated on the battery compartment When installing the batteries insert the end first to avoid a short circuit Use only the specified batteries When you are not using the remote con...

Page 10: ...t allow the same image pattern to be continuously displayed on the screen for a long time otherwise the area on the screen corresponding to the image may vary in brightness leaving an afterimage on the screen To reduce the afterimage you can use the Refresh function see page 29 The Monitor is manufactured using very high precision technology allowing for more than 99 99 active pixels however be aw...

Page 11: ...PC98 640 400 24 8 56 4 Non interlace 2 VGA400 70 640 400 31 5 70 1 Non interlace 3 VGA480 60 640 480 31 5 59 9 Non interlace 4 VGA480 72 640 480 37 9 72 8 Non interlace 5 VGA480 75 640 480 37 5 75 0 Non interlace 6 MAC13 640 480 35 0 66 7 Non interlace 7 SVGA 56 800 600 35 2 56 3 Non interlace 8 SVGA 60 800 600 37 9 60 3 Non interlace 9 SVGA 72 800 600 48 1 72 2 Non interlace 10 XGA 60 1024 768 48...

Page 12: ...rd supplied To a wall outlet External speakers Personal computer used to control the Monitor System connections To audio output When connecting the RGB terminals set the RGB INPUT setting correctly see page 23 For audio signal connections change the connection when you change the RGB INPUT setting When connecting another Monitor you can use these RGB B OUT terminals To R input To G input To B inpu...

Page 13: ...output To audio output To audio output To video output VCR 2 used as the playback source To video output Notes You can connect another VCR or Monitor to the VIDEO A OUT terminal However when connecting a VCR to the VIDEO A terminals do not connect both IN and OUT terminals to the same VCR When connecting a VCR to the VIDEO B terminals you can use either the video or S video terminals If the both t...

Page 14: ...s displayed you can adjust the volume by pressing 2 3 on the Monitor When the INTERNAL EXTERNAL selecting switch on the back of the Monitor is set to EXTERNAL no sounds come out of the built in speakers When you want to hear audio sound from the built in speakers set the INTERNAL EXTERNAL selecting switch to INTERNAL To turn off the volume immediately Press MUTING MUTING ON is displayed and the so...

Page 15: ... using a wide screen mode for a while will reduce the burn in gradually With this Monitor you can select among three types of wide screens FULL ZOOM and PANORAMIC in addition to the REGULAR screen of conventional 4 3 aspect ratio Press ASPECT to select the screen size Each time you press the button the screen size changes as follows REGULAR Displays at conventional 4 3 aspect ratio FULL REGULAR si...

Page 16: ...iewing the adjustment bar on the next page reset See To reset the adjustments on the next page Adjustment is not possible when RGB input is selected Adjustment is only possible when viewing NTSC signal through the VIDEO A or B terminal 5 Press 2 3 to make adjustments 6 Press MENU EXIT or MENU on the Monitor twice to exit from the menu operations C O N T R A S T B R I G H T C H R O M A P H A S E S ...

Page 17: ...nlarged rightward or downward only and reduced leftward or upward only Therefore it is necessary to adjust both the size and position alternately to adjust to the appropriate size 1 Press MENU EXIT or MENU on the Monitor to display the Main Menu 2 Press 5 to move the cursor 3 to SIZE POSITION ADJ 3 Press 3 to display the Size Position Adjustment Menu 4 Press 5 to move the cursor 3 to the item you ...

Page 18: ...on the Sub Menu changes as follows 4 Press 2 3 to adjust the selected item 5 Repeat steps 3 and 4 to adjust the other items 6 Press MENU EXIT or MENU on the Monitor three times to exit from the menu operations To reset the adjustments After step 3 on page 17 proceed as follows 1 Press 5 to move the cursor 3 to reset 2 Press 3 The confirmation screen appears 3 Press 3 again to reset the adjustments...

Page 19: ...ANCE The Setup Menu consists of two pages If you keep pressing 5 you can move to the other page from the current page 3 Press 3 to display the White Balance Adjustment Menu 4 Press 5 to move the cursor 3 to the item you want to adjust 5 Press 2 3 to adjust the selected item 6 Repeat steps 4 and 5 to adjust the other items 7 Press MENU EXIT or MENU on the Monitor twice to exit from the menu operati...

Page 20: ...t Each time you press the button the Sub Menu changes as follows 4 Press 2 3 to adjust the selected item 5 Repeat steps 3 and 4 to adjust the other items 6 Press MENU EXIT or MENU on the Monitor three times to exit from the menu operations To reset the adjustments After step 3 on page 19 proceed as follows 1 Press 5 to move the cursor 3 to reset 2 Press 3 The confirmation screen appears 3 Press 3 ...

Page 21: ...and XGA 60 you can select the picture mode suited to either still pictures or moving pictures 1 Press MENU EXIT or MENU on the Monitor to display the Main Menu 2 Press 5 to move the cursor 3 to FUNCTION SELECT 3 Press 3 to display the Function Selection Menu PICTURE MODE and SIGNAL MODE do not appear at the same time PICTURE MODE appears when RGB input is selected and one of the following signals ...

Page 22: ... MODE 5 Press 2 3 to select the receivable video signal type Each time you press the button the receivable video signal type changes as follows When VIDEO A or VIDEO B input is selected When COMPONENT input is selected Changes according to the HD SIGNAL MODE setting see page 27 6 Press MENU EXIT or MENU on the Monitor twice to exit the menu operations P I C T U R E A D J S I Z E P O S I T I O N A ...

Page 23: ...ion Menu Settings You can reset all the Function Selection Menu settings at a time 1 Press MENU EXIT or MENU on the Monitor to display the Main Menu 2 Press 5 to move the cursor 3 to FUNCTION SELECT 3 Press 3 to display the Function Selection Menu PICTURE MODE and SIGNAL MODE do not appear at the same time PICTURE MODE appears when RGB input is selected and one of the following signals comes in RG...

Page 24: ...WER MENU INPUT POWER MENU 2 3 5 5 To set the other convenient functions use menus You can use the buttons either on the remote control or on Monitor for menu operations Refer also to Menu Classifications on pages 33 and 35 Showing On screen Display The input mode and signal type will be indicated on the screen The following procedure can be done by using the buttons on the Monitor You can also sho...

Page 25: ...MENU while holding 2 to display the Setup Menu 2 Keep pressing 5 until the second page of the Setup Menu appears The Setup Menu consists of two pages If you keep pressing 5 you can move to the other page from the current page 3 Confirm the hour of use The displayed value for the hours of use is divided by 100 To calculate the actual hours of use multiply the displayed value by 100 4 Press MENU EXI...

Page 26: ...ress MENU EXIT or MENU on the Monitor once to exit from the menu operations Note Even when the Control Lock function is in use the following operations are possible Operation to cancel the Control Lock function All operations from the remote control Showing the On screen When Changing the Input Mode With this function you can see the selected input mode and signal type when changing the input mode...

Page 27: ...0 8 0 i Setting the High Definition Signal Types You can select one of the High Definition HD signal types through the COMPONENT terminals 1080i or 1035i Normally set it to 1080i 1 On the remote control Press MENU EXIT while holding VOLUME to display the Setup Menu On the Monitor Press MENU while holding 2 to display the Setup Menu 2 Press 5 to move the cursor 3 to HD SIGNAL MODE The Setup Menu co...

Page 28: ...le holding 2 to display the Setup Menu 2 Press 5 to move the cursor 3 to POWER SAVE on the second page The Setup Menu consists of two pages If you keep pressing 5 you can move to the other page from the current page 3 Press 2 3 to select the desired setting Each time you press the button the Power Save function alternates between ON and OFF To cancel the Power Save function select OFF 4 Press MENU...

Page 29: ...pt the use time of the source lamp HOUR METER 1 On the remote control Press MENU EXIT while holding VOLUME to display the Setup Menu On the Monitor Press MENU while holding 2 to display the Setup Menu 2 Press 5 to move the cursor 3 to reset on the second page The Setup Menu consists of two pages If you keep pressing 5 you can move to the other page from the current page 3 Press 3 The confirmation ...

Page 30: ...pressing 5 you can move to the other page from the current page 3 Press 3 The confirmation screen appears 4 Press 3 again to reset all the Menu settings and adjustments To cancel the reset press MENU EXIT or MENU on the Monitor Cursor 3 A U T O S L E E P C O N T R O L L O C K S T A T U S D I S P L A Y V E N T I L A T I O N M O D E H D S I G N A L M O D E W H I T E B A L A N C E S E T U P M E N U 1...

Page 31: ... Slave XX Remote control cable supplied with Monitor 2 Remote control cable supplied with Monitor 1 Remote control cable supplied with Monitor 3 Notes Do not connect the last monitor to Monitor 1 When operating with a wired remote control connect it to the REMOTE 2 JVC CODE input terminal of Monitor 1 When Monitors are serially connected Monitor 2 and subsequent Monitors cannot be directly control...

Page 32: ...ens 2 Press ID to select the Monitor you want to operate Example To select 02 Press ID twice Slave 2 s ID number 02 is highlighted The selected ID number will be also shown on the Master Monitor in this example MASTER 02 3 Perform any desired operations such as adjusting menu items Notes If 00 is displayed on all the Monitor screens or if some of the Monitor screens have no indication in step 1 pr...

Page 33: ...lay 0 1 C O N T R A S T 01 BRIGHT 0 1 C H R O M A 0 1 P H A S E 0 1 S H A R P N E S S 0 1 H S I Z E 0 1 H P O S I T I O N 0 1 V S I Z E 0 1 V P O S I T I O N 0 1 C L O C K P H A S E A r e y o u s u r e Y E S t h e n p r e s s k e y N O t h e n p r e s s k e y M E N U A r e y o u s u r e Y E S t h e n p r e s s k e y N O t h e n p r e s s k e y M E N U A r e y o u s u r e Y E S t h e n p r e s s k ...

Page 34: ... position Adjustment Menu settings to defaults FUNCTION SELECT See pages 19 to 23 COLOR TEMP Adjusts the color temperature Use when the picture is reddish or bluish PICTURE MODE Selects the picture quality suited to either the still picture or the moving picture ASPECT Selects the horizontal to vertical ratio of the screen SIGNAL MODE Selects a color system NTSC NTSC 4 43 PAL SECAM when VIDEO A or...

Page 35: ...O N O N 0 0 1 AUTO SLEEP Sets the length of time before standby mode is automatically assumed after the input signal has stopped being supplied See page 25 CONTROL LOCK Sets the Monitor so that it cannot be operated with the buttons on itself See page 26 STATUS DISPLAY Sets if you want the input terminal and the type of signal to be indicated on the screen just after inputs are switched See page 2...

Page 36: ...ctive action Page Insert the power cord plug firmly Turn on the MAIN POWER switch Select the correct input by pressing VIDEO A VIDEO B COMPO and RGB on the remote control or INPUT on the Monitor Connect the devices correctly Set the devices correctly Set it correctly Check if the signal is appropriate scanning frequency etc and input the appropriate signal Adjust brightness on the menu Adjust volu...

Page 37: ...ur dealer and tell which lamps are lighting or flashing Copy and fax the Self diagnostic Report Sheet below Note If you turn on the Monitor soon after turning it off or after recovering from a brief power interruption the self diagnostic lamps may light or flash and no image may appear on the screen In this case turn off the Monitor again wait for about 10 seconds then turn it on again If no self ...

Page 38: ...systems VIDEO A B input NTSC NTSC 4 43 PAL SECAM COMPONENT input 480i 576i 480p 720p 1080i 1035i Audio power output INTERNAL 2 W 2 W TYP at impedance 8 Ω EXTERNAL 3 W 3 W TYP at impedance 6 Ω Built in speakers 2 pcs 4 cm x 7 cm oval shaped impedance 6 Ω Operating conditions Temperature 0 C to 40 C Relative humidity 20 to 80 non condensation VIDEO A Video input BNC terminal x 1 1 V p p 75 Ω Video o...

Page 39: ...nals 1 GD V4210PCE GD V4210PCE G and GD V4211PCE do not have the following input terminals VIDEO A VIDEO B and COMPONENT You need to install the video interface kit IF C421P1W which is separately purchased to reproduce input images for VIDEO A VIDEO B and COMPONENT For easy understanding pictures and illustrations are shown by being emphasized omitted or composed and may be more or less different ...

Page 40: ... name 6 DSR 7 RTS 8 CTS 9 RI 4 3 2 1 9 8 5 7 6 RGB Input Terminal Pin number Signal name 1 Red 2 Green 3 Blue 4 N C 5 GND 6 GND 7 GND 8 GND Pin number Signal name 9 N C 10 GND 11 GND 12 N C 13 HD Cs 14 VD 15 N C External GND 1 2 8 4 5 6 7 3 9 10 11 12 13 14 15 Unit mm inch Side view Top view Front view Dimensions MENU INPUT POWER 1035 40 4 3 89 3 11 2 1 57 5 2 8 3 570 22 2 1 17 16 11 997 39 8 3 94...

Reviews: