background image

2


Introduction


Precautions


Installation


• Install in a place which is level, dry and neither too hot nor 

too cold—between 5°C and 35°C.

• Install the System in a location with adequate ventilation to 

prevent internal heat buildup inside the System.

• Leave sufficient distance between the System and the TV.
• Keep the speakers away from the TV to avoid interference 

with TV.


Power sources


• When unplugging the System from the wall outlet, always 

pull on the plug, not the AC power cord.


Moisture condensation


Moisture may condense on the lenses inside the System in 
the following cases:
• After starting to heat the room
• In a damp room
• If the System is brought directly from a cold to a warm 

place

Should this occur, the System may malfunction. In this case, 
leave the System turned on for a few hours until the moisture 
evaporates, unplug the AC power cord, then plug it in again.


Others


• Should any metallic object or liquid fall into the System, 

unplug the AC power cord and consult your dealer before 
operating any further.

• If you are not going to operate the System for an extended 

period of time, unplug the AC power cord from the wall 
outlet.

If anything goes wrong, unplug the AC power cord and 
consult your dealer.


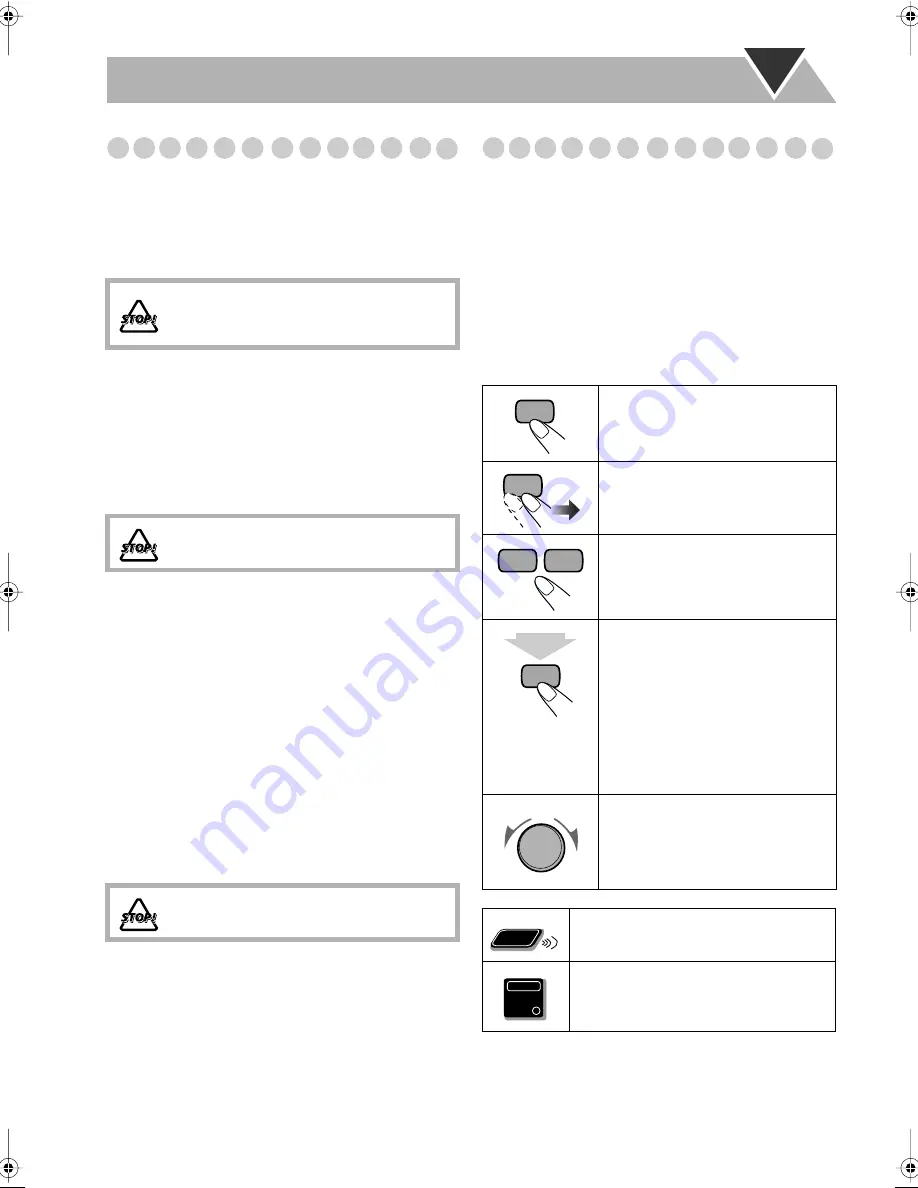
How to Read This Manual


To make this manual as simple and easy-to-understand as 
possible, we have adapted the following methods:
• Button and control operations are explained as listed in the 

table below.


Some related tips and notes are explained later in the 
sections “Additional Information” and 
“Troubleshooting,” but not in the same section 
explaining the operations.


 If you want to know more 

about the functions, or if you have a doubt about the 
functions, go to these sections and you will find the 
answers.

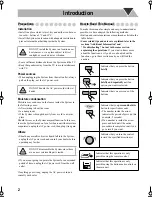
DO NOT install the System in a location near 
heat sources, or in a place subject to direct 
sunlight, excessive dust or vibration.

DO NOT handle the AC power cord with wet 
hands.

DO NOT disassemble the System since there 
are no user serviceable parts inside.


Indicates that you press the button 


briefly


.

Indicates that you press the button 


briefly and repeatedly


 until an 

option you want is selected.

Indicates that you press one of the 
buttons.

Indicates that you 


press and hold


 the 

button for specified seconds.
• The number inside the arrow 

indicates the period of press (in this 
example, 2 seconds).

• If no number is inside the arrow, 

press and hold until the entire 
procedure is complete or until you 
get a result you want.

Indicates that you turn the control 
toward the specified direction(s).

Indicates that this operation is only 
possible using the remote control.

Indicates that this operation is only 
possible using the buttons and controls on 
the main unit.

2

 sec.

Remote
ONLY

Main Unit

ONLY


Introduction.fm  Page 2  Tuesday, February 17, 2004  10:15 PM

Summary of Contents for FS-P550

Page 1: ...MICRO COMPONENT SYSTEM UX P550 Consists of CA UXP550 and SP UXP550 INSTRUCTIONS GVT0130 003A B SUPER VIDEO ...

Page 2: ... below IMPORTANT DO NOT make any connection to the terminal which is marked with the letter E or by the safety earth symbol or coloured green or green and yellow The wires in the mains lead on this product are coloured in accordance with the following code Blue Neutral Brown Live As these colours may not correspond with the coloured markings identifying the terminals in your plug proceed as follow...

Page 3: ...es 17 Switching Temporarily to a Program of Your Choice Automatically 18 Unique DVD VCD Operations 20 Selecting the View Angle 20 Selecting the Subtitle Language 20 Selecting the Audio Track 21 Playing Back a Bonus Group 21 Special Effect Playback 22 Advanced Disc Operations 23 Programming the Playing Order Program Play 23 Playing at Random Random Play 24 Playing Repeatedly 25 Prohibiting Disc Eje...

Page 4: ...l as simple and easy to understand as possible we have adapted the following methods Button and control operations are explained as listed in the table below Some related tips and notes are explained later in the sections Additional Information and Troubleshooting but not in the same section explaining the operations If you want to know more about the functions or if you have a doubt about the fun...

Page 5: ...orrectly Step 1 Unpack the package and check the accessories Step 2 Prepare the remote control Step 3 Hook up the components such as AM FM antennas speakers etc see pages 4 to 6 Finally plug the AC power cord Now you can operate the System DO NOT use an old battery together with a new one DO NOT use different types of batteries together DO NOT expose batteries to heat or flame DO NOT leave the bat...

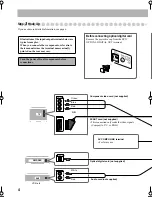
Page 6: ...ls since the terminal names actually printed on the rear may vary Turn the power off to all components before connections Audio cord not supplied White Red Optical digital cord not supplied Component video cord not supplied Red Blue Green SCART cord not supplied This connection only sends the video signals Composite Y C or RGB AV COMPU LINK terminal For future use Before connecting optical digital...

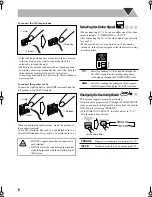
Page 7: ...na Keep it connected Vynile covered wire not supplied Extend it horizontally Disconnect the supplied FM antenna and connect to an outdoor FM antenna using a 75 Ω wire with coaxial type connector IEC or DIN45325 Outdoor FM antenna not supplied For better FM AM reception To a wall outlet Plug the AC power cord only after all connections and selector settings on the rear are complete ...

Page 8: ...rrectly for your TV Make sure the unit is not yet turned on If it is already turned on turn off then on again so that the selector setting becomes active Changing the Scanning Mode This System supports progressive scanning If you connect a progressive TV through the COMPONENT jacks you can enjoy a high quality picture from the built in DVD player by selecting PROGRE If the VIDEO OUT SELECT switch ...

Page 9: ...ion ratio is lower than for Dolby Digital it provides wider dynamic range and better separation When playing a multi channel encoded DVD the System properly converts these multi channel signals into 2 channels and emits the downmixed sound from the speakers To enjoy the powerful sound of these multi channel encoded DVDs connect a proper decoder or an amplifier with a proper built in decoder to the...

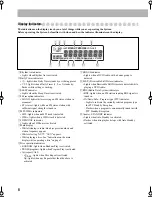
Page 10: ...on frequency appear While selecting AUX AUX appears While playing a disc See Indications on the main display while operating a disc on page 9 8 Disc operation indicators RANDOM lights when Random Play is activated PRGM program lights when Program Play is activated repeat ALL lights when Disc Repeat is activated lights when any Repeat other than the above is activated 9 BONUS indicator Lights when ...

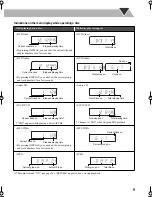
Page 11: ...SVCD VCD PBC appears while playing a disc with PBC SVCD VCD Changes to PBC when stopping PBC playback MP3 WMA By pressing DISPLAY you can show the current group and track numbers for a few seconds MP3 WMA JPEG JPEG Elapsed playing time Current chapter no Total title no Elapsed playing time Current track no Total group no Group no Track no Elapsed playing time Current track no Total playing time To...

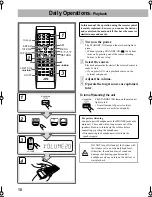
Page 12: ...anual the operation using the remote control is mainly explained however you can use the buttons and controls on the main unit if they have the same or similar name and marks The STANDBY ON lamp on the main unit lights in red A small amount of power is always consumed even while on standby For private listening Connect a pair of headphones to the PHONES jack on the main unit The sound will no long...

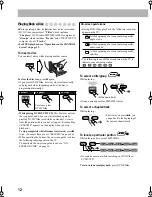
Page 13: ...ation you want to preset You can also store the monaural reception mode for FM preset stations if selected 2 Activate the preset number entry mode Finish the following process while the indication on the display is flashing 3 Select a preset number for the station you store You can also use the or 1 buttons 4 Store the station To tune in to a preset station 1 Select the band FM or AM 2 Select a pr...

Page 14: ...e see RESUME on page 36 When operating the System the on screen guide icon see the following table appears on the TV To deactivate the on screen guide icons see ON SCREEN GUIDE on page 36 To select a title group While playing Group name appears for MP3 WMA discs To select a chapter track While playing To locate a particular portion While playing a disc except MP3 WMA No sound comes out while searc...

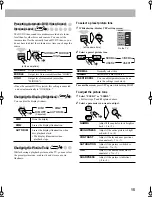
Page 15: ...en press DVD CD 3 Examples To select number 5 press 5 To select number 15 press 10 then 5 To select number 30 press 10 10 then 10 ACTION Suitable for action movies and sports programs DRAMA Creates natural and warm sound Enjoy movies in a relaxed mood THEATER Enjoy sound effects like in a major theater Remote ONLY AUDIO ANGLE SUBTITLE ZOOM VFP FM MODE DVD LEVEL 1 4 7 10 2 5 8 3 6 9 10 3D PHONIC Ca...

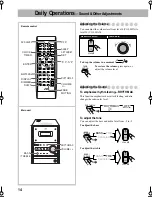
Page 16: ... To adjust the tone You can adjust the bass and treble level from 5 to 5 To adjust the bass To adjust the treble RHYTHM AX VOLUME SLEEP A STANDBY SET ENTER DISPLAY CLOCK TIMER BASS TREBLE VFP DVD LEVEL DIMMER SHIFT FADE MUTING BASS TREBLE VOLUME RHYTHM AX Remote control Main unit Remote control Main unit To restore the volume press again or adjust the volume level VOLUME VOLUME Remote ONLY FADE MU...

Page 17: ...to adjust NORMAL Original recording level MIDDLE Output level is increased less than HIGH HIGH Output level is increased more than MIDDLE DIM1 Dims the display DIM2 Erases the display illumination AUTO DIM Erases the display illumination when disc playback starts The display illuminates when playback stops Remote ONLY DVD LEVEL 5 NORMAL MIDDLE HIGH at the same time Remote ONLY DIMMER DIM1 DIM2 AUT...

Page 18: ...ning Off the Power Automatically To turn off the unit after playback is over Auto Standby When Auto Standby is in use the A STANDBY indicator lights on the display When disc play stops the A STANDBY indicator starts flashing If no operation is done for about 3 minutes while the indicator is flashing the System turns off stands by automatically Auto Standby does not work while you are listening to ...

Page 19: ...elect a PTY code For details about each PTY code see page 19 PS Program Service Shows commonly known station names PTY Program Type Shows types of broadcast programs RT Radio Text Shows text messages the station sends Enhanced Other Networks Provides the information about the types of the programs broadcast by the RDS stations of the different networks PTY SELECT PTY SEARCH TA News Info RDS DISPLA...

Page 20: ...ST ST Ex When NEWS is selected at the same time Remote ONLY TA News Info TA NEWS INFO OFF Canceled at the same time How the Enhanced Other Networks function actually works CASE 1 If a station is not broadcasting the program of your choice The System continues tuning in to the current station When a station broadcasting the program of your choice the System automatically switches to the station The...

Page 21: ...WEATHER Weather reports and forecasts FINANCE Stock market reports commerce trading etc CHILDREN Programs targeted at a young audience SOCIAL Programs about sociology history geography psychology and society RELIGION Religious programs Classification of the PTY codes for some FM stations may be different from the above list PHONE IN Involving members of the public expressing their views either by ...

Page 22: ...taining subtitles in different languages you can select the subtitle language to display on the TV For SVCD While playing you can select the subtitles even if no subtitles are recorded on the disc You can also select the subtitle language using the on screen bar see page 26 While playing a DVD Video 1 Display the subtitle selection window ANGLE ENTER SLOW 10 keys AUDIO ZOOM 8 7 SUB TITLE SHIFT DVD...

Page 23: ...alled bonus group whose contents are not open to the public To play back a bonus group you have to enter the specific key number a kind of password for the bonus group The way of getting the key number depends on the disc 1 Select the bonus group The bonus group is usually recorded as the last group for example if a disc contains 4 groups including a bonus group group 4 is the bonus group For how ...

Page 24: ...le playing back Zoom 1 While playing back 2 Move the zoomed in position To cancel Zoom press ZOOM repeatedly while holding SHIFT until ZOOM OFF appears on the TV To start still picture play back To resume normal playback While playing Still picture playback starts Still picture playback starts AUDIO ANGLE SUBTITLE ZOOM VFP FM MODE DVD LEVEL PROGRESSIVE 1 4 7 0 2 5 8 3 6 9 ENTER Remote ONLY DVD CD ...

Page 25: ...ve steps 1 and 2 For SVCD VCD CD 1 Select tracks 4 7 DVD CD 3 0 8 7 SHIFT 10 keys CANCEL REPEAT ENTER DVD CD 3 PLAY MODE 4 REPEAT A B Remote control Main unit To enter the numbers directly Examples To enter number 5 press 5 To enter number 15 press 10 then 5 To enter number 30 press 10 10 then 10 Remote ONLY PLAY MODE PROGRAM RANDOM Canceled PRGM USE NUMERIC KEYS TO PROGRAM TRACKS USE CANCEL TO DE...

Page 26: ...ck To exit from Random Play Before or after playback Playback starts in the order you have programmed To skip a step To pause To stop To release press DVD CD 3 To erase the last step To erase the entire program To add steps in the program Repeat step 2 DVD CD GROUP TITLE In the programmed order In the reverse order CANCEL RETURN PLAY MODE PROGRAM RANDOM Canceled Playback starts in random order Ran...

Page 27: ...A B again while holding SHIFT A B Repeat will also be canceled when you stop play or skip the chapter or track Prohibiting Disc Ejection Child Lock You can lock the disc tray so that no one can eject the loaded disc This is possible while the System is on standby While the disc tray is closed To cancel the prohibition repeat the same procedure UNLOCKED appears on the display REP CHAP Repeats the c...

Page 28: ...eo DVD Audio SVCD 2 OFF 1 3 1 3 1 3 TIME 4 TITLE 14 TOTAL1 25 58 CHAP 23 VCD TIME OFF ST TIME 00 58 TRACK 3 1 3 VCD CD 1 Disc type 2 Playback information Indication Meanings Mbps Current transfer rate Megabits per second Current title Current chapter Current group Current track Time indications 3 Operation modes Indication Meanings Playback Forward Reverse search Forward Reverse slow motion Pause ...

Page 29: ...REEN Goes off OFF 1 3 1 3 1 3 TIME DVD VIDEO TITLE 2 TIME 0 00 58 CHAP 3 8 5Mbps TITLE 14 TOTAL1 25 58 CHAP 23 DVD VIDEO TITLE 2 TIME OFF CHAP 1 3 1 3 1 1 DISC 3 TIME 0 00 58 CHAP 3 8 5Mbps OFF 1 3 1 3 1 3 TIME TITLE 14 TOTAL1 25 58 CHAP 23 DVD VIDEO TITLE 2 TIME OFF CHAP 1 3 1 3 1 1 TIME 0 00 58 CHAP 3 8 5Mbps ENTER 1 3 1 3 1 3 TITLE 14 TOTAL1 25 58 CHAP 23 TITLE 2 1 3 1 3 1 1 TIME 0 00 58 CHAP 3...

Page 30: ...lect or 3 Display the pop up window A B Repeats a desired portion see below TITLE Repeats the current title GROUP Repeats the current group ALL Repeats the disc except for DVD or program CHAPTER Repeats the current chapter TRACK Repeats the current track OFF Cancels Repeat Play A B Repeat starts The selected portion plays repeatedly Before pressing ENTER you can search for the end point using the ...

Page 31: ...apter track 5 press 5 To select chapter track 15 press 1 then 5 To select chapter track 30 press 3 then 0 The System starts playing the searched chapter or track AUDIO ANGLE SUBTITLE ZOOM VFP FM MODE DVD LEVEL PROGRESSIVE 1 4 7 0 2 5 8 3 6 9 ENTER Remote ONLY PAGE 1 5 OFF 1 3 TIME TRACK DVD AUDIO GROUP 14 TIME 0 00 58 TRACK 23 1 5 PAGE 1 OFF 1 3 TIME TRACK DVD AUDIO GROUP 14 TIME 0 00 58 TRACK 23 ...

Page 32: ...l ZOOM OFF appears on the TV Move the highlight bar to a desired item If you move the highlight bar while playing back an MP3 WMA disc the selected track starts playback automatically For MP3 WMA Playback starts with the selected track Pressing DVD CD 3 also starts playback For JPEG The selected track still picture is displayed until you change it Slide show playback starts Each track still pictur...

Page 33: ...tem enter the clock setting mode 2 Make the timer setting as you want Repeat the following operations until you finish setting in the following order 1 Set the hour then the minute for on time CANCEL STANDBY ON CLOCK TIMER SET Remote control DAILY TIMER Main unit Daily Timer initial settings when shipped from the factory DAILY 1 ON Time 6 00 OFF Time 8 00 Source TUNER FM 1 Volume level DAILY 2 ON ...

Page 34: ...1 DAILY 2 or DAILY 3 you want to activate 2 Activate the selected Timer 3 Wait until the indication goes off How Daily Timer actually works Once the Daily Timer has been set the timer indicator and timer number indicator 1 2 3 are lit on the display Daily Timer is activated at the same time everyday until the timer is turned off manually see the next column or another timer is activated When the o...

Page 35: ...u 2 PICTURE Setup Menu 3 AUDIO Setup Menu 4 OTHERS Setup Menu Remote ONLY MENU SET UP ENGLISH ENGLISH ENGLISH ENGLISH LANGUAGE MENU LANGUAGE ON SCREEN LANGUAGE AUDIO LANGUAGE SUBTITLE USE TO SELECT USE ENTER TO CONFIRM TO EXIT PRESS SET UP ENTER SELECT at the same time 4 3 LB AUTO PICTURE MONITOR TYPE PICTURE SOURCE ON AUDIO SCREEN SAVER FILE TYPE USE TO SELECT USE ENTER TO CONFIRM TO EXIT PRESS S...

Page 36: ...n on the TV from ENGLISH FRENCH and GERMAN PICTURE Setup Menu You can select the desired options concerning a picture or monitor screen MONITOR TYPE Select the monitor type of your TV to play DVD Video recorded with aspect ratio of 16 9 Select one of the following ENTER MENU SET UP at the same time ENGLISH ENGLISH ENGLISH ENGLISH LANGUAGE MENU LANGUAGE ON SCREEN LANGUAGE AUDIO LANGUAGE SUBTITLE US...

Page 37: ...AL AUDIO OUTPUT is set to PCM ONLY from this System Select one of the following AUTO Normally select this When playing back a disc containing both video and film sources the System automatically changes the processing to match it to the picture type film or video source of the current chapter FILM To play a film source disc VIDEO To play a video source disc ON The pictures on the TV becomes dark w...

Page 38: ...reen guide icons see page 12 When recording the picture on a VCR select OFF to avoid recording the guide icons on your video tape Select one of the following AV COMPU LINK MODE This function is equipped for future use Keep this setting to the initial setting DVD1 for this System PARENTAL LOCK Select this to enter the PARENTAL LOCK submenu See the section that follows AUTO To enjoy powerful sounds ...

Page 39: ...ted then enter any 4 digit number for your password 10 Finish the setting Remote ONLY MENU SET UP ENGLISH ENGLISH ENGLISH ENGLISH LANGUAGE MENU LANGUAGE ON SCREEN LANGUAGE AUDIO LANGUAGE SUBTITLE USE TO SELECT USE ENTER TO CONFIRM TO EXIT PRESS SET UP ENTER SELECT at the same time ON ON OTHERS RESUME ON SCREEN GUIDE DVD1 PARENTAL LOCK AV COMPULINK MODE USE TO SELECT USE ENTER TO CONFIRM TO EXIT PR...

Page 40: ...ict rating level some discs may not be played back at all When you try to play such a disc the following screen appears on the TV 1 Select TEMPORARY RELEASE then ENTER If you do not play back such a disc select NOT RELEASE then ENTER Then eject the disc 2 Enter your password If you enter a wrong password three times NOT RELEASE is automatically selected In this case press ENTER Then eject the disc...

Page 41: ...ximum number cannot be recognized Playback order of MP3 WMA tracks may be different from the one you have intended while recording see page 40 If a folder does not include MP3 WMA tracks they are ignored Daily Operations Sound Other Adjustments see pages 14 to 16 Adjusting the Volume Be sure to turn down the volume before connecting or putting the headphones Adjusting the Sound This function also ...

Page 42: ...ance of the System keep your discs and mechanism clean Handling discs When removing the disc from its case hold it at the edge while pressing the center hole lightly Do not touch the shiny surface of the disc or bend the disc Put the disc back in its case after use to prevent warping Be careful not to scratch the surface of the disc Avoid exposure to direct sunlight temperature extremes and moistu...

Page 43: ...etermined when the disc was recorded It depends on the writing application MP3 WMA or JPEG tracks are not played back The inserted disc may include both type of tracks MP3 WMA files and JPEG files In this case you can only play back the files selected by the FILE TYPE setting see page 35 You have changed the FILE TYPE setting after you inserted a disc In this case reload the disc NO AUDIO appears ...

Page 44: ...KO Korean KOR KS Kashmiri KU Kurdish KY Kirghiz LA Latin LN Lingala LO Laothian LT Lithuanian LV Latvian Lettish MG Malagasy MI Maori MK Macedonian ML Malayalam MN Mongolian MO Moldavian MR Marathi MS Malay MAY MT Maltese MY Burmese NA Nauru NE Nepali NL Dutch NO Norwegian OC Occitan OM Afan Oromo OR Oriya PA Panjabi PL Polish PS Pashto Pushto PT Portuguese QU Quechua RM Rhaeto Romance RN Kirundi ...

Page 45: ...GA Gabon GB United Kingdom GD Grenada GE Georgia GF French Guiana GH Ghana GI Gibraltar GL Greenland GM Gambia GN Guinea GP Guadeloupe GQ Equatorial Guinea GR Greece GS South Georgia and the South Sandwich GT Guatemala GU Guam GW Guinea Bissau GY Guyana HK Hong Kong HM Heard Island and McDonald Islands HN Honduras HR Croatia HT Haiti HU Hungary ID Indonesia IE Ireland IL Israel IN India IO British...

Page 46: ...Grenadines VE Venezuela VG Virgin Islands British VI Virgin Islands U S VN Vietnam VU Vanuatu WF Wallis and Futuna Islands WS Samoa YE Yemen YT Mayotte YU Yugoslavia ZA South Africa ZM Zambia ZR Zaire ZW Zimbabwe DVD OPTICAL DIGITAL OUT Signals While playing some DVDs digital signals may be emitted at 20 bits or 24 bits at their original bit rate through the DVD OPTICAL DIGITAL OUT terminal if the...

Page 47: ...mensions approx 145 mm x 230 mm x 202 mm W H D Mass approx 2 2 kg each Supplied Accessories See page 3 General Power requirement AC 230 V 50 Hz Power consumption 90 W at operation 1 8 W on standby Dimensions approx 170 mm x 230 mm x 311 mm W H D Mass approx 5 0 kg Parts Index Refer to the pages to see how to use the buttons and controls SLEEP A STANDBY CLOCK TIMER FADE MUTING PTY SELECT PTY SEARCH...

Page 48: ... cover as this may expose dangerous voltages DON T leave equipment switched on when it is unattended unless it is specifically stated that it is designed for unattended operation or has a standby mode Switch off using the switch on the equipment and make sure that your family know how to do this Special arrangements may need to be made for infirm or handicapped people DON T use equipment such as p...

Reviews: