background image

4

KS-U57

KS-U58

KS-PD500

KS-PD100

To disconnect the connector

Hold the connector top tightly (

1

), then pull it out (

2

).

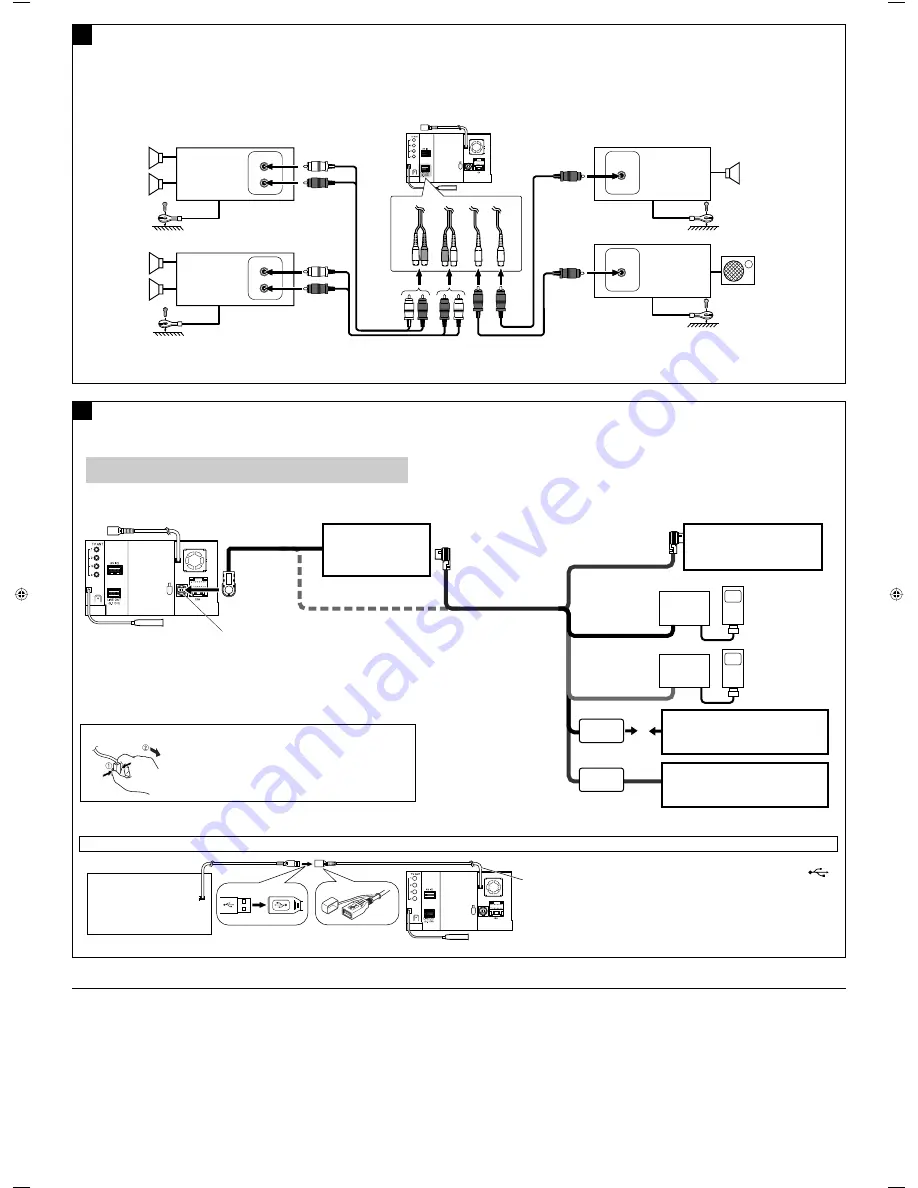
C

JVC CD changer

External component with RCA pin jacks

External component with stereo-mini jack

or

or

or

JVC Bluetooth adapter

*

5

You can connect external components in series as shown in the diagram below.
• All the components, adapters or signal cords need to be purchased separately.

CAUTION:

Before connecting the external components, make sure that the unit is turned off.

•  To use JVC CD changer, Apple iPod or JVC D. player, set “External Input” to “Changer/iPod/D. Player” (see page 59 of the INSTRUCTIONS).
•  To use other external components via KS-U57 or KS-U58, set “External Input” to “External” (see page 59 of the INSTRUCTIONS).

• iPod is a trademark of Apple Inc., registered in the U.S. and other countries.

USB cable (approx. 1.2 m)

USB device

•  You cannot connect a computer to the USB (

terminal of the unit.

CD changer jack

USB devices

Connecting external components

iPod

JVC D. Player XA-HD500

*

5


Audio cord (not supplied) is required.

or

L

R

L

L

INPUT

INPUT

INPUT

R

L

INPUT

R

L

R

L

R

R

*

4

*

4

*

4

*

4

LINE OUT (FR

ONT)

LINE OUT (REAR)

SUBW

OOFER

CENTER OUT

You can connect amplifiers to upgrade surround system in the car compartment.
•  Connect the amplifiers to 5.1-ch analog discrete output plugs to enjoy multi-channel source.
• 

After you have connected the center speaker, make sure to activate the center speaker; otherwise, no sound comes out of the connected center speaker,

 see page 57 of the INSTRUCTIONS.

•  You can supply the power to the amplifiers by connecting the remote leads (blue with white stripe) of this unit and amplifiers. (To connect more than one amplifier using the remote leads, Y-connectors need to 

be separately purchased.)

•  Disconnect the speakers from the unit, and connect them to the amplifier. Leave the speaker leads of the unit unused

.

*

4


Firmly attach the ground wire to the metallic body or to the chassis of the car—to the place uncoated with paint (if coated with paint, remove the paint before attaching the wire). Failure to do so may cause 
damage to the unit.

Subwoofer

Rear speakers

Center speaker

JVC Amplifier

Front speakers

JVC Amplifier

JVC Amplifier

JVC Amplifier

Connecting the external amplifiers

B

TROUBLESHOOTING

•  The fuse blows.

*  Are the red and black leads connected correctly?

•  Power cannot be turned on.

*  Is the yellow lead connected?

•  No sound from the speakers.

*  Is the speaker output lead short-circuited?

•  Sound is distorted.

*  Is the speaker output lead grounded?
*  Are the “–” terminals of L and R speakers grounded in common?

•  Noise interfere with sounds.

*  Is the rear ground terminal connected to the car’s chassis using shorter and thicker cords?

•  Unit becomes hot.

*  Is the speaker output lead grounded?
*  Are the “–” terminals of L and R speakers grounded in common?

•  This unit does not work at all.

*  Have you reset your unit?

Instal_KW-AVX900[A]_1.indd   4

Instal_KW-AVX900[A]_1.indd   4

2007.3.14   5:12:53 PM

2007.3.14   5:12:53 PM

Summary of Contents for EXAD KW-AVX900

Page 1: ...For installation and connections refer to the separate manual INSTRUCTIONS LVT1670 001A A For canceling the display demonstration see page 8 DVD RECEIVER WITH MONITOR KW AVX900 ...

Page 2: ...ion of safety devices such as air bags it may obstruct visibility DO NOT operate the unit while driving If you need to operate the unit while driving be sure to look around carefully The driver must not watch the monitor while driving The driver must not put on the headphones while driving Cautions on the monitor The monitor built in this unit has been produced with high precision but it may have ...

Page 3: ...N Playable disc type 4 Basic operations Monitor panel touch panel 5 Basic operations Remote controller RM RK251 6 OPERATIONS Before operating the unit 8 Common operations 9 Listening to the radio 10 Disc operations 13 Dual Zone operations 27 SD operations 30 USB operations 32 Watching TV 34 EXTERNAL DEVICES Bluetooth operations Cellular phone audio player 37 Listening to the CD changer 44 Listenin...

Page 4: ... Recordable Rewritable CD R RW ISO 9660 level 1 level 2 Romeo Joliet CD DA MP3 WMA WAV AAC 4 JPEG DivX MPEG1 MPEG2 MPEG4 1 IfyouinsertaDVDVideodiscofanincorrectRegionCode Regioncodeerror appearsonthemonitor 2 DVD Rrecordedinmulti borderformatisalsoplayable exceptforduallayerdiscs 3 Itispossibletoplaybackfinalized R RW Videoformatonly discs However theuseof Rdoublelayerdiscis notrecommended 4 Thisu...

Page 5: ...among the sources For details see each source operation section Change the display information OPEN Open the monitor panel EJECT Eject the disc CLOSE Close the monitor panel TILT Tilt the monitor panel Exit Erase this screen Shaded icons cannot be used at that time For details on the touch panel operations see each source operation sections Display Source Menu pages 9 and 27 Display the Open Tilt ...

Page 6: ...ht or artificial lighting Caution Do not expose batteries to heat or flame IMPORTANT If Dual Zone is activated page 27 the remote controller functions only for operating the DVD CD player and the built in TV Main elements and features i o a s 1 1 Turns on the power Attenuates the sound if the power is on Turns off the power if pressed and held while the power is on 2 1 Selects the source 3 1 Displ...

Page 7: ...previousmenu Confirmstheselection 5 1 2 Selects surround mode 6 DVD DivX 6 Shows the disc menu VCD Resumes PBC playback DVD VR Shows the Original Program screen 7 Makes selection settings Skips back or forward by 5 minutes for DivX MPEG1 MPEG2 DISC buttons Changes discs for CD CH 8 Shows the on screen bar 9 1 Changes the display information p Display or erase AV Menu q For disc SD USB operations 6...

Page 8: ...al English indications are used for purpose of explanation You can select the indication language on the monitor page 55 Turn on the power Ÿ Display AV Menu Display the Setup menu Cancel the display demonstrations Select Off Set the clock settings Finish the procedure Beforeoperatingtheunit Moves to the succeeding menu page Moves to the preceding menu page Return to the previous screen ...

Page 9: ...ot select these sources if they are not ready Changing the display information Available display information varies among the playback sources On the monitor panel only Each time you press DISP the display changes to show the various information Ex When the playback source is a DivX disc Exit Source information screen Animation screen Navigation screen When Navigation is selected for AV Input page...

Page 10: ...Search Hold either 4 or until Manual Search appears on the display then press it repeatedly The ST indicator lights up when receiving an FM stereo broadcast with sufficient signal strength 3 Reception improves but stereo effect will be lost The MONO indicator lights up To restore stereo effect select Off Preset No Band page 9 Sound mode page 51 page 11 51 Buttons on the touch panel In the explanat...

Page 11: ...Tuning in to stations with sufficient signal strength This function works only for FM bands Once you have activated this function selected Local it always works when searching for FM stations 1 Press AV MENU You can also use AV MENU on the monitor panel 2 Press Mode 3 Only stations with sufficient signal strength will be detected The DX indicator goes off then the LO indicator lights up You can al...

Page 12: ...ouch panel To select from the Preset List 1 2 Manual presetting Ex Storing FM station of 92 5 MHz into preset number 4 of the FM1 band 1 Display the Preset List 2 Tune in to a station you want to preset 3 Select a preset number The station selected in step 2 is now stored in preset number 4 ...

Page 13: ... depends on its internal program If a disc does not have any disc menu all tracks in it will be played repeatedly until you change the source or eject the disc If appears on the monitor the unit cannot accept the operation you have tried to do In some cases without showing operations will not be accepted Label side Caution on volume setting Discs produce very little noise compared with other sourc...

Page 14: ...produced sound indicator MULTI CH LR ONLY page 65 Sampling frequency Bit rate Recorded signal channel no Speaker signal indicators page 64 page 19 3 8 Start and pause playback 7 Stop playback 4 Press Select chapter Hold Reverse forward search 2 5 Select title program playlist page 19 B S P indicator page 23 BONUS indicator page 23 1 DVD VRalsoindicateseitherPRG program orPLAY playlist playback 2 S...

Page 15: ...er no Track no 3 8 Start and pause playback 7 Stop playback 4 Press Select track Hold Reverse forward search for DivX MPEG1 MPEG2 4 5 Press Select folder Hold Display Folder list While playing the following discs press Each time you press the button the display changes to show the different information page 9 Surround mode 3 page 24 Disc type page 19 page 19 PBC indicator lights up when PBC is in ...

Page 16: ...ode 3 page 51 page 19 3 8 Start and pause playback 7 Stop playback 4 Press Select track Hold Reverse forward search 2 5 Press Select folder Hold Display Folder list 3 8 Start and pause playback 7 Stop playback 4 Press Select track Hold Reverse forward search 2 Total track no included in the disc Total play time Total track no included in the disc Speaker signal indicators page 64 While playing a D...

Page 17: ...lay the Short Cut buttons 3 8 Start and pause playback 7 Stop playback 4 Press Select track Hold Reverse forward search 5 Select folders The above buttons also work when they are not shown on the touch panel while watching pictures on the screen WhileadiscmenuisplayedbackforDVD KEY is automaticallydisplayed Onthediscmenu you canselecta menuitemdirectlybytouchingitonthescreen B For DVD VCD DivX men...

Page 18: ... current program not available for Playlist playback Track Plays the first 15 seconds of each track for VCD PBC not in use Track Repeats current track 1 for VCD PBC not in use Disc All Randomly plays all tracks for VCD PBC not in use Track Plays the first 15 seconds of each track Folder Plays the first 15 seconds of the first track of each folder Track Repeats current track 1 Folder Repeats all tr...

Page 19: ...ist number total track list number of the current folder Track List can also be accessed by pressing DISP on the monitor panel Selected track starts playing Prohibiting disc ejection You can lock a disc in the loading slot To cancel the prohibition repeat the same procedure to select EJECT OK Using Short Cut Icons You can easily access the some frequently used functions by using SHORT CUT on the t...

Page 20: ... pause Hold Reverse forward search 4 Select title during playback or pause Using menu driven features 1 2 Select an item you want to start play 3 Select chapter Select title when not playing twice Select title during playback or pause Select aspect ratio Select audio language Select subtitle language Select view angle Select track twice Select group Select aspect ratio Select audio stream Using me...

Page 21: ...se Hold Reverse forward search 4 Select program Select playlist during playback or pause Select aspect ratio Select audio channel ST stereo L left R Right Turn on off subtitle Select chapter Select program when not playing twice Select program playlist during playback or pause Using Original Program Play List screens page 23 1 For Original Program For Play List 2 Select an item you want to start p...

Page 22: ...layback Start playback pause if pressed during playback Reverse forward search 2 Press Select track Hold Reverse forward search 4 Select folder Select track within the same folder twice Select folder 2 Searchspeed x2 x5 x10 x20 x60 3 Slowmotionspeed 1 32 1 16 1 8 1 4 1 2 4 Searchspeed x2 x10 Stop playback Start playback Slide show each file is shown for a few seconds Shows the current file until y...

Page 23: ...cted the B S P indicator lights up on the source information screen When disc shows the BSP selecting icons such as or on the screen 1 Select an item you want to display 2 Using the list screens You can use Original Program and Play List screen anytime while playing DVD VR with its data recorded 1 Display the Original Program Play List screen 2 Select an item you want To erase the screen 1 Program...

Page 24: ...rces except for DivX MPEG1 MPEG2 discs To turn on the surround 1 You can also use AV MENU on the monitor panel 2 3 Off Deactivates surround On Activates surround go to the following steps 4 Auto When multi channel digital signals come in MULTI surround is activated When 2 channel or 2 1 channel signals come in 4CH STEREO is activated Through All incoming channel signals are sent to the correspondi...

Page 25: ...enter Width Center Width Adjust the center image so it may be heard only from the center speaker only form the left right front speaker as a phantom center image or various combination of these speakers As the number increases the phantom effect becomes stronger normally select 04 On the remote controller You cannot change the Dolby PL IIMusic settings using the remote controller 1 Manufacturedund...

Page 26: ...o stream or audio channel Change or erase the subtitle language Change the view angle Change the browsable still pictures pages The numbers in the indicator shows the current page total page number Above example is of DVD Video Items shown on the bar vary due to the disc type 1 Disc type 2 DVD Audio signal format VCD PBC 3 Playback mode 1 DVD Video T RPT Title repeat C RPT Chapter repeat DVD Audio...

Page 27: ...atch the TV programs Ex When DISC SURROUND is selected To select a different source main source to listen through the speakers Press SOURCE on the monitor panel You cannot select SD and USB for the main source By using the buttons on the monitor panel you can operate the newly selected main source without affecting Dual Zone DISC TV operations On the remote controller 1 When the main source is SD ...

Page 28: ...nd VCD While Dual Zone is on these operations are possible on the external monitor using the remote controller The control screen automatically appears when you insert a disc For DivX MPEG1 MPEG2 JPEG while not playing When Dual Zone is off you can only watch the control screen but cannot operate it Ex MP3 WMA 1 Current folder highlighted bar 2 Current folder number total folder number 3 Folder li...

Page 29: ...ent folder 3 Current page total number of the pages included in the list 4 Current folder track highlighted bar To change the playback modes You can also change the playback modes For CD MP3 WMA WAV AAC Intro Repeat Random For DivX MPEG1 MPEG2 JPEG Repeat 1 2 Only for CD MP3 WMA WAV AAC Select a playback mode 3 Select your desired option 4 Selectable playback mode CD T RPT Track repeat A RND All r...

Page 30: ...me way you operate the files on discs except OSD operation and those on the external monitor page 15 to 25 All tracks in the SD card will be played repeatedly until you change the source You cannot select SD when Dual Zone is in use Make sure all important data has been backed up Open the monitor panel Open Tilt menu appears Shaded icons cannot be used at that time Ÿ Press OPEN 1 Thisunitcanplayba...

Page 31: ...V MENU on the monitor panel 2 Selecting playback modes File type Intro Repeat Random Track Plays the first 15 seconds of each track Folder Plays the first 15 seconds of the first track of each folder Track Repeats current track 1 Folder Repeats all tracks of the current folder Folder Randomly plays all tracks of current folder then tracks of next folders SD All Randomly plays all tracks Folder Rep...

Page 32: ...USB when Dual Zone is in use Make sure all important data has been backed up 1 ExceptforJVCD PlayerXA HD500 2 ExceptforMPEG2filesrecordedbyJVCEverio camcorder extensioncode mod 3 ThisunitcanplaybackAACfilesencodedusing iTunes ThisunitcannotplaybackAACfilespurchased fromtheiTunesStore USB cable from the rear of the unit You cannot connect a computer to the USB terminal of the unit Caution Avoid usi...

Page 33: ...ting playback modes File type Intro Repeat Random Track Plays the first 15 seconds of each track Folder Plays the first 15 seconds of the first track of each folder Track Repeats current track 1 Folder Repeats all tracks of the current folder Folder Randomly plays all tracks of current folder then tracks of next folders USB All Randomly plays all tracks Track Repeats current track Folder Repeats c...

Page 34: ...tor panel Press it repeatedly Ÿ Press 4 or to search for a station Auto Search Manual Search Hold either 4 or until Manual Search appears on the display then press it repeatedly 3 Local TV stations with the strongest signals are searched and stored automatically Preset No Assigned name page 52 No Name appears if not assigned page 9 page 5 Sound mode page 51 page 36 Buttons on the touch panel In th...

Page 35: ...g PRESET 1 6 Ô 7 12 you can move to the other preset list of the other six preset stations The station selected in step 2 is now stored in preset number 4 Selecting preset stations On the remote 1 or On the unit To select directly on the touch panel To select from the Preset List 1 2 By pressing PRESET 1 6 Ô 7 12 you can move to the other preset list of the other six preset stations ...

Page 36: ...played while watching TV Using Short Cut Icons You can easily access to the some frequently used functions by using SHORT CUT on the touch panel 1 2 On screen information left Aspect ratio page 55 Sound mode page 51 Touch the screen center portion To display the operation buttons while watching TV SOURCE Display the Source Menu AV MENU Display the AV Menu SHORTCUT Display the Short Cut buttons 4 S...

Page 37: ...nd Bluetooth AUDIO Registering a Bluetooth device Registration Pairing methods Use either of the following items in the Bluetooth menu to register and establish the connection with a device Select Bluetooth PHONE or Bluetooth AUDIO as the source to operate the Bluetooth menu Menu item To do Open Make the unit ready to establish a new Bluetooth connection Connection is established by operating the ...

Page 38: ...the previous character before the cursor Del Erases the character on the cursor Enter Confirms the entry 5 Use the Bluetooth device to connect while Open is displayed on the screen Enter the same PIN code as entered in the above step on the device to be connected Now connection is established and you can use the device through the unit The device remains registered even after you disconnect the de...

Page 39: ...uetooth PHONE page 9 You can also use SOURCE on the monitor panel Press it repeatedly Ÿ Press AV Menu You can also use AV MENU on the monitor panel Press Bluetooth Establish the connection with a device then make a call or settings using the Bluetooth menu pages 61 and 62 Sound mode page 51 Status of the device Signal strength Battery remainder only when the information comes from the device Bluet...

Page 40: ...outgoing call Hold any button on the monitor panel except ATT or When an SMS comes in If the cellular phone is compatible with SMS Short Message Service you can read the messages on the monitor You cannot edit or send a message through the unit When Message Info is set to Auto The unit rings and the following screen is displayed on the monitor to inform you of the arrival of the message page 62 To...

Page 41: ...ber by selecting preset number page 42 Dial Calls the entered number You can easily access Dial Menu by pressing SHORT CUT on the touch panel then You can also access Dial Menu by holding SOURCE on the monitor panel You can easily activate Voice Dialing by pressing SHORT CUT on the touch panel then You can also activate Voice Dialing by holding AV MENU To redial the dialed numbers 1 2 3 When using...

Page 42: ...all Adjust the volume Make a call to the preset numbers Presetting the phone numbers You can preset up to six phone numbers 1 Select the phone number you want to preset from Phonebook Redial Received Calls or Missed Calls 1 Press AV MENU on the touch panel or AV MENU on the monitor panel 2 Press Bluetooth 3 Press Dial Menu then Ex Selecting Received Calls 2 Select a telephone number to store 3 Sel...

Page 43: ...ing a registered device Bluetooth Information If you wish to receive more information about Bluetooth visit our JVC web site Buttons on the touch panel In the explanation they are indicated inside You can use the following buttons on the remote controller for the Bluetooth audio operations Start and pause playback Reverse forward skip Adjust the volume 3 8 7 Start and pause playback 4 Reverse forw...

Page 44: ...time Disc no MP3 indicator page 45 Tag data appears only when it is recorded Select a disc to start playing If you select an MP3 disc the Track list of the current folder appears You can select a track and start playing also page 19 If you select a folder on the list you can start playing the first track of the folder To go to the other list Sound mode page 51 4 Press Select track Hold Reverse for...

Page 45: ... all tracks of the current disc All Randomly plays all tracks of all loaded discs Track Plays the first 15 seconds of each track Folder Plays the first 15 seconds of the first track of each folder Disc Plays the first 15 seconds of the first track of all loaded discs Track Repeats current track Folder Repeats all tracks of the current folder Disc Repeats all tracks of the current disc Folder Rando...

Page 46: ...e forward search 5 Enter player s menu Pause stop play To resume press again Selecting a track from the player s menu 1 Press 5 to enter the player s menu SEARCH flashes on the monitor during menu operations This mode will be canceled if no operations are done for about 5 seconds 2 Press 4 or to select the desired item Press Select an item Hold Skip 10 items at a time if more than 10 items For iPo...

Page 47: ...riate option Repeat One Functions the same as Repeat One or Repeat Mode One All Functions the same as Repeat All or Repeat Mode All Random Album Functions the same as Shuffle Albums of the iPod Song On Functions the same as Shuffle Songs or Random Play On When the playback modes are selected the corresponding indicators lights up alternately on the monitor To cancel select Off You can easily turn ...

Page 48: ...ing the playback picture If no operations are done for about 5 seconds the operation buttons disappear KEY does not work when the source is AV IN page 51 You can easily access to Aspect setting menu by pressing SHORT CUT on the touch panel then Assigned title page 52 Sound mode page 51 Buttons on the touch panel In the explanation they are indicated inside These buttons also work when they are not...

Page 49: ...edwiththevoiceguidancefunction Touch the screen center portion Touch the screen center portion To display the operation buttons page 17 while viewing the navigation screen The operation buttons displayed on the screen vary among the playback sources If no operations are done for about 5 seconds the operation buttons disappear The above buttons except KEY also work when they are not shown on the to...

Page 50: ...d Preparation Make sure External is selected for External Input page 59 Press SOURCE then press EXT IN page 9 You can also use SOURCE on the monitor panel Press it repeatedly Ÿ Turn on the connected component and start playing the source Assigned title page 52 page 51 Sound mode page 51 EXTERNAL DEVICES Buttons on the touch panel In the explanation they are indicated inside ...

Page 51: ...mode is temporarily canceled Soundequalization You can select a preset sound mode for 2 channel sources Storing your own adjustment You can store your adjustment into User1 User2 and User3 1 Repeat steps and Ÿ then in step 2 Adjust 1 then store 2 Ex When storing into User 2 While playing any source other than Bluetooth PHONE Equalizer menu can be easily accessed by pressing SHORT CUT on the touch ...

Page 52: ...y Title Entry screen You can also use AV MENU on the monitor panel Assign a title You can enter up to 16 characters for available characters page 69 Store Confirm the entry 2 3 Moves the cursor BS Erases the previous character before the cursor Del Erases the character on the cursor Cap Changes the upper lower cases Space Enter a space Change Change the character set Finish the procedure Assigning...

Page 53: ...rocedures Some of the settings do not open the sub setting window but just selecting an option will change the setting Ex Changing the AV Input setting You can also use AV MENU on the monitor panel Ÿ Non available items will be displayed being shaded Continued on the next page ...

Page 54: ...he headlights 1 Dimmer Time Set Activates the Dimmer Time setting below Dimmer Time Set Sets the Dimmer On Off times Dimmer Level You can preset the brightness for dimmer 00 brightest to 10 darkest Initial 05 Bright You can adjust brightness of the monitor 15 darkest to 15 brightest Initial 00 Picture Adjust 2 You can adjust the following to make the monitor clear and legible for watching the play...

Page 55: ...guage shown on the monitor English Spanish French German Italian Dutch Swedish Danish Russian NTSC PAL 4 Select the color system of the external monitor connected NTSC PAL Turn off the power and turn it on again to make the new setting effective Clock Time Set Initial 1 00AM 8 12Hours 24Hours Select either 12 hour system or 24 hour system 12 Hours 24 Hours 8 OSD Clock When On is selected the clock...

Page 56: ...res are shown on the monitor OSD Position 5 Select the position of the on screen bar 25 1 Higher position 2 Lower position File Type 5 Select playback file type when a disc SD USB contains different types of files You can store this setting separately for each source DISC SD USB Audio Plays back audio files Picture Plays back JPEG files Video Plays back DivX MPEG1 MPEG2 files Not applicable to SD ...

Page 57: ...front speaker is set to Large No sound comes out of the center speaker when surround is deactivated Speaker Level 6 You can adjust the output level of the activated speakers Speaker Size above monitoring the test tone L C R RS SW 7 LS adjust the output level of each speaker in the range of 10dB to 10dB Initial 00dB Press Test to turn on and off the test tone Speaker Distance 6 8 You can adjust the...

Page 58: ...io Select when connecting an audio component such as a digital audio player 48 Navigation Select when connecting a Navigation System 49 Camera Input 10 Off Select when no rear view camera is connected to the CAMERA IN plug Normal Select when connecting the rear view camera to the CAMERA IN plug The picture from the camera is displayed as it is taken Mirror The mirror image of the picture taken by ...

Page 59: ...TouchPanel Sens Change the sensitivity of the touch panel As the number decreases sensitivity become higher 1 2 3 Initial 2 Initialize Initialize all settings you have made in AV Menu Press and hold Enter to initialize the settings then reset the unit page 3 11 NotselectablewhenthecomponentconnectedtotheCDchangerjackisselectedasthesource 12 ThenameofthecomponentdetectedthroughtheCDchangerjackissho...

Page 60: ...uto adjustment level is commonly used when playing DivX MPEG1 MPEG2 MP3 WMA WAV AAC files Subwoofer Phase Select either Normal or Reverse which reproduces a better sound Subwoofer Level 16 Adjust the subwoofer output level Level 06 to 08 Initial 00 High Pass Filter Through Select when the subwoofer is not connected On Select when the subwoofer is connected Crossover Adjust the crossover frequency ...

Page 61: ... Bluetooth 19 Menu items Selectable settings reference page Dial Menu 20 Select the method to make a call 40 Message 21 You can read a message from the following message histories Unread Messages you have not read Read Messages you have read Unsent Messages you have not sent Sent Messages you have sent The number of messages in each history is also shown on the monitor Open 37 Search 38 Special De...

Page 62: ...ngs Auto Connect 22 When the unit is turned on the connection is established automatically with Off No Bluetooth device Last The last connected Bluetooth device Order The available registered Bluetooth device found at first Auto Answer 23 Off The unit does not answer the calls automatically Answer the calls manually On The unit answers the incoming calls automatically Reject The unit rejects all i...

Page 63: ...ing surface When storing a disc into its case gently insert the disc around the center holder with the printed surface facing up Make sure to store discs into the cases after use To keep discs clean A dirty disc may not play correctly If a disc does become dirty wipe it with a soft cloth in a straight line from center to edge Do not use any solvent for example conventional record cleaner spray thi...

Page 64: ...ds the disc is automatically inserted again into the loading slot to protect it from dust Speaker signal indicators for DVD The speaker indicators square around the letters lights in light blue when the corresponding speakers are set to Large or Small The center speaker indicator square around C lights in light blue when the center speaker is set to Large or Small and when surround is activated So...

Page 65: ... MP3 or Dolby Digital The file encoded in the interlaced scanning mode may not be played back correctly The maximum bit rate for video signals average is as follows DVD 4 Mbps USB 2 Mbps Playing MPEG1 MPEG2 files This unit can play back MPEG1 MPEG2 files with the extension code mpg mpeg or mod mod is an extension code used for the MPEG2 files recorded by JVC Everio camcorders The stream format sho...

Page 66: ... files or has not been formatted correctly Cannot play this SD card Check the SD card appears on the monitor Replace the SD card Do not pull out or attach the SD card while Now Reading is shown on the monitor This unit can recognize a total of 5 000 files and 250 folders a maximum of 999 files per folder This unit can recognize a total 25 characters for file folder names USB If No USB Device appea...

Page 67: ... http www jvc co jp english car support ks pd500 index html Bluetooth operations General While driving do not perform complicated operation such as dialing the numbers using phone book etc When you perform these operations stop your car in a safe place Some Bluetooth devices may not be connected to this unit depending on the Bluetooth version of the device This unit may not work for some Bluetooth...

Page 68: ...herwise authorized by Macrovision Reverse engineering or disassembly is prohibited Title assignment You can assign the titles to 30 stations both for FM AM and for TV If you try to assign the title to a 31st station Title Entry screen will not appear Menu settings If you change the Amplifier Gain setting from High to Low while the volume level is set higher than 30 the unit automatically changes t...

Page 69: ...se the following characters to assign titles page 52 Preset equalizing values Frequency 60 Hz 150 Hz 400 Hz 1 kHz 2 5 kHz 6 3 kHz 15 kHz Sound mode Flat 00 00 00 00 00 00 00 Hard Rock 03 03 01 00 00 02 01 R B 03 02 02 00 01 01 03 Pop 00 02 00 00 01 01 02 Jazz 03 02 01 01 01 03 02 Dance 04 02 00 02 01 01 01 Country 02 01 00 00 00 01 02 Reggae 03 00 00 01 02 02 03 Classic 02 03 01 00 00 02 00 User1 ...

Page 70: ... RN Kirundi TL Tagalog BG Bulgarian HA Hausa LT Lithuanian RO Rumanian TN Setswana BH Bihari HI Hindi LV Latvian Lettish RW Kinyarwanda TO Tonga BI Bislama HR Croatian MG Malagasy SA Sanskrit TR Turkish BN Bengali Bangla HU Hungarian MI Maori SD Sindhi TS Tsonga BO Tibetan HY Armenian MK Macedonian SG Sangho TT Tatar BR Breton IA Interlingua ML Malayalam SH Serbo Croatian TW Twi CA Catalan IE Inte...

Page 71: ...le playing in stereo This happens while playing some discs with Auto selected for Surround Mode page 24 Cancel surround The monitor is not clear and legible Sunshine from the windscreen may cause this symptom Adjust Bright page 54 You cannot select SD and USB as the source Deactivate Dual Zone page 27 While Dual Zone is activated you cannot select them as the source The remote controller does not ...

Page 72: ...ayed back Tracks on the Recordable Rewritable discs cannot be skipped Insert a finalized disc Finalize the discs with the component which you used for recording Playback does not start Insert the disc correctly again The format of files is not supported by the unit The playback picture is not clear and legible Adjust items in Picture Adjust page 54 Sound and pictures are sometimes interrupted or d...

Page 73: ...d track skips The track is unplayable SD USB Noise is generated The track played back is not a playable file format Skip to another file Tracks cannot play back as you have intended them to play Playback order may differs from the one played back using other players Now Reading keeps flashing on the monitor Readout time varies depending on the SD card USB device Do not use too many hierarchy and f...

Page 74: ...etter signal reception The sound is interrupted or skipped during playback of a Bluetooth audio device Reduce the distance between the unit and the Bluetooth audio device Disconnect the device connected for Bluetooth PHONE Turn off then turn on the unit When the sound is not yet restored connect the device again New Device cannot be selected for Bluetooth AUDIO Bluetooth audio device is being conn...

Page 75: ...player Disconnect the D player from the adapter Then connect them again No Files or No Track appears on the monitor No tracks are stored Import tracks to the iPod or D player Reset 01 Reset 07 appears on the monitor Disconnect the adapter from both this unit and iPod D player Then connect them again Reset 08 appears on the monitor Check the connection between the adapter and this unit The iPod s o...

Page 76: ...N CAMERA IN USB input terminal Aerial input Output 2nd AUDIO OUT VIDEO OUT Others CD changer FM AM TUNER Frequency Range FM 87 5 MHz to 108 0 MHz AM 531 kHz to 1 602 kHz FM Tuner Usable Sensitivity 11 3 dBf 1 0 μV 75 Ω 50 dB Quieting Sensitivity 16 3 dBf 1 8 μV 75 Ω Alternate Channel Selectivity 400 kHz 65 dB Frequency Response 40 Hz to 15 000 Hz Stereo Separation 35 dB AM Tuner Sensitivity Select...

Page 77: ...tical Drive Method TFT Thin Film Transistor active matrix format Color System NTSC PAL Aspect Ratio 16 9 wide GENERAL Power Requirement Operating Voltage DC 14 4 V 11 V to 16 V allowance Grounding System Negative ground Allowable Storage Temperature 10 C to 60 C Allowable Operating Temperature 0 C to 40 C Dimensions W H D Installation Size approx 178 mm 100 mm 160 mm Panel Size approx 171 mm 97 mm...

Page 78: ...EN 0307MNMMDWJEIN 2007 Victor Company of Japan Limited Having TROUBLE with operation Please reset your unit Refer to page of How to reset your unit ...

Page 79: ... monitor would eject when in use 30 160 90 4 100 Required space for the monitor ejection Unit mm Holder Double sided adhesive tape Remote controller Parts list for installation and connection The following parts are provided for this unit If anything is missing contact your dealer immediately Main unit Power cord AV I O cord Round head screws M5 x 8 mm Flat head screws M5 x 8 mm Reverse gear signa...

Page 80: ...als see diagram Å on page 3 3Finally connect the wiring harness to the unit 1 2 3 4 6 9 7 1 ILLUMINATION TEL MUTING PARKING BRAKE 3 C B A 8 2 2 C POWER ANTENNA 5 REMOTE OUT 15 A fuse Rear ground terminal 1 Not included for this unit Ignition switch White with black stripe White Gray with black stripe Gray Green with black stripe Green Purple with black stripe Purple Right speaker front Left speake...

Page 81: ...tances Be sure to wipe the window surface where the aerials will be attached with the cleaner supplied to remove moisture dirt dust wax oil or other substances The windows with windshield heating wave insulated or thermally insulated screen will interfere with signal reception Consult your JVC car audio dealer For connecting the TV aerials to the unit see page 2 TV aerial Left Aerial cords Aerial ...

Page 82: ...ce After you have connected the center speaker make sure to activate the center speaker otherwise no sound comes out of the connected center speaker see page 57 of the INSTRUCTIONS You can supply the power to the amplifiers by connecting the remote leads blue with white stripe of this unit and amplifiers To connect more than one amplifier using the remote leads Y connectors need to be separately p...

Reviews: