background image

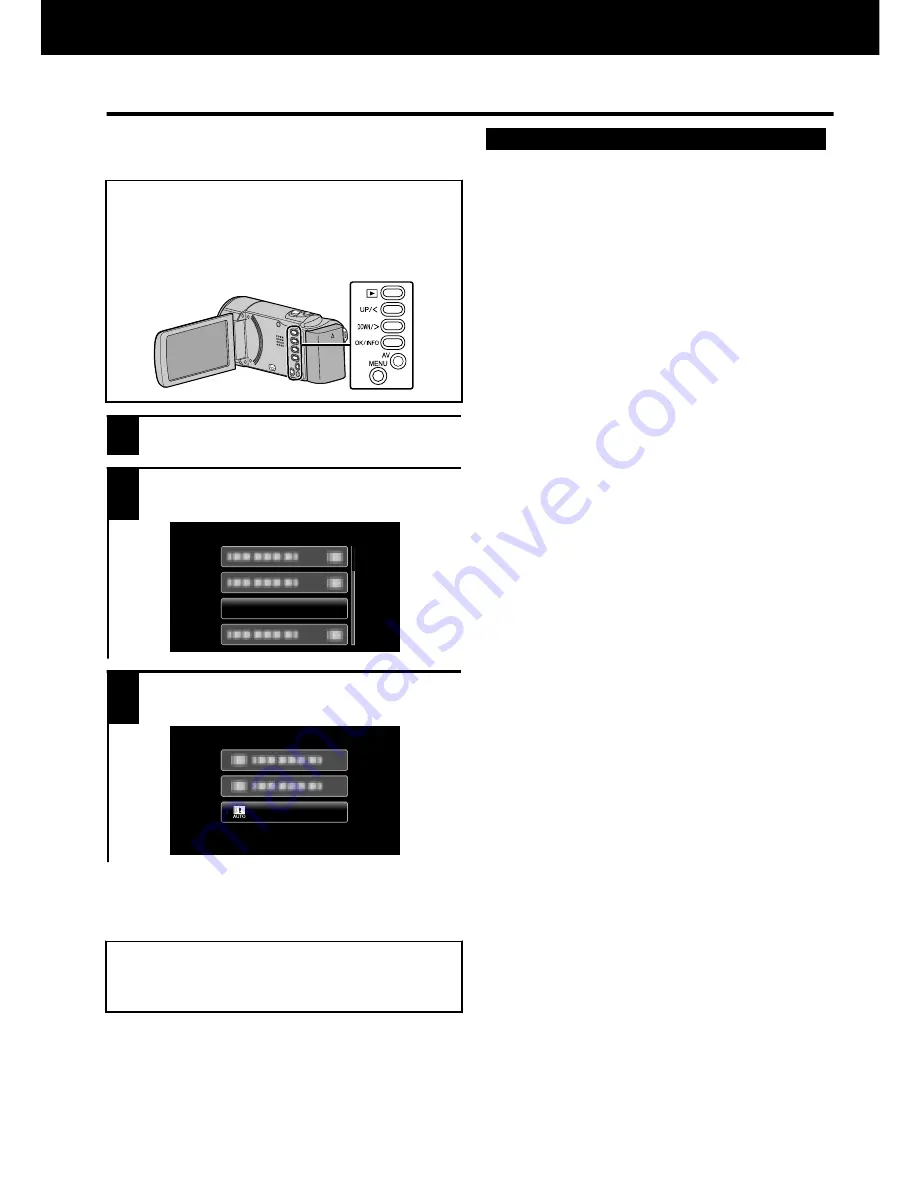
Funcionamiento del menú

Se pueden configurar varios ajustes

utilizando el menú.

Para seleccionar/mover el cursor

hacia arriba/izquierda o hacia abajo/

derecha, presione el botón UP/< o

DOWN/>.

.

1

Presione MENU.

2

Seleccione el menú que desee y

presione OK.

.

GANANCIA

3

Seleccione la configuración

deseada y presione OK.

.

OBTUR. LENTA AUTOM.

o

Para volver a la pantalla anterior

Presione MENU.

0

Para más información sobre los

ajustes, consulte la Guía detallada

del usuario.

.

SALIDA DE VÍDEO

VER EN TV

CONFIG. CONEXIÓN

CONFIG. DE FÁBRICA

ACTUALIZAR

REINICIO RÁPIDO

DESCONEXIÓN AUTOM.

SONIDO FUNCIONAM.

MODO DEMO

CONFIG. BÁSICA

BRILLO PANTALLA

TIPO INDIC. FECHA

LANGUAGE

CONFIG. PANTALLA

Menú común

DATOS EN PANTALLA

AJUS.RELOJ

REPR. OTRO ARCHIVO

PROTEGER/CANCELAR

ELIMINAR

Menú de reproducción

AJUS.RELOJ

ZOOM

CALIDAD DE VÍDEO

GRABACIÓN AUTOMÁTICA

GRAB. POR INTERVALO

CORTA-VIENTO

GANANCIA

DIS

PRIORIDAD CARA AE/AF

TELE MACRO

COMP. CONTRALUZ

BALANCE BLANCOS

AJUSTAR BRILLO

FOCO

SELECC. ESCENA

AJUSTE MANUAL

Menú de grabación

Mapa del menú

FORMATEAR TARJETA SD

CONFIG. MEDIOS

Más información

20

Para obtener más información, consulte la Guía detallada del usuario

http://manual.jvc.co.jp/index.html/

Summary of Contents for Everio GZ-MS150U

Page 1: ... are available for this product For more details on operating this product please refer to the Detailed User Guide at the following website o http manual jvc co jp index html o You can also access the website from the supplied CD ROM p 18 For Future Reference Enter the Model No located on the bottom of the camera and Serial No located on the battery pack mount of the camera below Model No Serial N...

Page 2: ... sufficient space on all sides to allow for ventilation 10 cm 3 15 16 or more on both sides on top and at the rear Do not block the ventilation holes If the ventilation holes are blocked by a newspaper or cloth etc the heat may not be able to get out No naked flame sources such as lighted candles should be placed on the apparatus When discarding batteries environmental problems must be considered ...

Page 3: ...pparatus has been exposed to rain or moisture does not operate normally or has been dropped If this symbol is shown it is only valid in the European Union Remember that this unit is intended for private consumer use only Any commercial use without proper permission is prohibited Even if you record an event such as a show performance or exhibition for personal enjoyment it is strongly recommended t...

Page 4: ...er Guide this manual and a Detailed User Guide are available for this product For more details on operating this product please refer to the Detailed User Guide at the following website o http manual jvc co jp index html o You can also access the website from the supplied CD ROM p 18 Verifying the Accessories AC Adapter AC V11U Battery Pack BN VG108U BN VG107U USB Cable Type A Mini Type B QAM1313 ...

Page 5: ... icons downward Forward search J OK INFO Button Confirms the selection Displays information as follows Recording Displays the remaining time and battery power Playback Displays file information such as recording date K AV Connector p 14 16 L MENU Button p 20 M USB Connector p 19 N Zoom Volume Lever Index u p 12 13 O i AUTO Intelligent Auto Button p 12 P DC Connector p 6 Q START STOP Button Video R...

Page 6: ...er battery packs besides JVC battery packs safety and performance cannot be guaranteed 0 Charging time Approx 2 h 10 m BN VG108U 1 h 50 m BN VG107U using supplied battery pack The charging time is when the unit is used at 25 C 77 F If the battery pack is charged outside the room temperature range of 10 C to 35 C 50 F to 95 F charging may take a longer time or it may not start The recordable and pl...

Page 7: ...pen the lever on the strap lock Using as a Hand Strap Adjust the length of the belt and loop it around your wrist For more information refer to the Detailed User Guide http manual jvc co jp index html 7 Getting Started Recording Playback Copying Further Information ...

Page 8: ...onic TOSHIBA SanDisk Eye Fi Video A Class 4 or higher compatible SDHC card 4 GB to 32 GB Class 4 or higher compatible SDXC card Max 64 GB Eye Fi Eye Fi Connect X2 Eye Fi Explore X2 Eye Fi Pro X2 Only the specified models may be used Refer to the Detailed User Guide for details 0 Using SD cards including SDHC SDXC cards other than those specified above may result in recording failure or data loss 0...

Page 9: ...ted when it is formatted Copy all files on the card to a computer before formatting A Press MENU B Select MEDIA SETTINGS and press OK C Select FORMAT SD CARD and press OK FORMAT SD CARD D Select FILE and press OK FILE FORMAT SD CARD E Select YES and press OK F After formatting press OK For more information refer to the Detailed User Guide http manual jvc co jp index html 9 Getting Started Recordin...

Page 10: ...e 2011 JAN 1 10 00 TIME CLOCK SETTING DATE 0 Press UP or DOWN to adjust the setting value and press OK to confirm it The cursor moves to the next item 0 Repeat this step to input the year month day hour and minute 4 Press UP or DOWN to select the region where you live and press OK 0 The city name and time difference are displayed GMT CLOCK AREA SETTING o To return to the previous screen Press MENU...

Page 11: ...age on the display can be changed A Press MENU B Select DISPLAY SETTINGS and press OK DISPLAY SETTINGS C Select LANGUAGE and press OK LANGUAGE D Select the desired language and press OK NOTE 0 SET DATE TIME is displayed when you turn on this unit after it has not been used for a prolonged period Charge this unit for more than 24 hours before setting the clock For more information refer to the Deta...

Page 12: ...ual with every press If the mode is H Manual press the S button to switch Check if the recording mode is PIntelligent Auto Open the lens cover Zoom ratio setting depends on the setting of VIDEO QUALITY P 26 o Indications during video recording 0 00 00 000 22 Battery Indicator Recording Media Recording in Progress Record Standby Remaining Recording Time Video Quality Scene Counter Image Stabilizer ...

Page 13: ...LE SELECT and press OK C Press UP or DOWN to select files and press OK D Press MENU select EXECUTE and press OK to confirm deletion E After deleting is complete press OK o Usable operation buttons levers during playback During video playback During video pause d e Pause Playback Zoom u Stop returns to thumbnail display Zoom T Vol Increases volume level Zoom W Vol Decreases volume level UP Reverse ...

Page 14: ...Select the TV input switch 4 Play back a file p 13 o To play back with date time display Set DISPLAY ON TV in the CONNECTION SETTINGS menu to ON Set ON SCREEN DISPLAY in the playback menu to ON o When images look unnatural on the TV Images do not appear on the TV properly 0 Disconnect the cable and connect again 0 Turn off and on this unit again Images are projected vertically on the TV 0 Set VIDE...

Page 15: ...Disc Device DVD Recorder X p 16 VCR X p 16 Computer p 17 For details on how to create a disc using a computer refer to the Detailed User Guide NOTE 0 It is not possible to connect and record to a DVD writer external Blu ray drive or external hard disk Copying For more information refer to the Detailed User Guide http manual jvc co jp index html 15 Getting Started Recording Playback Copying Further...

Page 16: ...onnected 2 Press L Play Record to select the playback mode 3 Prepare to record Preparation on TV and VCR DVD recorder 0 Switch to a compatible external input 0 Insert a DVD R or video tape Preparation on this unit 0 Set VIDEO OUTPUT in the CONNECTION SETTINGS menu to the aspect ratio 4 3 or 16 9 of the connecting TV 0 To include the date during dubbing set DISPLAY ON TV in the CONNECTION SETTINGS ...

Page 17: ...e Premium Pre installed versions only Windows 7 System type 32 bit 64 bit Memory At least 2 GB o Windows XP Memory At least 2 GB Processor High definition Intel Core Duo CPU 1 66 GHz or higher Intel Core 2 Duo CPU 2 13 GHz or higher recommended Service Pack 3 Home Edition or Professional Pre installed versions only Windows XP o Other requirements Graphic Intel G945 or higher recommended NOTE 0 Ify...

Page 18: ...operations will work with all computer environments Installing the Provided Software You can display the recorded images in calendar format and perform simple editing using the provided software 1 Load the provided CD ROM into your PC A Select LoiLoScope AX install Follow the on screen instructions 0 Windows Installer appears after a while 0 If it doesn t appear double click the CD ROM icon in My ...

Page 19: ...the power supply 0 The provided software LoiLoScope MediaBrowser starts up on the PC The subsequent operations are to be performed on the PC 3 Select the files to back up 4 Select backup Click 5 Start backup Click If you encounter any problems with the provided software LoiLoScope AX refer to following website http loilo tv product 15 o To disconnect this unit from the PC A Click Safely Remove Har...

Page 20: ...OUTPUT DISPLAY ON TV CONNECTION SETTINGS FACTORY PRESET UPDATE QUICK RESTART AUTO POWER OFF OPERATION SOUND DEMO MODE BASIC SETTINGS MONITOR BRIGHTNESS DATE DISPLAY STYLE LANGUAGE DISPLAY SETTINGS Common Menu ON SCREEN DISPLAY CLOCK ADJUST PLAYBACK OTHER FILE PROTECT CANCEL DELETE Playback Menu CLOCK ADJUST ZOOM VIDEO QUALITY AUTO REC TIME LAPSE RECORDING WIND CUT GAIN UP DIS FACE PRIORITY AE AF T...

Page 21: ... INFO button Approximate Video Recording Time Quality SDHC SDXC Card 4 GB 8 GB 16 GB 32 GB 48 GB 64 GB HR 1 h 2 h 4 h 8 h 10 m 12 h 10 m 16 h 30 m SR 2 h 4 h 10 m 8 h 30 m 17 h 20 m 25 h 30 m 34 h 30 m HRW 1 h 2 h 4 h 8 h 10 m 12 h 10 m 16 h 30 m SRW 2 h 4 h 10 m 8 h 30 m 17 h 20 m 25 h 30 m 34 h 30 m 0 The approximate recording time is only a guide The actual recording time may shorten depending ...

Page 22: ...y pack from this unit reattach them and this unit powers on automatically 5 If the above do not solve the problem consult your nearest JVC dealer or JVC service center Trouble Trouble Action Page Power POWER CHARGE lamp starts blinking when the monitor is closed 0 The battery pack is being charged 6 Recording Recording cannot be performed 0 Set to the recording mode with the L Play Record button 1...

Page 23: ...RE 0 Turn off and on this unit again 0 If the above does not solve the problem back up your files and execute FORMAT SD CARD in the MEDIA SETTINGS menu All data will be deleted DATA RECORDED FILE IS TOO SMALL TO BE SAVED 0 When recording is stopped with the recorded time less than 0 00 00 17 the video will not be saved MEMORY CARD ERROR 0 Turn off and on this unit again 0 Remove the AC adapter and...

Page 24: ... months when storing the battery pack over a long period of time remove from charger or powered unit when not in use as some machines use current even when switched off do not drop or subject to strong impact ATTENTION The product you have purchased is powered by a rechargeable battery that is recyclable Please call 1 800 8 BATTERY for information on how to recycle this battery USA and Canada only...

Page 25: ... battery pack attached when the camcorder is not in use place naked flame sources such as lighted candles on the apparatus expose the apparatus to dripping or splashing leave dust or metal objects adhered to the power plug or an AC wall outlet insert any objects in the camcorder Avoid using the unit in places subject to excessive humidity or dust in places subject to soot or steam such as near a c...

Page 26: ...Recording area Video HRW SRW 340 000 to 1 050 000 pixels dynamic zoom ON HRW SRW 630 000 to 1 050 000 pixels dynamic zoom OFF HR SR 340 000 to 790 000 pixels dynamic zoom ON HR SR 470 000 to 790 000 pixels dynamic zoom OFF Lens F1 8 6 3 f 2 9 mm to 116 0 mm 16 9 35 mm conversion 45 6 mm to 3 182 mm dynamic zoom ON 35 mm conversion 45 6 mm to 1 824 mm dynamic zoom OFF 4 3 35 mm conversion 55 9 mm t...

Page 27: ...uding cord and AC plug Mass Approx 71 g 0 15 lbs When using the AC adapter overseas please prepare a commercially available converter plug for the country or region of visit 0 The specifications and appearance of this product are subject to changes for further improvement without prior notice For more information refer to the Detailed User Guide http manual jvc co jp index html 27 Getting Started ...

Page 28: ...te 16 F Format SD Card 9 I Installation 18 L Language Setting 11 LCD Monitor 24 M Mac 18 Menu Settings 20 R Recordable Time 21 S SD Card 8 Software 17 U USB Cable 19 V Viewing Files on TV 14 W Windows 17 Z Zoom 12 28 For more information refer to the Detailed User Guide http manual jvc co jp index html 0411ZAR SW MP 01 US 2011 Victor Company of Japan Limited LYT2340 001B M ...

Page 29: ...onibles para este producto Para más detalles sobre el funcionamiento de este producto consulte el Guía detallada del usuario en el siguiente sitio web o http manual jvc co jp index html o También puede acceder al sitio web desde el CD ROM provisto p 18 Para futuras consultas Introduzca el número de modelo ubicado en la parte inferior de la cámara y el número de serie ubicado en el compartimineto d...

Page 30: ...puede requerirse una manipulación especial Visite www dtsc ca gov hazardouswaste perchlorate Cuando el equipo se encuentra instalado en un gabinete o en un estante asegúrese que tenga suficiente espacio en todos los lados para permitir la ventilación 10 cm 3 15 16 o más en cada lado en la parte superior y en la parte trasera No bloquee los orificios de ventilación Si los orificios de ventilación e...

Page 31: ...to fue expuesto a la lluvia o humedad si no funciona normalmente o sufrió caídas Si este símbolo aparece sólo es válido en la Unión Europea Realice una copia de seguridad de los datos importantes que haya grabado JVC no se responsabilizará de cualquier pérdida de datos Le sugerimos que guarde los datos importantes que haya grabado copiándolos en un DVD o cualquier otro soporte de grabación Recuerd...

Page 32: ...manual y un Guía detallada del usuario se encuentran disponibles para este producto Para más detalles sobre el funcionamiento de este producto consulte el Guía detallada del usuario en el siguiente sitio web o http manual jvc co jp index html o También puede acceder al sitio web desde el CD ROM provisto p 18 Comprobación de los accesorios Adaptador de CA AC V11U Batería BN VG108U BN VG107U Cable U...

Page 33: ...te J Botón OK INFO Confirma la selección Muestra información de la siguiente manera Grabación Muestra el tiempo y carga de batería restantes Reproducción Muestra la información de los archivos como por ejemplo la fecha de grabación K Conector AV p 14 16 L Botón MENU p 20 M Conector USB p 19 N Palanca de zoom volumen Índice u p 12 13 O Botón i AUTO auto inteligente p 12 P Conector de CC p 6 Q Botón...

Page 34: ...la seguridad ni el rendimiento del producto 0 Tiempo de carga Aprox 2 h 10 m BN VG108U 1 h 50 m BN VG107U utilizando la batería suministrada El tiempo de carga aplica cuando la unidad se utiliza a 25 C 77 F Si se carga la batería en un rango de temperatura ambiente que no se encuentre entre 10 C y 35 C 50 F y 95 F la carga puede tardar más tiempo en realizarse o puede que no se inicie El tiempo de...

Page 35: ...ra la palanca en la traba de la correa Uso de la correa de muñeca Regule la longitud de la correa y ajústela en su muñeca Para obtener más información consulte la Guía detallada del usuario http manual jvc co jp index html 7 Introducción Grabación Reproducción Copia Más información ...

Page 36: ... SanDisk Eye Fi Vídeo A Tarjeta SDHC compatible Clase 4 o superior de 4 GB a 32 GB Tarjeta SDXC compatible Clase 4 o superior máximo 64 GB Eye Fi Eye Fi Connect X2 Eye Fi Explore X2 Eye Fi Pro X2 Sólo los modelos especificados pueden utilizarse Consulte el Guía detallada del usuario para obtener detalles 0 El uso de otras tarjetas SD incluyendo las tarjetas SDHC SDXC que no sean las indicadas ante...

Page 37: ...a se eliminarán Realice una copia de todos los archivos a una computadora antes de realizar el formateado A Presione MENU B Seleccione CONFIG MEDIOS y presione OK C Seleccione FORMATEAR TARJETA SD y presione OK FORMATEAR TARJETA SD D Seleccione ARCHIVO y presione OK ARCHIVO FORMATEAR TARJETA SD E Seleccione SÍ y presione OK F Después del formateado presione OK Para obtener más información consulte...

Page 38: ...11 JAN 1 10 00 HORA CONF RELOJ FECHA 0 Presione UP o DOWN para establecer el valor de ajuste y presione OK para confirmarlo El cursor se mueve al siguiente ítem 0 Repita este paso para ingresar el año mes día hora y minuto 4 Presione UP o DOWN para seleccionar la región donde usted vive y presione OK 0 Se mostrará el nombre de la ciudad y la diferencia horaria GMT CONFIG RELOJ ÁREA o Para volver a...

Page 39: ...nformación de la pantalla puede cambiarse A Presione MENU B Seleccione CONFIG PANTALLA y presione OK CONFIG PANTALLA C Seleccione LANGUAGE y presione OK LANGUAGE D Seleccione el idioma que desee y presione OK NOTA 0 AJUSTE FECHA HORA aparece si se enciende esta unidad después de no haberla utilizado durante un periodo prolongado de tiempo Cargue esta unidad durante más de 24 horas antes de ajustar...

Page 40: ...esiona Si el modo es Manual H presione el botón S para cambiar de modo Compruebe que el modo de grabación sea PAuto Inteligente Abra la cubierta de la lente La proporción del zoom depende del ajuste de CALIDAD DE VÍDEO P 26 o Indicaciones durante la grabación de vídeo 0 00 00 000 22 Indicador de batería Grabación de soportes Grabación en curso Espera de grabación Tiempo restante de grabación Calid...

Page 41: ...eleccionar los archivos y presione OK D Presione MENU seleccione EJECUTAR y presione OK para confirmar la eliminación E Después de que la eliminación se haya completado presione OK o Botones palancas de funcionamiento habilitados durante la reproducción Durante la reproducción de vídeo Durante la pausa del vídeo d e Pausa Reproducción Zoom u Detención regresa a la pantalla de vistas en miniatura Z...

Page 42: ...ada del televisor 4 Reproduzca un archivo p 13 o Para reproducir visualizando la fecha y hora Ajuste VER EN TV del menú CONFIG CONEXIÓN en ON Ajuste DATOS EN PANTALLA del menú de reproducción en ON o Si las imágenes no se ven naturales en el televisor Las imágenes no aparecen en el televisor adecuadamente 0 Desconecte el cable y vuelva a conectarlo 0 Apague esta unidad y vuelva a encenderla Las im...

Page 43: ... DVD Dispositivo Grabadora de DVD X p 16 VCR X p 16 Computadora p 17 Para obtener información sobre cómo crear un disco utilizando un ordenador consulte la Guía detallada del usuario NOTA 0 No es posible conectar y grabar en una grabadora de DVD unidad externa de Blu ray o disco duro externo Copia Para obtener más información consulte la Guía detallada del usuario http manual jvc co jp index html ...

Page 44: ...ecta el adaptador de CA 2 Presione L reproducir grabar para seleccionar el modo de reproducción 3 Prepárese para la grabación Preparación del televisor y de la grabadora de vídeo o DVD 0 Cambie a una entrada externa compatible 0 Introduzca un DVD R o cinta de vídeo Preparación en esta unidad 0 Ajuste SALIDA DE VÍDEO del menú CONFIG CONEXIÓN en la proporción de aspecto 4 3 o 16 9 del TV conectado 0...

Page 45: ...rsiones preinstaladas Windows Vista Home Premium edición 32 bit 64 bit sólo versiones preinstaladas Windows 7 o Windows XP Memoria 2 GB como mínimo Procesador Alta definición Intel Core Duo CPU 1 66 GHz o superior se recomienda Intel Core 2 Duo CPU 2 13 GHz o superior Service Pack 3 Home Edition o Professional solo versiones preinstaladas Windows XP o Otros requisitos Gráficos se recomienda Intel ...

Page 46: ... en todos los entornos Instalación del software proporcionado Sepuedenvisualizarlasimágenesgrabadas en formato calendario y realizar una edición sencilla utilizando el software proporcionado 1 Coloque el CD ROM proporcionado en su PC A Seleccione LoiLoScope AX install Siga las instrucciones que aparecen en pantalla 0 Aparecerá Windows Installer luego de un momento 0 Si no apareciera haga doble cli...

Page 47: ...e alimentación eléctrica 0 El software proporcionado LoiLoScope MediaBrowser se inicia en el PC Las demás operaciones se deben realizar en el PC 3 Seleccione los archivos para realizar la copia de seguridad 4 Seleccione Respaldo Haga clic 5 Inicie la copia de seguridad Haga clic Si tuviera algún problema con el software proporcionado LoiLoScope MediaBrowser visite el siguiente sitio Web http loilo...

Page 48: ...V CONFIG CONEXIÓN CONFIG DE FÁBRICA ACTUALIZAR REINICIO RÁPIDO DESCONEXIÓN AUTOM SONIDO FUNCIONAM MODO DEMO CONFIG BÁSICA BRILLO PANTALLA TIPO INDIC FECHA LANGUAGE CONFIG PANTALLA Menú común DATOS EN PANTALLA AJUS RELOJ REPR OTRO ARCHIVO PROTEGER CANCELAR ELIMINAR Menú de reproducción AJUS RELOJ ZOOM CALIDAD DE VÍDEO GRABACIÓN AUTOMÁTICA GRAB POR INTERVALO CORTA VIENTO GANANCIA DIS PRIORIDAD CARA ...

Page 49: ...o de grabación de vídeo presionando el botón OK INFO Tiempo estimado de grabación de vídeo Calidad Tarjeta SDHC SDXC 4 GB 8 GB 16 GB 32 GB 48 GB 64 GB HR 1 h 2 h 4 h 8 h 10 m 12 h 10 m 16 h 30 m SR 2 h 4 h 10 m 8 h 30 m 17 h 20 m 25 h 30 m 34 h 30 m HRW 1 h 2 h 4 h 8 h 10 m 12 h 10 m 16 h 30 m SRW 2 h 4 h 10 m 8 h 30 m 17 h 20 m 25 h 30 m 34 h 30 m 0 El tiempo estimado de grabación es solo una guí...

Page 50: ...nuevamente y la unidad de encencerá automáticamente 5 Si lo mencionado anteriomente no resuelve el problema póngase en contacto con su distribuidor JVC o centro de servicios JVC más cercanos Problema Problema Acción Página Alimentación La luz POWER CHARGE empieza a parpadear cuando el monitor está cerrado 0 La batería se está cargando 6 Grabación La grabación no puede realizarse 0 Ajuste el modo g...

Page 51: ...a unidad y vuelva a encenderla 0 Si lo mencionado más arriba no soluciona el problema realice una copia de seguridad de los archivosyejecute FORMATEARTARJETASD en el menú CONFIG MEDIOS se eliminarán todos los datos LOS DATOS GRABADOS SON INSUFICIENTES NO SE PUEDEN GUARDAR 0 Cuando se detiene la grabación con un tiempo de grabación menor a 0 00 00 17 no se podrá guardar el vídeo ERROR EN TARJETA DE...

Page 52: ...vadas aumentará la descarga natural y reducirá el periodo de vida útil se debe cargar totalmente y luego descargar totalmente la batería cada seis meses cuando se guarde durante un periodo de tiempo prolongado cuando no se utilice se debe retirar del cargador o dispositivo eléctrico ya que algunas máquinas utilizan corriente incluso estando apagadas ATENCIÓN La batería que ha adquirido es reciclab...

Page 53: ...a en un lugar con polvo o arena Para evitar que la unidad se caiga Ajuste bien la correa de mano Si utiliza la cámara con un trípode fije bien la cámara en el trípode Si se le cae la cámara puede herirse usted y dañarse la cámara Si un niño utiliza la unidad un adulto deberá guiarle Los cambios o modificaciones no aprobados por JVC podrian anular la autoridad del usuario para utilizar el equipo Es...

Page 54: ...rea de grabación vídeo HRW SRW 340 000 a 1 050 000 pixeles zoom dinámico ON HRW SRW 630 000 a 1 050 000 pixeles zoom dinámico OFF HR SR 340 000 a 790 000 pixeles zoom dinámico ON HR SR 470 000 a 790 000 pixeles zoom dinámico OFF Lente F1 8 a 6 3 f 2 9 mm a 116 0 mm 16 9 conversión de 35 mm 45 6 mm a 3 182 mm zoom dinámico ON conversión de 35 mm 45 6 mm a 1 824 mm zoom dinámico OFF 4 3 conversión d...

Page 55: ... D sin incluir el cable ni enchufe de CA Masa Aprox 71 g 0 15 lbs Si utiliza un adaptador de CA en el extranjero utilice un enchufe adaptador comercialmente disponible para el país o región en la que se encuentre 0 Las especificaciones y el aspecto de este producto están sujetos a cambios sin previo aviso Para obtener más información consulte la Guía detallada del usuario http manual jvc co jp ind...

Page 56: ...ad 15 Copia duplicado 16 E Eliminación de archivos 13 F Formato tarjeta SD 9 I Instalación 18 M Mac 18 Monitor LCD 24 S Software 17 T Tarjeta SD 8 Tiempo de grabación 21 V Visualización de archivos en un televisor 14 W Windows 17 Z Zoom 12 28 Para obtener más información consulte la Guía detallada del usuario http manual jvc co jp index html 0411ZAR SW MP 01 US 2011 Victor Company of Japan Limited...

Reviews: