background image

Memo:

The clock can be reset again later.

"Resetting the Clock" 

A

 P.15

When using this unit overseas, you can set it to the local time for re-
cording.

"Setting the Clock to Local Time when Traveling" 

A

 P.18

“SET DATE/TIME!” is displayed when you turn on this unit after it has
not been used for a prolonged period.
Charge this unit for more than 24 hours before setting the clock.

"Charging the Battery Pack" 

A

 P.12

You can turn on or off the clock display during playback mode.

"ON-SCREEN DISPLAY" 

A

 P.94

Touch the slider and buttons around the screen with your fingers.

The slider and buttons do not function if you touch them with your fin-
gernails or with gloves on.

The displays on the screen do not work even if you touch them.

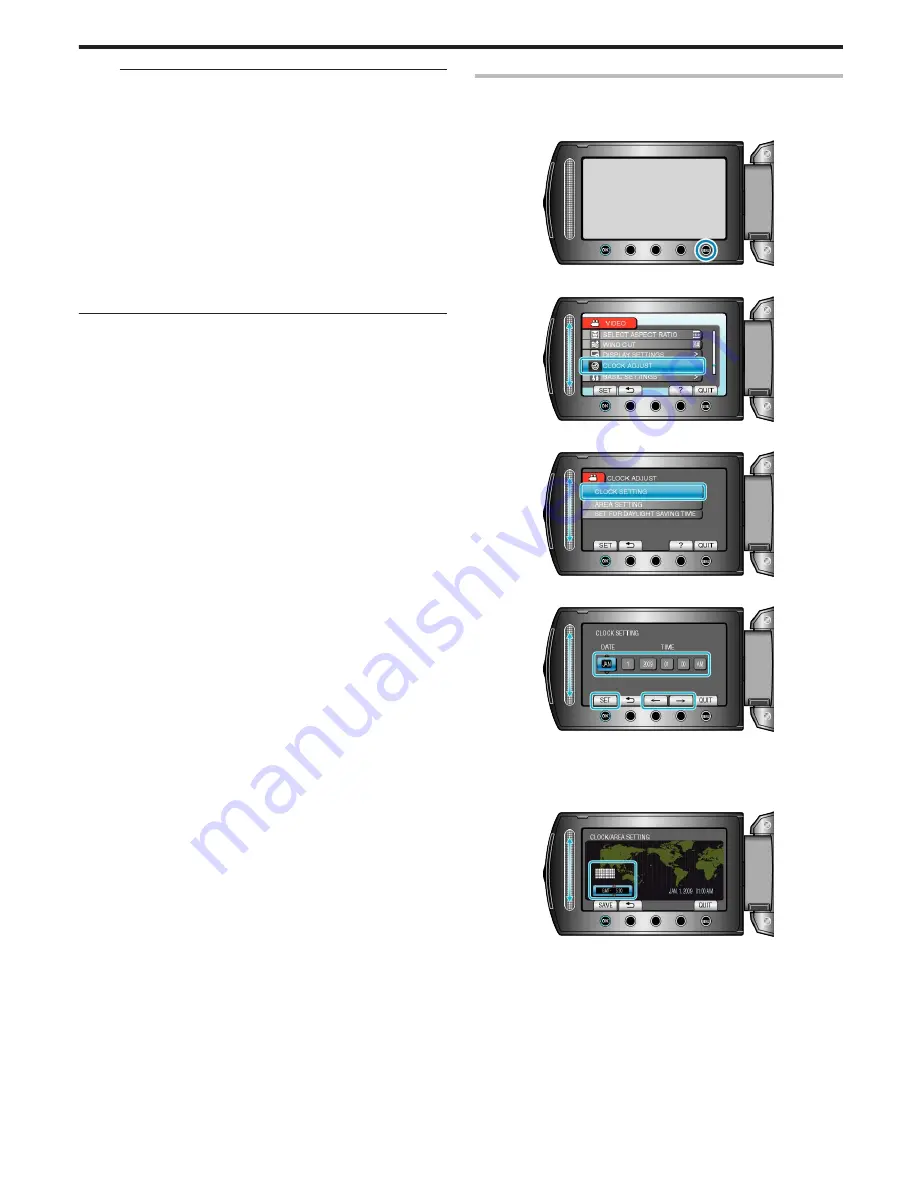
Resetting the Clock

Set the clock with “CLOCK ADJUST” from the menu.

1

Touch 

D

 to display the menu.

.

2

Select “CLOCK ADJUST” and touch 

C

.

.

3

Select “CLOCK SETTING” and touch 

C

.

.

4

Set the date and time.

.

Use the slider to adjust the year, month, day, hour, and minute in order.

Touch the operation buttons "

E

" / "

F

" to move the cursor.

After setting the date and time, touch 

C

.

5

Select the region where you live and touch 

C

.

.

The city name and time difference are displayed.

Touch 

C

 after the color of the selected region changes.

Getting Started

15

Summary of Contents for Everio GZ-MG750

Page 1: ...GZ MG750 A HARD DISK CAMERA Detailed User Guide LYT2150 003A ...

Page 2: ...arch 40 Event and Date Search 41 Connecting to and Viewing on TV 41 Playing Back Playlists 42 Playing Back a DVD Created on this Unit 43 Editing Deleting Unwanted Files 45 Deleting the Currently Displayed File 45 Deleting Selected Files 46 Deleting All Files 47 Protecting Files 47 Protecting the Currently Displayed File 47 Protecting Selected Files 48 Protecting All Files 49 Releasing Protection o...

Page 3: ...97 DATE DISPLAY STYLE 97 MONITOR BRIGHTNESS 98 LCD BACKLIGHT 98 CLOCK ADJUST 98 Basic Settings Menu 99 DEMO MODE 100 AUTO POWER OFF 100 OPERATION SOUND 101 RECORD BUTTON 101 QUICK RESTART 102 DROP DETECTION 102 UPDATE 103 FACTORY PRESET 103 Connection Settings Menu 104 DISPLAY ON TV 104 VIDEO OUTPUT 104 Media Settings Menu 105 REC MEDIA FOR VIDEO 105 REC MEDIA FOR IMAGE 105 FORMAT HDD 106 FORMAT S...

Page 4: ...to achieve stable images Set to the wide angle as much as possible as the image will be prone to camera shake Be considerate Do not inconvenience the people around you Squatting and Shooting at Eye Level Staying low is a common position to take when shooting small children By recording from the eye level of the child you can capture all his cute expressions clearly Getting Ready Kneel down with yo...

Page 5: ...n No Derivative Works 3 0 Record the scenes as everyone helps to prepare the feast of the night You can film the mother who is cooking the children who are helping and of course the process of making a cake Recording the Christmas Party Photo by InnerSpirit Creative Commons Attribution No Derivative Works 3 0 After all preparations it is finally the Christmas party itself Not only should you recor...

Page 6: ...changing or during the entertainment programs Closing Up on the Bride s Face During the Thank You Speech The climax of the event finally comes during the bride and groom s thank you speech and presentation of flowers The touching words of apprecia tion from the bride and tears of joy from the parents are scenes that must not be missed Start by closing up on the bride s face using zoom As the tears...

Page 7: ... a long time Charge the battery pack while sleeping so that you can record with full battery power the next day Power Plug AdapterA P 17 The shape of the power plug varies according to countries Be sure to check the shape of the power plug beforehand and bring the appropriate power plug adapter Battery Charger Recording cannot be performed when an AC adapter is connected to the camcorder for batte...

Page 8: ...ooting Tips found in this website on how to use panning effectively In addition you may also like to take a shot of the signs or monuments that can often be found at the tourist spots Showing Everyone Having a Good Time When taking a video it is rather dull to shoot only the scenery or histori cal sites Talk about your feelings while recording the breath taking scenery of an attraction so that it ...

Page 9: ...al ferris wheel fun bicycle rides etc Inducing Responses by Calling Out Videos with no waving of hands nor laughter are not only dull when you view them later but also put the capability of the audio recording function of the camcorder to a waste When recording induce more reactions by enthusiastically waving your hands or shouting out Is it fun and the like Capturing the Best Moment in a Video as...

Page 10: ... or when the expression cannot be seen clearly Increase the brightness of the whole image by setting BACKLIGHT COMP if the faces appear too dark Even the expressions of faces un der shadows can be captured brightly and clearly Setting Details A P 28 Without backlight compensation With backlight compensation Useful Shooting Techniques 10 ...

Page 11: ...le Connects this unit to a TV to play back recorded images on the TV USB Cable Type A Mini Type B Connects this unit to a PC CD ROM For installing the provided software Everio MediaBrowser on a PC Basic User Guide Read well and keep in a safe place where it can be accessed easily when necessary Memo microSD cards are sold separately Types of Usable microSD Card A P 14 When using the AC adapter ove...

Page 12: ... this unit outdoors in the winter weather warm the battery such as by placing it in the pocket before attaching it Keep away from direct contact with a warm pack Do not expose the battery to excessive heat such as direct sunlight or fire After removing the battery store it in a dry place between 15 C to 25 C 59 F to 77 F If the battery pack is not to be used for a long time use up the charge compl...

Page 13: ...ard A P 14 Approximate Video Recording Time A P 36 1 Press the power button for more than 2 seconds to turn off this unit 2 Open the card slot cover 3 Insert a microSD card Insert with the metal contact area facing outward Warning Make sure not to insert the card in the wrong direction It may cause damage to the unit and card Turn off the power of this unit before inserting or removing a card Do n...

Page 14: ... to have a minimum transfer rate of 4 MB s and 6 MB s respectively during reading or writing of data Clock Setting The SET DATE TIME screen appears when you turn on this unit for the first time after purchase when it has not been used for a long time or when the clock is not set yet Set the clock before recording 1 Open the LCD monitor This unit turns on When the LCD monitor is closed this unit tu...

Page 15: ...ns around the screen with your fingers The slider and buttons do not function if you touch them with your fin gernails or with gloves on The displays on the screen do not work even if you touch them Resetting the Clock Set the clock with CLOCK ADJUST from the menu 1 Touch D to display the menu 2 Select CLOCK ADJUST and touch C 3 Select CLOCK SETTING and touch C 4 Set the date and time Use the slid...

Page 16: ...plays on the screen do not work even if you touch them Using the Slider Slide the ball of your finger along the slider for smooth operations While the slider is being pressed the cursor moves automatically Fine operations such as moving the cursor one by one can be performed by touching the slider Slide the ball of your finger along the slider for smooth operations While the slider is being presse...

Page 17: ...t it is securely attached Memo It is recommended to use the tripod when recording in conditions prone to camera shake such as in dark places or when zoomed to the tele photo end Set DIS to Z OFF when using a tripod for recording Reducing Camera Shake A P 22 Using the Camcorder Overseas The shape of the power outlet varies according to countries and regions To charge the battery pack you need a con...

Page 18: ...differ ence is accounted for After returning to your country re select the region that was set initially to restore the original clock settings Setting Daylight Saving Time When ON is selected in SET FOR DAYLIGHT SAVING TIME of CLOCK ADJUST the time is set 1 hour ahead 1 Touch D to display the menu 2 Select CLOCK ADJUST and touch C 3 Select SET FOR DAYLIGHT SAVING TIME and touch C 4 Set daylight s...

Page 19: ... Battery Battery Pack Actual Recording Time Continuous Re cording Time BN VG107U Supplied 40 m 1 h 10 m BN VG114U 1 h 25 m 2 h 30 m BN VG121U 2 h 5 m 3 h 50 m The above are values when LIGHT is set to OFF and LCD BACK LIGHT is set to STANDARD The actual recording time may be shorter if zooming is used or if re cording is stopped repeatedly It is recommended to prepare battery packs ready for three...

Page 20: ... A P 105 Battery Indica tor Displays the approximate remaining battery power Details of the battery power can be displayed by pressing the INFO button Remaining Recording Time Battery Power A P 35 Operation Buttons for Video Recording Operation Button Description T W Zoom Allows the same functions as the zoom lever to be performed Camera shake that often occurs when using the zoom lever can be min...

Page 21: ...space move copy the data to a PC or disc Do not forget to make copies after recording Recording stops automatically as it cannot be performed for 12 or more consecutive hours according to specifications It may take some time to resume recording For long recordings the file is split into two or more files if the size ex ceeds 4 GB You can connect this unit to the AC adapter to record for long hours...

Page 22: ...ecently captured images while in the recording mode Quick Review Memo You can also delete the image after checking Quick Review can no longer recall the most recently captured image once the power is turned off Use the playback mode to check the image in this case Still Image Checking the Captured Image Immediately Still Image A P 24 Taking Still Images in Auto Mode You can record without worrying...

Page 23: ...ming A P 24 Quick Review Enables the most recently captured still image to be viewed Checking the Captured Image Immediately A P 24 Auto Manual Switches the recording mode between Auto and Manual Memo The slider operation button cannot be used when the LCD monitor is flipped The zoom appears when the slider is touched Useful Settings for Recording When QUICK RESTART is set to ON this unit turns on...

Page 24: ...ecking Quick Review can no longer recall the most recently captured image once the power is turned off Use the playback mode to check the image in this case Video Checking the Captured Image Immediately Video A P 22 Manual Recording You can adjust settings such as brightness and shutter speed by using the manual mode Manual recording can be set for both video and still image modes 1 Select video o...

Page 25: ...is when the color on the screen appears dif ferently from the actual color Setting White Balance A P 28 BACKLIGHT COMP Corrects the image when the subject appears dark due to backlight Use this when shooting against the light Setting Backlight Compensation A P 28 METERING AREA TYPE Brightness of a specified area can be set as the standard Setting Metering Area A P 29 EFFECT Images that look like o...

Page 26: ...e cording snow scenes on a sunny day SPOT LIGHT Prevents the human subject from appearing too bright un der light Adjusting Focus Manually Set this when the focus is not clear in AUTO or when manual focusing is desired 1 Touch D to display the menu 2 Select MANUAL SETTING and touch C 3 Select FOCUS and touch C 4 Select MANUAL and touch C 5 Adjust the focus with the slider Slide upward to focus on ...

Page 27: ...rease the brightness 6 Touch C to confirm Memo Settings can be adjusted separately for videos and still images Setting Shutter Speed You can set the shutter speed to suit the type of subject 1 Touch D to display the menu 2 Select MANUAL SETTING and touch C 3 Select SHUTTER SPEED and touch C 4 Select MANUAL and touch C 5 Select the shutter speed with the slider Sets the shutter speed from 1 2 to 1 ...

Page 28: ...n a sunny day CLOUD Set this when shooting on a cloudy day or inside a shade HALOGEN Set this when shooting under illumination such as a vid eo light Using MWB 1 Hold a sheet of plain white paper in front of the lens so that the white paper fills the screen 2 Select MWB and keep touching C The cursor blinks 3 Release C after the menu disappears Setting Backlight Compensation You can correct the im...

Page 29: ...re from the usual recording The image is only an impression 1 Touch D to display the menu 2 Select MANUAL SETTING and touch C 3 Select EFFECT and touch C 4 Select the effect setting and touch C Setting Details OFF No effect SEPIA Gives images a brownish tint like old photographs BLACK WHITE Records in black and white like old TV images CLASSIC FILM Skips frames to give images of the effect of an o...

Page 30: ...LE MACRO to OFF Registering Files to Events Before Record ing Videos can be found easily during playback by categorizing them when recording 1 Select video mode 2 Touch D to display the menu 3 Select REGISTER EVENT and touch C 4 Select the event type and touch C Event Type VACATION HOLIDAY SPORTS ANNIVERSARY CONGRATULATIONS BABY SON DAUGHTER BIRTHDAY GRADUATION An icon appears on the screen and th...

Page 31: ...ng stops automatically after 10 minutes Memo Upload recording can only be performed for up to 10 minutes the time limit of YouTube Changing videos to the file format for uploading cannot be performed on this unit To upload video files refer to Uploading Videos below The upload recording icon disappears when recording stops To record another video in upload mode perform the settings again Uploading...

Page 32: ...file For details on transferring files to iPod refer to the help file of iTunes Installing the Provided Software A P 75 Copying All Files A P 76 Trouble with Exporting Files to iTunes Refer to Q A Latest Information Download Information etc in Click for Latest Product Info in the help file of the provided software Everio MediaBrowser Recording at Intervals TIME LAPSE RE CORDING This function enabl...

Page 33: ...ond intervals Recorded videos will be played back at 150 times speed 10SEC IN TERVAL Takes a frame at 10 second intervals Recorded videos will be played back at 300 times speed 20SEC IN TERVAL Takes a frame at 20 second intervals Recorded videos will be played back at 600 times speed 40SEC IN TERVAL Takes a frame at 40 second intervals Recorded videos will be played back at 1 200 times speed 80SEC...

Page 34: ...recording manually press the START STOP button However as the AUTO REC setting remains at ON even after the vid eo recording is stopped recording starts again when movements of the subject changes in brightness are detected within the red frame To cancel AUTO REC set it to OFF CAUTION The only manual recording setting available is TELE MACRO The rest are all set to AUTO Digital zoom DIS self timer...

Page 35: ...cording time of each re cording media While the remaining recording time is being displayed touch the opera tion button BATTERY ICON to display the remaining battery power To exit the display touch the D button 3 Display the remaining battery power To exit the display press the M button or touch the D button The remaining battery power will not be displayed when the AC adapt er is connected Memo Y...

Page 36: ... 5950 9999 9999 640x480 4 3 STANDARD 4210 8510 9999 9999 640x360 16 9 FINE 3680 7440 9999 9999 640x360 16 9 STANDARD 4910 9930 9999 9999 Up to 9999 still images may be recorded on the HDD and microSD cards with 8 GB capacity regardless of image size and quality Approximate Recording Time Using Battery Battery Pack Actual Recording Time Continuous Recording Time BN VG107U Supplied 40 m 1 h 10 m BN ...

Page 37: ...ward slow motion l Reverse slow motion Memo Touch the slider and buttons around the screen with your fingers The slider and buttons do not function if you touch them with your fin gernails or with gloves on The displays on the screen do not work even if you touch them You can search for a specific file by the recording date or registered category event This is useful when searching from a large nu...

Page 38: ...humbnail display d NORM Returns to normal playback g Advances to the next video h Returns to the beginning of the scene i Forward search j Reverse search k Forward slow motion l Reverse slow motion Playing a Video with Defective Management Information Plays videos with defective management information 1 Select the playback mode 2 Select video mode 3 Touch D to display the menu 4 Select PLAYBACK MP...

Page 39: ...scending order during a slide show Memo Touch the slider and buttons around the screen with your fingers The slider and buttons do not function if you touch them with your fin gernails or with gloves on The displays on the screen do not work even if you touch them You can search for a specific file by the recording date This is useful when searching from a large number of files Date Search A P 40 ...

Page 40: ...ST to play back a few seconds from each video allowing you to check the contents of many videos in a short time Groups are created automatically according to recording dates The group may change when the recording is continued Date Search You can search and play videos or still images according to recording dates The contents of the saving destination selected in REC MEDIA FOR VIDEO or REC MEDIA F...

Page 41: ...d files Deleting Unwanted Files A P 93 Connecting to and Viewing on TV By connecting the supplied AV cable to the video terminal videos can be played back on a TV Refer also to the instruction manual of the TV in use 1 Connect to the TV Press and hold the power button for 2 seconds or more to turn off the power 2 Connect the AC adapter to this unit 3 Press the external input button on the TV to sw...

Page 42: ...ust the TV s screen accordingly Playing Back Playlists Play back the playlists that you have created 1 Select the playback mode 2 Select video mode 3 Touch D to display the menu 4 Select PLAYBACK PLAYLIST and touch C 5 Select the desired playlist and touch C to start playback Operation Buttons for Video Playback A P 37 Touch CHECK to check the content of the selected playlist To exit the playback ...

Page 43: ...ith a DVD Writer 1 Close the LCD monitor and connect Connect the AC adapter to this unit Connect the AC adapter of the DVD writer Connect the USB cable provided with the DVD writer To view on a TV connect this unit to the TV Connecting to and Viewing on TV A P 41 2 Load a DVD created on this unit into the DVD writer Press the power button to turn on the power Press the eject button to open the dis...

Page 44: ...yed on the menu Digest Playback You can view a few seconds of each video in the disc continuously by playing back the created disc in a player and selecting DIGEST PLAY BACK from the top menu Use this to check the content of videos or to look for the desired scene To return to normal playback press the top menu button on the remote control of the player and select TO NORMAL PLAYBACK Playback 44 ...

Page 45: ...re to back up important files on a PC Backing Up All Files A P 76 Deleting the Currently Displayed File Deletes the currently displayed file CAUTION Deleted files cannot be restored 1 Select the playback mode 2 Select video or still image mode 3 Touch D to display the menu 4 Select DELETE and touch C 5 Select CURRENT and touch C 6 Check that it is the file to delete select YES and touch C The file...

Page 46: ... 6 Select the desired file and touch C A delete mark appears on the selected file To remove the delete mark touch C again Touch CHECK to check the selected file 7 After selecting all the files to delete touch EXEC 8 Select YES and touch C After deleting touch C Memo When files in a playlist are deleted the playlist changes Files that are protected cannot be deleted Release protection before deleti...

Page 47: ... A P 47 Protecting Files Prevent important videos still images from being deleted accidently by protecting them Protecting the Currently Displayed File A P 47 Protecting Selected Files A P 48 Protecting All Files A P 49 Releasing Protection of All Files A P 49 CAUTION When the recording media is formatted even the protected files will be deleted Protecting the Currently Displayed File Protects or ...

Page 48: ... protection of the selected files 1 Select the playback mode 2 Select video or still image mode 3 Touch D to display the menu 4 Select EDIT and touch C 5 Select PROTECT CANCEL and touch C 6 Select FILE SELECT and touch C 7 Select the desired file and touch C A protect mark appears on the selected file To remove the protect mark touch C again Touch CHECK to check the selected file 8 After selecting...

Page 49: ... C 6 Select PROTECT ALL and touch C 7 Select YES and touch C After setting touch C Releasing Protection of All Files Releases protection of all files 1 Select the playback mode 2 Select video or still image mode 3 Touch D to display the menu 4 Select EDIT and touch C 5 Select PROTECT CANCEL and touch C 6 Select CANCEL ALL and touch C 7 Select YES and touch C After setting touch C Editing 49 ...

Page 50: ...g Files to Events Before Recording A P 30 Changing the Event of the Currently Displayed File Checks and changes the event of the currently displayed file 1 Select the playback mode 2 Select video mode 3 Touch D to display the menu 4 Select EDIT and touch C 5 Select CHANGE EVENT REG and touch C 6 Select CURRENT and touch C 7 Select YES and touch C Touch the operation buttons E F to select the previ...

Page 51: ...elect EDIT and touch C 5 Select CHANGE EVENT REG and touch C 6 Select TO RESET RANGE and touch C 7 Select the first file of the range and touch C Touch CHECK to check the selected file 8 Select the last file of the range and touch C 9 Select a new event and touch C You can cancel the registered event by touching CANCEL After setting touch C To exit the screen touch D Editing 51 ...

Page 52: ...age Memo The size of the still images captured varies with the SELECT ASPECT RATIO setting 16 9 640 360 4 3 640 480 The picture quality varies with the IMAGE QUALITY setting IMAGE QUALITY A P 89 Captured still images are stored in the media specified in REC MEDIA FOR IMAGE REC MEDIA FOR IMAGE A P 105 Capturing a Required Part in the Video Select the required part of a video and save it as a new vi...

Page 53: ... the division point may not be accurate Capturing Videos for Uploading to YouTube Capture and copy a part of a recorded video maximum 10 minutes for uploading to YouTube and save it as a YouTube video When capturing videos for YouTube the duration cannot be longer than 10 minutes 1 Select the playback mode 2 Select video mode 3 Press the UPLOAD EXPORT button to display the UPLOAD SET TINGS EXPORT ...

Page 54: ...ware A P 75 Copying to Windows PC A P 74 Trouble with Uploading Videos Check if you have created an account with YouTube You need a You Tube account to upload files to YouTube Refer to Q A Latest Information Download Information etc in Click for Latest Product Info in the help file of the provided software Everio MediaBrowser Preparing Videos to Transfer to iTunes Set EXPORT attributes to the reco...

Page 55: ...avorite videos from the recorded ones is called a playlist By creating a playlist you can play back only your favorite videos in the order you like The original video file remains even when it is registered to a playlist To create a new playlist Creating Playlists with Selected Files A P 55 Creating Playlists by Group A P 56 Creating Playlists by Date A P 57 Creating Playlists by Event A P 58 To e...

Page 56: ...ch C Repeat steps 7 8 and arrange the videos in the playlist 9 After arranging touch D 10 Select SAVE AND THEN QUIT and touch C Creating Playlists by Group Create a playlist by arranging multiple files according to group 1 Select the playback mode 2 Select video mode 3 Touch D to display the menu 4 Select EDIT PLAYLIST and touch C 5 Select NEW LIST and touch C 6 Select CREATE BY GROUP and touch C ...

Page 57: ...r arranging touch D 10 Select SAVE AND THEN QUIT and touch C Creating Playlists by Date Create a playlist by arranging multiple files according to recording date 1 Select the playback mode 2 Select video mode 3 Touch D to display the menu 4 Select EDIT PLAYLIST and touch C 5 Select NEW LIST and touch C 6 Select CREATE BY DATE and touch C 7 Select the date to add to playlist and touch C Touch CHECK...

Page 58: ...in the playlist 9 After arranging touch D 10 Select SAVE AND THEN QUIT and touch C Creating Playlists by Event Create a playlist by arranging multiple files according to events and re cording dates 1 Select the playback mode 2 Select video mode 3 Touch D to display the menu 4 Select EDIT PLAYLIST and touch C 5 Select NEW LIST and touch C 6 Select CREATE BY EVENT and touch C 7 Select an event and t...

Page 59: ... steps 8 9 and arrange the videos in the playlist 10 After arranging touch D 11 Select SAVE AND THEN QUIT and touch C Editing Playlists You can change the content of a created playlist 1 Select the playback mode 2 Select video mode 3 Touch D to display the menu 4 Select EDIT PLAYLIST and touch C 5 Select EDIT and touch C 6 Select the playlist you want to edit and touch C 7 Select the file to add t...

Page 60: ...QUIT and touch C Deleting Playlists Delete the playlists that you have created 1 Select the playback mode 2 Select video mode 3 Touch D to display the menu 4 Select EDIT PLAYLIST and touch C 5 Select DELETE and touch C 6 Select the playlist you want to delete and touch C All created playlists will be deleted when DELETE ALL is selected 7 Select YES and touch C After deleting is complete the screen...

Page 61: ... Title Create a playlist simply by selecting a recording date and a title screen from the list 1 Select the playback mode 2 Select video mode 3 Touch D to display the menu 4 Select PICTURE TITLE and touch C 5 Select a title and touch C Touch CHECK to check the title 6 Select the desired recording date and touch C Touch CHECK to check the selected video Memo Play back the DVD created from a playlis...

Page 62: ...opying All Files A P 62 Copying Selected Files A P 63 Copying All Files Copies all videos and still images to another media 1 Select the playback mode 2 Select video or still image mode 3 Touch D to display the menu 4 Select EDIT and touch C 5 Select COPY and touch C 6 Select the direction of copying and touch C 7 Select COPY ALL and touch C 8 Select YES and touch C Copying starts After copying to...

Page 63: ...Select EDIT and touch C 5 Select COPY and touch C 6 Select the direction of copying and touch C 7 Select SELECT AND COPY and touch C 8 Select the desired file and touch C A check mark appears on the selected file To remove the check mark touch C again 9 After selecting all the files to copy touch EXEC 10 Select YES and touch C Copying starts After copying touch C Copying 63 ...

Page 64: ...les A P 65 Moving All Files Moves all videos and still images to another media Files that are moved will be deleted from the original media Files with a protect mark will not be deleted from the original media 1 Select the playback mode 2 Select video or still image mode 3 Touch D to display the menu 4 Select EDIT and touch C 5 Select MOVE and touch C 6 Select the direction of moving and touch C 7...

Page 65: ...h D to display the menu 4 Select EDIT and touch C 5 Select MOVE and touch C 6 Select the direction of moving and touch C 7 Select SELECT AND MOVE and touch C 8 Select the desired file and touch C A check mark appears on the selected file To remove the check mark touch C again 9 After selecting all the files to move touch EXEC 10 Select YES and touch C Moving of files starts After moving touch C Co...

Page 66: ...ing to the way of record ing Still images cannot be copied using a DVD writer Copy them to a PC Copying to Windows PC A P 74 Preparing a DVD Writer CU VD50U 1 Close the LCD monitor and connect Connect the AC adapter to this unit Connect the AC adapter of the DVD writer Connect the USB cable provided with the DVD writer Refer also to the instruction manual of the DVD writer 2 Turn on the DVD writer...

Page 67: ...lectric shocks or malfunctions may occur Copying All Files All videos recorded on this unit will be copied You can also select and copy only the videos that have never been cop ied 1 Select CREATE FROM ALL and touch C 2 Select the media for copying and touch C 3 Select the desired menu and touch C All videos in this unit will be copied when ALL SCENES is selected Videos that have never been copied...

Page 68: ... be cop ied Memo To check the created disc select PLAYBACK in step 1 Copying Files by Date Videos are sorted and copied according to the date on which they were recorded 1 Select SELECT AND CREATE and touch C 2 Select the media for copying and touch C 3 Select CREATE BY DATE and touch C 4 Select the desired recording date and touch C 5 Select ALL and touch C The number of discs required to copy th...

Page 69: ...e the USB cable until copying is complete Files that are not on the index screen during playback cannot be cop ied Memo To check the created disc select PLAYBACK in step 1 Copying Files by Event Videos are sorted and copied according to the registered event 1 Select SELECT AND CREATE and touch C 2 Select the media for copying and touch C 3 Select CREATE BY EVENT and touch C 4 Select the desired ev...

Page 70: ...k the created disc select PLAYBACK in step 1 To register files to events Registering Files to Events Before Recording A P 30 Changing Event Registration of Videos A P 50 Copying Selected Playlists Arrange and copy the created playlists in the order you like 1 Select SELECT AND CREATE and touch C 2 Select the media for copying and touch C 3 Select CREATE BY PLAYLIST and touch C 4 Select the desired...

Page 71: ...isplayed on the top menu of the created DVD To check the created disc select PLAYBACK in step 1 To create a playlist Creating Playlists from the Recorded Videos A P 55 Creating a Playlist with Title A P 61 Copying Selected Files Select and copy the desired videos 1 Select SELECT AND CREATE and touch C 2 Select the media for copying and touch C 3 Select SELECT FROM SCENES and touch C 4 Select the d...

Page 72: ...1 Creating Multiple Discs You can create multiple discs of the same content 1 Select CREATE DUPLICATE and touch C 2 Select the media for copying and touch C The media for copying varies with the model 3 Select the date of creation from the creation history and touch C Touch CHECK to check the file to copy 4 Select EXECUTE and touch C When INSERT NEXT DISC appears change the disc 5 After copying to...

Page 73: ...nu to the aspect ratio 4 3 or 16 9 of the connecting TV VIDEO OUTPUT A P 104 To include the date during dubbing set DISPLAY ON TV in the con nection settings menu to ON Set ON SCREEN DISPLAY in the playback menu to DISPLAY DATE ONLY DISPLAY ON TV A P 104 ON SCREEN DISPLAY A P 94 5 Start recording Start playback on this unit and press the record button on the VCR DVD recorder Playing Back Videos A ...

Page 74: ...e Provided Software Everio MediaBrowser Consult the customer service center below Pixela User Support Center Telephone USA and Canada English 1 800 458 4029 toll free Europe UK Germany France and Spain English German French Spanish 800 1532 4865 toll free Other Countries in Europe English German French Spanish 44 1489 564 764 Asia Philippines English 63 2 438 0090 China Chinese 10800 163 0014 toll...

Page 75: ...ice Pack 3 CPU Intel Core Duo CPU 1 5 GHz or higher Intel Pentium 4 CPU 1 6 GHz or higher Intel Pentium M CPU 1 4 GHz or higher Intel Core Duo CPU 1 5 GHz or higher Intel Pentium 4 CPU 1 6 GHz or higher Intel Pentium M CPU 1 4 GHz or higher RAM At least 1 GB 1024 MB At least 512 MB Memo If your PC does not meet the above system requirements operations of the provided software cannot be guaranteed ...

Page 76: ...e stored on this unit If you encounter any problems with the provided software Everio Me diaBrowser please consult the Pixela User Support Center Tele phone USA and Canada English 1 800 458 4029 toll free Europe UK Germany France and Spain English German French Spanish 800 1532 4865 toll free Other Countries in Europe English German French Spanish 44 1489 564 764 Asia Philippines English 63 2 438 ...

Page 77: ...or Still Image You can select files using the SELECT menu on the top right of the screen Check the video still image icon on the top right corner of the thumb nail Memo If you encounter any problems with the provided software Everio Me diaBrowser please consult the Pixela User Support Center Tele phone USA and Canada English 1 800 458 4029 toll free Europe UK Germany France and Spain English Germa...

Page 78: ...arts After copying click OK Memo The following types of discs can be used on the provided software Ev erio MediaBrowser DVD R DVD R DL DVD RW DVD R DVD R DL DVD RW To view the help file of Everio MediaBrowser select Help from the Everio MediaBrowser s menu bar or press F1 on the keyboard If you encounter any problems with the provided software Everio Me diaBrowser please consult the Pixela User Su...

Page 79: ...fective on the date when You install and use the Program on Your machine and continue to be in effect until the termination under the following provision Should You breach any provision of this Agreement JVC may terminate this Agreement without giving any notice to You In this event JVC may claim against You for any damages caused by Your breach Should this Agreement be terminated You must immedia...

Page 80: ... cannot be played back on this unit anymore Memo To edit the files use a software that supports MOD JPEG files The above operations on PC may vary with the system used Disconnecting this Unit from PC 1 Click Safely Remove Hardware 2 Click Safely Remove USB Mass Storage Device 3 For Windows Vista Click OK 4 Disconnect the USB cable and close the LCD monitor List of Files and Folders Folders and fil...

Page 81: ... back on this unit anymore MOD files that are copied to a Mac computer cannot be imported to iM ovie To use MOD files with iMovie import the files using iMovie Memo To edit the files use a software that supports MOD JPEG files When removing this unit from the computer drag and drop the EVER IO_HDD or EVERIO_SD icon on the desktop to the trash bin iMovie and iPhoto You can import files from this un...

Page 82: ...to display the menu 2 Select the desired menu and touch C 3 Select the desired setting and touch C Memo To close the menu touch D To return to the previous screen touch J To display the help file touch K Returning All Settings to Default Set using FACTORY PRESET in the camera settings menu FACTORY PRESET A P 103 Menu Settings 82 ...

Page 83: ...ideo quality VIDEO QUALITY A P 84 ZOOM Sets the maximum zoom ratio ZOOM A P 85 GAIN UP Makes the subject appear bright automatically when recording in dark places GAIN UP A P 85 TIME LAPSE RE CORDING Enables the changes of a scene that occur slowly over a long period to be shown within a short time by taking frames of it at a certain interval Recording at Intervals TIME LAPSE RECORDING A P 32 AUTO...

Page 84: ...recording Operating Details Registering Files to Events Before Recording A P 30 VIDEO QUALITY Sets the video quality Setting Details ULTRA FINE Enables recording in the best picture quality FINE Enables recording in high picture quality NORMAL Enables recording in standard quality ECONOMY Enables long recordings Displaying the Item 1 Select video mode 2 Touch D to display the menu 3 Select VIDEO Q...

Page 85: ...ect video mode 2 Touch D to display the menu 3 Select ZOOM and touch C GAIN UP Makes the subject appear bright automatically when recording in dark places Setting Details OFF Deactivates the function AGC Electrically brightens the scene when it is dark AUTO Automatically brightens the scene when it is dark Memo Although AUTO brightens the scene more than AGC movements of the subject may become unn...

Page 86: ...htness Operating Details Recording Automatically by Sensing Movements AUTO REC A P 34 SELECT ASPECT RATIO Recording with aspect ratio 16 9 or 4 3 can be performed Setting Details 16 9 Sets the aspect ratio to 16 9 4 3 Sets the aspect ratio to 4 3 Displaying the Item 1 Select video mode 2 Touch D to display the menu 3 Select SELECT ASPECT RATIO and touch C WIND CUT Reduces the noise caused by wind ...

Page 87: ...s on off the light LIGHT A P 88 SELF TIMER Use this when taking a group photo SELF TIMER A P 88 SHUTTER MODE Continuous shooting settings can be adjusted SHUTTER MODE A P 89 IMAGE QUALITY Sets the image quality IMAGE QUALITY A P 89 GAIN UP Makes the subject appear bright automatically when recording in dark places GAIN UP A P 90 AUTO REC Enables the unit to record still images automatically by sen...

Page 88: ... self timer when taking a group pho to Using the 2 second self timer also helps to prevent camera shake caused by pressing the SNAPSHOT button Setting Details OFF Deactivates the self timer 2SEC Starts recording 2 seconds after the SNAPSHOT button is pressed 10SEC Starts recording 10 seconds after the SNAPSHOT but ton is pressed This setting is suitable for taking group photos Displaying the Item ...

Page 89: ...ous shooting The continuous shooting speed will drop if this function is used repeat edly Displaying the Item 1 Select still image mode 2 Touch D to display the menu 3 Select SHUTTER MODE and touch C IMAGE QUALITY Sets the image quality Setting Details FINE Enables recording in high picture quality but number of recordable images becomes lesser STANDARD Enables recording in standard quality Displa...

Page 90: ...scene when it is dark Memo Setting can be adjusted separately for videos GAIN UP Video A P 85 Displaying the Item 1 Select still image mode 2 Touch D to display the menu 3 Select GAIN UP and touch C AUTO REC Records automatically by sensing the changes in brightness Operating Details Recording Automatically by Sensing Movements AUTO REC A P 34 Menu Settings 90 ...

Page 91: ...ts when using the telephoto T end of the zoom Taking Close up Shots A P 30 SCENE SELECT Settings to suit the shooting condition can be selected Operating Details Scene Selection A P 25 FOCUS Focus can be adjusted automatically or manually Operating Details Adjusting Focus Manually A P 26 BRIGHTNESS ADJUST Adjusts the overall brightness of the screen Operating Details Adjusting Brightness A P 27 SH...

Page 92: ...s A P 59 Deleting Playlists A P 60 Adding Title Screens to Playlists A P 61 PLAYBACK MPG FILE Plays videos with defective management information Playing a Video with Defective Management Information A P 38 EDIT COPY Copies files to another media Copying All Files A P 62 Copying Selected Files A P 63 MOVE Moves files to another media Moving All Files A P 64 Moving Selected Files A P 65 PROTECT CANC...

Page 93: ...copying or protecting videos Setting Details COPY Copies files to another media Copying All Files A P 62 Copying Selected Files A P 63 MOVE Moves files to another media Moving All Files A P 64 Moving Selected Files A P 65 PROTECT CANCEL Protects files from being deleted accidently Protecting the Currently Displayed File A P 47 Protecting Selected Files A P 48 Protecting All Files A P 49 Releasing ...

Page 94: ...ing playback Setting Details OFF No display at all DISPLAY ALL Displays everything DISPLAY DATE ONLY Displays the date only Displaying the Item 1 Select the playback mode 2 Select video mode 3 Touch D to display the menu 4 Select ON SCREEN DISPLAY and touch C Menu Settings 94 ...

Page 95: ...ges Operating Details Deleting the Currently Displayed File A P 45 Deleting Selected Files A P 46 Deleting All Files A P 47 SEARCH DATE You can search and play videos or still images according to recording dates Operating Details Date Search A P 40 EDIT You can perform operations such as copying or protecting still images Setting Details COPY Copies files to another media Copying All Files A P 62 ...

Page 96: ...ct from SLIDE BLINDS and CHECKERBOARD Displaying the Item 1 Select the playback mode 2 Select still image mode 3 Touch D to display the menu 4 Select SLIDE SHOW EFFECTS and touch C ON SCREEN DISPLAY Sets whether to show on screen displays such as icons during playback Setting Details OFF No display at all DISPLAY ALL Displays everything DISPLAY DATE ONLY Displays the date only Displaying the Item ...

Page 97: ...e display can be changed 1 Touch D to display the menu 2 Select DISPLAY SETTINGS and touch C 3 Select LANGUAGE and touch C 4 Select the desired language and touch C DATE DISPLAY STYLE Sets the order of year month day and the time display format 24H 12H 1 Touch D to display the menu 2 Select DISPLAY SETTINGS and touch C 3 Select DATE DISPLAY STYLE and touch C 4 Set the style of date and time displa...

Page 98: ... Brightens the backlight of the monitor regardless of the surrounding conditions STANDARD Helps to save battery life when selected AUTO Sets the brightness automatically to BRIGHTER when using outdoors and to STANDARD when using in doors Displaying the Item 1 Touch D to display the menu 2 Select DISPLAY SETTINGS and touch C 3 Select LCD BACKLIGHT and touch C CLOCK ADJUST Resets the current time or...

Page 99: ...OUND A P 101 RECORD BUTTON Displays the REC button on the LCD monitor and enables it to be used as the START STOP button RECORD BUTTON A P 101 QUICK RESTART Reduces the power consumption within 5 minutes after the LCD monitor is closed to 1 3 of that used during re cording QUICK RESTART A P 102 DROP DETECTION Prevents damage to the HDD when this unit is dropped DROP DETECTION A P 102 UPDATE Update...

Page 100: ...1 Touch D to display the menu 2 Select BASIC SETTINGS and touch C 3 Select DEMO MODE and touch C AUTO POWER OFF Prevents the situation of forgetting to turn off the power when this is set Setting Details OFF Power is not turned off even if this unit is not operated for 5 minutes ON Turns off the power automatically if this unit is not oper ated for 5 minutes Memo When using battery power is turned...

Page 101: ...ect BASIC SETTINGS and touch C 3 Select OPERATION SOUND and touch C RECORD BUTTON Displays the REC button on the LCD monitor and enables it to be used as the START STOP button Setting Details OFF No display ON Displays the REC button on the LCD monitor Displaying the Item 1 Touch D to display the menu 2 Select BASIC SETTINGS and touch C 3 Select RECORD BUTTON and touch C Menu Settings 101 ...

Page 102: ...TART and touch C The power consumption within 5 minutes after the LCD monitor is closed is reduced to 1 3 of that used during recording DROP DETECTION Prevents damage to the HDD when this unit is dropped Setting Details OFF Deactivates the function ON Stops recordings and playbacks when this unit is dropped to prevent damage to the HDD Memo The HDD may not be protected even when ON is selected Dis...

Page 103: ...he software of this unit is available nothing will be provided on the homepage FACTORY PRESET Returns all the settings to their default values 1 Touch D to display the menu 2 Select BASIC SETTINGS and touch C 3 Select FACTORY PRESET and touch C 4 Select YES and touch C All settings return to their default values Menu Settings 103 ...

Page 104: ...ls OFF Does not display icons and date time on TV ON Displays icons and date time on TV Displaying the Item 1 Touch D to display the menu 2 Select CONNECTION SETTINGS and touch C 3 Select DISPLAY ON TV and touch C VIDEO OUTPUT Sets the aspect ratio 16 9 or 4 3 according to the connecting TV Setting Details 16 9 Select this when connecting to a widescreen TV 16 9 4 3 Select this when connecting to ...

Page 105: ... passing it to another person DELETE DATA ON HDD A P 107 REC MEDIA FOR VIDEO Sets the recording playback media of videos Setting Details HDD Records videos to the camcorder s built in HDD SD Records videos to the microSD card Displaying the Item 1 Touch D to display the menu 2 Select MEDIA SETTINGS and touch C 3 Select REC MEDIA FOR VIDEO and touch C REC MEDIA FOR IMAGE Sets the recording playback...

Page 106: ...nd touch C 3 Select FORMAT HDD and touch C FORMAT SD CARD Deletes all files on the microSD card Setting Details FILE Deletes all files on the microSD card FILE MANAGE MENT NO Deletes all files on the microSD card and resets the folder and file numbers to 1 CAUTION Not available for selection when no microSD card is inserted All data on the card will be deleted when it is formatted Copy all files o...

Page 107: ... to display the menu 2 Select MEDIA SETTINGS and touch C 3 Select DELETE DATA ON HDD and touch C 4 Select YES and touch C After deleting the data touch C CAUTION Connect the AC adapter as it may take some time to delete data Memo Repeat the process to make data restoration even more difficult Menu Settings 107 ...

Page 108: ...oom Volume Lever During shooting Adjusts the shooting range During playback index screen Changes the number of images to dis play During video playback Adjusts the volume 2 SNAPSHOT Still image recording Button Takes a still image 3 USB Terminal Connects to PC using a USB cable 4 DC Terminal Connects to an AC adapter to charge the battery 5 START STOP Video recording Button Starts stops video reco...

Page 109: ...ng and playback modes 3 A B Video Still Image Button Switches between video and still image 4 UPLOAD EXPORT Upload Export to iTunes Button Recording Takes videos in YouTube or iTunes format Playback Changes the video to YouTube or iTunes format 5 M Power Info Button Recording Displays the remaining time for video only and battery power Playback Displays file information such as recording date Pres...

Page 110: ...ing and closing Enables self portraits to be taken by rotating the monitor 3 OK Button Confirms the selected item or image 4 Operation Buttons Functions of the operation buttons may be displayed 5 MENU Button Displays the settings menu CAUTION Do not press against the surface with force or subject it to strong im pact Doing so may damage or break the screen Names of Parts 110 ...

Page 111: ...acro Taking Close up Shots A P 30 16 Backlight Compensation Setting Backlight Compensation A P 28 17 Brightness Adjusting Brightness A P 27 18 Shutter Speed Setting Shutter Speed A P 27 Video Recording 1 Video Mode Interior A P 109 2 Time Lapse Recording Recording at Intervals TIME LAPSE RECORDING A P 32 3 Video Quality VIDEO QUALITY A P 84 4 Scene Counter 5 Remaining Recording Time 6 Recording in...

Page 112: ... Time Lapse Recording Recording at Intervals TIME LAPSE RECORDING A P 32 3 Playlist Playback Playing Back Playlists A P 42 4 Digest Playback Checking the Content of Videos Quickly A P 38 5 Video Quality VIDEO QUALITY A P 84 6 Scene Counter 7 Operation Indicator Playing Back Videos A P 37 8 Media REC MEDIA FOR VIDEO A P 105 9 Battery Indicator Remaining Recording Time Battery Power A P 35 10 Date T...

Page 113: ...File Number 4 Operation Indicator Playing Back Still Images A P 39 5 Media REC MEDIA FOR IMAGE A P 105 6 Battery Indicator Remaining Recording Time Battery Power A P 35 7 Date Time Clock Setting A P 14 8 DROP DETECTION DROP DETECTION A P 102 Indications on the LCD monitor 113 ...

Page 114: ...ayed correctly Recording Recording cannot be performed Check the A B switch Interior A P 109 Set to the recording mode with the L Play Button Interior A P 109 Recording stops automatically Recording stops automatically as it cannot be performed for 12 or more consecutive hours according to specifications It may take some time to resume recording Turn off the power wait for a while and start record...

Page 115: ...eventually if the condition persists Execute FORMAT SD CARD in the media settings menu All data will be deleted FORMAT SD CARD A P 106 Cannot find a recorded video Cancel group display and date search functions Searching for a Specific Video Still Image A P 40 Change the setting in REC MEDIA FOR VIDEO or REC MEDIA FOR IMAGE Files on other media are not displayed REC MEDIA FOR VIDEO A P 105 Select ...

Page 116: ...are Everio MediaBrowser is not installed some functions may not work properly Installing the Provided Software A P 75 Before making backup make sure that enough free space is left in the PC s hard disk HDD Still images cannot be recorded to disk using the provided software Unable to copy files to DVD with a PC To record to discs a recordable DVD drive is required for the PC in use Cannot upload th...

Page 117: ...til natural colors are achieved It may take some time for white balance to be adjusted Set WHITE BALANCE in the manual settings menu to MANUAL Se lect from FINE CLOUD HALOGEN according to the light source Se lect MWB and adjust accordingly Setting White Balance A P 28 Other Problems The slider and operation buttons do not work Touch the slider and buttons around the screen with your fingers The sl...

Page 118: ...Management Information A P 38 UNSUPPORTED FILE Use files recorded with this unit Files recorded with other devices may not be playable THIS FILE IS PROTECTED Switch off the PROTECT CANCEL function in the EDIT menu Protecting Files A P 47 POWER IS OFF OR USB DEVICE IS UNSUPPORTED Turn on the power of the connected USB device Connect the AC adapter to the DVD writer INSUFFICIENT AVAILABLE SPACE Dele...

Page 119: ...the body with it and then use a clean cloth to remove the detergent CAUTION Do not use benzene or thinner Doing so may cause damage to the unit When using a chemical cloth or cleaner be sure to observe the warning labels and instructions of the product Do not leave the device in contact with rubber or plastic products for a long time Lens LCD Monitor Use a lens blower commercially available to rem...

Page 120: ...onitor 2 7 wide 12 3 megapixels polysilicon color LCD Recording me dia Internal HDD 80 GB microSD microSDHC card commercially available Clock battery Rechargeable battery Video Item Details Recording Playback for mat SD VIDEO standard Video MPEG 2 Audio Dolby Digital 2ch Extension MOD Signal system NTSC standard Image quality Sound quality ULTRA FINE 720 pixels x 480 pixels 8 5 Mbps VBR Video 48 k...

Page 121: ......

Reviews: