background image

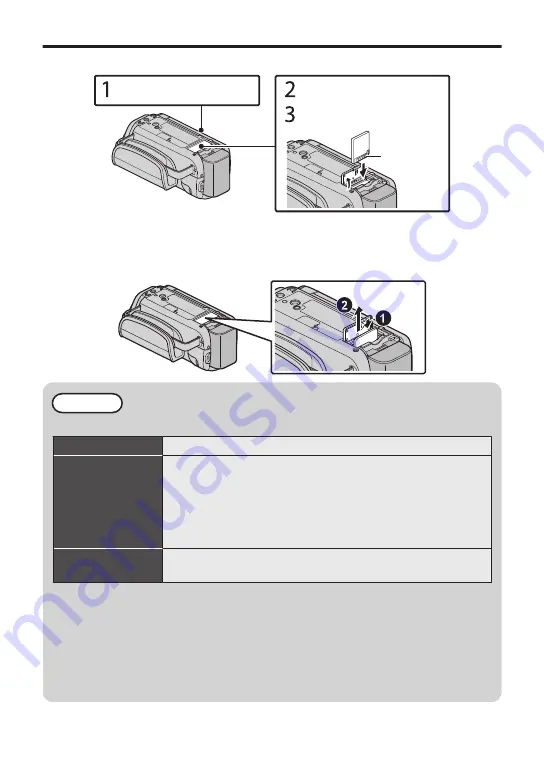
Inserting an SD Card

Insert a commercially available SD card before recording.

.

*

Turn off the power of this unit before 
inserting or removing an SD card.

(Base)

Terminal

Insert an SD card.

Open the cover.

Close the LCD monitor.

o

To remove the SD card

Push the SD card inward once, then pull it out straight.

.

(Base)

NOTE

Operations are confirmed on the following SD cards.

Manufacturer

Panasonic, TOSHIBA, SanDisk

Video 

A

Class 4 or higher compatible SD card (2 GB)/

Class 4 or higher compatible SDHC card (4 GB to 32 GB)/

Class 4 or higher compatible SDXC card (48 GB to 128 GB)

0

When recording with video quality [UXP], Class 6 or higher is

recommended.

0

When recording with iFrame format, Class 6 or higher is required.

Still Image 

B

SD card (256 MB to 2 GB) / SDHC card (4 GB to 32 GB) /

SDXC card (48 GB to 128 GB)

0

Using SD cards (including SDHC/SDXC cards) other than those specified

above may result in recording failure or data loss.

0

This unit is not guaranteed to operate with all SD cards, even when using the ones

specified above. Some SD cards may not work due to specification changes, etc.

0

To protect the data, do not touch the terminals of the SD card.

0

When using an SDXC card, check its compatibility with the OS of your computer

by referring to the Detailed User Guide.

6

Summary of Contents for Everio GZ-EX515BEK

Page 1: ...01A M EN Detailed User Guide For more details on operating this product please refer to the Detailed User Guide at the following website o http manual3 jvckenwood com index html Mobile User Guide When you are outside refer to the Mobile User Guide Mobile User Guide can be viewed with standard browser for Android tablet and iPhone o http manual3 jvckenwood com mobile eu Dear Customers Thank you for...

Page 2: ...proved extension lead or consult your dealer BE SURE to replace the fuse only with an identical approved type as originally fitted and to replace the fuse cover If nonetheless the mains plug is cut off be sure to remove the fuse and dispose of the plug immediately to avoid possible shock hazard by inadvertent connection to the mains supply If this product is not supplied fitted with a mains plug t...

Page 3: ... Disposal of Old Electrical and Electronic Equipment and Batteries applicable for countries that have adopted separate waste collection systems Products and batteries with the symbol crossed out wheeled bin cannot be disposed as household waste Old electrical and electronic equipment and batteries should be recycled at a facility capable of handling these items and their waste by products Contact ...

Page 4: ...nt Enables optional accessories such as external microphone to be attached D Zoom Volume Lever p 8 9 E SNAPSHOT Still Image Recording Button F START STOP Video Recording Button p 8 G a Image Stabilizer Button H M Power Button Press and hold to turn the power on off while the LCD monitor is opened I Microphone Connector J HDMI Mini Connector K USB Connector L AV Connector o Attaching the Core Filte...

Page 5: ...than JVC is attempted for battery charge charging stops In these cases the CHARGE lamp blinks quickly for notification 0 You can record or play back videos while the AC adapter is connected Battery charging cannot be performed during recording or playback Remove the battery when the unit is to be used for a long time Performance of the battery may drop if it is left attached to the unit 0 Charging...

Page 6: ...atible SDXC card 48 GB to 128 GB 0 When recording with video quality UXP Class 6 or higher is recommended 0 When recording with iFrame format Class 6 or higher is required Still Image B SD card 256 MB to 2 GB SDHC card 4 GB to 32 GB SDXC card 48 GB to 128 GB 0 Using SD cards including SDHC SDXC cards other than those specified above may result in recording failure or data loss 0 This unit is not g...

Page 7: ... where you live and tap SAVE 0 Time difference between the selected city and the GMT Greenwich Mean Time is displayed 0 Tap 0 or 1 to select the city name Video Quality This unit can perform recording in both high and standard definition By default it is set to high definition XP AVCHD 1280x720 iFrame o To change the setting A Tap MENU B Tap RECORD SETTING C Tap VIDEO QUALITY D Tap the desired vid...

Page 8: ...o switch 0 You can also tap 6 on the touch screen to record To stop recording tap 7 In addition you can also tap D to zoom 0 You can tap D to tag important scenes while recording so that those scenes can be found easily and watched instantly o Indications during video recording MENU PLAY 0 00 00 0 54 REC Recording in Progress Recording Standby Battery Indicator Recording Media Image Stabilizer Vid...

Page 9: ...button o Usable operation buttons during playback During video playback During still image playback d e Playback pause Start pause slideshow u Stop returns to index screen Stop returns to index screen g Advances to the next video Advances to the next still image h Returns to the beginning of the scene Returns to the previous still image i Forward search j Reverse search k During pause forward slow...

Page 10: ...he camcorder power or remove the battery or AC adapter during shooting playback or when otherwise accessing the recording medium Do not bring the recording medium near objects that have a strong magnetic field or that emit strong electromagnetic waves Do not store the recording medium in locations with high temperature or high humidity Do not touch the metal parts When formatting or erasing data u...

Page 11: ...he soft camera case excessively when the camera is inside it store the camcorder in a dusty or sandy area Dear Customer European Union This apparatus is in conformance with the valid European directives and standards regarding electromagnetic compatibility and electrical safety European representative of JVC KENWOOD Corporation is JVC Technical Services Europe GmbH Postfach 10 05 04 61145 Friedber...

Page 12: ... h 50 m 5 h 10 h 10 m 0 The approximate recording time is only a guide The actual recording time may shorten depending on the shooting environment Camera Power supply Using AC adapter DC 5 2 V Using battery pack DC 3 6 V Power consumption 2 6 W when LIGHT is set to OFF and MONITOR BRIGHTNESS is set to 3 standard Rated Current Consumption 1A Dimensions 53 5 mm x 59 5 mm x 116 5 mm W x H x D excludi...

Reviews: