background image

27

ENGLISH

CEC Settings

CEC allows you to control devices using your TV remote control when the CEC devices are 

connected via HDMI.

CEC Function

Enable or disable CEC function.

Device Search

If CEC Function is enabled, select to search for CEC devices.

System Audio Control Connect to your device though Audio Return Channel-enabled HDMI Port

 (HDMI 1)

Menu Language

Select the on-screen menu language.

Adjusting the Menu Settings

Time & Local Settings

Time Zone

Select a location to apply the time zone.

Daylight Saving

Enable or disable daylight saving time.

Parental Control

The Parental Control feature allows you to control and restrict TV programs by Channel Lock , TV 

Rating, or Movie Rating.

Access Parental Control Menu

The Parental Control menu requires you to enter the password to access its submenu.

1   

Press 

MENU

.

2   

Press 


or 


to select “Setup”, then press   or 

OK

.

   Press   or    to select “Parental Control”, then press   or 

OK

.

4   

Enter the 4-digit password. Press 

,    

or    


to select “

OK

”, then press 

OK

 to access the submenu 

options.

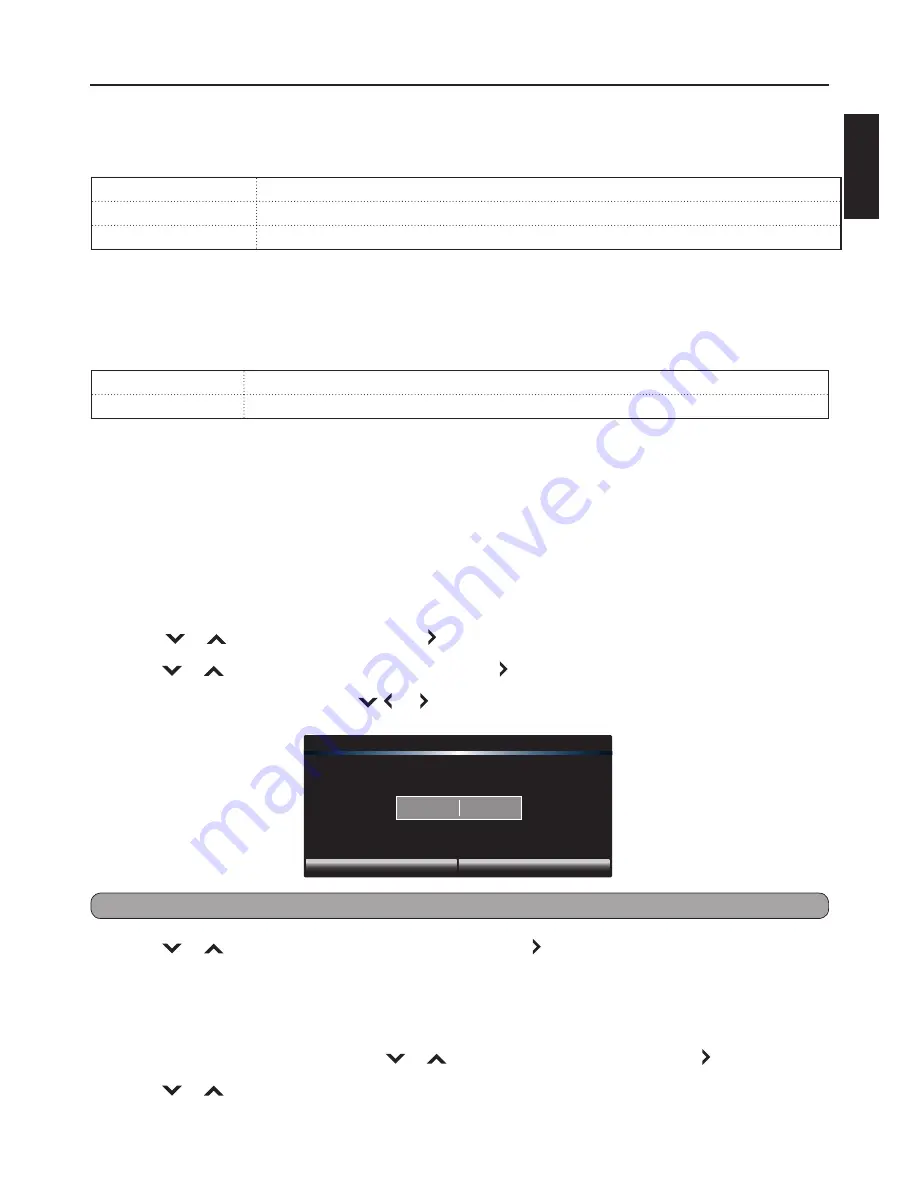
Please enter password.

Cancel

OK

Note: 

The default password is “0000”.

   Press   or    to select the submenu options, then press    or 

OK

 to enter the submenu.

Restrict By Channel

Use the Channel Lock feature to restrict viewing a specified channel. Once locked channel is selected, the 

TV displays a blank screen.

1   

In the “Parental Control” menu, press 


or 


to select “Channel Lock”, then press   or 

OK

.

   Press   or   to highlight a channel that you want to lock.

Summary of Contents for EM32TS

Page 1: ...User Manual Emerald Series LED HDTV EM39T 39 Class Before operating your LED TV please read this manual thoroughly ...

Page 2: ...We Are Here To Help Before Returning the Product Call Our Customer Service at 1 855 868 1928 We can help you with Damaged Package Missing Parts Technical Support ...

Page 3: ...making any adjustments and retain them for future reference For assistance call the JVC Customer Support and Service Center 1 855 868 1928 or visit our website http go jvc com HDTVSupport We recommend that you register your JVC LED TV either at our website http go jvc com HDTVSupport or fill out and mail the Product Registration Card on the back of the manual Retain your purchase receipt and write...

Page 4: ...and if not installed and used in accordance with the instructions may cause harmful interference to radio communications However there is no guarantee that interference will not occur in a particular installation If this equipment does cause harmful interference to radio or television reception which can be determined by turning the equipment off and on the user is encouraged to try to correct the...

Page 5: ...mally or has been dropped 15 Apparatus should not be exposed to dripping or splashing and objects filled with liquids such as vases should not be placed on the apparatus 16 An outside antenna system should not be located in the vicinity of overhead power lines or other electric light or power circuits or where it can fall into such power lines or circuits When installing an outside antenna system ...

Page 6: ... Difference How and Where You Use TV Congratulations on your purchase As you enjoy your new product please keep these safety tips in mind THE ISSUE The home theater entertainment experience is a growing trend and larger TVs are popular purchases However TVs are not always supported on the proper stands or installed according to the manufacturer s recommendations TVs that are inappropriately situat...

Page 7: ... Adverse Effects on LED Panel If a fixed non moving pattern remains on the LED Panel for long periods of time the image can become permanently engrained in the LED Panel and cause subtle but permanent ghost images This type of damage is NOT COVERED BY YOUR WARRANTY Never leave your TV on for long periods of time while it is displaying the following formats or images Fixed Images such as stock tick...

Page 8: ...harge unit size of the grounding conductors location of antenna discharge unit connection to grounding electrodes and requirements of the grounding electrode ANTENNA LEAD IN WIRE ANTENNA DISCHARGE UNIT NEC SECTION 810 20 GROUNDING CONDUCTORS NEC SECTION 810 21 GROUND CLAMPS POWER SERVICE GROUNDING ELECTRODE SYSTEM NEC ART 250 PART H ELECTRIC SERVICE EQUIPMENT GROUND CLAMP Lightning Protection For ...

Page 9: ...g only TVs continue to work as before to receive low power Class A or translator television stations and with cable and satellite TV services gaming consoles VCRs DVD players and similar products For more information about the DTV transition visit www dtv gov FCC s Consumer Center Email dtvinfo fcc gov Phone 1 888 CALL FCC 1 888 225 5322 Fax 1 866 418 0232 or writing to Mail Federal Communications...

Page 10: ...es 19 Multimedia Photo 20 Audio Only Mode 20 Wall Mount 21 Installing Wall Mount 21 provided with the wall mount kit 21 Wall Mount Specifications VESA 21 Adjusting the Menu Settings 22 Quick Menu Operation 22 Input Menu 23 Picture Menu 23 Picture Mode 23 Backlight 23 Contrast 23 Brightness 23 Color 23 Tint 23 Sharpness 24 Size Position 24 Color Temperature 24 Advanced Picture 24 Reset Picture Mode...

Page 11: ...9 ENGLISH Troubleshooting 33 Specifications 34 Limited Warranty 35 Product Registration 37 Contents ...

Page 12: ...reen facing down It is recommended to place the TV cover or protection sheet between the TV and the flat surface 1 Attach stand to TV and Fasten four 4 screws provided 2 Attach base to stand and Fasten three 3 screws provided EM39T 39 Removing the Stand When the TV needs to be transported remove the stand and pack the TV back in the carton To remove the stand perform the assemble steps in reverse ...

Page 13: ...t to open the cover 2 Insert the batteries making sure the and polarities are correct 3 Close the battery cover Battery Precautions Be sure to follow the correct polarity Incorrect installation may cause battery leakage or damage the remote control Always replace batteries in pair Do not combine a used battery with a new one Do not use different battery types together e g Alkaline and Carbon zinc ...

Page 14: ...or Remote control IR receiver Rear View AC Power In USB port HDMI Side Optical Audio OUT Component Composite Audio In Music Port DTV Cable Antenna Input Component Composite Video HDMI 1 Click to select TV Input Source Press and hold to power off TV Analog Audio Out Headphone ...

Page 15: ...ion if available 17 Direction buttons Navigate the menu select options or adjust settings value 18 OK button Enter a menu or confirm an option 19 RETURN button Return to a previous menu or screen 20 AUDIO button Enter Audio Only mode and turn the screen off See page 24 21 CH Channel buttons Use CH to increase the channel number or CH to decrease the channel number 22 ENT Enter button Access the en...

Page 16: ...al cable directly to the DTV TV Cable Antenna jack of the TV DTV TV CABLE ANTENNA 75 ohm coaxial cable Connecting HD Devices You can connect different devices to the TV using HDMI DVI Composite or Component connections Check the type of connection available on your device ...

Page 17: ... TV Making Connections Connecting External Speakers Soundbar AV Receivers Digital Connection Connect the SPDIF Optical audio cable to the Audio OUT optical port of the TV and the optical port of the soundbar AV receiver or audio system TV Connecting Music Port The TV supports music playback from portable music players such as an MP3 player or iPodTM ...

Page 18: ...t the TV Mode then press OK TV Mode options Home Use Select this mode for in home use Store Demo Select this mode for in store demo Note Store Demo is for retailers only To exit Store Demo see page 17 4 Press or to select the Time Zone then press OK Time Zone Select the Time Zone Time Zone Alaska Change Select OK Exit INFO Previous Setup RETURN 5 Press or to set Daylight Saving Time ON or OFF then...

Page 19: ... Exit Store Demo 1 Press RETURN 2 Press or to select OK then press OK to confirm Do you wish to exit Retail Mode Cancel OK Basic TV Operation Changing Channel Press the number buttons to directly select channels Note After pressing the number buttons there will be a few seconds delay before the TV changes channel To change to the channel right away press ENT after pressing the number buttons To Br...

Page 20: ... timer has expired 1 Press SLEEP to display the Sleep screen 2 Press SLEEP repeatedly or press or to scroll through the options then press OK To cancel sleep set the timer to Off Display Info Press INFO to display the channel or input information on the screen Press INFO again to hide the Info screen Basic Operations Normal When watching a 4 3 content the TV displays a standard picture with black ...

Page 21: ... a 16 9 content it displays the full picture pixel to pixel Stretch When watching a 4 3 content the picture is stretched Horizontally to fill the width of the screen When watching a 16 9 content the picture is stretched horizontally on the left and right sides Selecting Input Source The TV provides various ways to select the input source On TV Panel While TV is on Press button on TV once to bring ...

Page 22: ...ge sorting order The label on this button varies depending on the current sorting order Name A Z Name Z A Newest First Oldest First 3 View button Change view mode The button label varies depending on the current view Folders Thumbnails 4 Setting button Change slide show settings Audio Only Mode While watching TV or playing music you can set the TV to Audio Only mode to turn off the TV display and ...

Page 23: ...ve and store the stand for future use Note The wall mount kit is not included with the product Do not install your wall mount while your TV is turned on It can result in personal injury due to electric shock For product protection and safety reasons JVC strongly recommends contacting a techni cian or professional for assistance installing the wall mount and setting up the TV If you decide to insta...

Page 24: ...to select a menu or option 2 Press OK or to enter a menu or confirm an option 3 Adjust or select the setting 1 Press or to select an option Or press or to adjust a setting such as Brightness 2 Press OK to apply the settings Remote Control 4 Exit the menu To exit the menu press RETURN Or to return to a previous screen one at a time press MENU or ...

Page 25: ...Picture Mode Select the picture mode Custom For custom picture settings Standard For standard picture settings Movie For moving pictures such as movies Game For fast and dynamic pictures suitable with playing games Vivid For bright and vivid picture settings Sport Suggested settings for sporting events Backlight Adjust the backlight that affects the overall brilliance of the picture 0 100 Contrast...

Page 26: ...Red Green Blue Offset Adjust the red green blue offset settings according to your preference Reset Color Temperature Reset the color temperature to default settings Advanced Picture CrystalColor CrystalColor produces more vivid and crisp color pictures Off Normal Rich Dynamic Contrast Dynamic contrast automatically enhances the image for greater picture details Adaptive Backlight Enable or disable...

Page 27: ...he speakers to your preference 10 10 Lip Sync Adjust to match the movements and the lips of the person talking on the screen 0 5 TV Speakers Turn the internal speakers on or off Audio Only Output audio from the TV speakers but turn off the TV display See page 25 Digital Audio Out Select the type of digital audio output Off Dolby Digital PCM Analog Audio Out Select the type of analog audio output F...

Page 28: ...e then press or OK 5 Press or to select the input source that you want to add a label name to then press OK 6 To select a custom label 1 Press or to select Input Labels then press or OK 2 Press or to select Custom and press OK To enter desired label 1 Press or to select the text box then press OK 2 Press or to select a character then press OK 3 Press or to select OK then press OK Press RETURN to c...

Page 29: ...and restrict TV programs by Channel Lock TV Rating or Movie Rating Access Parental Control Menu The Parental Control menu requires you to enter the password to access its submenu 1 Press MENU 2 Press or to select Setup then press or OK 3 Press or to select Parental Control then press or OK 4 Enter the 4 digit password Press or to select OK then press OK to access the submenu options Please enter p...

Page 30: ...ff USA Movie Set by USA movie rating standards CAN English Set by Canadian English movie rating standards CAN French Set by Canadian French movie rating standards Block Unrated Shows Select On to block unrated shows 2 Press or then press OK to select the rating 3 Press to return to the previous screen or press RETURN to close the menu screen Change Password 1 In the Parental Control menu press or ...

Page 31: ... Caption or Digital Closed Caption then press or OK Note Either Analog Closed Caption or Digital Closed Caption is available depending on your TV service 4 Press or to select a closed caption type or select Off to disable this feature then press OK For digital closed caption you can select closed caption options such as text size and text color Press or to select Digital CC Options then press OK S...

Page 32: ... Scan Find Channel Channel Management Digital MTS Cable English Audio Setup PIP Closed Caption Wide Channel Note Auto scan may take 15 to 30 minutes to find available channels Adjusting the Menu Settings Partial Scan Channels You can partially scan for network signal within a specified range of channels 1 Press MENU 2 Press or to select Partial Channel Scan then press or OK 3 Press or to select Sc...

Page 33: ...ct Enter Channel then enter a channel 5 Press to select Add Channel then press OK Added channels are listed on the Channel List screen Delete Channel To remove a channel from the Channel List screen 1 Press MENU 2 Press or to select Channel then press or OK 3 Press or to select Channel Management then press or OK 4 Press or then press OK to mark the channels that you want to remove from the Channe...

Page 34: ...Hz HDMI Supported HD Video signal Timing 640 x 480 59 94 60Hz 4 3 720 x 480 P 59 94 60Hz 16 9 720 1440 x 576 I 50Hz 4 3 720 x 576 P 50Hz 16 9 1280 x 720 P 50 59 94 60Hz 16 9 1920 x 1080 I 50 59 94 60Hz 16 9 1920 x 1080 P 50 59 94 60Hz 16 9 1920 x 1080 P 23 97 24Hz 16 9 Supported Video Timing NTSC Composite 480i Supported Video Timing ATSC Component HDMI 480i 480p 720p 1080i 1080p ...

Page 35: ...une to another channel Make sure that channels are set into memory Check the antenna or cable TV connections Check for possible sources of interference Poor reception on some channels The channel or cable TV is experiencing problems tune to another channel Make sure that channels are set into memory The network signal is weak adjust the antenna to receive better reception Check for possible source...

Page 36: ...odes 6 picture mode customizable modes Convenience Features Ambient Light Sensor No Interactive Setup Guide Yes Input Port Naming All inputs Audio Only Mode Yes Gaming Mode No HDMI ARC Yes HDMI 1 HDMI CEC Yes USB Multimedia Pictures Audio Audio Technology XinemaSound 3D Dolby Digital decode MTS Decode Mono Stereo SAP Graphic Equalizer Yes Speaker Output Power 20W 10Wx2 down firing Energy Saving Fe...

Page 37: ... or replacement whichever is longer Type of Service Defective Products must be sent to the designated service center to obtain warranty service The Warrantor is not responsible for the transportation costs to the service center but will cover the costs for return shipping to the customer PRE AUTHORIZATION IS REQUIRED BEFORE SENDING ANY PRODUCT TO A DESIGNATED SERVICE CENTER FOR WARRANTY SERVICE Pr...

Page 38: ...ware which is based on the license granted under the GNU General Public License and Lesser General Public License hereinafter GPL LPGL that are subject to the GPL2 0 LGPL2 1 You may use modify or distribute only if you agree to all of the terms and conditions of the GPL LGPL Please note that any software component developed or created independently by AmTRAN Video Corporation shall not be subject ...

Page 39: ...ail Address 1 Would you like to receive the JVC Community e mail newsletter 2 Would you like to receive special offers from JVC Yes Yes No No Comments THANK YOU FOR PURCHASING THIS JVC PRODUCT Registering your product will allow us to contact you in the unlikely event a product safety notification is required This form is for Product Registration purposes only Failure to return this form does not ...

Page 40: ...We Are Here To Help Before Returning the Product Call Our Customer Service at 1 855 868 1928 We can help you with Damaged Package Missing Parts Technical Support ...

Reviews: