background image

55

56

ENGLISH

IMPORT

ANT!

PREP

ARE

USE

SETTINGS

TROUBLE?

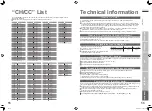
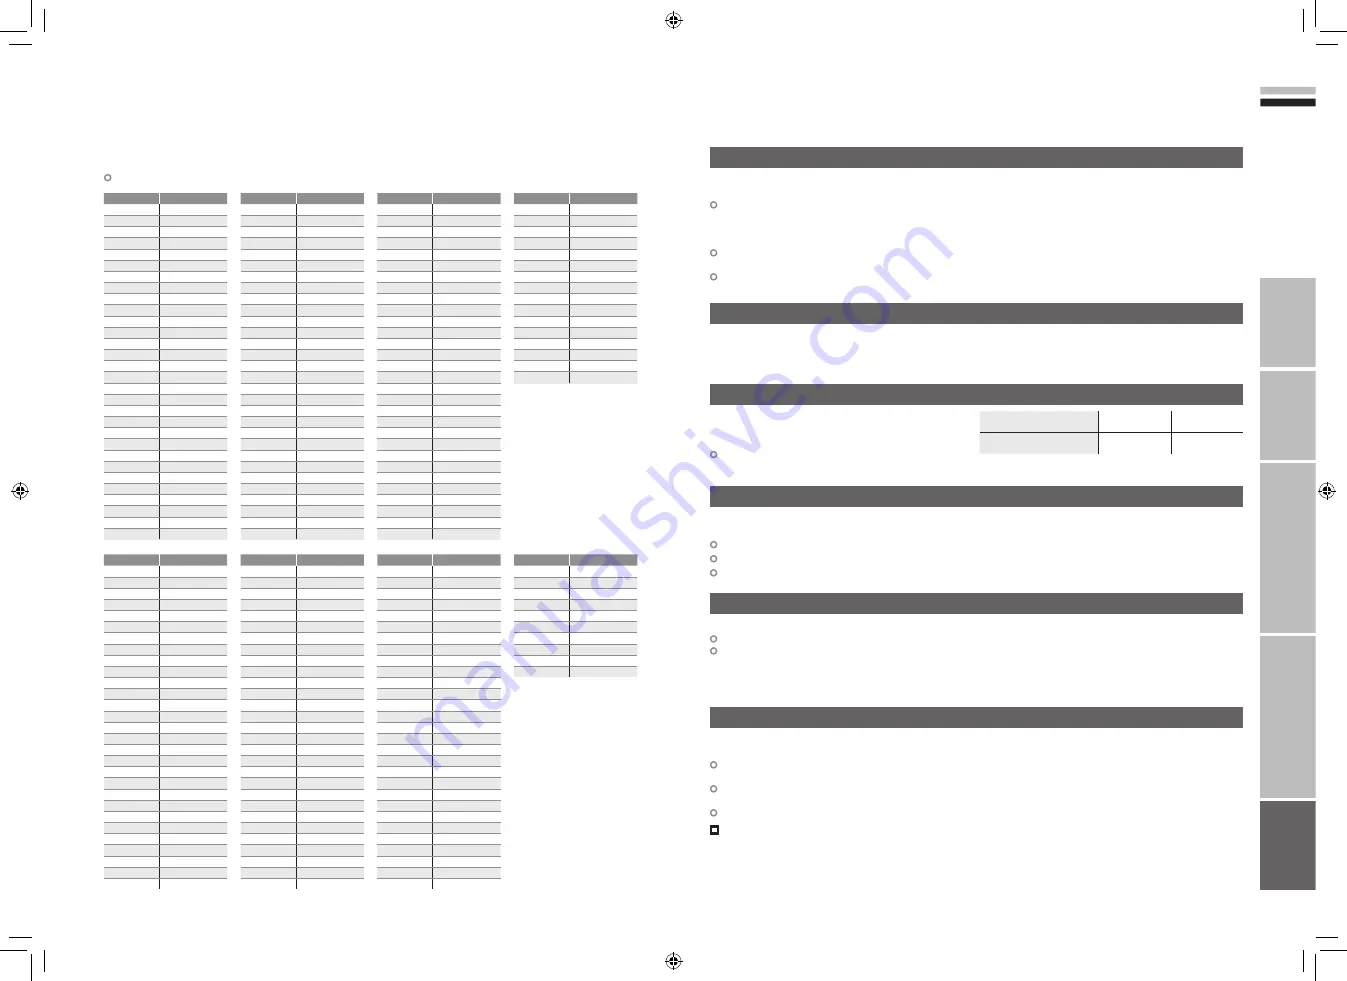
To use the INSERT function (P. 49), find the “CH/CC” number corresponding to the TV’s analogue channel 

number from this table.

When the Country setting is “France”, select a three-digit CH/CC number.

“CH/CC” List

CH

Channel

CH 02/CH 202 E2, R1
CH 03/CH 203 E3, ITALY A
CH 04/CH 204 E4, ITALY B, R2
CH 05/CH 205 E5, ITALY D, R6
CH 06/CH 206 E6, ITALY E, R7
CH 07/CH 207 E7, ITALY F, R8
CH 08/CH 208 E8, R9
CH 09/CH 209 E9, ITALY G
CH 10/CH 210 E10, ITALY H, R10
CH 11/CH 211 E11, ITALY H+1, R11
CH 12/CH 212 E12, ITALY H+2, R12
CH 21/CH 221 E21, R21
CH 22/CH 222 E22, R22
CH 23/CH 223 E23, R23
CH 24/CH 224 E24, R24
CH 25/CH 225 E25, R25
CH 26/CH 226 E26, R26
CH 27/CH 227 E27, R27
CH 28/CH 228 E28, R28
CH 29/CH 229 E29, R29
CH 30/CH 230 E30, R30
CH 31/CH 231 E31, R31
CH 32/CH 232 E32, R32
CH 33/CH 233 E33, R33
CH 34/CH 234 E34, R34
CH 35/CH 235 E35, R35
CH 36/CH 236 E36, R36
CH 37/CH 237 E37, R37
CH 38/CH 238 E38, R38
CH 39/CH 239 E39, R39

CH

Channel

CH 40/CH 240 E40, R40
CH 41/CH 241 E41, R41
CH 42/CH 242 E42, R42
CH 43/CH 243 E43, R43
CH 44/CH 244 E44, R44
CH 45/CH 245 E45, R45
CH 46/CH 246 E46, R46
CH 47/CH 247 E47, R47
CH 48/CH 248 E48, R48
CH 49/CH 249 E49, R49
CH 50/CH 250 E50, R50
CH 51/CH 251 E51, R51
CH 52/CH 252 E52, R52
CH 53/CH 253 E53, R53
CH 54/CH 254 E54, R54
CH 55/CH 255 E55, R55
CH 56/CH 256 E56, R56
CH 57/CH 257 E57, R57
CH 58/CH 258 E58, R58
CH 59/CH 259 E59, R59
CH 60/CH 260 E60, R60
CH 61/CH 261 E61, R61
CH 62/CH 262 E62, R62
CH 63/CH 263 E63, R63
CH 64/CH 264 E64, R64
CH 65/CH 265 E65, R65
CH 66/CH 266 E66, R66
CH 67/CH 267 E67, R67
CH 68/CH 268 E68, R68
CH 69/CH 269 E69, R69

CC

Channel

CC 31/CC 231 S31
CC 32/CC 232 S32
CC 33/CC 233 S33
CC 34/CC 234 S34
CC 35/CC 235 S35
CC 36/CC 236 S36
CC 37/CC 237 S37
CC 38/CC 238 S38
CC 39/CC 239 S39
CC 40/CC 240 S40
CC 41/CC 241 S41
CC 75/CC 275 X
CC 76/CC 276 Y, R3
CC 77/CC 277 Z, ITALY C, R4
CC 78/CC 278 Z+1, R5
CC 79/CC 279 Z+2

CC

Channel

CC 01/CC 201 S1
CC 02/CC 202 S2
CC 03/CC 203 S3
CC 04/CC 204 S4
CC 05/CC 205 S5
CC 06/CC 206 S6
CC 07/CC 207 S7
CC 08/CC 208 S8
CC 09/CC 209 S9
CC 10/CC 210 S10
CC 11/CC 211 S11
CC 12/CC 212 S12
CC 13/CC 213 S13
CC 14/CC 214 S14
CC 15/CC 215 S15
CC 16/CC 216 S16
CC 17/CC 217 S17
CC 18/CC 218 S18
CC 19/CC 219 S19
CC 20/CC 220 S20
CC 21/CC 221 S21
CC 22/CC 222 S22
CC 23/CC 223 S23
CC 24/CC 224 S24
CC 25/CC 225 S25
CC 26/CC 226 S26
CC 27/CC 227 S27
CC 28/CC 228 S28
CC 29/CC 229 S29
CC 30/CC 230 S30

CH

Channel

CH 102

F2

CH 103

F3

CH 104

F4

CH 105

F5

CH 106

F6

CH 107

F7

CH 108

F8

CH 109

F9

CH 110

F10

CH 121

F21

CH 122

F22

CH 123

F23

CH 124

F24

CH 125

F25

CH 126

F26

CH 127

F27

CH 128

F28

CH 129

F29

CH 130

F30

CH 131

F31

CH 132

F32

CH 133

F33

CH 134

F34

CH 135

F35

CH 136

F36

CH 137

F37

CH 138

F38

CH 139

F39

CH 140

F40

CC

Frequency (MHz)

CC 110

116-124

CC 111

124-132

CC 112

132-140

CC 113

140-148

CC 114

148-156

CC 115

156-164

CC 116

164-172

CC 123

220-228

CC 124

228-236

CC 125

236-244

CC 126

244-252

CC 127

252-260

CC 128

260-268

CC 129

268-276

CC 130

276-284

CC 131

284-292

CC 132

292-300

CC 133

300-306

CC 141

306-311

CC 142

311-319

CC 143

319-327

CC 144

327-335

CC 145

335-343

CC 146

343-351

CC 147

351-359

CC 148

359-367

CC 149

367-375

CC 150

375-383

CC 151

383-391

CH

Channel

CH 141

F41

CH 142

F42

CH 143

F43

CH 144

F44

CH 145

F45

CH 146

F46

CH 147

F47

CH 148

F48

CH 149

F49

CH 150

F50

CH 151

F51

CH 152

F52

CH 153

F53

CH 154

F54

CH 155

F55

CH 156

F56

CH 157

F57

CH 158

F58

CH 159

F59

CH 160

F60

CH 161

F61

CH 162

F62

CH 163

F63

CH 164

F64

CH 165

F65

CH 166

F66

CH 167

F67

CH 168

F68

CH 169

F69

CC

Frequency (MHz)

CC 152

391-399

CC 153

399-407

CC 154

407-415

CC 155

415-423

CC 156

423-431

CC 157

431-439

CC 158

439-447

CC 159

447-455

CC 160

455-463

CC 161

463-469

“T-V LINK” allows the TV to share information easily with a connected “T-V LINK” compatible device.

By using T-V LINK :

You can send the analogue channel information programmed on the TV to the “T-V LINK” compatible device, 

so that both the TV and the external device have the same channel settings. When connecting a new external 

device, channel information is loaded into it, allowing channel setup to be completed very quickly. For more 

details, refer to the external device’s manual.

You can easily record the TV programme you are viewing on a “T-V LINK” compatible device by using the 

“DIRECT REC” feature. For more details, refer to the external device’s manual.

After timer-record setting, the TV will instruct the recorder to start and stop recording, via “DIRECT REC”.

*Macintosh* computers are not supported. 

(Macintosh is a registered trademark of  

Apple Computer, Inc.)

If the signal doesn’t appear, check that the vertical 

frequency on the PC is set to “60Hz”.

Technical information

Some cable companies transmit a signal called “ACI” which contains information that allows analogue channels to 

be registered automatically on your TV.

When an ACI signal is received, “ACI Start / ACI Skip” appears in the “Auto Program” screen.

Connect a “DVI“ device to “EXT-5 (HDMI)” using “DVI-HDMI” conversion cable. Connect analogue sound output of 

the DVI device to L and R terminals in EXT-4.

Set “Audio” in “HDMI Setting” to “Analogue” or “Auto” 

 (P. 36)

EXT-6 input does not support DVI devices.

EXT-6 input does not support analogue sound (EXT-4).

Resolution

640 x 480 (VGA) 1024 x 768 (XGA)

Vertical frequency (Hz)

60.0

60.0

What is “T-V LINK”?

What is “ACI” (Automatic Channel Installation)?

PC Signals that can be displayed

Connect “DVI” devices

Depending on the country selected during “Auto Program”, the receivable broadcast system differs.

UNITED KINGDOM: Receive only PAL-I.

FRANCE: Can receive SECAM-L.

To receive SECAM-L in countries other than France:

1) Change the “Country” to “France” in “Auto Program”. 

2) Press the “BACK” button to return to the menu and enter the channel using “Insert” or “Manual”.

Receivable broadcast systems (Analogue channels)

When using an indoor aerial which needs external power, set “Antenna power” to “On” during “Initial settings” (P. 11).

The TV will supply DC 5V, 50mA (max) from the aerial socket through the cable to the aerial.

Supplying power to outdoor and indoor aerials which does not need external power, may cause damage to the 

aerial. If you are uncertain whether the aerial needs external power, select “Off”.

Connect the aerial directly to the TV. When a recording device is connected between the aerial and the TV, 

power can not be supplied to the aerial.

Power is supplied to the aerial only when the TV is on.

To change the setting after “Initial settings” is complete 

 “Antenna power” (P. 43)

Power supply for the indoor aerial

   55-56

6/29/2006   1:16:44 PM

Summary of Contents for DynaPix LT-26DX7BSP

Page 1: ... MANUAL DE INSTRUCCIONES WIDE LCD PANEL TV INSTRUCTIONS Trade Mark of the DVB Digital Video Broadcasting Project 1991 to 1996 Number 3930 3934 3938 3942 LT 26DX7BSP LT 26DX7SSP LT 32DX7BSP LT 32DX7SSP LT 26DX7BSP 26 32 X U LCT2151 001A U_Cover indd 1 2 LCT2151 001A U_Cover indd 1 2 6 29 2006 1 54 30 PM 6 29 2006 1 54 30 PM ...

Page 2: ...tate East Kilbride G74 5BA Reino Unido CASTELLANO Dear Customer This apparatus is in conformance with the valid European directives and standards regarding electromagnetic compatibility and electrical safety European representative of Victor Company of Japan Limited is JVC Manufacturing U K Limited 2 Glenburn Road College Milton Industrial Estate East Kilbride G74 5BA United Kingdom ENGLISH Inform...

Page 3: ...nels 23 Watching videos DVDs 25 Using timer record 27 Useful functions 29 Subtitle Audio selection Sleep timer Zoom Multi picture etc Operate JVC recorders and other devices 33 Just the way you like it Customising your TV 35 Using DTV menu 37 Advanced picture adjustment 39 Reduce noise Watch a more natural picture Set the aspect ratio etc DTV configuration 41 DTV setup 43 DTV installation 45 Editin...

Page 4: ...per etc on the TV may cause a fire Never insert objects into the cabinet openings It may cause a fatal electric shock Take care when children are near Unplug the power cord when going out The power buttons on the remote control and the TV unit cannot completely turn off the TV Make appropriate arrangements for bedridden people Make enough room for inserting and removing the power plug Place the TV ...

Page 5: ...nalogue channels Power On Off Change channel page Watch video etc P 25 Select and confirm settings in menus To previous channel Change channel page Switch between TV VCR DVR DVD HC P 33 Mute Channel information P 17 Display on screen menu P 35 Colour buttons Volume View teletext P 21 AAA R03 Batteries For confirming the TV works Insert the batteries Use two AAA R03 dry cell batteries Insert the batt...

Page 6: ...and A Smart Card B will be sent by the broadcasting company after subscribing to it It may be necessary for you to purchase a Conditional Access Module A in addition to the Smart Card Consult your broadcasting company or retailer 1Unplug the power cord 2Insert B into A 3Insert A 4Plug the power cord and turn the power on 5Perform necessary settings Common Interface P 43 Pay TV analogue channels ca...

Page 7: ...g HDMI devices Output Input HDMI signal P 58 HDMI Setting P 36 EXT 6 input does not support analogue sound AUDIO OUT Listening to the TV on external speakers Output Sound L R DIGITAL AUDIO OUT Listening to the digital audio of digital channels on external speakers Output Digital sound P 58 The sound from analogue channels and external devices cannot be output Dolby Digital output from the DIGITAL ...

Page 8: ...VC logo does not appear or if you wish to make changes later Digital channel settings Configurations P 41 Installation P 45 Analogue channel settings Set Up P 36 The remote control doesn t work Confirm the mode is set to TV Shown only when powering on for the first time The power button on the unit can also be used 2 1 Set digital channels Select a language 1select 2set Confirm Spain is set Scan digit...

Page 9: ...firm Confirm the language select 3 When not using analogue channels When using analogue channels or cable TV When change a language 1 2 3 select When change a country When the TV cannot find the digital channels Is the TV connected correctly to the aerial Change the direction of the indoor aerial Is there a digital channels transmission tower nearby Turn Attenuator to On P 36 since the radio waves ar...

Page 10: ...nnected devices Dub videos PC position adjustment Using EPG 19 PAGE View the programme list for 8 days Search from a genre Reserve a programme to watch record Watching videos DVDs Personal preferences Adjust the picture Adjust the sound Basic settings channel settings etc Advanced settings sleep timer child lock etc Setting digital channels timer record configuration channel settings etc Watching d...

Page 11: ...ttons Channel information Select a channel 5 Name of station Clock Channel Programme Symbols No indication 2view 1select PR List EPG Channels Channels registered in Initial settings will appear here You can select only from your favourite channels Favourite mode P 41 3view 2select a channel Display only programmes which match your selected genre Genre P 20 up down Move up or down a channel You can...

Page 12: ...te a channel a programme 3 2 Date Channel Programme Display only programmes which match your selected genre Genre Reserve a programme to watch and record Timer You can find a digital channel programme from an eight day programme guide check its information and make a reservation Using EPG Electronic Programme Guide Display EPG Close EPG Genre Select a genre Only programmes in the selected genre are...

Page 13: ...ion answers to quizzes etc Returns to page 100 or a previously designated page Double the size of the displayed text Leave the current page open while you switch to watch TV Release Useful when running a page search Press the coloured button as in step 2 Press again to sub page View sub pages Move up or down a page Switch digital analogue channels 2 Enter a teletext page Hold the current page HOLD...

Page 14: ... information and clock Select a channel No indication Time is displayed only when teletext broadcasting can be received 2view 1select PR list up down Move up or down a channel To the previous channel E g 1 15 Press a channel number 4 Switch between mono stereo bilingual broadcasting Stereo t u P 36 Channel information Time FAVOURITE CHANNEL Register a channel to a button Press the number to regist...

Page 15: ...Set Up Select EXT Setting 1select 2next Advanced functions 1 2 select The device selection display will change from E1 to S1 S OUT is not available when EXT 2 receives an RGB input Cancel this mode Clear the name Select the blank space in 3 Set up dubbing on EXT 2 DUBBING Edit names of connected devices ID LIST 1Select the EXT connected to S VIDEO 3Select a name from the list 1Select the arrow 2Se...

Page 16: ...re is problem with the reservation In the following cases enter the PIN code When entering the PIN Code P 38 When changing the Maturity Rating When reserving a channel which is set to Lock P 47 Set the recording device to external input mode before the start time Manually set the timer on T V LINK incompatible devices For details refer to the device s manual Make sure that recording times on the r...

Page 17: ...p Timer 2next 1select a time in minutes 2set Cancel Set the time to 0 in step 4 Remaining time You can confirm the remaining time at step 4 after repeating this process Move the picture with 1 or 4 while this bar is displayed 1select 2set When set to Auto the aspect ratio will turn to the ratio obtained from the information the TV received Without receiving aspect information it will be the setting...

Page 18: ... signals Only the selected frame has a moving picture Main Sub Main Sub Main Select the number of screens Watch in dual picture mode E g You can watch TV and video at the same time Move up or down a page Not available when in digital channels EXT 5 or EXT 6 input Select an analogue channel in 12 screen mode All registered channels are displayed as still images Switch between the sound sources Chan...

Page 19: ...ode C or 3 by default The included remote control can be used to operate JVC recorders and other devices VCRs DVD recorders HDD recorders Home theatre system DVD players TV P 6 TV DVD HC VCR DVR Code C or 3 Press and hold Press and hold Operate DVD HDD recorder menus Select VCR DVD recorder HDD recorder VCR HDD recorders DVD recorders Display the subtitle DVD HDD recorder mode Press Playback Recor...

Page 20: ... Ambience level High Low Mono Off MaxxBass 1 Emphasize the bass sound Off Low High Voice Enhancer Sound enhancement technology On Off Features Sleep Timer Timer for turning off the TV P 30 Child Lock Stops children from watching specific channels P 32 Appearance Format for displaying the channel number Type A Type B Blue Back Displays a blue screen and mute the sound when the signal is weak or abse...

Page 21: ...le your favourite channels P 41 Maturity Rating Restrict programmes according to the age P 41 Setup Digital Audio Output When the Dolby Digital signal is received you can select to output the signal from the DIGITAL AUDIO OUTPUT terminal P 43 Banner Duration Select the display time for channel information 2 sec 5 sec 8 sec Receiver Upgrade Upgrade your tuner software as newer versions becomes avai...

Page 22: ...y 2 3 4 5 6 2next 1select 2next 1select 2next 1select 2set 1select For natural looking outlines For smooth cinema film Off Function is turned off On Auto Automatically adjusts Function is always on For natural looking pictures Off Function is turned off On Maintain a natural colour balance Fix bright dark pictures Off Function is turned off On Make it easier to view bright dark pictures When there ...

Page 23: ... Mode Off Maturity Rating Country D Menu Language Audio Language Subtitle Language Teletext Language D Enter PIN Code Favorite Mode Maturity Rating None Maturity Rating Age 4 Age 5 Age 6 Age 7 Age 8 Age 9 Age 10 Age 11 Age 12 4 5 6 7 8 9 10 11 12 IMPORTANT PREPARE USE SETTINGS TROUBLE To the previous screen Exit 1 2 3 4 5 6 select Display the menu bar Select DTV Select Configuration Select an item ...

Page 24: ...instructions on the screen to set up pay TV The content of the menu is different depending on the broadcasting company For details consult your broadcasting company The language shown in the menu may differ to the Language set for the TV Available for setting power supply for the aerial and upgrading the tuner software etc Please read Dolby Digital output from the DIGITAL AUDIO OUT terminal P 57 b...

Page 25: ...Check the broadcast signal Signal Check Initialise the DTV settings Factory Settings Scan Automatic Scan automatically Manual Scan a specified channel range Network You can select and register only necessary networks Start Channel Specify a scanning channel range For Manual Stop Channel Mode Add Add a new channel to the registered channel Reinstall Register all channels again 2change 1select an ite...

Page 26: ...cted PR will be permanently Edit PR List 14 00 05 05 2006 TV Name Delete Favourites Number Lock 4 CLAN 50 TVE 5 TM3 6 LAOTRA 1 TVE 1 2 TVE 2 7 ONDA6 8 TELEDEPORTE 3 24H TVE Edit PR List 14 00 TV Name Delete Favourites Number Lock 4 CLAN 50 TVE 5 TM3 6 LAOTRA 1 TVE 1 2 TVE 2 7 ONDA6 8 TELEDEPORTE 3 24H TVE Edit PR List 14 00 05 05 2006 TV Name Delete Favourites Number Lock 4 CLAN 50 TVE 5 TM3 6 LAO...

Page 27: ...3 14 15 16 17 18 19 CH CC CH 08 B G CC 06 ID 11 10 PR 12 13 14 15 16 17 18 19 CH CC CH 08 CC 06 Edit ID Manual 11 10 PR 12 13 14 15 16 17 18 19 CH CC CH 08 I CC 06 IMPORTANT PREPARE USE SETTINGS TROUBLE Display the menu bar Select Set Up Select Edit Manual Confirm settings Finish When coming from Initial settings P 13 skip to Select a row Edit Editing analogue channels Edit the channels registered ...

Page 28: ... aerial radio waves or the area you live in where reception is bad Consult your retailer Not displayed black screen 51 14 Unplug TV several minutes later plug it in again Remote control stops working Unnatural colour Adjust Colour and Bright 1 Check your Colour System Noise Set to the following functions Picture Mode Standard Super DigiPure Max Dull picture Set to the following functions Picture M...

Page 29: ...device turned on After confirming all the conditions above press OK button again Feature Not Available 56 56 DTV When Dolby Digital is selected in Digital Audio Output the sound of a programme containing Dolby Digital signals cannot be output from the TV or the audio system connected to the AUDIO OUT terminal When the channel is changed a message will be displayed for a few seconds To listen with t...

Page 30: ...9 367 CC 149 367 375 CC 150 375 383 CC 151 383 391 CH Channel CH 141 F41 CH 142 F42 CH 143 F43 CH 144 F44 CH 145 F45 CH 146 F46 CH 147 F47 CH 148 F48 CH 149 F49 CH 150 F50 CH 151 F51 CH 152 F52 CH 153 F53 CH 154 F54 CH 155 F55 CH 156 F56 CH 157 F57 CH 158 F58 CH 159 F59 CH 160 F60 CH 161 F61 CH 162 F62 CH 163 F63 CH 164 F64 CH 165 F65 CH 166 F66 CH 167 F67 CH 168 F68 CH 169 F69 CC Frequency MHz CC...

Page 31: ... Dolby Digital signals In these cases Dolby Digital signals can be output from the DIGITAL AUDIO OUT terminal 1 Connect an audio system with a Dolby Digital decoder P 10 2 Change the Digital Audio Output setting from PCM to Dolby Digital P 43 When changing the setting the message Dolby Digital selected No analogue audio available may be displayed for a few seconds Each time the channel is changed ...

Reviews: