background image

Masterpage:Right-FullCol

EN


43

Filename [HM-DH5U_Eng.fm]

A

Access Main Menu screen

Press [MENU].

B

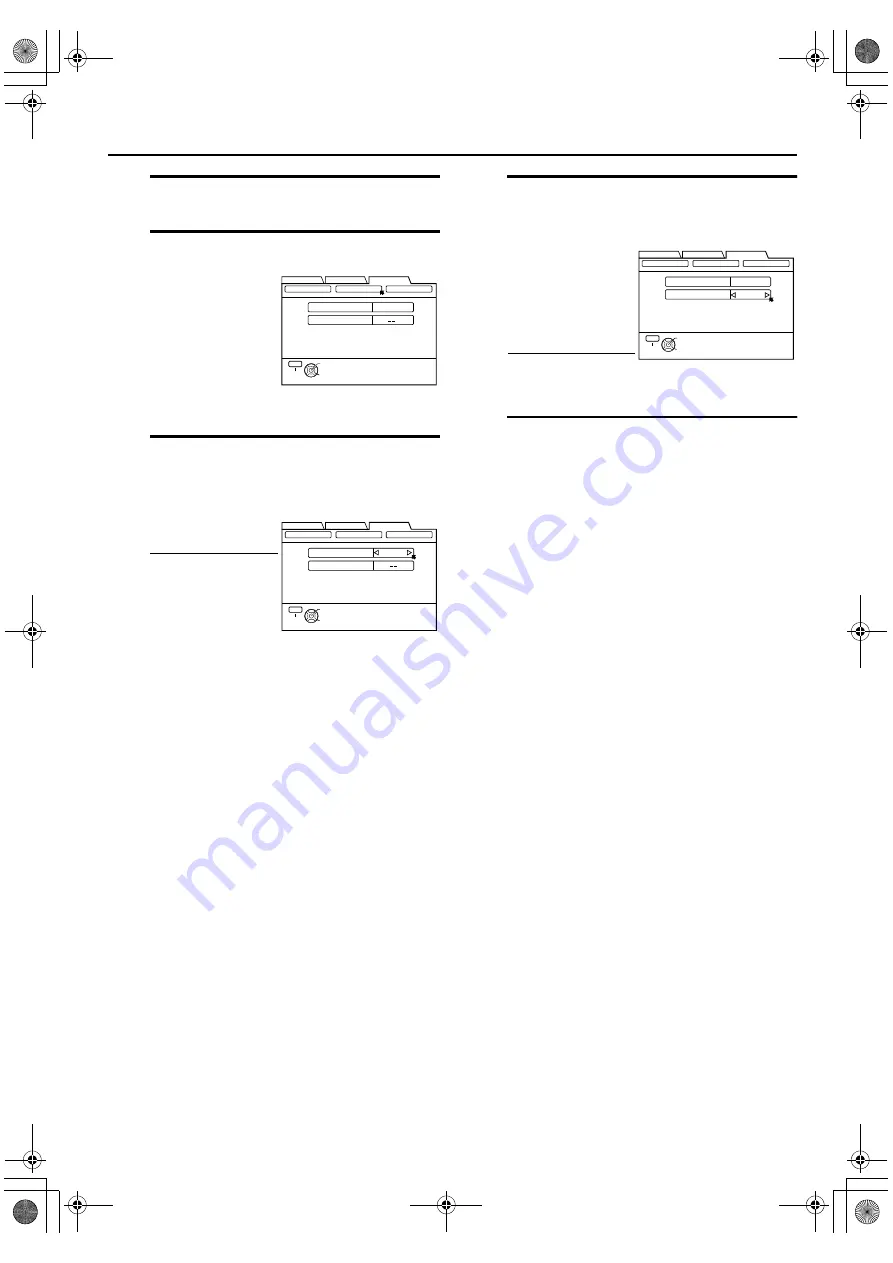
Access Guide Channel Set screen

C

Input guide channel number

In that case, it is possible to change the channel 
by 10 channels by pressing and holding [

D E

in steps 

C

 and 

D

.

D

Input receiving channel number

E

Return to normal screen

Press [MENU].

A

Press [

D E

] to 

move the arrow 
to “INITIAL SET 
UP”, then press 
[

G

] or [OK].

B

Press [

D E

] to 

move the arrow 
to “GUIDE 
CHANNEL”, then 
press [

G

] or [OK]. 

Press [

D E

] to input 

the VCR Plus+ guide 
channel number as 
shown in the TV 
listing.

If you receive your 
channels with a 
cable box and if 
you have properly 
set your Controller, 
“CABLE CH” 
appears in place of 
“VCR CH”. If not, 
refer to pages 22 
24 and re-perfo
rm 
the procedure.

FUNCTION SET UP

INITIAL SET UP

TUNER SET UP

THEN PRESS [OK]

CLOCK SET

GUIDE CH

6

VCR CH

GUIDE CHANNEL

OTHER

SELECT WITH ARROW KEYS

SELECT

OK

EXIT

MENU

FUNCTION SET UP

INITIAL SET UP

TUNER SET UP

THEN PRESS [OK]

CLOCK SET

GUIDE CH

6

VCR CH

GUIDE CHANNEL

OTHER

SELECT WITH ARROW KEYS

SELECT

OK

EXIT

MENU

(Eg.) When inputting the guide 
channel number for number 6 
WNJU(Ind.)

Press [

FG

] to move 

the arrow to “VCR 
CH”, then press [

E

] to input the 

number of the 
channel on which the 
guide channel’s 
broadcasts are 
received.

• Repeat steps 

C

 and 

D

 for each 

instance.

(Eg.) If WNJU(Ind.) is received 
on channel 47

FUNCTION SET UP

INITIAL SET UP

TUNER SET UP

THEN PRESS [OK]

CLOCK SET

GUIDE CH

6

VCR CH

47

GUIDE CHANNEL

OTHER

SELECT WITH ARROW KEYS

SELECT

OK

EXIT

MENU

HM-DH5U_Eng.fm  Page 43  Friday, June 25, 2004  11:42 AM

Summary of Contents for D-VHS

Page 1: ...R EJECT POWER PCM DTS REW PLAY FF HDMI F 1 VIDEO MONO L AUDIO R S VIDEO MENU K MTP NTSC For Customer Use Model No Serial No D VHS DIGITAL RECORDER INSTRUCTIONS LPT0943 001B Enter below the Model No and Serial No which are located on the rear of cabinet Retain this information for future reference ...

Page 2: ... fire hazards DO NOT use any other power source CAUTION TO PREVENT ELECTRIC SHOCK MATCH WIDE BLADE OF PLUG TO WIDE SLOT FULLY INSERT ATTENTION POUR ÉVITER LES CHOCS ÉLECTRIQUES INTRODUIRE LA LAME LA PLUS LARGE DE LA FICHE DANS LA BORNE CORRESPONDANTE DE LA PRISE ET POUSSER JUSQU AU FOND Note to CATV system installer This reminder is provided to call the CATV system installer s attention to Article...

Page 3: ...paying particular attention to cords at plugs convenience receptacles and the point where they exit from the product 5 Ventilation Slots and openings in the cabinet are provided for ventilation To ensure reliable operation of the product and to protect it from overheating these openings must not be blocked or covered Do not block the openings by placing the product on a bed sofa rug or other simil...

Page 4: ...g to qualified service personnel under the following conditions a When the power supply cord or plug is damaged b If liquid has been spilled or objects have fallen into the product c If the product has been exposed to rain or water d If the product does not operate normally by following the operating instructions Adjust only those controls that are covered by the operating instructions as an impro...

Page 5: ...ned on for a few hours to let the moisture evaporate ABOUT HEAD CLEANING After an extended period of use the video heads can become dirty resulting in a loss of picture or sound during playback If this happens clean the video heads by using the optional cleaning tapes The heads get dirty in the following cases in an environment prone to extreme temperature or humidity in a dusty environment flaw d...

Page 6: ...by Frame Playback 34 Viewing slow motion picture Slow Motion Playback 34 RECORDING 35 Basic Recording 35 D VHS Recording via i LINK Connection 35 D VHS S VHS VHS Recording 36 Basic Recording Features 37 Changing display information 37 Specifying recording length Instant Timer Recording ITR 37 Watching one program while recording another 38 Showing on screen display 38 TIMER RECORDING 40 VCR Plus C...

Page 7: ...age 9 R Remote sensor S HDMI button A page 12 T D VHS button A page 36 U REC SPEED button A page 35 36 V REC R button A page 35 36 W PAUSE W button A page 34 36 X S button A page 31 Y T button A page 31 Z AUDIO MONITOR button A page 30 a i LINK connector A page 72 i LINK AUDIO MONITOR REC SPEED REC PAUSE D VHS DOLBY D CH STOP D THEATER HDMI D VHS TIMER EJECT POWER PCM DTS REW PLAY FF HDMI F 1 VIDE...

Page 8: ...AUDIO VIDEO INPUT connectors L 2 A page 15 74 G REMOTE PAUSE AV COMPULINK terminal REMOTE PAUSE terminal A page 75 AV COMPULINK terminal A page 67 H CABLE BOX Controller connector A page 22 25 I JLIP terminal A page 69 J ANTENNA OUT terminal A page 13 K i LINK IN OUT DV IN Connector i Link A page 72 i Link refers to the IEEE1394 1995 industry specification and extensions thereof The A logo is used...

Page 9: ... auxiliary input L1 L2 F1 I 1 etc Clock time Time counter A page 29 Remaining time Recording mode indicator A page 37 41 Tape speed E Remain indicator A page 37 F Channel mode indicator G Cassette type indicator A page 35 H Pause mode indicator A page 34 36 I Record mode indicator A page 37 41 J Play mode indicator A page 29 41 CH D S VHS A BC D G F E J I H HM DH5U_Eng fm Page 9 Friday June 25 200...

Page 10: ...appears when a D VHS cassette contains the multiple angle g appears when a D VHS cassette contains the audio in multiple language h appears when a D VHS cassette contains the subtitle in multiple language NOTE The subtitles does not appear while the on screen display is displayed L Selections of the selected icon K M Model name of the device connected to the i LINK connector N Brand name of the de...

Page 11: ...V Muting button A page 76 n DISPLAY button A page 37 END of Index How to use the Remote Before use insert two AA size batteries into the Remote with the polarity F and G matched correctly as indicated on the battery compartment or on the lid The Remote can operate most of your VCR s functions as well as basic functions of TV sets cable boxes and DBS receivers Point the Remote toward the remote sen...

Page 12: ...A page 38 you must also connect the VCR to the TV using the RF cable Use the commercially available i LINK cable 4 pin S400 below 3m If the cable used is above 3m this VCR will not fully maximize its performance For full identification of the VCR s rear panel refer to the Index A page 8 REMOTE PAUSE AV COMPULINK CABLE BOX VHF UHF IN ANTENNA ANTENNA L 2 PCM STREAM DIGITAL AUDIO OUT OPTICAL PB CB PR...

Page 13: ...ween the VCR s AUDIO OUTPUT connectors and the TV s audio input connectors VIDEO S VIDEO Connection a Connect an S Video cable between the VCR s S VIDEO OUTPUT connector and the TV s S Video input connector If your TV does not have a S Video input connector use a video cable to connect between the VCR s VIDEO OUTPUT connector and the TV s video input connector b Connect an audio cable between the ...

Page 14: ...AL PB CB PR CR Y COMPONENT VIDEO OUT OUTPUT HDMI OUT D THEATER REGION 1 i LINK IN OUT DV IN L 1 S400 INPUT S VIDEO VIDEO L AUDIO R S VIDEO VIDEO L AUDIO R OUT DIGITAL IN AUDIO VIDEO R L To DTV Component Output Connectors To Audio Input Connectors To DTV Input Connectors Component Video Cable not supplied Audio Cable not supplied TV HD Ready To HDMI connector To Audio Output Connectors Antenna or C...

Page 15: ... Basic Connection A page 13 B Connect a component video cable between the VCR s COMPONENT VIDEO OUT con nectors and the TV s component video input connectors C Connect an audio cable between the VCR s AUDIO OUTPUT connectors and the TV s audio input connectors E Connect Digital Set Top Box to TV A Connect a component video cable between the Digital Set Top Box s DTV component output connectors and...

Page 16: ...Play is in progress INFORMATION If AUTO CLOCK is set to ON on the Clock Set screen on page 17 the clock will be adjusted automatically by the host channel every hour except 11 00 PM midnight 1 00 AM and 2 00 AM using the incoming PBS channel clock setting data This automatic clock adjustment can only be performed when the VCR is turned off The clock will be adjusted just on these hours on the time...

Page 17: ...CK MANUALLY appears on the screen press OK to access the Clock Set screen Even if you do not press OK the Clock Set screen disappears after 5 seconds then the Clock Set screen appears automatically Turn on the VCR and the TV and select the AV mode on the TV Set the VCR TV CABLE DBS selector on the Remote to VCR B F A G VCR TV CABLE DBS A Press D E to move the arrow to INITIAL SET UP then press G o...

Page 18: ...s displayed by the Plug Play setting you may be receiving the clock setting data of a PBS channel from an adjacent time zone or from an incorrect PBS channel from a cable TV system If you selected AUTO for the host channel in step D be sure to select the correct time zone manually G Return to normal screen Press MENU Press FG to move the arrow to AUTO CLOCK SET then press OK You can either select ...

Page 19: ...highlight bar to D S T then press D E to select ON or OFF ON Adjustment will be made by the built in clock itself OFF Select when Daylight Saving Time does not apply to you H Start clock Press MENU and normal screen appears To make corrections any time during the process Press FG to select the item you want to change then press D E H C G VCR TV CABLE DBS Press D E until the desired time appears th...

Page 20: ...the arrow to AUTO CH SET then press OK NOTES When Auto Channel Set is complete SCAN COMPLETED appears on screen If the scan was unsuccessful SCAN COMPLETED NO SIGNAL FOUND appears on screen Check the connections then select RETRY to start again or select EXIT INFORMATION The VCR selects the correct band TV or CATV automatically during Auto Channel Set The selected band will be displayed on the rig...

Page 21: ...ip other channels E Return to normal screen Press MENU END of Tuner Setting D A E B D VCR TV CABLE DBS Press FG to move the arrow to MANUAL CH SET then press OK A Press FG to move the arrow to CH then press the Number keys to input a channel number you want to add A Press FG to move the arrow to CH then press the Number keys or D E to input a channel number you want to skip FUNCTION SET UP INITIAL...

Page 22: ...inal on the rear of the VCR If your cable box has audio video output connectors Connect an audio video cable between the AUDIO VIDEO INPUT connectors on the rear of the VCR and the audio video output connectors on the cable box NOTE When connecting your cable box refer to its instruction manual D Connect Controller to VCR Connect the Controller to the CABLE BOX Controller connector on the rear pan...

Page 23: ...to your VCR s AUDIO VIDEO INPUT L 1 or AUDIO VIDEO INPUT L 2 connectors on the rear panel Press D E until ON L 1 or ON L 2 appears on the screen If you do not use a cable box Press D E until OFF appears on the screen Turn on the VCR and the TV and select the AV mode on the TV Set the VCR TV CABLE DBS selector on the Remote to VCR B G C F VCR TV CABLE DBS A Press D E to move the arrow to TUNER SET ...

Page 24: ... channel and brand again For customers in U S A If you are unable to set the Controller contact JVC toll free at 1 800 252 5722 End of Cable Box Control Setting Press FG to move the arrow to BRAND Press D E to enter the brand code from the list shown to the right If the cable box s channel changes to 9 setting is complete Press D E to move the arrow to YES then press OK and CABLE BOX CONTROL IS ON...

Page 25: ...g the adhesive strip attached on the back of the Controller C Connect DBS receiver to VCR If your DBS receiver does not have audio video output connectors Connect the RF output terminal on the DBS receiver to the ANTENNA IN terminal on the rear of your VCR If your DBS receiver has audio video output connectors Connect an audio video cable between the AUDIO VIDEO INPUT connectors on the rear of the...

Page 26: ... your DBS receiver is connected to your VCR s AUDIO VIDEO INPUT L 1 or AUDIO VIDEO INPUT L 2 connectors on the rear panel Press D E until ON L 1 or ON L 2 appears on the screen If you do not use a DBS receiver Press D E until OFF appears on the screen Turn on the VCR and the TV and select the AV mode on the TV Set the VCR TV CABLE DBS selector on the Remote to VCR B C D VCR TV CABLE DBS A Press D ...

Page 27: ...and F Engage test mode Press FG to move the arrow to TEST MODE then press OK The program currently received through the DBS receiver appears for about 10 seconds NOTE If you do not engage the test mode in step F INPUT CH and BRAND are not set If the DBS receiver s channel changes to 205 setting is complete If the DBS receiver s channel does not change as shown above A Press D E to move the arrow t...

Page 28: ...yed on the TV press HDMI on the front panel to turn off the HDMI LED and set TV OUTPUT 2 to ALLto480i A page 65 In event when even the main menu screen cannot be displayed on the TV when MENU is pressed power off this VCR press and hold PAUSE W on the front panel for more than 5 seconds then power on the VCR again To stop playback Press STOP L on the Remote or on the front panel To rewind the tape...

Page 29: ...ss and hold PLAY I for more than 5 seconds The play indicator E on the front display panel starts flashing slowly and a tape will be played back 50 times To stop playback press STOP L on the Remote or on the front panel NOTE For a cassette recorded in D VHS mode Repeat Playback is not possible if the cassette was recorded in LS3 mode Turn on the VCR and the TV and select the AV mode on the TV Set ...

Page 30: ...il optimum picture and sound quality are achieved To reactivate automatic tracking press CHANNEL and on the front panel at the same time The automatic tracking becomes active again D Selecting monitor sound Audio Monitor You can select the desired monitor sound While playing back a tape on which stereo sound or SAP sound is recorded press A MONITOR on the Remote or AUDIO MONITOR on the front panel...

Page 31: ...nt to find the very beginning of the desired program press REW Q or FF P after playback starts NOTE An index code is not placed on the tape when recording is resumed from recording pause G Skipping unwanted portions Skip Search You can skip over view at high speed unwanted portions of the tape Press SKIP SEARCH on the Remote once to 6 times during playback Each press initiates a 30 second period o...

Page 32: ... the front panel will light up in accordance to the selected sound Dolby Digital PCM or DTS 1 STEREO 2 Dolby D Angle Selection During normal playback press the Number key 4 on the Remote to select the desired angle It is impossible to select the angle if the tape does not contain multiple angles Subtitle Selection During normal playback press SUBTITLE Number key 6 on the Remote to select the desir...

Page 33: ...EP mode The picture may be distorted at the part where the playback speed is changed Mosaic block noise and still picture may appear during the high speed picture search of a tape recorded in D VHS format on other devices L Variable Speed Picture Search S VHS VHS only You can change the speed of picture search How to use the buttons on the Remote To do forward picture search press T repeatedly Eac...

Page 34: ...n picture Slow Motion Playback S VHS VHS only During normal playback Press S to decrease the playback speed Each time you press the button the speed decreases toward reverse slow motion playback then reverse picture search Holding PAUSE W for more than 2 seconds also starts forward slow motion playback If you press PAUSE W again still picture resumes To resume normal playback press PLAY I During s...

Page 35: ...rated HDTV or the Digital Set Top Box D Set recording speed Press REC SPEED to set the recording speed The recording speed changes each time REC SPEED is pressed E Start recording On the front panel Press REC R On the Remote While holding REC R press PLAY I Turn on the TV and or Digital Set Top Box and select the channel to be recorded Set the VCR TV CABLE DBS selector on the Remote to VCR REC SPE...

Page 36: ... not running You can also eject the cassette when the VCR is turned off To turn off the VCR Press POWER Compatibility Of Cassettes And Recording Mode To record on the VHS cassette with S VHS quality use the S VHS ET function A page 68 NOTES The D VHS MTP S VHS S VHS ET and VHS mode recordings are possible with this VCR To record in the D VHS mode use a D VHS cassette To record in the S VHS VHS mod...

Page 37: ... length Instant Timer Recording ITR You can easily specify the recording length from 30 minutes to 8 hours and the VCR shuts off after recording is finished During recording press REC R on the front panel repeatedly until the recording length you want appears on the front display panel The record X indicator starts flashing Each time you press the button recording length increases in 30 minute int...

Page 38: ... 2 Exit on screen display Press OSD again NOTES The subtitles does not appear while the on screen display is displayed If the VCR is in recording pause mode Y is always displayed The VCR status can be also displayed during playback Even if SUPERIMPOSE is set to OFF A page 66 the on screen display appears when the VCR plays back the blank portion of a tape and the VCR receives the channel which has...

Page 39: ...dication appears on the screen for about 5 seconds if the program is a stereo broadcast The SAP indication appears on the screen for about 5 seconds if the program is a SAP broadcast The SAP STEREO indication appears when a stereo program is accompanied by SAP sound S VHS Recording Mode A page 67 This VCR allows you to record on a D VHS and S VHS tape with VHS picture quality S VHS ET A page 68 Th...

Page 40: ...D If the VCR Plus Program screen appears go to step E To make corrections press CANCEL and input the correct PlusCode number If an incorrect PlusCode number or one where the broadcast already ended has been inputted PLUSCODE NO ERROR CONFIRM PLUSCODE NO THEN RETRY is displayed for about 5 seconds then the VCR Plus screen reappears Turn on the VCR and the TV and select the AV mode on the TV Set the...

Page 41: ... the broadcasts you want When AUTO TIMER A page 66 is set to ON the timer recording standby mode is automatically engaged when the VCR is turned off It is temporarily canceled when the VCR is turned on You do not have to press TIMER j to engage or disengage the timer recording standby mode NOTES Even if a power failure occurs the VCR keeps your timer programs However the clock time is lost if it l...

Page 42: ...channel number on which it is received in your area NOTES In many instances the VCR Plus guide channel numbers for cable and broadcast TV stations DO NOT match the channel number on which it is received by your VCR or cable box Check your TV listing or contact your cable supplier for details Many TV stations can be viewed on cable Check your TV listing or contact your cable supplier for details Tu...

Page 43: ... place of VCR CH If not refer to pages 22 24 and re perform the procedure FUNCTION SET UP INITIAL SET UP TUNER SET UP THEN PRESS OK CLOCK SET GUIDE CH 6 VCR CH GUIDE CHANNEL OTHER SELECT WITH ARROW KEYS SELECT OK EXIT MENU FUNCTION SET UP INITIAL SET UP TUNER SET UP THEN PRESS OK CLOCK SET GUIDE CH 6 VCR CH GUIDE CHANNEL OTHER SELECT WITH ARROW KEYS SELECT OK EXIT MENU Eg When inputting the guide ...

Page 44: ...n 30 minute intervals F Set program date Press DATE The current date is displayed on the screen The date you enter appears in its place G Set channel number Press TV VCR CH If you are using a DBS receiver see ATTENTION FOR DBS RECEIVER USERS on next page Holding down TV VCR CH rapidly changes the channel numbers Turn on the VCR and the TV and select the AV mode on the TV Set the VCR TV CABLE DBS s...

Page 45: ... time 2 If the clock time is restored correctly and AUTO TIMER is set to ON each timer program you have made will start at its start time unless its end time has elapsed Programs that start after midnight must have the next day s date After timer recording is completed the VCR turns off automatically You can program the timer recording while a regular recording is in progress the menu screens will...

Page 46: ...ly resumes when you turn off the VCR Turn on the VCR and the TV and select the AV mode on the TV Set the VCR TV CABLE DBS selector on the Remote to VCR Press PROG CHECK The clock must be set to access the program list If you have not set the clock the Main Menu screen appears after an error message is displayed Refer to page 17 for the clock setting procedure B 2 A 1 A 2 3 B 3 A 1 B 4 A 3 B 2 B 2 ...

Page 47: ...ording stops Video Calibration A page 63 does not work while Satellite Auto Recording is in progress Auto Clock A page 18 does not work while in the Satellite Auto Recording standby mode The VCR may not record a short portion at the beginning of the program or may record slightly longer than the actual length of the program when Satellite Auto Recording method is used If you engage the Satellite A...

Page 48: ...tablished between this VCR and the Integrated HDTV Set the recording speed to AUTO if this option is available For timer programming method refer to the manual of the Integrated HDTV D Engage recording standby mode Press POWER to turn off the VCR The Integrated HDTV will activate the VCR to automatically start recording through i LINK at the programmed time The VCR may not record a short portion a...

Page 49: ...mote a Press TV VCR CH or to select L 1 etc or b Press the Number key 0 AUX C Set recording speed Press REC SPEED to set the recording speed D Set timer program on the Inte grated HDTV For timer programming method refer to the manual of the Integrated HDTV E Engage recording standby mode Press POWER to turn off the VCR The Integrated HDTV will activate the VCR to automatically start recording thro...

Page 50: ...mer programming method refer to the manual of the Integrated HDTV or Digital Set Top Box 10 00 11 00 CH10 12 00 CH40 Not recorded Program 1 Program 2 10 00 11 00 12 00 CH40 Not recorded Program 1 Program 2 10 00 11 00 12 00 CH10 CH40 Not recorded Program 1 Program 2 10 00 11 00 10 00 11 00 Not recorded Program 1 Program 2 Not recorded Program 1 Program 2 Integrated HDTV This VCR Integrated HDTV Th...

Page 51: ...you must record each program for over the minimum recording time 5 min for the D VHS HS mode 10 min for the D VHS STD mode 30 min for the D VHS LS3 mode 5 min for the S VHS VHS SP mode and 15 min for S VHS VHS EP mode Video Navigation may not work properly for some tapes During playback or when searching for the beginning of a program a VCR might find two different tape numbers recorded on a tape ...

Page 52: ...screen appears Press FG to move the arrow to the item that you want to watch then press OK Playback starts automatically after the selected item is located D Theater is a technical specification based on D VHS standards that was developed for HD content Commercial D Theater titles can only be played back on D VHS digital recorders bearing the D Theater logo BLANK NAVI SET UP SEARCH LIBRARY 1 SYDNE...

Page 53: ...creen A Select the program that you want to watch then press OK B Insert the corresponding tape C Press OK again with the arrow on SEARCH D Confirm that the desired program is highlighted then press OK Playback starts automatically after the selected program is located A 2 4 B 2 3 C 2 3 A 1 5 B 4 C 4 VCR TV CABLE DBS Press FGD E to move the arrow to LIBRARY then press G or OK Press D E to move the...

Page 54: ... the left of the tape title The items without the cassette marks are the program titles included in the tape BLANK NAVI SET UP SEARCH LIBRARY TITLE CATEGORY DATE TAPE NUMBER SELECT OK EXIT NAVI SELECT WITH ARROW KEYS THEN PRESS OK Navigation BLANK NAVI SET UP SEARCH LIBRARY 0016 EURO 2000 SEARCH RETURN DELETE EDIT TITLE LIST 1 3 SELECT OK 0017 2 ENGLAND VS BRAZIL 0017 1 JAPAN VS KOREA 0017 SOCCER ...

Page 55: ...list screen appears being sorted by the recording date is displayed beside the tape number of the loaded cassette The cassette mark is displayed on the left of the tape title The items without the cassette marks are the program titles included in the tape BLANK NAVI SET UP SEARCH LIBRARY TITLE CATEGORY DATE TAPE NUMBER SELECT OK EXIT NAVI SELECT WITH ARROW KEYS THEN PRESS OK Navigation BLANK NAVI ...

Page 56: ...LIST RECORDING CONDITION LS3 BLANK TIME 2 00 SELECT WITH ARROW KEYS THEN PRESS OK Navigation BLANK NAVI SET UP SEARCH LIBRARY RECORDING MODE BLANK SPACE LIST RECORDING CONDITION LS3 SELECT OK EXIT BLANK TIME 2 00 NAVI SELECT WITH ARROW KEYS THEN PRESS OK TO LIST Navigation Press FG then press OK To go to another page of the lists press or Press D E to move the arrow to STOP then press OK The VCR w...

Page 57: ...re the program titles included in the tape To go to another page of the lists press or Turn on the VCR and the TV and select the AV mode on the TV Set the VCR TV CABLE DBS selector on the Remote to VCR A 2 6 A 1 7 A 6 Number keys VCR TV CABLE DBS Press FGD E to move the arrow to LIBRARY then press G or OK Press D E to move the arrow to TAPE NUMBER then press OK The tape number list screen appears ...

Page 58: ...ess 7 PQRS four times to enter S then press NOTES If you want to delete a character select the character then press CLEAR or press OK with the arrow on ERASE If you want to delete all characters press OK with the arrow on ALL ERASE Press D E to move the arrow to EDIT then press OK A Press FGD E to move the arrow on the desired charac ter or symbol then press OK OR BLANK NAVI SET UP SEARCH LIBRARY ...

Page 59: ... FG to move the arrow to EDIT then press OK A Press FGD E to move the arrow on the desired charac ter or symbol then press OK OR BLANK NAVI SET UP SEARCH LIBRARY 1 SYDNEY OLYMPIC PLAY STOP DELETE EDIT 0107 ALL SPORTS TAPE BLANK 2 00 LS3 1 3 SELECT OK 2 FOOTBALL 3 EURO 96 ENGLAND 4 PROJECT XYZ SYDNEY OLYMPIC SPECIAL 12 21 02 SAT 6 30 AM 5 53 PM i LINK LS3 SELECT WITH ARROW KEYS THEN PRESS OK EXIT N...

Page 60: ...SYDNEY OLYMPIC ERASE NEXT BACK ALL ERASE NAVI SELECT WITH ARROW KEYS THEN PRESS OK Navigation SYDNEY OLYMPIC SPECIAL 12 21 02 MON 6 30 AM 5 53 PM i LINK LS3 MOVIES CHILD MUSIC COMEDY CLASSIC SHOPPING OTHERS MISCELLANY RELIGION RETURN EDIT TITLE EDUCATION SERIES SPECIAL SOAPS SPORTS NEWS SELECT OK EXIT NAVI SELECT WITH ARROW KEYS THEN PRESS OK Navigation SYDNEY OLYMPIC SPECIAL 12 21 02 MON 6 30 AM ...

Page 61: ...e information is deleted it is impossible to restore that information Press FG to select the program you want to edit then press OK Press D E to move the arrow to DELETE then press OK Press D E to move the highlight bar to YES then press OK BLANK NAVI SET UP SEARCH LIBRARY 1 SYDNEY OLYMPIC PLAY STOP DELETE EDIT 0107 ALL SPORTS TAPE BLANK 2 00 LS3 1 3 SELECT OK 2 FOOTBALL 3 EURO 96 ENGLAND 4 PROJEC...

Page 62: ...O FUNCTION A page 64 IN OUT FUNCTION A page 65 ADDITIONAL A page 66 Press D E to move the arrow to FUNCTION SET UP then press G or OK Press D E to move the arrow to the menu of the function you want to set then press G or OK Press FG to move the arrow to the function you want to set FUNCTION SET UP INITIAL SET UP TUNER SET UP THEN PRESS OK V CALIBRATION PICTURE CONTROL AUTO ON VIDEO STABILIZER VID...

Page 63: ...quality is adjusted automatically NORM When V CALIBRATION is OFF NORM will appear instead of AUTO The quality is not adjusted automatically when NORM appears EDIT Minimizes picture degradation during editing recording and playback SOFT Reduces image coarseness when viewing overplayed tapes containing much noise SHARP Clearer sharper edged picture when viewing images with much flat same colored sur...

Page 64: ...use there are only two channels those two channels are recorded regardless of the DV sound setting L OPTICAL OUT Dolby D 2CH PCM STREAM This VCR can send the Dolby Digital bitstream or PCM Audio to external devices When you play back a tape including the Dolby Digital bitstream and if you have a device equipped with Dolby Digital decoder set this function to Dolby D If not set this function to 2CH...

Page 65: ...when ALLto480p is selected If your TV supports only 480i image format and ALLto480p mode is previously selected you can forcibly change the mode to ALLto480i by pressing and holding PAUSE W on the front panel for more than 5 seconds during power off mode During DV input the image format output to the TV will be 480i even if this function is set to ALLto480p However the menu setting is retained and...

Page 66: ...the recording speed manually during timer programming In order to ensure that the recording fits on the tape this function may leave a slight non recorded portion at the end of the tape There may be some noise and sound disturbance where the recording speed switches from SP to EP mode on the tape This function is not available during ITR Instant Timer Recording and will work properly on the follow...

Page 67: ...ecorded in S VHS mode S VHS MODE setting does not affect recording on VHS tapes Recording on VHS tapes is always performed in VHS mode except when using S VHS ET mode A page 68 L AV COMPU LINK ON OFF The REMOTE PAUSE AV COMPULINK terminal on the rear panel can be used as either the REMOTE PAUSE terminal or the AV COMPULINK terminal When this function is set to ON you can use this terminal as the A...

Page 68: ...ant recordings You can play back S VHS ET recordings on most of S VHS VCRs and of VHS VCR equipped with SQPB S VHS QUASI PLAYBACK function Notice some VCRs are not compatible with this function While playing back a tape recorded with this function on some tapes noise may appear If playback picture becomes blurred or interrupted use a cleaning cassette During special effect playback A page 33 noise...

Page 69: ...ow the procedure below A Access Main Menu screen Press MENU B Select JLIP ID Set Up screen A Press D E to move the arrow to INITIAL SET UP then press G or OK B Press D E to move the arrow to OTHER then press G or OK C Set JLIP ID Number D Return to normal screen Press MENU NOTE For further details on the JLIP system or devices consult your nearest JVC dealer U S customer can contact JVC directly t...

Page 70: ...n step C Turn on the VCR and the TV and select the AV mode on the TV Set the VCR TV CABLE DBS selector on the Remote to VCR ATTENTION If the i LINK setting does not work press D VHS and STOP L on the front panel simultaneously for more than 5 seconds to reset the settings The cassette is automatically ejected LINC You can control one of the i LINK compatible devices connected to this VCR with the ...

Page 71: ...es are connected in such a way that digital signals do not return loop back to the device that output them Looped connection is not permitted NOTES You can connect as many as 63 devices including this VCR through an i LINK connection If you use a branched i LINK connection however the maximum path length on a branch is 17 devices In the case of a personal computer and some other devices data is no...

Page 72: ...the TV s analog input instead A You can use a camcorder as the playback device and your VCR as the recording VCR This VCR for recording To i LINK DV cable not supplied To DV output DV camcorder for playback This VCR supports the copy protection technologies of DTLA Digital Transmission Licensing Administrator These technologies are admitted by DTLA It is impossible to dub copy limited signals betw...

Page 73: ...cording speed Press REC SPEED to set the recording speed For more details refer to About Recording Speed below E Start playback Press PLAY I on the connected device NOTE If the connected device is equipped with a superimpose OSD disable feature then set it to OFF before starting playback F Start recording On the front panel Press REC R On the Remote Press REC R and PLAY I at the same time NOTE If ...

Page 74: ...ape has better picture quality than those made by VHS to VHS editing S VHS to S VHS editing S VIDEO connection Original picture quality of S VHS made can be duplicated with minimal picture degradation This is the best editing method you can use on S VHS VCRs A You can use a camcorder as the playback device and your VCR as the recording VCR This VCR for recording To AUDIO input Mini plug cable not ...

Page 75: ...E Select video input terminal Access the IN OUT FUNCTION screen A page 65 When using S VIDEO terminal set FRONT AUX F 1 or REAR AUX L 1 or L 2 if you use the connectors on the rear to S VIDEO When using VIDEO terminal set FRONT AUX F 1 or REAR AUX L 1 or L 2 if you use the connectors on the rear to VIDEO F Set PICTURE CONTROL to EDIT Access the VIDEO FUNCTION screen A page 63 G Start playback Pres...

Page 76: ...s from the Remote JVC and PANASONIC have two codes If the TV does not function with one code try entering the other D Operate TV Press one of the following buttons POWER TV VCR TV VCR CH c d TV Muting TV VOL and Number keys For some brands you must press ENTER after having pressed the Number keys to enter a channel number To operate the VCR set the VCR TV CABLE DBS selector back to VCR NOTES Depen...

Page 77: ...r s channels press TV VCR CH or the Number keys To operate the VCR set the VCR TV CABLE DBS selector back to VCR NOTES Depending on the type of cable box or DBS receiver some or all functions cannot be operated using this Remote It is impossible to control a cable box or DBS receiver that does not have a remote sensor It s not possible to set the Remote for both your cable box and a DBS receiver a...

Page 78: ...3 for C code control signals and 4 for D code con trol signals C Press STOP L and release A B C D C Turn off VCR Press POWER on the VCR D Check remote control code for VCR Press PLAY I on the VCR for more than 5 seconds The code currently set appears on the front display panel E Turn on VCR Press POWER on the Remote The code transmitted from the Remote blinks for a few seconds on the front display...

Page 79: ...terrupted even though TV broadcasts are clear The video heads may be dirty The heads must be cleaned Use an optional dry cleaning cassette or consult your JVC dealer 4 The picture stops or the black or mosaic noise appears when play ing back a program recorded in D VHS mode The video heads may be dirty The digital program is not recorded in D VHS mode The heads must be cleaned Use an optional dry ...

Page 80: ...pe editing will not work The components have been incorrectly connected or correct video connector S VIDEO VIDEO or DV is not selected The power to one or more of the units has not been turned on The recording VCR s input location has been set incorrectly Connect the components correctly A pages 72 74 or check REAR AUX L 1 or L 2 and FRONT AUX F 1 setting A page 65 Make sure the power to all units...

Page 81: ...select the correct number A page 23 Make sure the power is on before timer recording starts 8 Satellite channels are not auto matically switched during timer recording The Controller is not properly connected to the VCR The input channel selected on the DBS Receiver Set screen is incorrect The VCR is not set correctly to control the DBS receiver The DBS receiver is turned off Connect the Controlle...

Page 82: ...deo Navigation refer to NOTES on page 51 SYMPTOM POSSIBLE CAUSE CORRECTIVE ACTION 1 When scanning channels some of them are skipped over Those channels have been preset to be skipped If you need the skipped channels restore them A page 21 2 The channel cannot be changed Recording is in progress Press PAUSE W to pause the recording change channels then press PLAY I to resume recording 3 The Remote ...

Page 83: ...s with fast action the image may jitter This does not affect recording which will proceed as usual When you watch the camcorder s search images through this VCR the block noise may appear When you record audio dubbed DVC cassettes tapes which have four recorded channels sound may not be heard for the first few seconds When you eject and insert D VHS cassettes the sound may be interrupted for an in...

Page 84: ...gnal into an analog signal for recording Switch to the analog input for recording 107 CAN NOT REC DIGITAL INPUT BY S VHS VHS USE ANALOG TIMER PROGRAMMING An attempt was made to make an S VHS VHS recording using the timer function with i LINK selected on the digital tuner side The i LINK connector on this VCR is intended only for D VHS recording This VCR does not convert a digital signal into an an...

Page 85: ...nector on this VCR Turn off any devices that are not in use 302 COPY RESTRICTED PROG OUTPUT 480i VIDEO When playing back a program that was copy protected in 1080i 720p or 480p mode the VCR down converts to 480i mode for output 303 VIDEO SIGNAL IS NOT FOUND FOR THIS PROGRAM An attempt was made to play back a tape that does not contain video signal 304 THIS PROGRAM CAN NOT PLAY BACK THE CONTENT IS ...

Page 86: ... for Video Navigation Q Sometimes during index search the VCR cannot find the program I want to see Why not A There may be index codes too close together Q During playback on screen display sometimes jitters Why does this happen A If the condition of the tape being played back is not good jittering of the video including on screen display may occur RECORDING Q When I pause and then resume a record...

Page 87: ...ontent Protection HDCP is a specification originally developed by Intel Corporation to enforce copyrights of digital entertainment content across the DVI interface and now across the HDMI interface as well HDMI Abbreviation for High definition Digital Multimedia Interface HDMI which was built on the foundation of DVI HDCP transmits uncompressed high definition video and multichannel digital audio ...

Page 88: ...GHTING 68 M Manual tracking 30 Multi Brand Remote Controlling four JVC VCRs 78 Setting Cable Box brand 77 Setting DBS receiver brand 77 Setting TV brand 76 N Next Function Memory 31 O On screen display 10 38 OPTICAL OUT 64 P PBS channel 16 PICTURE CONTROL 63 Playback 28 Plug Play 16 POWER SAVE 67 R REAR AUX L 1 66 REAR AUX L 2 66 Recording D VHS Recording via i LINK Connection 35 D VHS S VHS VHS R...

Page 89: ... fields Recording Playback system DA 4 Double Azimuth head helical scan system Signal to noise ratio 45 dB Frequency range Normal audio 70 Hz to 10 000 Hz Hi Fi audio 20 Hz to 20 000 Hz TUNER Tuning system Frequency synthesized tuner Channel coverage VHF Channels 2 13 UHF Channels 14 69 CATV 113 Channels TIMER Clock reference Quartz Program capacity 1 year programmable timer 24 programs Memory bac...

Page 90: ...ized by JVC to render such service or if affixed to any attachment not provided with the products or if the model or serial number has been altered tampered with defaced or removed 2 Initial installation installation and removal from cabinets or mounting systems 3 Operational adjustments covered in the Owner s Manual normal maintenance video and audio head cleaning 4 Damage that occurs in shipment...

Page 91: ...Masterpage Right FullCol EN 91 Filename HM DH5U_Eng fm MEMO HM DH5U_Eng fm Page 91 Friday June 25 2004 11 42 AM ...

Page 92: ...SPECIFICATIONS OR THAT IMPLEMENT THE SPECIFICATIONS IN A NON CONFORMING OR NON COMPATIBLE MANNER WITH THIS PRODUCT MAY NOT BE SUPPORTED AND MAY CAUSE DAMAGE TO OR MALFUNCTION OF THIS PRODUCT ANY USE OF THIS PRODUCT WITH A NON CONFORMING OR NON COMPATIBLE PRODUCT DEVICE COMPONENT PART OR OTHER MATERIAL SHALL BE AT THE USER S SOLE AND EXCLUSIVE RISK FOR SERVICING Only in U S A THANK YOU FOR PURCHASI...

Reviews: