background image

EN 

15

P LA

Y

OFF

CAMERA MENU
CAMERA

P I CTURE MODE
SYSTEM
EX I T

P I CTURE MODE

F I NE

STD

EX I T

ECONOMY

Pictrue Mode Selection

The Picture Quality mode can be selected to best match your needs. Three Picture Quality modes are
available: FINE, STD (standard) and ECONOMY (in order of quality).
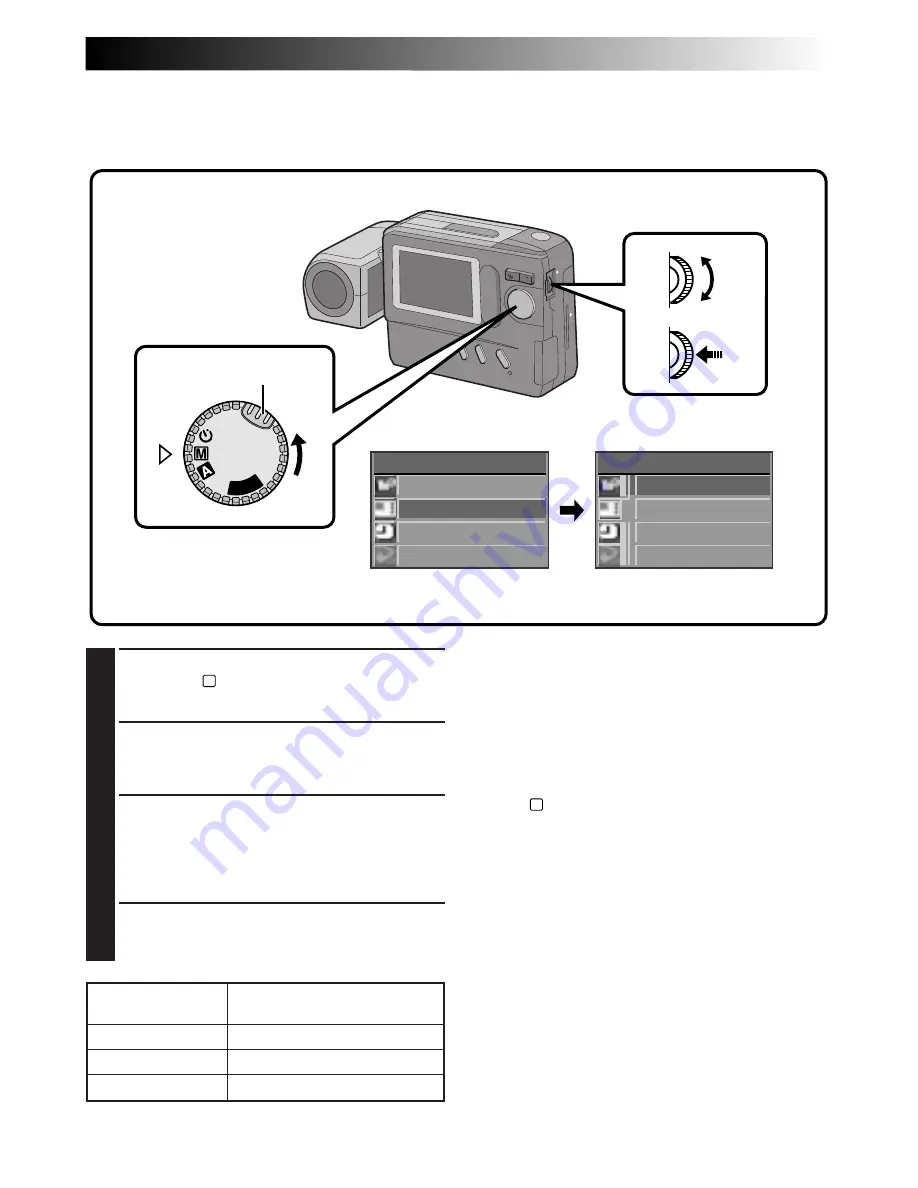
1

Turn the Power Dial, while pressing its Lock
Button, to “

M

” and push the MENU Jog Dial.

•The CAMERA MENU Screen appears.

2

Rotate the MENU Jog Dial to select “PICTURE
MODE” and push it.

•The PICTURE MODE Screen appears.

3

Rotate the MENU Jog Dial to select the
“FINE”, “STD” or “ECONOMY” Picture
Quality mode and push it.

•The Picture Quality mode is set, and the

CAMERA MENU Screen appears.

4

Push the MENU Jog Dial.

•The shooting screen reappears.

NOTES:

 The number of storable images depends on the

selected Picture Quality mode, the conditions
under which the camera is used, the temperature
during use of the camera and the batteries being
used.

 The selected Picture Quality mode is used even

when the Power Dial is turned to positions other
than “

M

”.

PICTURE QUALITY
MODE

FINE

STANDARD (STD)

ECONOMY

Number of Storable Images
(in Built-in Memory)

Approx. 30

Approx. 50

Approx. 100

Power Dial

MENU Jog Dial

Lock Button

LCD monitor

CAMERA MENU Screen

PICTURE MODE Screen

Summary of Contents for CompactFlash LYT0143-001A

Page 1: ...ITAL STILL CAMERA LYT0143 001A INSTRUCTIONS ENGLISH EN STILL CAMERA Please visit our CyberCam Homepage on the World Wide Web and answer our Consumer Survey in English only http www jvc victor co jp index e html ...

Page 2: ...oting and LCD monitor playback are possible anywhere CAUTIONS n To prevent shock do not open the cabinet No user serviceable parts inside Refer servicing to qualified personnel n When you are not using the AC Power Adapter for a long period of time it is recommended that you disconnect the power cord from AC outlet IMPORTANT For Customers in U K Connection to the mains supply in the United Kingdom...

Page 3: ...tch off withdraw the mains plug and consult your dealer DON T remove any fixed cover as this may expose dangerous voltages DON T leave equipment switched on when it is unattended unless it is specifically stated that it is designed for unattended operation or has a standby mode Switch off using the switch on the equipment and make sure that your family knows how to do this Special arrangements may...

Page 4: ...d in memory appears 2 Select an image with the Zoom Button Lock button 190 Power Dial Shutter Release Button Zoom Button 1 1 2 2 P L A Y OFF QUICK START Load batteries Z pg 8 1 Slide the BATTERY cover slightly to open 2 Insert four LR6 AA size batteries as indicated by the orientation marking inside the cover Four LR6 AA size alkaline batteries Turn the power on Z pg 14 1 Turn the Power Dial to A ...

Page 5: ...ece of equipment without using a cable provided that it is compatible with the IrTran P standard Compact Flash Card for Shooting More Images The Compact Flash card makes it possible to shoot and store images in addition to those that can be stored in the built in memory The extra available images mean you don t have to worry about missing great shots Also by using several Compact Flash cards you c...

Page 6: ...uto Shooting 16 Camera Setup Check 17 Zoom Shooting 18 Self Timer Shooting 19 Flash Shooting 20 MANUAL SHOOTING 21 Exposure Control 21 White Balance Control 22 Adjusting the White Balance 22 Adjusting the White Balance Manually M W B 23 Shutter Speed Selection 24 Selecting the Shutter Speed 24 Shutter Speeds and Effects 25 Manual Focusing 26 View Mode Selection 27 Power Save Mode 28 Flash Adjustme...

Page 7: ...ack Images Stored in a Compact Flash Card 46 Copying Images Between the Built in Memory and a Compact Flash Card 47 Image Copy Using Infrared Communication IrTran P 50 Printing on a Digital Printer IrDA Transfer 52 PC Connection Operation 53 CONTROLS CONNECTORS AND INDICATORS 54 TROUBLESHOOTING 60 DISPLAY AND MESSAGES 62 CAUTIONS 63 MAJOR SPECIFICATIONS 66 INDEX 67 PROVIDED ACCESSORIES LR6 AA size...

Page 8: ... the battery cover by performing step 1 of Loading Batteries to the left 2 Take out batteries by tilting the camera slightly NOTES Do not use manganese batteries as they do not have sufficient energy to power this camera If the batteries are not used for an extended period remove them from the camera to avoid battery leakage which can cause malfunctions to occur Since batteries become very hot aft...

Page 9: ...cting it to an AC outlet If you plug it into an outlet first and the Adapter s terminals come in contact with a metal surface or object short circuit or fire may result Vibration noise can sometimes be heard coming from the inside of the AC Power Adapter This is normal The AC Power Adapter processes electricity internally and will become warm during use This is normal Make sure to use the AC Power...

Page 10: ...gorizing pictures later 1 Turn the Power Dial while pressing its Lock Button to M and push the MENU Jog Dial The CAMERA MENU Screen appears 2 Rotate the MENU Jog Dial to select SYSTEM and push it The SYSTEM Setup Screen appears 3 Rotate the MENU Jog Dial to select DATE TIME and push it The DATE TIME Setup Screen appears If you wish to set only the time without changing the date go to step 5 Power ...

Page 11: ...s from 0 seconds Repeat this procedure until you are satisfied with the time settings 6 Rotate the MENU Jog Dial to select EXIT and push it 3 times The shooting screen reappears and the clock starts functioning NOTES The date time setting is backed up by a built in rechargeable clock battery Connect the camera to an AC outlet using the AC power adapter for over 24 hours to charge the clock battery...

Page 12: ...on to the first step is called a half press From the half pressed position press the button all the way to the second step Unpressed position Half pressed position Fully pressed position 100 90 NOTES Do not press the Shutter Release Button with your finger raised over the button or do not press it with too strong a force as this may disrupt the horizontal positioning of the image or cause blurring...

Page 13: ...e LCD monitor by rotating the BRIGHT dial except during manual focusing or menu adjustment To darken the image Rotate the BRIGHT dial upward To brighten the image Rotate the BRIGHT dial downward To darken the image To brighten the image BRIGHT Dial MENU Jog Dial ...

Page 14: ...Timer mode A Full Auto mode The camera will automatically control all items including exposure shutter speed focusing and white balance M Manual mode Exposure shutter speed focusing and white balance can be controlled manually according to the shooting conditions Self Timer mode A 15 second self timer can be used P L A Y OFF Power Dial Lock Button BASIC OPERATION cont ...

Page 15: ...ENU Jog Dial to select the FINE STD or ECONOMY Picture Quality mode and push it The Picture Quality mode is set and the CAMERA MENU Screen appears 4 Push the MENU Jog Dial The shooting screen reappears NOTES The number of storable images depends on the selected Picture Quality mode the conditions under which the camera is used the temperature during use of the camera and the batteries being used T...

Page 16: ...ode 2 Train the lens on the subject to be photo graphed If the low light icon appears on the LCD monitor use the flash Z pg 20 3 Press the Shutter Release Button The image will be stored in the built in memory or Compact Flash card Power Dial Lock Button NOTES When the Shutter Release Button is half pressed auto focusing is performed After storing images in the built in memory it is recommended th...

Page 17: ... taken remaining battery power date and time For details see On Screen Display During Shooting Z pg 57 58 Each press of the DISPLAY Button switches the View mode The camera setup can be checked in the Information Display Screen Standard View mode colour display Standard View with Information Display mode colour display Quick View mode monochrome display DISPLAY Button Standard View with Informatio...

Page 18: ... lens of a 35 mm camera Zooming allows you to shoot wide areas as well as close ups of subjects located far away without changing the shooting position W Wide angle zooming A relatively wide area can be photographed T Telescopic zooming A faraway subject can be magnified and photographed BASIC OPERATION cont ...

Page 19: ...ck Button to appears If the low light icon appears on the LCD monitor use the flash Z pg 20 2 Press the Shutter Release Button The Self Timer Lamp and the on screen icon start blinking then the shutter is released 15 seconds later Blinks NOTES The Self Timer Lamp starts blinking faster when there are 5 seconds or less remaining before the shutter is released If you wish to cancel the Self Timer ha...

Page 20: ... Lock Button To take another shot with a flash repeat the above steps Flash Adjustment The flash intensity can be increased or decreased by 2 steps For details see Flash Adjustment Z pg 29 NOTES While the flash is charging the LCD monitor turns off to save power This is not a malfunction Once the flash is charged after a few seconds the LCD monitor turns on again When the batteries are nearly exha...

Page 21: ...ntrol When the subject appears too dark or too bright on the LCD monitor it may be necessary to compensate for the ambient brightness This will make it possible to capture the contours of the dark and bright regions of the image more clearly NOTE Use the flash when the low light icon appears To darken the image To brighten the image Lock button LCD monitor CAMERA MENU Screen MENU Jog Dial Power Di...

Page 22: ...pears MENU Jog Dial Power Dial LCD monitor CAMERA MENU Screen CAMERA Setup Screen M W B Setup Screen Lock Button 4 Rotate the MENU Jog Dial to select or AUTO and push it Select the preset that can provide the subject with the most desirable white balance The following 5 options can be selected AUTO Select this position to adjust the colour balance automatically When the Full Auto mode is selected ...

Page 23: ...white balance to an automatically set white balance select AUTO in step 4 in the procedure on page 22 or turn the Power Dial to A NOTE The manually set white balance is held in memory until another balance value is set by selecting M W B During indoor shooting the subject is exposed to a variety of light sources including outdoor light fluorescent light candle light and so on As the colour tempera...

Page 24: ...n appears 2 Rotate the MENU Jog Dial to select CAMERA and push it The CAMERA Setup Screen appears 3 Rotate the MENU Jog Dial to select SHUTTER SPEED and push it The SHUTTER SPEED Setup Screen appears 4 Rotate the MENU Jog Dial to select the desired shutter speed and push it twice The shutter speed is selected and the shooting screen reappears MENU Jog Dial Power Dial NOTE When you select a shutter...

Page 25: ...ual and shoot bright clear images of hard to shoot subjects in low light Suitable for shooting under outdoor lighting conditions such as a cloudy day Suitable for shooting under outdoor lighting conditions such as a sunny day This shutter speed is not affected by subtle hand movements Suitable for shooting under outdoor lighting conditions such as by the seashore on a sunny day This shutter speed ...

Page 26: ...ial MENU Jog Dial is rotated If the FOCUS Dial MENU Jog Dial is rotated quickly the focus changes drastically If the FOCUS Dial MENU Jog Dial is rotated slowly the focus changes gradually FOCUS Dial MENU Jog dial Power Dial 4 Press the Shutter Release Button to shoot the image NOTE Manual focusing is recommended in the following cases When shooting a subject with low contrast variation in brightne...

Page 27: ...r display Quick View mode monochrome display Standard View with Information Display mode colour display Standard View mode A colour image is displayed on the LCD monitor and is updated about 4 times a second This mode is suitable for shooting stationary subjects Quick View mode A black and white image is displayed on the LCD monitor and is updated about 15 times a second This mode is suitable for ...

Page 28: ...een appears 4 Rotate the MENU Jog Dial to select ON and push it twice The shooting screen reappears and the Power Save mode is activated Power Dial MENU Jog Dial Lock Button LCD monitor CAMERA MENU Screen SYSTEM Setup Screen POWER SAVE Screen To deactivate the Power Save mode select OFF in step 4 When the Power Dial is set to A M or PLAY the camera power will stay on even when no operations are pe...

Page 29: ...the MENU Jog Dial to select FLASH ADJ and push it The FLASH ADJ Adjustment Screen appears Lock Button Power Dial MENU Jog Dial SYSTEM Setup Screen FLASH ADJ Adjustment Screen CAMERA MENU Screen LCD monitor 4 Rotate the MENU Jog Dial to select the flash intensity and push it Select from 0 1 2 1 and 2 To brighten the flash 1 2 Rotate the MENU Jog Dial downward To darken the flash 1 2 Rotate the MENU...

Page 30: ...ed onto a videotape NOTES For connections to a TV monitor or VCR refer to their instruction manuals The playback image can also be viewed on the LCD monitor of the camera without connecting it to a TV monitor or VCR During playback on a TV monitor indications displayed in any of the shooting modes do not appear TV VCR Video cable provided To VIDEO OUT To VIDEO IN To VIDEO IN Digital Still Camera C...

Page 31: ...me much like flipping through a photo album 1 Turn the Power Dial while pressing its Lock Button to PLAY The most recently photographed image is displayed If there are no images in memory a blue background is displayed on the screen 2 When there is more than one image in memory Press the Zoom Button to view other images T Displays the next image W Displays the previous image NOTE Even if you shoot...

Page 32: ...ed up to fill any gaps in the numerical sequence Therefore the number of remaining images is 7 and the new index numbers range from 001 to 007 When images are stored in both the built in memory and a Compact Flash card installed in the camera their index images and numbers are different from those stored using only the built in memory Index number Selected image Picture Quality mode Protect icon F...

Page 33: ...ton to PLAY and push the MENU Jog Dial The PLAY MENU Screen appears 2 Rotate the MENU Jog Dial to select PLAY MODE and push it The PLAY MODE Screen appears 3 Rotate the MENU Jog Dial to select INDEX and push it The INDEX Screen appears 4 Rotate the MENU Jog Dial to select the image to be displayed and push it The image selected in the INDEX Screen is displayed MENU Jog Dial Power Dial NOTE If no i...

Page 34: ...ile pressing its Lock Button to PLAY and push the MENU Jog Dial The PLAY MENU Screen appears 2 Rotate the MENU Jog Dial to select FILE and push it The FILE Setup Screen appears 3 Rotate the MENU Jog Dial to select PROTECT and push it The PROTECT Screen appears MENU Jog Dial Power Dial NOTE When the camera s memory is initialized even protected images are deleted If you do not want to lose importan...

Page 35: ... image that you do not want to delete by accident 5 Press the Shutter Release Button 6 Push the MENU Jog Dial twice The screen returns to the normal playback screen PROTECT Screen To remove protection Perform steps 1 through 3 then rotate the MENU Jog Dial to select the desired padlocked image and push it The padlock mark located above the image disappears and the image is no longer protected When...

Page 36: ...r all at once PLAYBACK cont 1 Turn the Power Dial while pressing its Lock Button to PLAY and push the MENU Jog Dial The PLAY MENU Screen appears 2 Rotate the MENU Jog Dial to select FILE and push it The FILE Screen appears MENU Jog Dial Power Dial 3 Rotate the MENU Jog Dial to select DELETE and push it The DELETE Screen appears PLAY MENU Screen LCD monitor Lock Button FILE Screen ...

Page 37: ...onfirmation Screen appears 5 Rotate the MENU Jog Dial to select EX ECUTE and push it DELETING IN PROGRESS is displayed until all images have been deleted which can take from a few seconds to several minutes depending on the number of images stored If CONTAINS PROTECTED IMAGES is displayed only the unprotected images will be deleted When you also want to delete protected images unprotect them by re...

Page 38: ...t The image is displayed with the black and white or sepia effect applied to it The effect is applied to other displayed images until it is canceled To cancel the effect press the CLEAR FOCUS Button 1 Turn the Power Dial while pressing its Lock Button to PLAY and push the MENU Jog Dial The PLAY MENU Screen appears 2 Rotate the MENU Jog Dial to select PLAY MODE and push it The PLAY MODE Screen appe...

Page 39: ...ed By rotating the MENU Jog Dial you can reach the desired area as indicated above The effect is applied to other displayed images until it is canceled To cancel the effect press the CLEAR FOCUS Button 1 Turn the Power Dial while pressing its Lock Button to PLAY and push the MENU Jog Dial The PLAY MENU Screen appears 2 Rotate the MENU Jog Dial to select PLAY MODE and push it The PLAY MODE Screen a...

Page 40: ...Frames An image can be displayed in 9 types of frames The framed image can be printed out by transmitting the image data with the frame data to a printer Frames can also be used in 4 split or 16 split screens Preset frames 9 types ...

Page 41: ...tton 1 Turn the Power Dial while pressing its Lock Button to PLAY and push the MENU Jog Dial The PLAY MENU Screen appears 2 Rotate the MENU Jog Dial to select PLAY MODE and push it The PLAY MODE Screen appears 3 Rotate the MENU Jog Dial to select FRAME and push it The FRAME Setup Screen appears 4 Rotate the MENU Jog Dial to select a frame and push it The selected image is displayed inside the fram...

Page 42: ...ng its Lock Button to select PLAY and push the MENU Jog Dial The PLAY MENU Screen appears 2 Rotate the MENU Jog Dial to select PLAY MODE and push it The PLAY MODE Screen appears 3 Rotate the MENU Jog Dial to select MULTI and push it The MULTI Setup Screen appears While a multi image screen is being displayed it is impossible to select the MULTI Setup Screen from the PLAY MODE Screen If you wish to...

Page 43: ...lti image screen To Create a Multi Image Screen Using Selected Images Before doing the following perform steps 1 through 3 Z pg 42 4 Rotate the MENU Jog Dial to select SELECTED 4 and push it The MULTI Index Screen appears 5 Rotate the MENU Jog Dial to select an image and push it u appears on the selected image To cancel the selection of an image rotate the MENU Jog Dial to select the image and pus...

Page 44: ...ash card is disengaged from the camera 2 Pull out the Compact Flash card NOTES Be sure to use only Compact Flash cards bearing the CF trademark Some brands of Compact Flash cards are not compatible with this camera Before purchasing a Compact Flash card consult its manufacturer or dealer P L A Y OFF P L A Y O F F 1 Install the Compact Flash card in the slot Insert the Compact Flash card so that it...

Page 45: ...S is displayed and formatting starts When NO IMAGES STORED is displayed formatting is complete PLAY MENU PLAY MODE F I LE COMM MODE EX I T F I LE PROTECT DELETE COPY EX I T FORMAT FORMAT EXECUTE EX I T P L A Y O F F Power Dial Lock Button MENU Jog Dial PLAY MENU Screen FILE Screen FORMAT Screen CAUTION Do not perform any other operation such as turning off the camera during initialization as this ...

Page 46: ... camera and remove the Compact Flash card from the camera See Removing a Compact Flash Card Z pg 44 To prevent the accidental erasure of images stored in a Compact Flash card transfer them to a Windows PC or Macintosh and save them We also recommend that you regularly copy images stored in a Compact Flash card to the camera s built in memory during shooting Playing Back Images Stored in a Compact ...

Page 47: ...removing a Compact Flash card MENU Jog Dial Power Dial 1 Install the Compact Flash card in the camera 2 Turn the Power Dial while pressing its Lock Button to PLAY and push the MENU Jog Dial The PLAY MENU screen appears 3 Rotate the MENU Jog Dial to select FILE and push it The FILE Screen appears 4 Rotate the MENU Jog Dial to select COPY and push it The COPY Screen appears 5 Rotate the MENU Jog Dia...

Page 48: ...epeat this procedure until every image you wish to copy is selected APPLIED OPERATION cont COPY ALL SELECTED EX I T COPY EXECUTE EX I T COPY Screen Shutter Release Button Copy Confirmation Screen 8 After selecting all the images to be copied press the Shutter Release Button The Copy Confirmation Screen appears 9 Rotate the MENU Jog Dial to select EXECUTE and push it The message IMAGE COPYING IN PR...

Page 49: ...nect the power supply or remove the Compact Flash card as this may cause the stored images to be erased or the camera s built in memory to be corrupted Also be sure to use the optional AC power adapter as the camera s built in memory or the Compact Flash card may be corrupted if the batteries become exhausted during the copy operation If 5 images stored in a Compact Flash card are copied to the bu...

Page 50: ...ation compatible equipment regardless of its manufacturer MENU Jog Dial Power Dial 1 Turn the Power Dial while pressing its Lock Button to PLAY and push the MENU Jog Dial The PLAY MENU Screen appears 2 Rotate the MENU Jog Dial to select COMM MODE and push it The COMM MODE Setup Screen appears 3 Rotate the MENU Jog Dial to select IR MODE and push it twice The normal playback screen reappears Lock B...

Page 51: ...SSION FAILED is displayed 30 seconds after the FLASH TRANSFER Button is pressed check the equipment orientation power supplies etc and retry the transfer To abort transfer in the middle press the CLEAR FOCUS Button The message TRANSMISSION TO BE STOPPED is displayed 6 If the camera is the receiving equipment the message RECEPTION IN PROGRESS is displayed Reception is complete when this message dis...

Page 52: ...image screens when processing images 5 Press the FLASH TRANSFER Button The message TRANSMISSION IN PROGRESS is displayed and image transfer to the printer starts After the transfer is complete perform the print operation on the printer If you use a printer which starts printing automatically simply wait for it to begin To abort image transfer in the middle press the CLEAR FOCUS Button The message ...

Page 53: ... the computer only one image should be displayed If a menu screen or index screen is displayed transfer is impossible Before transferring image data from the computer to this camera be sure to select the FINE Picture Quality mode referring to Picture Mode Selection Z pg 15 PLAY MENU PLAY MODE F I LE COMM MODE EX I T COMM MODE PC MODE I R MODE EX I T PLAY MENU Screen COMM MODE Setup Screen 1 Connec...

Page 54: ...54EN CONTROLS CONNECTORS AND INDICATORS PC V I D E O O U T D C I N P L A Y OFF 1 8 6 2 3 5 4 7 9 0 Lock button ...

Page 55: ... to zoom during shooting or to switch to the next previous image during play back 0 MENU BRIGHT FOCUS Jog Dial Z pg 10 13 26 Turn to adjust settings for shooting or playback to adjust the brightness of the LCD monitor or to adjust the focus BATTERY Cover Z pg 8 Open to replace the batteries CLEAR FOCUS Button Z pg 26 Press to cancel an effect or to focus on a subject manually DISPLAY Button Z pg 1...

Page 56: ...re Use only tripods not equipped with a stud that prevents the camera from rotating 3 Hand Strap Eyelet Z pg 8 Thread the provided hand strap through this eyelet 4 Compact Flash Card Slot Z pg 44 Insert an optional Compact Flash card 5 Reset Switch Allows you to reset the camera to its factory presets First remove the power supply AC power adapter batteries etc then insert a pin or similar object ...

Page 57: ...ator Z pg 26 Displays manual focusing adjustments 8 Battery Power Remaining Displays the approximate battery power remaining 9 White Balance Z pg 22 Displays the current setting when any white balance except AUTO is selected Fine Cloudy Halogen Manual White Balance M W B 0 Flash Icon Z pg 20 Appears when the flash is charged Low Light Icon Z pg 20 Appears when the flash is required Date Display Da...

Page 58: ... 5 4 4 Far Z pg 26 Rotate the FOCUS Dial MENU Jog Dial upward to focus on a farther subject When rotating the FOCUS Dial MENU Jog Dial is displayed 5 Near Z pg 26 Rotate the FOCUS Dial MENU Jog Dial downward to focus on a nearer subject When rotating the FOCUS Dial MENU Jog Dial is displayed 1 CF Icon Z pg 46 Appears when the image is stored in a Compact Flash card 2 Picture Quality Mode FINE STD ...

Page 59: ...ed in a Compact Flash card is played back 2 Picture Quality Mode Z pg 15 Displays the Picture Quality mode used for the image 3 Image Number Displays the index number given to the image file 4 Total Number of Images Displays the total number of stored images Playback image Playback image and information display 021 F I NE 030 CF 7 1 2 3 4 5 6 12 1998 4 05 23 27 1 5 Date Z pg 10 6 Time Z pg 10 7 Ba...

Page 60: ...function Turn the lens to adjust the LCD monitor angle or adjust the brightness Is the image being played back in a cold place In cold areas the LCD monitor appears slightly dark This is not a malfunction The LCD monitor s lamp is reaching the end of its service life Consult your nearest JVC dealer When the built in memory is full and no more shooting is possible this message appears Use a blank C...

Page 61: ...ect the camera to the AC power adapter and plug it in for over 24 hours Is the Compact Flash card being held in the correct direction Switch the camera off remove the power supply battery or AC power adapter and press the Reset Switch on the bottom of the camera with a pin or similar object All settings are returned to their factory presets The LCD monitor is manufactured using high precision tech...

Page 62: ...a is transmitting image data via the IR communication system Appears while the camera is receiving image data via the IR communication system Appears when copying is impossible because there is not enough space at the destination Either make space at the destination or reduce the number of images to be copied Appears while image data is being copied Appears while a Compact Flash card or the built ...

Page 63: ...the camera to avoid battery leakage which can cause malfunctions to occur Do not use different kinds of batteries or old and new batteries together Do not expose the batteries to excessive heat as it may cause them to leak or explode Do not dispose of batteries in fire Do not shortcircuit the terminals Keep them away from metallic objects when not in use AC Power Adapter Optional 1 To prevent fire...

Page 64: ... metallic objects to enter the unit remove the batteries or disconnect the power supply while the power is on 2 Avoid using the unit in places subject to excessive humidity or dust in places subject to soot or steam such as near a cooking stove in places subject to excessive shock or vibration near a television set near appliances generating strong magnetic or electric fields speakers broadcasting...

Page 65: ...ther the front or back surface If the CD ROM gets dirty gently wipe it with a soft cloth outward from the centre hole using a circular motion Do not use conventional disc cleaners or cleaning spray Do not bend the CD ROM or touch its mirror surface Do not store your CD ROM in a dusty hot or humid environment Keep it away from direct sunlight Serious malfunctioning If malfunctioning occurs stop usi...

Page 66: ...35 mm camera Zoom 10X optical zoom Filter diameter 27 mm Aperture F number F1 6 Minimum subject distance Approx 7 cm with the zoom set all the way to W Approx 1 m with the zoom set all the way to T Photometry method TTL CCD photometry Shutter system Electronic shutter Shutter speeds Auto Manual 1 7 to 1 1000 sec White balance Auto Manual Fine Cloudy Halogen M W B Focusing Auto Manual 7 cm to Pictu...

Page 67: ...16 I Index playback pg 33 INDEX screen pg 32 Infrared image communication pg 50 51 Infrared transmitter receiver pg 51 IrDA transfer pg 50 IrTran P pg 50 M Manual focusing pg 26 Manual white balance M W B pg 22 23 Multi image screen pg 42 43 N Normal playback pg 31 P Picture Quality mode pg 15 Playback mode pg 31 Power Save mode pg 28 Power supply pg 8 9 Protecting images pg 34 35 S Self Timer pg ...

Page 68: ...GC S1 COPYRIGHT 1998 VICTOR COMPANY OF JAPAN LTD EG EK Printed in Japan 0398MNV UN VP VICTOR COMPANY OF JAPAN LIMITED EN ...

Reviews: