background image

17

3

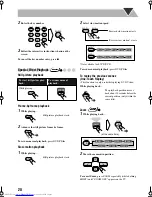
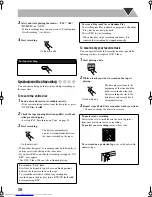
Adjust the parameter.

4

Repeat steps 

2

 to 

3

 to adjust other parameters.

To erase the screen, 

press VFP again while holding SHIFT.

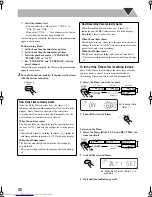
Setting the Clock

Without setting the built-in clock, you cannot use Daily 
Timers, Recording Timer (see page 31) and Sleep Timer.
• To correct a misentry during the process, press CANCEL 

or CLOCK/TIMER. You can return to the previous step.

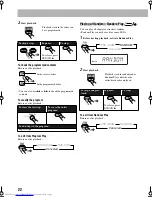
1

Activate the clock setting mode.

• If you have already adjusted the clock before, press the 

button repeatedly until the clock setting mode is 
selected.

2

Adjust the hour.

3

Adjust the minute.

Now the built-in clock starts working.

To check the current clock time during play

• While playing a DVD and MP3/WMA, you cannot check 

the current clock time (see page 9) .

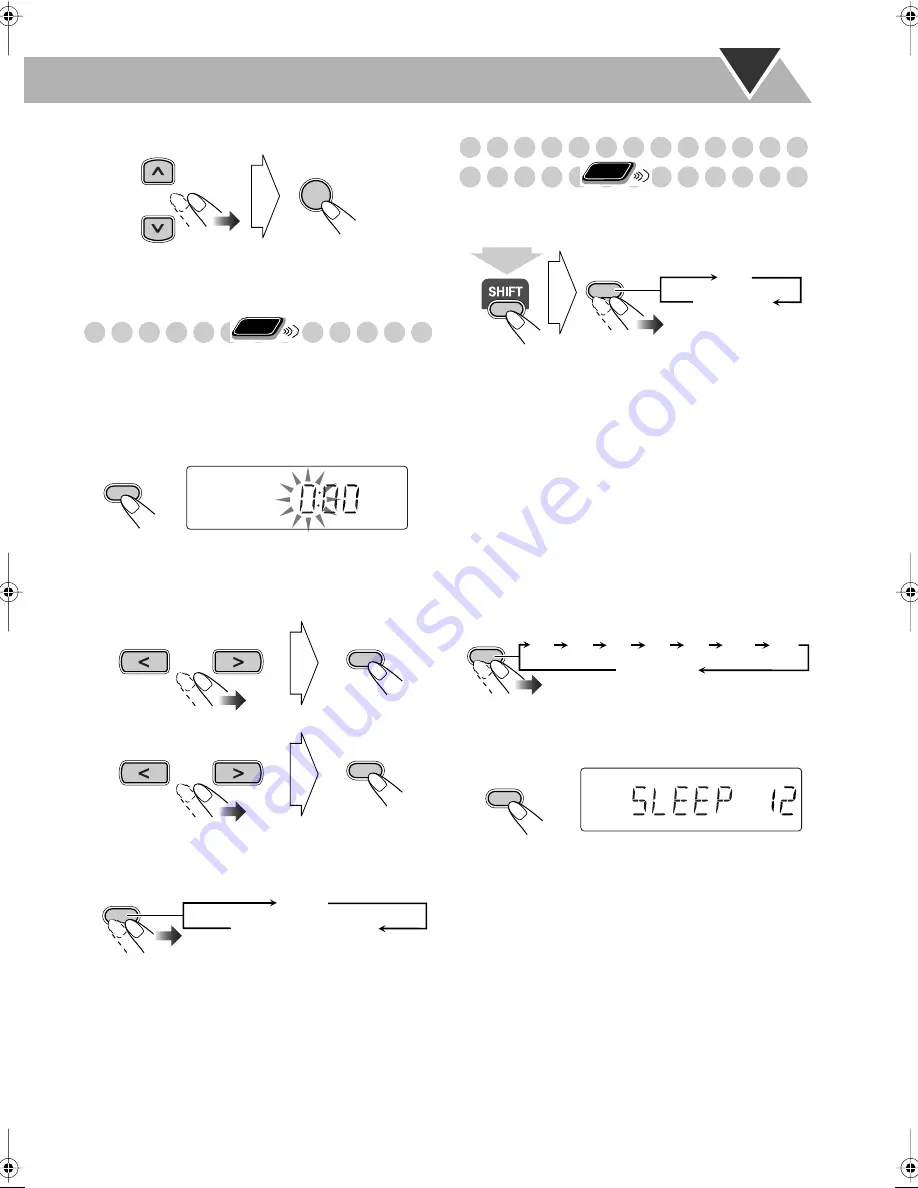
Turning Off the Power 

Automatically

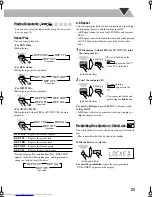
To turn off the unit after playback is over—Auto 
Standby

When Auto Standby is in use, the A.STANDBY indicator 
lights on the display.
When disc play stops, the A.STANDBY indicator starts 
flashing. If no operation is done for about 3 minutes while 
the indicator is flashing, the System turns off (stands by) 
automatically.
• Auto Standby does not work while you are listening to 

radio (FM/AM) and the external component (AUX).

To turn off the unit after a certain period of time
—Sleep Timer

1

Specify the time (in minutes).

2

Wait until the set time goes off.

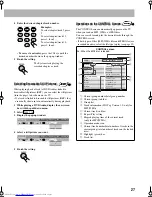
To check the time remaining until the shut-off time

• If you press the button repeatedly, you can change the shut-

off time.

ENTER

Remote
ONLY

CLOCK/

TIMER

SET

SET

DISPLAY

Clock

Source information

Remote
ONLY

SLEEP

A.STANDBY

On

Canceled

(at the same time)

SLEEP

A.STANDBY

10

20

30

60

90

120

Canceled

150

SLEEP

SLEEP

A.STANDBY

Basic.fm  Page 17  Friday, May 14, 2004  7:00 PM

Summary of Contents for CA-UXP450

Page 1: ... MICRO COMPONENT SYSTEM 微型組合音響 UX P450 Consists of CA UXP450 and SP UXP450 由 CA UXP450 及 SP UXP450 組成 INSTRUCTIONS 使用說明書 GVT0129 008A US UN SUPER VIDEO English 中 文 ...

Page 2: ...face Maintain an adequate air path for ventilation by placing on a stand with a height of 10 cm or more 注意 STANDBY ON 開關 無論 STANDBY ON 開關在任何位置 電源線的電源還是 沒有被切斷 若要將電源完全關閉 應把電源插頭拔离插座 所有的燈和信息均熄滅 當主機正處于備用狀態 STANDBY ON 燈為紅色 當主機開啟后 STANDBY ON 燈為綠色 電源開關可用遙控器控制 注意 為了減少触電 火災等危險 1 切勿擅自卸下螺絲釘 蓋子或機殼 2 切勿讓本機受雨淋或置潮濕環境中 鐳射產品的重要說明 1 一級鐳射產品 2 注意 切勿打開頂蓋板 本机內部沒有用戶可自行維修的部 件 所有維修工作應由有資格的人員完成 3 注意 當內部鎖定裝置失效或者損坏后 打開蓋板可能會產 ...

Page 3: ...ting the View Angle 18 Selecting the Subtitle Language 18 Selecting the Audio Track 19 Playing Back a Bonus Group 19 Special Effect Playback 20 Advanced Disc Operations 21 Programming the Playing Order Program Play 21 Playing at Random Random Play 22 Playing Repeatedly 23 Prohibiting Disc Ejection Child Lock 23 On Screen Disc Operations 24 On screen Bar Information 24 Operations Using the On scree...

Page 4: ...anual as simple and easy to understand as possible we have adapted the following methods Button and control operations are explained as listed in the table below Some related tips and notes are explained later in the sections Additional Information and Troubleshooting but not in the same section explaining the operations If you want to know more about the functions or if you have a doubt about the...

Page 5: ... Unpack the package and check the accessories Step 2 Prepare the remote control Step 3 Hook up the components such as AM FM antennas speakers etc see pages 4 to 6 Finally plug the AC power cord If the wall outlet does not match the AC plug use the supplied AC plug adaptor Now you can operate the System DO NOT use an old battery together with a new one DO NOT use different types of batteries togeth...

Page 6: ...White Red Optical digital cord not supplied Component video cord not supplied Red Blue Green AV COMPU LINK cord not supplied cord with monaural mini plug For details see AV COMPU LINK remote control system on page 6 Before connecting optical digital cord OR S video cord not supplied Composite video cord supplied Yellow OR VCR etc Remove the protective cap from the DVD OPTICAL DIGITAL OUT terminal ...

Page 7: ...wer cord only after all connections and selector settings on the rear are complete Before plugging in the System Set the correct voltage for your area with the voltage selector on the rear Use a screwdriver to rotate the voltage selector so that the voltage marker is pointing at the same voltage as where you are plugging in the unit See also the back cover page Voltage marker DO NOT plug in before...

Page 8: ...Setting the Video Output Selector You can select the video output to match it to the color system of your TV Changing the Scanning Mode This System supports progressive scanning If you connect a progressive TV through the COMPONENT jacks you can enjoy a high quality picture from the built in DVD player by selecting PROGRE DO NOT connect more than one speaker to each terminal DO NOT allow the condu...

Page 9: ...he downmixed sound from the speakers To enjoy the powerful sound of these multi channel encoded DVDs connect a proper decoder or an amplifier with a proper built in decoder to the digital output terminal on the rear Manufactured under license from Dolby Laboratories Dolby Pro Logic MLP Lossless and the double D symbol are trademarks of Dolby Laboratories DTS and DTS2 0 DIGITAL OUT are registered t...

Page 10: ...ors 2 3 tape direction Lights to indicate the current tape running direction Flashes slowly during playback and recording Flashes quickly while rewinding a tape reverse mode tape play continues endlessly tape automatically reverses once tape play stops at the end of one side 9Disc operation indicators RANDOM lights when Random Play is activated PRGM program lights when Program Play is activated re...

Page 11: ...D SVCD VCD PBC appears while playing a disc with PBC SVCD VCD Changes to PBC when stopping PBC playback MP3 WMA By pressing DISPLAY you can show the current group and track numbers for a few seconds MP3 WMA JPEG JPEG Elapsed playing time Current chapter no Total title no Elapsed playing time Current track no Total group no Group no Track no Elapsed playing time Current track no Total playing time ...

Page 12: ...is manual the operation using the remote control is mainly explained however you can use the buttons and controls on the main unit if they have the same or similar name and marks The STANDBY ON lamp on the main unit lights in red A small amount of power is always consumed even while on standby For private listening Connect a pair of headphones to the PHONES jack on the main unit The sound will no ...

Page 13: ...earching manually press either button If the received FM station is hard to listen The MONO indicator lights on the display Reception will improve though stereo effect is lost Monaural reception mode To restore the stereo effect press the button again the MONO indicator goes off To preset the stations You can preset 30 FM and 15 AM stations 1 Tune in to a station you want to preset You can also st...

Page 14: ...sert Close With the tape side facing outside To start To stop To rewind tape Before or after play Tape is played from the forward side to the reverse side When the reverse side is played back playback stops Tape is automatically reversed and playback repeats until you stop it Tape will not be reversed When the current side of the tape reaches its end playback stops IMPORTANT Before playing a disc ...

Page 15: ...RESUME on page 36 When operating the System the on screen guide icon see the following table appears on the TV To deactivate the on screen guide icons see ON SCREEN GUIDE on page 36 To select a title group While playing Group name appears for MP3 WMA discs To select a chapter track While playing To locate a particular portion While playing a disc except MP3 WMA No sound comes out while searching o...

Page 16: ...DVD CD 3 Examples To select number 5 press 5 To select number 15 press 10 then 5 To select number 30 press 10 10 then 10 ACTION Suitable for action movies and sports programs DRAMA Creates natural and warm sound Enjoy movies in a relaxed mood THEATER Enjoy sound effects like in a major theater Remote ONLY AUDIO ANGLE SUBTITLE ZOOM VFP FM MODE REV MODE DVD LEVEL 1 4 7 10 2 5 8 3 6 9 10 3D PHONIC Ca...

Page 17: ...ofer level To adjust the tone You can adjust the bass and treble level from 5 to 5 To adjust the bass To adjust the treble RHYTHM AX VOLUME SLEEP A STANDBY SET ENTER DISPLAY CLOCK TIMER BASS TREBLE VFP DVD LEVEL DIMMER SHIFT FADE MUTING RHYTHM AX VOLUME Remote control Main unit Remote control Main unit To restore the volume press again or adjust the volume level VOLUME VOLUME Remote ONLY FADE MUTI...

Page 18: ... parameter you want to adjust NORMAL Original recording level MIDDLE Output level is increased less than HIGH HIGH Output level is increased more than MIDDLE DIM1 Dims the display DIM2 Erases the display illumination AUTO DIM Erases the display illumination when disc playback starts The display illuminates when playback stops Remote ONLY DVD LEVEL 5 NORMAL MIDDLE HIGH at the same time Remote ONLY ...

Page 19: ...ime see page 9 Turning Off the Power Automatically To turn off the unit after playback is over Auto Standby When Auto Standby is in use the A STANDBY indicator lights on the display When disc play stops the A STANDBY indicator starts flashing If no operation is done for about 3 minutes while the indicator is flashing the System turns off stands by automatically Auto Standby does not work while you...

Page 20: ... containing subtitles in different languages you can select the subtitle language to display on the TV For SVCD While playing you can select the subtitles even if no subtitles are recorded on the disc You can also select the subtitle language using the on screen bar see page 24 While playing a DVD Video 1 Display the subtitle selection window ANGLE ENTER SLOW 10 keys AUDIO ZOOM 8 7 SUB TITLE SHIFT...

Page 21: ...up called bonus group whose contents are not open to the public To play back a bonus group you have to enter the specific key number a kind of password for the bonus group The way of getting the key number depends on the disc 1 Select the bonus group The bonus group is usually recorded as the last group for example if a disc contains 4 groups including a bonus group group 4 is the bonus group For ...

Page 22: ...eo While playing back Zoom 1 While playing back 2 Move the zoomed in position To cancel Zoom press ZOOM repeatedly while holding SHIFT until ZOOM OFF appears on the TV To start still picture play back To resume normal playback While playing Still picture playback starts Still picture playback starts AUDIO ANGLE SUBTITLE ZOOM VFP FM MODE REV MODE DVD LEVEL PROGRESSIVE 1 4 7 0 2 5 8 3 6 9 ENTER Remo...

Page 23: ...e steps 1 and 2 For SVCD VCD CD 1 Select tracks 4 7 DVD CD 3 0 8 7 SHIFT 10 keys CANCEL REPEAT ENTER DVD CD 3 PLAY MODE 4 REPEAT A B Remote control Main unit To enter the numbers directly Examples To enter number 5 press 5 To enter number 15 press 10 then 5 To enter number 30 press 10 10 then 10 Remote ONLY PLAY MODE PROGRAM RANDOM Canceled PRGM USE NUMERIC KEYS TO PROGRAM TRACKS USE CANCEL TO DEL...

Page 24: ...ayback To exit from Random Play Before or after playback Playback starts in the order you have programmed To skip a step To pause To stop To release press DVD CD 3 To erase the last step To erase the entire program To add steps in the program Repeat step 2 DVD CD GROUP TITLE In the programmed order In the reverse order CANCEL RETURN PLAY MODE PROGRAM RANDOM Canceled Playback starts in random order...

Page 25: ...EAT A B again while holding SHIFT A B Repeat will also be canceled when you stop play or skip the chapter or track Prohibiting Disc Ejection Child Lock You can lock the disc tray so that no one can eject the loaded disc This is possible while the System is on standby While the disc tray is closed To cancel the prohibition repeat the same procedure UNLOCKED appears on the display REP CHAP Repeats t...

Page 26: ...deo DVD Audio SVCD 2 OFF 1 3 1 3 1 3 TIME 4 TITLE 14 TOTAL1 25 58 CHAP 23 VCD TIME OFF ST TIME 00 58 TRACK 3 1 3 VCD CD 1 Disc type 2 Playback information Indication Meanings Mbps Current transfer rate Megabits per second Current title Current chapter Current group Current track Time indications 3 Operation modes Indication Meanings Playback Forward Reverse search Forward Reverse slow motion Pause...

Page 27: ...LY ON SCREEN Goes off OFF 1 3 1 3 1 3 TIME DVD VIDEO TITLE 2 TIME 0 00 58 CHAP 3 8 5Mbps TITLE 14 TOTAL1 25 58 CHAP 23 DVD VIDEO TITLE 2 TIME OFF CHAP 1 3 1 3 1 1 TIME 0 00 58 CHAP 3 8 5Mbps OFF 1 3 1 3 1 3 TIME TITLE 14 TOTAL1 25 58 CHAP 23 DVD VIDEO TITLE 2 TIME OFF CHAP 1 3 1 3 1 1 TIME 0 00 58 CHAP 3 8 5Mbps ENTER 1 3 1 3 1 3 TITLE 14 TOTAL1 25 58 CHAP 23 TITLE 2 1 3 1 3 1 1 TIME 0 00 58 CHAP ...

Page 28: ...ect or 3 Display the pop up window A B Repeats a desired portion see below TITLE Repeats the current title GROUP Repeats the current group ALL Repeats the disc except for DVD or program CHAPTER Repeats the current chapter TRACK Repeats the current track OFF Cancels Repeat Play A B Repeat starts The selected portion plays repeatedly Before pressing ENTER you can search for the end point using the b...

Page 29: ...apter track 5 press 5 To select chapter track 15 press 1 then 5 To select chapter track 30 press 3 then 0 The System starts playing the searched chapter or track AUDIO ANGLE SUBTITLE ZOOM VFP FM MODE REV MODE DVD LEVEL PROGRESSIVE 1 4 7 0 2 5 8 3 6 9 ENTER Remote ONLY PAGE 1 5 OFF 1 3 TIME TRACK DVD AUDIO GROUP 14 TIME 0 00 58 TRACK 23 1 5 PAGE 1 OFF 1 3 TIME TRACK DVD AUDIO GROUP 14 TIME 0 00 58 ...

Page 30: ...s ZOOM repeatedly while holding SHIFT until ZOOM OFF appears on the TV Move the highlight bar to a desired item If you move the highlight bar while playing back an MP3 WMA disc the selected track starts playback automatically For MP3 WMA Playback starts with the selected track Pressing DVD CD 3 also starts playback For JPEG The selected track still picture is displayed until you change it Slide sh...

Page 31: ... MODE TAPE 2 3 7 DVD CD 3 AUX FM AM REC 7 DVD CD 3 PUSH OPEN 0 TAPE 2 3 AUX FM AM Remote control Main unit IMPORTANT It may be unlawful to record or play back copyrighted material without the consent of the copyright owner To record on both sides When using Reverse Mode start recording in the forward 3 direction To record on only one side With the tape side facing outside Push Insert Close Tape di...

Page 32: ...tape is playing 3 Repeat steps 2 and 3 to record other tracks you want You can exchange the discs if necessary To stop recording On the main unit The System automatically creates 4 second blanks between the tunes recorded on the tapes To record a Live disc It will not be desirable to put 4 second blank portions between the tunes recorded on the tape To record the entire disc without any interrupti...

Page 33: ...wing operations until you finish setting in the following order For Daily Timers 1 Set the hour then the minute for on time 2 Set the hour then the minute for off time 3 Select the playback source TUNER FM TUNER AM TAPE DISC or AUX 4 For TUNER FM and TUNER AM Select a preset channel For DISC Select the title group number then the chapter track number CANCEL STANDBY ON CLOCK TIMER SET Remote contro...

Page 34: ...r is activated at the same time everyday until the timer is turned off manually see the next column or another timer is activated When the on time comes The System turns on starts playing the specified source except AUX and sets the volume level to the preset level While Daily Timer is working the timer indicator and timer number indicator 1 2 3 flash on the display When the off time comes The Sys...

Page 35: ... Menu 2 PICTURE Setup Menu 3 AUDIO Setup Menu 4 OTHERS Setup Menu Remote ONLY MENU SET UP ENGLISH ENGLISH ENGLISH ENGLISH LANGUAGE MENU LANGUAGE ON SCREEN LANGUAGE AUDIO LANGUAGE SUBTITLE USE TO SELECT USE ENTER TO CONFIRM TO EXIT PRESS SET UP ENTER SELECT at the same time 4 3 LB AUTO PICTURE MONITOR TYPE PICTURE SOURCE ON AUDIO SCREEN SAVER FILE TYPE USE TO SELECT USE ENTER TO CONFIRM TO EXIT PRE...

Page 36: ...monitor type of your TV to play DVD Video recorded with aspect ratio of 16 9 For the multi color system TV When you use a multi color system TV you can change the color system of the System automatically by selecting MULTI options for the monitor type In this case the color system of the System is changed to match to that of the loaded disc regardless of the VIDEO OUT SELECT setting see page 6 Sel...

Page 37: ...TPUT is set to PCM ONLY from this System Select one of the following AUTO Normally select this When playing back a disc containing both video and film sources the System automatically changes the processing to match it to the picture type film or video source of the current chapter FILM To play a film source disc VIDEO To play a video source disc ON The pictures on the TV becomes dark when no oper...

Page 38: ...ape Select one of the following AV COMPULINK MODE When connecting the System to a JVC s TV with the AV COMPU LINK remote control system select the proper setting Select one of the following For details see AV COMPU LINK remote control system on page 6 PARENTAL LOCK Select this to enter the PARENTAL LOCK submenu See the section that follows AUTO To enjoy powerful sounds with full dynamic range ON B...

Page 39: ...ed then enter any 4 digit number for your password 10 Finish the setting Remote ONLY MENU SET UP ENGLISH ENGLISH ENGLISH ENGLISH LANGUAGE MENU LANGUAGE ON SCREEN LANGUAGE AUDIO LANGUAGE SUBTITLE USE TO SELECT USE ENTER TO CONFIRM TO EXIT PRESS SET UP ENTER SELECT at the same time ON ON OTHERS RESUME ON SCREEN GUIDE DVD1 PARENTAL LOCK AV COMPULINK MODE USE TO SELECT USE ENTER TO CONFIRM TO EXIT PRE...

Page 40: ... some discs may not be played back at all When you try to play such a disc the following screen appears on the TV 1 Select TEMPORARY RELEASE then ENTER If you do not play back such a disc select NOT RELEASE then ENTER Then eject the disc 2 Enter your password If you enter a wrong password three times NOT RELEASE is automatically selected In this case press ENTER Then eject the disc MY 4 _ _ _ _ PA...

Page 41: ... made at bit rate of less than 64 kbps This System can recognize the total of 1000 tracks and of 99 groups each group can contain up to 150 tracks Those exceeding the maximum number cannot be recognized Playback order of MP3 WMA tracks may be different from the one you have intended while recording see page 40 If a folder does not include MP3 WMA tracks they are ignored When using an 8 cm disc pla...

Page 42: ...ing recording with Reverse Mode set to the last tune will be re recorded at the beginning of the reverse side Timer Operations see pages 31 to 32 When using an external component AUX for the playback source set the timer built in the component at the same time Before turning off the power do not forget to prepare the required materials a disc or tape for playback and a recordable tape for recordin...

Page 43: ...ch the tape surface Avoid the following places to store the tape in dusty places in direct sunlight or heat in moist areas on a TV or speaker or near a magnet To keep the best recording and playback sound quality Use a cotton swab moistened with alcohol to clean the heads capstans and pinch rollers Use a head demagnetizer available at electronics and audio shops to demagnetize the heads when the S...

Page 44: ...PEG tracks are not played back The inserted disc may include both type of tracks MP3 WMA files and JPEG files In this case you can only play back the files selected by the FILE TYPE setting see page 35 You have changed the FILE TYPE setting after you inserted a disc In this case reload the disc NO AUDIO appears This System cannot play back illegally produced DVD Audio discs LR ONLY appears Some DV...

Page 45: ...ada KO Korean KOR KS Kashmiri KU Kurdish KY Kirghiz LA Latin LN Lingala LO Laothian LT Lithuanian LV Latvian Lettish MG Malagasy MI Maori MK Macedonian ML Malayalam MN Mongolian MO Moldavian MR Marathi MS Malay MAY MT Maltese MY Burmese NA Nauru NE Nepali NL Dutch NO Norwegian OC Occitan OM Afan Oromo OR Oriya PA Panjabi PL Polish PS Pashto Pushto PT Portuguese QU Quechua RM Rhaeto Romance RN Kiru...

Page 46: ...tan GA Gabon GB United Kingdom GD Grenada GE Georgia GF French Guiana GH Ghana GI Gibraltar GL Greenland GM Gambia GN Guinea GP Guadeloupe GQ Equatorial Guinea GR Greece GS South Georgia and the South Sandwich GT Guatemala GU Guam GW Guinea Bissau GY Guyana HK Hong Kong HM Heard Island and McDonald Islands HN Honduras HR Croatia HT Haiti HU Hungary ID Indonesia IE Ireland IL Israel IN India IO Bri...

Page 47: ...the Grenadines VE Venezuela VG Virgin Islands British VI Virgin Islands U S VN Vietnam VU Vanuatu WF Wallis and Futuna Islands WS Samoa YE Yemen YT Mayotte YU Yugoslavia ZA South Africa ZM Zambia ZR Zaire ZW Zimbabwe DVD OPTICAL DIGITAL OUT Signals While playing some DVDs digital signals may be emitted at 20 bits or 24 bits at their original bit rate through the DVD OPTICAL DIGITAL OUT terminal if...

Page 48: ...cone x 1 Impedance 4 Ω Dimensions approx 145 mm x 230 mm x 191 mm W H D Mass approx 2 2 kg each Supplied Accessories See page 3 General Power requirement AC 110 V AC 127 V AC 220 V AC 230 V AC 240 V adjustable with the voltage selector 50 Hz 60 Hz Power consumption 65 W at operation 4 1 W on standby Dimensions approx 170 mm x 230 mm x 311 mm W H D Mass approx 4 8 kg Parts Index Refer to the pages ...

Page 49: ...UT VIDEO OUT SELECT PAL NTSC PU SH OP EN AU TO RE VE RS E CAUTION for mains AC line BEFORE PLUGGING IN do check that your mains AC line voltage corresponds with the position of the voltage selector switch provided on the outside of this equipment and if different reset the voltage selector switch to prevent from a damage or risk of fire electric shock 有關主 AC 電源線路的重要事項 接插電源以前 務請檢查當地的主 AC 電 源線路電壓是否和...

Page 50: ...MICRO COMPONENT SYSTEM UX P450 Consists of CA UXP450 and SP UXP450 INSTRUCTIONS GVT0129 009A UX SUPER VIDEO English ...

Page 51: ...t the power off completely all lamps and indications go off The STANDBY ON button in any position does not disconnect the mains line When the unit is on standby the STANDBY ON lamp lights in red When the unit is turned on the STANDBY ON lamp lights in green The power can be remote controlled ...

Page 52: ... by a newspaper or cloth etc the heat may not be able to get out Do not place any naked flame sources such as lighted candles on the apparatus When discarding batteries environmental problems must be considered and local rules or laws governing the disposal of these batteries must be followed strictly Do not expose this apparatus to rain moisture dripping or splashing and that no objects filled wi...

Page 53: ...osure to beam 4 REPRODUCTION OF LABEL CAUTION LABEL PLACED INSIDE THE UNIT Caution Proper Ventilation To avoid risk of electric shock and fire and to prevent damage locate the apparatus as follows 1 Front No obstructions and open spacing 2 Sides Top Back No obstructions should be placed in the areas shown by the dimensions below 3 Bottom Place on the level surface Maintain an adequate air path for...

Page 54: ...ting the View Angle 18 Selecting the Subtitle Language 18 Selecting the Audio Track 19 Playing Back a Bonus Group 19 Special Effect Playback 20 Advanced Disc Operations 21 Programming the Playing Order Program Play 21 Playing at Random Random Play 22 Playing Repeatedly 23 Prohibiting Disc Ejection Child Lock 23 On Screen Disc Operations 24 On screen Bar Information 24 Operations Using the On scree...

Page 55: ...anual as simple and easy to understand as possible we have adapted the following methods Button and control operations are explained as listed in the table below Some related tips and notes are explained later in the sections Additional Information and Troubleshooting but not in the same section explaining the operations If you want to know more about the functions or if you have a doubt about the...

Page 56: ... Unpack the package and check the accessories Step 2 Prepare the remote control Step 3 Hook up the components such as AM FM antennas speakers etc see pages 4 to 6 Finally plug the AC power cord If the wall outlet does not match the AC plug use the supplied AC plug adaptor Now you can operate the System DO NOT use an old battery together with a new one DO NOT use different types of batteries togeth...

Page 57: ...White Red Optical digital cord not supplied Component video cord not supplied Red Blue Green AV COMPU LINK cord not supplied cord with monaural mini plug For details see AV COMPU LINK remote control system on page 6 Before connecting optical digital cord OR S video cord not supplied Composite video cord supplied Yellow OR VCR etc Remove the protective cap from the DVD OPTICAL DIGITAL OUT terminal ...

Page 58: ...wer cord only after all connections and selector settings on the rear are complete Before plugging in the System Set the correct voltage for your area with the voltage selector on the rear Use a screwdriver to rotate the voltage selector so that the voltage marker is pointing at the same voltage as where you are plugging in the unit See also the back cover page Voltage marker DO NOT plug in before...

Page 59: ...Setting the Video Output Selector You can select the video output to match it to the color system of your TV Changing the Scanning Mode This System supports progressive scanning If you connect a progressive TV through the COMPONENT jacks you can enjoy a high quality picture from the built in DVD player by selecting PROGRE DO NOT connect more than one speaker to each terminal DO NOT allow the condu...

Page 60: ...he downmixed sound from the speakers To enjoy the powerful sound of these multi channel encoded DVDs connect a proper decoder or an amplifier with a proper built in decoder to the digital output terminal on the rear Manufactured under license from Dolby Laboratories Dolby Pro Logic MLP Lossless and the double D symbol are trademarks of Dolby Laboratories DTS and DTS2 0 DIGITAL OUT are registered t...

Page 61: ...ors 2 3 tape direction Lights to indicate the current tape running direction Flashes slowly during playback and recording Flashes quickly while rewinding a tape reverse mode tape play continues endlessly tape automatically reverses once tape play stops at the end of one side 9Disc operation indicators RANDOM lights when Random Play is activated PRGM program lights when Program Play is activated re...

Page 62: ...D SVCD VCD PBC appears while playing a disc with PBC SVCD VCD Changes to PBC when stopping PBC playback MP3 WMA By pressing DISPLAY you can show the current group and track numbers for a few seconds MP3 WMA JPEG JPEG Elapsed playing time Current chapter no Total title no Elapsed playing time Current track no Total group no Group no Track no Elapsed playing time Current track no Total playing time ...

Page 63: ...is manual the operation using the remote control is mainly explained however you can use the buttons and controls on the main unit if they have the same or similar name and marks The STANDBY ON lamp on the main unit lights in red A small amount of power is always consumed even while on standby For private listening Connect a pair of headphones to the PHONES jack on the main unit The sound will no ...

Page 64: ...earching manually press either button If the received FM station is hard to listen The MONO indicator lights on the display Reception will improve though stereo effect is lost Monaural reception mode To restore the stereo effect press the button again the MONO indicator goes off To preset the stations You can preset 30 FM and 15 AM stations 1 Tune in to a station you want to preset You can also st...

Page 65: ...sert Close With the tape side facing outside To start To stop To rewind tape Before or after play Tape is played from the forward side to the reverse side When the reverse side is played back playback stops Tape is automatically reversed and playback repeats until you stop it Tape will not be reversed When the current side of the tape reaches its end playback stops IMPORTANT Before playing a disc ...

Page 66: ...RESUME on page 36 When operating the System the on screen guide icon see the following table appears on the TV To deactivate the on screen guide icons see ON SCREEN GUIDE on page 36 To select a title group While playing Group name appears for MP3 WMA discs To select a chapter track While playing To locate a particular portion While playing a disc except MP3 WMA No sound comes out while searching o...

Page 67: ...DVD CD 3 Examples To select number 5 press 5 To select number 15 press 10 then 5 To select number 30 press 10 10 then 10 ACTION Suitable for action movies and sports programs DRAMA Creates natural and warm sound Enjoy movies in a relaxed mood THEATER Enjoy sound effects like in a major theater Remote ONLY AUDIO ANGLE SUBTITLE ZOOM VFP FM MODE REV MODE DVD LEVEL 1 4 7 10 2 5 8 3 6 9 10 3D PHONIC Ca...

Page 68: ...ofer level To adjust the tone You can adjust the bass and treble level from 5 to 5 To adjust the bass To adjust the treble RHYTHM AX VOLUME SLEEP A STANDBY SET ENTER DISPLAY CLOCK TIMER BASS TREBLE VFP DVD LEVEL DIMMER SHIFT FADE MUTING RHYTHM AX VOLUME Remote control Main unit Remote control Main unit To restore the volume press again or adjust the volume level VOLUME VOLUME Remote ONLY FADE MUTI...

Page 69: ... parameter you want to adjust NORMAL Original recording level MIDDLE Output level is increased less than HIGH HIGH Output level is increased more than MIDDLE DIM1 Dims the display DIM2 Erases the display illumination AUTO DIM Erases the display illumination when disc playback starts The display illuminates when playback stops Remote ONLY DVD LEVEL 5 NORMAL MIDDLE HIGH at the same time Remote ONLY ...

Page 70: ...ime see page 9 Turning Off the Power Automatically To turn off the unit after playback is over Auto Standby When Auto Standby is in use the A STANDBY indicator lights on the display When disc play stops the A STANDBY indicator starts flashing If no operation is done for about 3 minutes while the indicator is flashing the System turns off stands by automatically Auto Standby does not work while you...

Page 71: ... containing subtitles in different languages you can select the subtitle language to display on the TV For SVCD While playing you can select the subtitles even if no subtitles are recorded on the disc You can also select the subtitle language using the on screen bar see page 24 While playing a DVD Video 1 Display the subtitle selection window ANGLE ENTER SLOW 10 keys AUDIO ZOOM 8 7 SUB TITLE SHIFT...

Page 72: ...up called bonus group whose contents are not open to the public To play back a bonus group you have to enter the specific key number a kind of password for the bonus group The way of getting the key number depends on the disc 1 Select the bonus group The bonus group is usually recorded as the last group for example if a disc contains 4 groups including a bonus group group 4 is the bonus group For ...

Page 73: ...eo While playing back Zoom 1 While playing back 2 Move the zoomed in position To cancel Zoom press ZOOM repeatedly while holding SHIFT until ZOOM OFF appears on the TV To start still picture play back To resume normal playback While playing Still picture playback starts Still picture playback starts AUDIO ANGLE SUBTITLE ZOOM VFP FM MODE REV MODE DVD LEVEL PROGRESSIVE 1 4 7 0 2 5 8 3 6 9 ENTER Remo...

Page 74: ...e steps 1 and 2 For SVCD VCD CD 1 Select tracks 4 7 DVD CD 3 0 8 7 SHIFT 10 keys CANCEL REPEAT ENTER DVD CD 3 PLAY MODE 4 REPEAT A B Remote control Main unit To enter the numbers directly Examples To enter number 5 press 5 To enter number 15 press 10 then 5 To enter number 30 press 10 10 then 10 Remote ONLY PLAY MODE PROGRAM RANDOM Canceled PRGM USE NUMERIC KEYS TO PROGRAM TRACKS USE CANCEL TO DEL...

Page 75: ...ayback To exit from Random Play Before or after playback Playback starts in the order you have programmed To skip a step To pause To stop To release press DVD CD 3 To erase the last step To erase the entire program To add steps in the program Repeat step 2 DVD CD GROUP TITLE In the programmed order In the reverse order CANCEL RETURN PLAY MODE PROGRAM RANDOM Canceled Playback starts in random order...

Page 76: ...EAT A B again while holding SHIFT A B Repeat will also be canceled when you stop play or skip the chapter or track Prohibiting Disc Ejection Child Lock You can lock the disc tray so that no one can eject the loaded disc This is possible while the System is on standby While the disc tray is closed To cancel the prohibition repeat the same procedure UNLOCKED appears on the display REP CHAP Repeats t...

Page 77: ...deo DVD Audio SVCD 2 OFF 1 3 1 3 1 3 TIME 4 TITLE 14 TOTAL1 25 58 CHAP 23 VCD TIME OFF ST TIME 00 58 TRACK 3 1 3 VCD CD 1 Disc type 2 Playback information Indication Meanings Mbps Current transfer rate Megabits per second Current title Current chapter Current group Current track Time indications 3 Operation modes Indication Meanings Playback Forward Reverse search Forward Reverse slow motion Pause...

Page 78: ...LY ON SCREEN Goes off OFF 1 3 1 3 1 3 TIME DVD VIDEO TITLE 2 TIME 0 00 58 CHAP 3 8 5Mbps TITLE 14 TOTAL1 25 58 CHAP 23 DVD VIDEO TITLE 2 TIME OFF CHAP 1 3 1 3 1 1 TIME 0 00 58 CHAP 3 8 5Mbps OFF 1 3 1 3 1 3 TIME TITLE 14 TOTAL1 25 58 CHAP 23 DVD VIDEO TITLE 2 TIME OFF CHAP 1 3 1 3 1 1 TIME 0 00 58 CHAP 3 8 5Mbps ENTER 1 3 1 3 1 3 TITLE 14 TOTAL1 25 58 CHAP 23 TITLE 2 1 3 1 3 1 1 TIME 0 00 58 CHAP ...

Page 79: ...ect or 3 Display the pop up window A B Repeats a desired portion see below TITLE Repeats the current title GROUP Repeats the current group ALL Repeats the disc except for DVD or program CHAPTER Repeats the current chapter TRACK Repeats the current track OFF Cancels Repeat Play A B Repeat starts The selected portion plays repeatedly Before pressing ENTER you can search for the end point using the b...

Page 80: ...apter track 5 press 5 To select chapter track 15 press 1 then 5 To select chapter track 30 press 3 then 0 The System starts playing the searched chapter or track AUDIO ANGLE SUBTITLE ZOOM VFP FM MODE REV MODE DVD LEVEL PROGRESSIVE 1 4 7 0 2 5 8 3 6 9 ENTER Remote ONLY PAGE 1 5 OFF 1 3 TIME TRACK DVD AUDIO GROUP 14 TIME 0 00 58 TRACK 23 1 5 PAGE 1 OFF 1 3 TIME TRACK DVD AUDIO GROUP 14 TIME 0 00 58 ...

Page 81: ...s ZOOM repeatedly while holding SHIFT until ZOOM OFF appears on the TV Move the highlight bar to a desired item If you move the highlight bar while playing back an MP3 WMA disc the selected track starts playback automatically For MP3 WMA Playback starts with the selected track Pressing DVD CD 3 also starts playback For JPEG The selected track still picture is displayed until you change it Slide sh...

Page 82: ... MODE TAPE 2 3 7 DVD CD 3 AUX FM AM REC 7 DVD CD 3 PUSH OPEN 0 TAPE 2 3 AUX FM AM Remote control Main unit IMPORTANT It may be unlawful to record or play back copyrighted material without the consent of the copyright owner To record on both sides When using Reverse Mode start recording in the forward 3 direction To record on only one side With the tape side facing outside Push Insert Close Tape di...

Page 83: ...tape is playing 3 Repeat steps 2 and 3 to record other tracks you want You can exchange the discs if necessary To stop recording On the main unit The System automatically creates 4 second blanks between the tunes recorded on the tapes To record a Live disc It will not be desirable to put 4 second blank portions between the tunes recorded on the tape To record the entire disc without any interrupti...

Page 84: ...wing operations until you finish setting in the following order For Daily Timers 1 Set the hour then the minute for on time 2 Set the hour then the minute for off time 3 Select the playback source TUNER FM TUNER AM TAPE DISC or AUX 4 For TUNER FM and TUNER AM Select a preset channel For DISC Select the title group number then the chapter track number CANCEL STANDBY ON CLOCK TIMER SET Remote contro...

Page 85: ...r is activated at the same time everyday until the timer is turned off manually see the next column or another timer is activated When the on time comes The System turns on starts playing the specified source except AUX and sets the volume level to the preset level While Daily Timer is working the timer indicator and timer number indicator 1 2 3 flash on the display When the off time comes The Sys...

Page 86: ... Menu 2 PICTURE Setup Menu 3 AUDIO Setup Menu 4 OTHERS Setup Menu Remote ONLY MENU SET UP ENGLISH ENGLISH ENGLISH ENGLISH LANGUAGE MENU LANGUAGE ON SCREEN LANGUAGE AUDIO LANGUAGE SUBTITLE USE TO SELECT USE ENTER TO CONFIRM TO EXIT PRESS SET UP ENTER SELECT at the same time 4 3 LB AUTO PICTURE MONITOR TYPE PICTURE SOURCE ON AUDIO SCREEN SAVER FILE TYPE USE TO SELECT USE ENTER TO CONFIRM TO EXIT PRE...

Page 87: ...monitor type of your TV to play DVD Video recorded with aspect ratio of 16 9 For the multi color system TV When you use a multi color system TV you can change the color system of the System automatically by selecting MULTI options for the monitor type In this case the color system of the System is changed to match to that of the loaded disc regardless of the VIDEO OUT SELECT setting see page 6 Sel...

Page 88: ...TPUT is set to PCM ONLY from this System Select one of the following AUTO Normally select this When playing back a disc containing both video and film sources the System automatically changes the processing to match it to the picture type film or video source of the current chapter FILM To play a film source disc VIDEO To play a video source disc ON The pictures on the TV becomes dark when no oper...

Page 89: ...ape Select one of the following AV COMPULINK MODE When connecting the System to a JVC s TV with the AV COMPU LINK remote control system select the proper setting Select one of the following For details see AV COMPU LINK remote control system on page 6 PARENTAL LOCK Select this to enter the PARENTAL LOCK submenu See the section that follows AUTO To enjoy powerful sounds with full dynamic range ON B...

Page 90: ...ed then enter any 4 digit number for your password 10 Finish the setting Remote ONLY MENU SET UP ENGLISH ENGLISH ENGLISH ENGLISH LANGUAGE MENU LANGUAGE ON SCREEN LANGUAGE AUDIO LANGUAGE SUBTITLE USE TO SELECT USE ENTER TO CONFIRM TO EXIT PRESS SET UP ENTER SELECT at the same time ON ON OTHERS RESUME ON SCREEN GUIDE DVD1 PARENTAL LOCK AV COMPULINK MODE USE TO SELECT USE ENTER TO CONFIRM TO EXIT PRE...

Page 91: ... some discs may not be played back at all When you try to play such a disc the following screen appears on the TV 1 Select TEMPORARY RELEASE then ENTER If you do not play back such a disc select NOT RELEASE then ENTER Then eject the disc 2 Enter your password If you enter a wrong password three times NOT RELEASE is automatically selected In this case press ENTER Then eject the disc SA 4 _ _ _ _ PA...

Page 92: ... made at bit rate of less than 64 kbps This System can recognize the total of 1000 tracks and of 99 groups each group can contain up to 150 tracks Those exceeding the maximum number cannot be recognized Playback order of MP3 WMA tracks may be different from the one you have intended while recording see page 40 If a folder does not include MP3 WMA tracks they are ignored When using an 8 cm disc pla...

Page 93: ...ing recording with Reverse Mode set to the last tune will be re recorded at the beginning of the reverse side Timer Operations see pages 31 to 32 When using an external component AUX for the playback source set the timer built in the component at the same time Before turning off the power do not forget to prepare the required materials a disc or tape for playback and a recordable tape for recordin...

Page 94: ...ch the tape surface Avoid the following places to store the tape in dusty places in direct sunlight or heat in moist areas on a TV or speaker or near a magnet To keep the best recording and playback sound quality Use a cotton swab moistened with alcohol to clean the heads capstans and pinch rollers Use a head demagnetizer available at electronics and audio shops to demagnetize the heads when the S...

Page 95: ...PEG tracks are not played back The inserted disc may include both type of tracks MP3 WMA files and JPEG files In this case you can only play back the files selected by the FILE TYPE setting see page 35 You have changed the FILE TYPE setting after you inserted a disc In this case reload the disc NO AUDIO appears This System cannot play back illegally produced DVD Audio discs LR ONLY appears Some DV...

Page 96: ...ada KO Korean KOR KS Kashmiri KU Kurdish KY Kirghiz LA Latin LN Lingala LO Laothian LT Lithuanian LV Latvian Lettish MG Malagasy MI Maori MK Macedonian ML Malayalam MN Mongolian MO Moldavian MR Marathi MS Malay MAY MT Maltese MY Burmese NA Nauru NE Nepali NL Dutch NO Norwegian OC Occitan OM Afan Oromo OR Oriya PA Panjabi PL Polish PS Pashto Pushto PT Portuguese QU Quechua RM Rhaeto Romance RN Kiru...

Page 97: ...tan GA Gabon GB United Kingdom GD Grenada GE Georgia GF French Guiana GH Ghana GI Gibraltar GL Greenland GM Gambia GN Guinea GP Guadeloupe GQ Equatorial Guinea GR Greece GS South Georgia and the South Sandwich GT Guatemala GU Guam GW Guinea Bissau GY Guyana HK Hong Kong HM Heard Island and McDonald Islands HN Honduras HR Croatia HT Haiti HU Hungary ID Indonesia IE Ireland IL Israel IN India IO Bri...

Page 98: ...the Grenadines VE Venezuela VG Virgin Islands British VI Virgin Islands U S VN Vietnam VU Vanuatu WF Wallis and Futuna Islands WS Samoa YE Yemen YT Mayotte YU Yugoslavia ZA South Africa ZM Zambia ZR Zaire ZW Zimbabwe DVD OPTICAL DIGITAL OUT Signals While playing some DVDs digital signals may be emitted at 20 bits or 24 bits at their original bit rate through the DVD OPTICAL DIGITAL OUT terminal if...

Page 99: ...m cone x 1 Impedance 4 Ω Dimensions approx 145 mm x 230 mm x 191 mm W H D Mass approx 1 8 kg each Supplied Accessories See page 3 General Power requirement AC 110 V AC 127 V AC 220 V AC 230 V AC 240 V adjustable with the voltage selector 50 Hz 60 Hz Power consumption 65 W at operation 4 1 W on standby Dimensions approx 170 mm x 230 mm x 311 mm W H D Mass approx 4 8 kg Parts Index Refer to the page...

Page 100: ...B PR S VIDEO VIDEO VIDEO OUT VIDEO OUT SELECT PAL NTSC PU SH OP EN AU TO RE VE RS E CAUTION for mains AC line BEFORE PLUGGING IN do check that your mains AC line voltage corresponds with the position of the voltage selector switch provided on the outside of this equipment and if different reset the voltage selector switch to prevent from a damage or risk of fire electric shock ...

Page 101: ... MICRO COMPONENT SYSTEM 微型組合音響 UX P450 Consists of CA UXP450 and SP UXP450 由 CA UXP450 及 SP UXP450 組成 INSTRUCTIONS 使用說明書 GVT0129 013A UB SUPER VIDEO English 中 文 ...

Page 102: ...face Maintain an adequate air path for ventilation by placing on a stand with a height of 10 cm or more 注意 STANDBY ON 開關 無論 STANDBY ON 開關在任何位置 電源線的電源還是 沒有被切斷 若要將電源完全關閉 應把電源插頭拔离插座 所有的燈和信息均熄滅 當主機正處于備用狀態 STANDBY ON 燈為紅色 當主機開啟后 STANDBY ON 燈為綠色 電源開關可用遙控器控制 注意 為了減少触電 火災等危險 1 切勿擅自卸下螺絲釘 蓋子或機殼 2 切勿讓本機受雨淋或置潮濕環境中 鐳射產品的重要說明 1 一級鐳射產品 2 注意 切勿打開頂蓋板 本机內部沒有用戶可自行維修的部 件 所有維修工作應由有資格的人員完成 3 注意 當內部鎖定裝置失效或者損坏后 打開蓋板可能會產 ...

Page 103: ...ting the View Angle 18 Selecting the Subtitle Language 18 Selecting the Audio Track 19 Playing Back a Bonus Group 19 Special Effect Playback 20 Advanced Disc Operations 21 Programming the Playing Order Program Play 21 Playing at Random Random Play 22 Playing Repeatedly 23 Prohibiting Disc Ejection Child Lock 23 On Screen Disc Operations 24 On screen Bar Information 24 Operations Using the On scree...

Page 104: ...anual as simple and easy to understand as possible we have adapted the following methods Button and control operations are explained as listed in the table below Some related tips and notes are explained later in the sections Additional Information and Troubleshooting but not in the same section explaining the operations If you want to know more about the functions or if you have a doubt about the...

Page 105: ... polarity and correctly Step 1 Unpack the package and check the accessories Step 2 Prepare the remote control Step 3 Hook up the components such as AM FM antennas speakers etc see pages 4 to 6 Finally plug the AC power cord Now you can operate the System DO NOT use an old battery together with a new one DO NOT use different types of batteries together DO NOT expose batteries to heat or flame DO NO...

Page 106: ...White Red Optical digital cord not supplied Component video cord not supplied Red Blue Green AV COMPU LINK cord not supplied cord with monaural mini plug For details see AV COMPU LINK remote control system on page 6 Before connecting optical digital cord OR S video cord not supplied Composite video cord supplied Yellow OR VCR etc Remove the protective cap from the DVD OPTICAL DIGITAL OUT terminal ...

Page 107: ...P EN AU TO RE VE RS E FM antenna supplied Extend it so that you can obtain the best reception AM loop antenna supplied Turn it until the best reception is obtained To a wall outlet Plug the AC power cord only after all connections and selector settings on the rear are complete ...

Page 108: ...Setting the Video Output Selector You can select the video output to match it to the color system of your TV Changing the Scanning Mode This System supports progressive scanning If you connect a progressive TV through the COMPONENT jacks you can enjoy a high quality picture from the built in DVD player by selecting PROGRE DO NOT connect more than one speaker to each terminal DO NOT allow the condu...

Page 109: ...he downmixed sound from the speakers To enjoy the powerful sound of these multi channel encoded DVDs connect a proper decoder or an amplifier with a proper built in decoder to the digital output terminal on the rear Manufactured under license from Dolby Laboratories Dolby Pro Logic MLP Lossless and the double D symbol are trademarks of Dolby Laboratories DTS and DTS2 0 DIGITAL OUT are registered t...

Page 110: ...ors 2 3 tape direction Lights to indicate the current tape running direction Flashes slowly during playback and recording Flashes quickly while rewinding a tape reverse mode tape play continues endlessly tape automatically reverses once tape play stops at the end of one side 9Disc operation indicators RANDOM lights when Random Play is activated PRGM program lights when Program Play is activated re...

Page 111: ...D SVCD VCD PBC appears while playing a disc with PBC SVCD VCD Changes to PBC when stopping PBC playback MP3 WMA By pressing DISPLAY you can show the current group and track numbers for a few seconds MP3 WMA JPEG JPEG Elapsed playing time Current chapter no Total title no Elapsed playing time Current track no Total group no Group no Track no Elapsed playing time Current track no Total playing time ...

Page 112: ...is manual the operation using the remote control is mainly explained however you can use the buttons and controls on the main unit if they have the same or similar name and marks The STANDBY ON lamp on the main unit lights in red A small amount of power is always consumed even while on standby For private listening Connect a pair of headphones to the PHONES jack on the main unit The sound will no ...

Page 113: ...earching manually press either button If the received FM station is hard to listen The MONO indicator lights on the display Reception will improve though stereo effect is lost Monaural reception mode To restore the stereo effect press the button again the MONO indicator goes off To preset the stations You can preset 30 FM and 15 AM stations 1 Tune in to a station you want to preset You can also st...

Page 114: ...sert Close With the tape side facing outside To start To stop To rewind tape Before or after play Tape is played from the forward side to the reverse side When the reverse side is played back playback stops Tape is automatically reversed and playback repeats until you stop it Tape will not be reversed When the current side of the tape reaches its end playback stops IMPORTANT Before playing a disc ...

Page 115: ...RESUME on page 36 When operating the System the on screen guide icon see the following table appears on the TV To deactivate the on screen guide icons see ON SCREEN GUIDE on page 36 To select a title group While playing Group name appears for MP3 WMA discs To select a chapter track While playing To locate a particular portion While playing a disc except MP3 WMA No sound comes out while searching o...

Page 116: ...DVD CD 3 Examples To select number 5 press 5 To select number 15 press 10 then 5 To select number 30 press 10 10 then 10 ACTION Suitable for action movies and sports programs DRAMA Creates natural and warm sound Enjoy movies in a relaxed mood THEATER Enjoy sound effects like in a major theater Remote ONLY AUDIO ANGLE SUBTITLE ZOOM VFP FM MODE REV MODE DVD LEVEL 1 4 7 10 2 5 8 3 6 9 10 3D PHONIC Ca...

Page 117: ...ofer level To adjust the tone You can adjust the bass and treble level from 5 to 5 To adjust the bass To adjust the treble RHYTHM AX VOLUME SLEEP A STANDBY SET ENTER DISPLAY CLOCK TIMER BASS TREBLE VFP DVD LEVEL DIMMER SHIFT FADE MUTING RHYTHM AX VOLUME Remote control Main unit Remote control Main unit To restore the volume press again or adjust the volume level VOLUME VOLUME Remote ONLY FADE MUTI...

Page 118: ... parameter you want to adjust NORMAL Original recording level MIDDLE Output level is increased less than HIGH HIGH Output level is increased more than MIDDLE DIM1 Dims the display DIM2 Erases the display illumination AUTO DIM Erases the display illumination when disc playback starts The display illuminates when playback stops Remote ONLY DVD LEVEL 5 NORMAL MIDDLE HIGH at the same time Remote ONLY ...

Page 119: ...ime see page 9 Turning Off the Power Automatically To turn off the unit after playback is over Auto Standby When Auto Standby is in use the A STANDBY indicator lights on the display When disc play stops the A STANDBY indicator starts flashing If no operation is done for about 3 minutes while the indicator is flashing the System turns off stands by automatically Auto Standby does not work while you...

Page 120: ... containing subtitles in different languages you can select the subtitle language to display on the TV For SVCD While playing you can select the subtitles even if no subtitles are recorded on the disc You can also select the subtitle language using the on screen bar see page 24 While playing a DVD Video 1 Display the subtitle selection window ANGLE ENTER SLOW 10 keys AUDIO ZOOM 8 7 SUB TITLE SHIFT...

Page 121: ...up called bonus group whose contents are not open to the public To play back a bonus group you have to enter the specific key number a kind of password for the bonus group The way of getting the key number depends on the disc 1 Select the bonus group The bonus group is usually recorded as the last group for example if a disc contains 4 groups including a bonus group group 4 is the bonus group For ...

Page 122: ...eo While playing back Zoom 1 While playing back 2 Move the zoomed in position To cancel Zoom press ZOOM repeatedly while holding SHIFT until ZOOM OFF appears on the TV To start still picture play back To resume normal playback While playing Still picture playback starts Still picture playback starts AUDIO ANGLE SUBTITLE ZOOM VFP FM MODE REV MODE DVD LEVEL PROGRESSIVE 1 4 7 0 2 5 8 3 6 9 ENTER Remo...

Page 123: ...e steps 1 and 2 For SVCD VCD CD 1 Select tracks 4 7 DVD CD 3 0 8 7 SHIFT 10 keys CANCEL REPEAT ENTER DVD CD 3 PLAY MODE 4 REPEAT A B Remote control Main unit To enter the numbers directly Examples To enter number 5 press 5 To enter number 15 press 10 then 5 To enter number 30 press 10 10 then 10 Remote ONLY PLAY MODE PROGRAM RANDOM Canceled PRGM USE NUMERIC KEYS TO PROGRAM TRACKS USE CANCEL TO DEL...

Page 124: ...ayback To exit from Random Play Before or after playback Playback starts in the order you have programmed To skip a step To pause To stop To release press DVD CD 3 To erase the last step To erase the entire program To add steps in the program Repeat step 2 DVD CD GROUP TITLE In the programmed order In the reverse order CANCEL RETURN PLAY MODE PROGRAM RANDOM Canceled Playback starts in random order...

Page 125: ...EAT A B again while holding SHIFT A B Repeat will also be canceled when you stop play or skip the chapter or track Prohibiting Disc Ejection Child Lock You can lock the disc tray so that no one can eject the loaded disc This is possible while the System is on standby While the disc tray is closed To cancel the prohibition repeat the same procedure UNLOCKED appears on the display REP CHAP Repeats t...

Page 126: ...deo DVD Audio SVCD 2 OFF 1 3 1 3 1 3 TIME 4 TITLE 14 TOTAL1 25 58 CHAP 23 VCD TIME OFF ST TIME 00 58 TRACK 3 1 3 VCD CD 1 Disc type 2 Playback information Indication Meanings Mbps Current transfer rate Megabits per second Current title Current chapter Current group Current track Time indications 3 Operation modes Indication Meanings Playback Forward Reverse search Forward Reverse slow motion Pause...

Page 127: ...LY ON SCREEN Goes off OFF 1 3 1 3 1 3 TIME DVD VIDEO TITLE 2 TIME 0 00 58 CHAP 3 8 5Mbps TITLE 14 TOTAL1 25 58 CHAP 23 DVD VIDEO TITLE 2 TIME OFF CHAP 1 3 1 3 1 1 TIME 0 00 58 CHAP 3 8 5Mbps OFF 1 3 1 3 1 3 TIME TITLE 14 TOTAL1 25 58 CHAP 23 DVD VIDEO TITLE 2 TIME OFF CHAP 1 3 1 3 1 1 TIME 0 00 58 CHAP 3 8 5Mbps ENTER 1 3 1 3 1 3 TITLE 14 TOTAL1 25 58 CHAP 23 TITLE 2 1 3 1 3 1 1 TIME 0 00 58 CHAP ...

Page 128: ...ect or 3 Display the pop up window A B Repeats a desired portion see below TITLE Repeats the current title GROUP Repeats the current group ALL Repeats the disc except for DVD or program CHAPTER Repeats the current chapter TRACK Repeats the current track OFF Cancels Repeat Play A B Repeat starts The selected portion plays repeatedly Before pressing ENTER you can search for the end point using the b...

Page 129: ...apter track 5 press 5 To select chapter track 15 press 1 then 5 To select chapter track 30 press 3 then 0 The System starts playing the searched chapter or track AUDIO ANGLE SUBTITLE ZOOM VFP FM MODE REV MODE DVD LEVEL PROGRESSIVE 1 4 7 0 2 5 8 3 6 9 ENTER Remote ONLY PAGE 1 5 OFF 1 3 TIME TRACK DVD AUDIO GROUP 14 TIME 0 00 58 TRACK 23 1 5 PAGE 1 OFF 1 3 TIME TRACK DVD AUDIO GROUP 14 TIME 0 00 58 ...

Page 130: ...s ZOOM repeatedly while holding SHIFT until ZOOM OFF appears on the TV Move the highlight bar to a desired item If you move the highlight bar while playing back an MP3 WMA disc the selected track starts playback automatically For MP3 WMA Playback starts with the selected track Pressing DVD CD 3 also starts playback For JPEG The selected track still picture is displayed until you change it Slide sh...

Page 131: ... MODE TAPE 2 3 7 DVD CD 3 AUX FM AM REC 7 DVD CD 3 PUSH OPEN 0 TAPE 2 3 AUX FM AM Remote control Main unit IMPORTANT It may be unlawful to record or play back copyrighted material without the consent of the copyright owner To record on both sides When using Reverse Mode start recording in the forward 3 direction To record on only one side With the tape side facing outside Push Insert Close Tape di...

Page 132: ...tape is playing 3 Repeat steps 2 and 3 to record other tracks you want You can exchange the discs if necessary To stop recording On the main unit The System automatically creates 4 second blanks between the tunes recorded on the tapes To record a Live disc It will not be desirable to put 4 second blank portions between the tunes recorded on the tape To record the entire disc without any interrupti...

Page 133: ...wing operations until you finish setting in the following order For Daily Timers 1 Set the hour then the minute for on time 2 Set the hour then the minute for off time 3 Select the playback source TUNER FM TUNER AM TAPE DISC or AUX 4 For TUNER FM and TUNER AM Select a preset channel For DISC Select the title group number then the chapter track number CANCEL STANDBY ON CLOCK TIMER SET Remote contro...

Page 134: ...r is activated at the same time everyday until the timer is turned off manually see the next column or another timer is activated When the on time comes The System turns on starts playing the specified source except AUX and sets the volume level to the preset level While Daily Timer is working the timer indicator and timer number indicator 1 2 3 flash on the display When the off time comes The Sys...

Page 135: ... Menu 2 PICTURE Setup Menu 3 AUDIO Setup Menu 4 OTHERS Setup Menu Remote ONLY MENU SET UP ENGLISH ENGLISH ENGLISH ENGLISH LANGUAGE MENU LANGUAGE ON SCREEN LANGUAGE AUDIO LANGUAGE SUBTITLE USE TO SELECT USE ENTER TO CONFIRM TO EXIT PRESS SET UP ENTER SELECT at the same time 4 3 LB AUTO PICTURE MONITOR TYPE PICTURE SOURCE ON AUDIO SCREEN SAVER FILE TYPE USE TO SELECT USE ENTER TO CONFIRM TO EXIT PRE...

Page 136: ...monitor type of your TV to play DVD Video recorded with aspect ratio of 16 9 For the multi color system TV When you use a multi color system TV you can change the color system of the System automatically by selecting MULTI options for the monitor type In this case the color system of the System is changed to match to that of the loaded disc regardless of the VIDEO OUT SELECT setting see page 6 Sel...

Page 137: ...TPUT is set to PCM ONLY from this System Select one of the following AUTO Normally select this When playing back a disc containing both video and film sources the System automatically changes the processing to match it to the picture type film or video source of the current chapter FILM To play a film source disc VIDEO To play a video source disc ON The pictures on the TV becomes dark when no oper...

Page 138: ...ape Select one of the following AV COMPULINK MODE When connecting the System to a JVC s TV with the AV COMPU LINK remote control system select the proper setting Select one of the following For details see AV COMPU LINK remote control system on page 6 PARENTAL LOCK Select this to enter the PARENTAL LOCK submenu See the section that follows AUTO To enjoy powerful sounds with full dynamic range ON B...

Page 139: ...ed then enter any 4 digit number for your password 10 Finish the setting Remote ONLY MENU SET UP ENGLISH ENGLISH ENGLISH ENGLISH LANGUAGE MENU LANGUAGE ON SCREEN LANGUAGE AUDIO LANGUAGE SUBTITLE USE TO SELECT USE ENTER TO CONFIRM TO EXIT PRESS SET UP ENTER SELECT at the same time ON ON OTHERS RESUME ON SCREEN GUIDE DVD1 PARENTAL LOCK AV COMPULINK MODE USE TO SELECT USE ENTER TO CONFIRM TO EXIT PRE...

Page 140: ...g level some discs may not be played back at all When you try to play such a disc the following screen appears on the TV 1 Select TEMPORARY RELEASE then ENTER If you do not play back such a disc select NOT RELEASE then ENTER Then eject the disc 2 Enter your password If you enter a wrong password three times NOT RELEASE is automatically selected In this case press ENTER Then eject the disc HK 4 _ _...

Page 141: ... made at bit rate of less than 64 kbps This System can recognize the total of 1000 tracks and of 99 groups each group can contain up to 150 tracks Those exceeding the maximum number cannot be recognized Playback order of MP3 WMA tracks may be different from the one you have intended while recording see page 40 If a folder does not include MP3 WMA tracks they are ignored When using an 8 cm disc pla...

Page 142: ...ing recording with Reverse Mode set to the last tune will be re recorded at the beginning of the reverse side Timer Operations see pages 31 to 32 When using an external component AUX for the playback source set the timer built in the component at the same time Before turning off the power do not forget to prepare the required materials a disc or tape for playback and a recordable tape for recordin...

Page 143: ...ch the tape surface Avoid the following places to store the tape in dusty places in direct sunlight or heat in moist areas on a TV or speaker or near a magnet To keep the best recording and playback sound quality Use a cotton swab moistened with alcohol to clean the heads capstans and pinch rollers Use a head demagnetizer available at electronics and audio shops to demagnetize the heads when the S...

Page 144: ...PEG tracks are not played back The inserted disc may include both type of tracks MP3 WMA files and JPEG files In this case you can only play back the files selected by the FILE TYPE setting see page 35 You have changed the FILE TYPE setting after you inserted a disc In this case reload the disc NO AUDIO appears This System cannot play back illegally produced DVD Audio discs LR ONLY appears Some DV...

Page 145: ...ada KO Korean KOR KS Kashmiri KU Kurdish KY Kirghiz LA Latin LN Lingala LO Laothian LT Lithuanian LV Latvian Lettish MG Malagasy MI Maori MK Macedonian ML Malayalam MN Mongolian MO Moldavian MR Marathi MS Malay MAY MT Maltese MY Burmese NA Nauru NE Nepali NL Dutch NO Norwegian OC Occitan OM Afan Oromo OR Oriya PA Panjabi PL Polish PS Pashto Pushto PT Portuguese QU Quechua RM Rhaeto Romance RN Kiru...

Page 146: ...tan GA Gabon GB United Kingdom GD Grenada GE Georgia GF French Guiana GH Ghana GI Gibraltar GL Greenland GM Gambia GN Guinea GP Guadeloupe GQ Equatorial Guinea GR Greece GS South Georgia and the South Sandwich GT Guatemala GU Guam GW Guinea Bissau GY Guyana HK Hong Kong HM Heard Island and McDonald Islands HN Honduras HR Croatia HT Haiti HU Hungary ID Indonesia IE Ireland IL Israel IN India IO Bri...

Page 147: ...the Grenadines VE Venezuela VG Virgin Islands British VI Virgin Islands U S VN Vietnam VU Vanuatu WF Wallis and Futuna Islands WS Samoa YE Yemen YT Mayotte YU Yugoslavia ZA South Africa ZM Zambia ZR Zaire ZW Zimbabwe DVD OPTICAL DIGITAL OUT Signals While playing some DVDs digital signals may be emitted at 20 bits or 24 bits at their original bit rate through the DVD OPTICAL DIGITAL OUT terminal if...

Page 148: ...akers Speaker units Full range 10 cm cone x 1 Impedance 4 Ω Dimensions approx 145 mm x 230 mm x 191 mm W H D Mass approx 1 8 kg each Supplied Accessories See page 3 General Power requirement AC 220 V 50 Hz 60 Hz Power consumption 65 W at operation 1 3 W on standby Dimensions approx 170 mm x 230 mm x 311 mm W H D Mass approx 4 8 kg Parts Index Refer to the pages to see how to use the buttons and co...

Page 149: ...0504AIMMDWJEM EN CS 2004 VICTOR COMPANY OF JAPAN LIMITED UX P450 MICRO COMPONENT SYSTEM VICTOR COMPANY OF JAPAN LIMITED ...

Page 150: ... MICRO COMPONENT SYSTEM UX P450 Consists of CA UXP450 and SP UXP450 INSTRUCTIONS GVT0129 014B A SUPER VIDEO ...

Page 151: ...AUTION LABEL PLACED INSIDE THE UNIT Caution Proper Ventilation To avoid risk of electric shock and fire and to prevent damage locate the apparatus as follows 1 Front No obstructions and open spacing 2 Sides Top Back No obstructions should be placed in the areas shown by the dimensions below 3 Bottom Place on the level surface Maintain an adequate air path for ventilation by placing on a stand with...

Page 152: ... the View Angle 18 Selecting the Subtitle Language 18 Selecting the Audio Track 19 Playing Back a Bonus Group 19 Special Effect Playback 20 Advanced Disc Operations 21 Programming the Playing Order Program Play 21 Playing at Random Random Play 22 Playing Repeatedly 23 Prohibiting Disc Ejection Child Lock 23 On Screen Disc Operations 24 On screen Bar Information 24 Operations Using the On screen Ba...

Page 153: ...l as simple and easy to understand as possible we have adapted the following methods Button and control operations are explained as listed in the table below Some related tips and notes are explained later in the sections Additional Information and Troubleshooting but not in the same section explaining the operations If you want to know more about the functions or if you have a doubt about the fun...

Page 154: ...arity and correctly Step 1 Unpack the package and check the accessories Step 2 Prepare the remote control Step 3 Hook up the components such as AM FM antennas speakers etc see pages 4 to 6 Finally plug the AC power cord Now you can operate the System DO NOT use an old battery together with a new one DO NOT use different types of batteries together DO NOT expose batteries to heat or flame DO NOT le...

Page 155: ...e Red Optical digital cord not supplied Component video cord not supplied Red Blue Green AV COMPU LINK cord not supplied cord with monaural mini plug For details see AV COMPU LINK remote control system on page 6 Before connecting optical digital cord OR S video cord not supplied Composite video cord supplied Yellow OR VCR etc Remove the protective cap from the DVD OPTICAL DIGITAL OUT terminal Viny...

Page 156: ... AU TO RE VE RS E FM antenna supplied Extend it so that you can obtain the best reception AM loop antenna supplied Turn it until the best reception is obtained To a wall outlet Plug the AC power cord only after all connections and selector settings on the rear are complete ...

Page 157: ...ing the Video Output Selector You can select the video output to match it to the color system of your TV Changing the Scanning Mode This System supports progressive scanning If you connect a progressive TV through the COMPONENT jacks you can enjoy a high quality picture from the built in DVD player by selecting PROGRE DO NOT connect more than one speaker to each terminal DO NOT allow the conductor...

Page 158: ...ownmixed sound from the speakers To enjoy the powerful sound of these multi channel encoded DVDs connect a proper decoder or an amplifier with a proper built in decoder to the digital output terminal on the rear Manufactured under license from Dolby Laboratories Dolby Pro Logic MLP Lossless and the double D symbol are trademarks of Dolby Laboratories DTS and DTS2 0 DIGITAL OUT are registered trade...

Page 159: ...2 3 tape direction Lights to indicate the current tape running direction Flashes slowly during playback and recording Flashes quickly while rewinding a tape reverse mode tape play continues endlessly tape automatically reverses once tape play stops at the end of one side 9Disc operation indicators RANDOM lights when Random Play is activated PRGM program lights when Program Play is activated repeat...

Page 160: ...CD VCD PBC appears while playing a disc with PBC SVCD VCD Changes to PBC when stopping PBC playback MP3 WMA By pressing DISPLAY you can show the current group and track numbers for a few seconds MP3 WMA JPEG JPEG Elapsed playing time Current chapter no Total title no Elapsed playing time Current track no Total group no Group no Track no Elapsed playing time Current track no Total playing time Tota...

Page 161: ...anual the operation using the remote control is mainly explained however you can use the buttons and controls on the main unit if they have the same or similar name and marks The STANDBY ON lamp on the main unit lights in red A small amount of power is always consumed even while on standby For private listening Connect a pair of headphones to the PHONES jack on the main unit The sound will no long...

Page 162: ... want to preset You can also store the monaural reception mode for FM preset stations if selected 2 Activate the preset number entry mode Finish the following process while the indication on the display is flashing 3 Select a preset number for the station you store You can also use the or 1 buttons 4 Store the station To tune in to a preset station 1 Select the band FM or AM 2 Select a preset numb...

Page 163: ... the tape to the left 3 forward play 2 reverse play Tape is played from the forward side to the reverse side When the reverse side is played back playback stops Tape is automatically reversed and playback repeats until you stop it Tape will not be reversed When the current side of the tape reaches its end playback stops IMPORTANT Before playing a disc make sure of the following Turn on the TV and ...

Page 164: ...pt MP3 WMA No sound comes out while searching on DVD Video SVCD VCD To return to normal playback press DVD CD 3 To locate an item directly You can select a title chapter track directly and start playback For DVD Video you can select a title before starting playback while you can select a chapter after starting playback To start To pause To stop To release press DVD CD 3 On screen guide icons Durin...

Page 165: ... 3 ACTION Suitable for action movies and sports programs DRAMA Creates natural and warm sound Enjoy movies in a relaxed mood THEATER Enjoy sound effects like in a major theater 3D PHONIC Canceled 3D PHONIC ACTION 3D PHONIC DRAMA 3D PHONIC THEATER 3D PHONIC OFF Remote ONLY MENU SET UP TOP MENU ENTER Examples To select number 5 press 5 To select number 15 press 10 then 5 To select number 30 press 10...

Page 166: ... level To adjust the tone You can adjust the bass and treble level from 5 to 5 To adjust the bass To adjust the treble RHYTHM AX VOLUME SLEEP A STANDBY SET ENTER DISPLAY CLOCK TIMER BASS TREBLE VFP DVD LEVEL DIMMER SHIFT FADE MUTING RHYTHM AX VOLUME Remote control Main unit Remote control Main unit To restore the volume press again or adjust the volume level VOLUME VOLUME Remote ONLY FADE MUTING R...

Page 167: ...ameter you want to adjust NORMAL Original recording level MIDDLE Output level is increased less than HIGH HIGH Output level is increased more than MIDDLE DIM1 Dims the display DIM2 Erases the display illumination AUTO DIM Erases the display illumination when disc playback starts The display illuminates when playback stops Remote ONLY DVD LEVEL 5 NORMAL MIDDLE HIGH at the same time Remote ONLY DIM1...

Page 168: ...see page 9 Turning Off the Power Automatically To turn off the unit after playback is over Auto Standby When Auto Standby is in use the A STANDBY indicator lights on the display When disc play stops the A STANDBY indicator starts flashing If no operation is done for about 3 minutes while the indicator is flashing the System turns off stands by automatically Auto Standby does not work while you are...

Page 169: ...taining subtitles in different languages you can select the subtitle language to display on the TV For SVCD While playing you can select the subtitles even if no subtitles are recorded on the disc You can also select the subtitle language using the on screen bar see page 24 While playing a DVD Video 1 Display the subtitle selection window ANGLE ENTER SLOW 10 keys AUDIO ZOOM 8 7 SUB TITLE SHIFT DVD...

Page 170: ...alled bonus group whose contents are not open to the public To play back a bonus group you have to enter the specific key number a kind of password for the bonus group The way of getting the key number depends on the disc 1 Select the bonus group The bonus group is usually recorded as the last group for example if a disc contains 4 groups including a bonus group group 4 is the bonus group For how ...

Page 171: ...hile playing back Zoom 1 While playing back 2 Move the zoomed in position To cancel Zoom press ZOOM repeatedly while holding SHIFT until ZOOM OFF appears on the TV To start still picture play back To resume normal playback While playing Still picture playback starts Still picture playback starts AUDIO ANGLE SUBTITLE ZOOM VFP FM MODE REV MODE DVD LEVEL PROGRESSIVE 1 4 7 0 2 5 8 3 6 9 ENTER Remote O...

Page 172: ...eps 1 and 2 For SVCD VCD CD 1 Select tracks 4 7 DVD CD 3 0 8 7 SHIFT 10 keys CANCEL REPEAT ENTER DVD CD 3 PLAY MODE 4 REPEAT A B Remote control Main unit To enter the numbers directly Examples To enter number 5 press 5 To enter number 15 press 10 then 5 To enter number 30 press 10 10 then 10 Remote ONLY PLAY MODE PROGRAM RANDOM Canceled PRGM USE NUMERIC KEYS TO PROGRAM TRACKS USE CANCEL TO DELETE ...

Page 173: ...ck To exit from Random Play Before or after playback Playback starts in the order you have programmed To skip a step To pause To stop To release press DVD CD 3 To erase the last step To erase the entire program To add steps in the program Repeat step 2 DVD CD GROUP TITLE In the programmed order In the reverse order CANCEL RETURN PLAY MODE PROGRAM RANDOM Canceled Playback starts in random order Ran...

Page 174: ...A B again while holding SHIFT A B Repeat will also be canceled when you stop play or skip the chapter or track Prohibiting Disc Ejection Child Lock You can lock the disc tray so that no one can eject the loaded disc This is possible while the System is on standby While the disc tray is closed To cancel the prohibition repeat the same procedure UNLOCKED appears on the display REP CHAP Repeats the c...

Page 175: ...DVD Audio SVCD 2 OFF 1 3 1 3 1 3 TIME 4 TITLE 14 TOTAL1 25 58 CHAP 23 VCD TIME OFF ST TIME 00 58 TRACK 3 1 3 VCD CD 1 Disc type 2 Playback information Indication Meanings Mbps Current transfer rate Megabits per second Current title Current chapter Current group Current track Time indications 3 Operation modes Indication Meanings Playback Forward Reverse search Forward Reverse slow motion Pause Sto...

Page 176: ...N SCREEN Goes off OFF 1 3 1 3 1 3 TIME DVD VIDEO TITLE 2 TIME 0 00 58 CHAP 3 8 5Mbps TITLE 14 TOTAL1 25 58 CHAP 23 DVD VIDEO TITLE 2 TIME OFF CHAP 1 3 1 3 1 1 TIME 0 00 58 CHAP 3 8 5Mbps OFF 1 3 1 3 1 3 TIME TITLE 14 TOTAL1 25 58 CHAP 23 DVD VIDEO TITLE 2 TIME OFF CHAP 1 3 1 3 1 1 TIME 0 00 58 CHAP 3 8 5Mbps ENTER 1 3 1 3 1 3 TITLE 14 TOTAL1 25 58 CHAP 23 TITLE 2 1 3 1 3 1 1 TIME 0 00 58 CHAP 3 EN...

Page 177: ...or 3 Display the pop up window A B Repeats a desired portion see below TITLE Repeats the current title GROUP Repeats the current group ALL Repeats the disc except for DVD or program CHAPTER Repeats the current chapter TRACK Repeats the current track OFF Cancels Repeat Play A B Repeat starts The selected portion plays repeatedly Before pressing ENTER you can search for the end point using the butto...

Page 178: ...r track 5 press 5 To select chapter track 15 press 1 then 5 To select chapter track 30 press 3 then 0 The System starts playing the searched chapter or track AUDIO ANGLE SUBTITLE ZOOM VFP FM MODE REV MODE DVD LEVEL PROGRESSIVE 1 4 7 0 2 5 8 3 6 9 ENTER Remote ONLY PAGE 1 5 OFF 1 3 TIME TRACK DVD AUDIO GROUP 14 TIME 0 00 58 TRACK 23 1 5 PAGE 1 OFF 1 3 TIME TRACK DVD AUDIO GROUP 14 TIME 0 00 58 TRAC...

Page 179: ...OM repeatedly while holding SHIFT until ZOOM OFF appears on the TV Move the highlight bar to a desired item If you move the highlight bar while playing back an MP3 WMA disc the selected track starts playback automatically For MP3 WMA Playback starts with the selected track Pressing DVD CD 3 also starts playback For JPEG The selected track still picture is displayed until you change it Slide show p...

Page 180: ...E TAPE 2 3 7 DVD CD 3 AUX FM AM REC 7 DVD CD 3 PUSH OPEN 0 TAPE 2 3 AUX FM AM Remote control Main unit IMPORTANT It may be unlawful to record or play back copyrighted material without the consent of the copyright owner To record on both sides When using Reverse Mode start recording in the forward 3 direction To record on only one side With the tape side facing outside Push Insert Close Tape direct...

Page 181: ... is playing 3 Repeat steps 2 and 3 to record other tracks you want You can exchange the discs if necessary To stop recording On the main unit The System automatically creates 4 second blanks between the tunes recorded on the tapes To record a Live disc It will not be desirable to put 4 second blank portions between the tunes recorded on the tape To record the entire disc without any interruption r...

Page 182: ... operations until you finish setting in the following order For Daily Timers 1 Set the hour then the minute for on time 2 Set the hour then the minute for off time 3 Select the playback source TUNER FM TUNER AM TAPE DISC or AUX 4 For TUNER FM and TUNER AM Select a preset channel For DISC Select the title group number then the chapter track number CANCEL STANDBY ON CLOCK TIMER SET Remote control Da...

Page 183: ... activated at the same time everyday until the timer is turned off manually see the next column or another timer is activated When the on time comes The System turns on starts playing the specified source except AUX and sets the volume level to the preset level While Daily Timer is working the timer indicator and timer number indicator 1 2 3 flash on the display When the off time comes The System ...

Page 184: ...u 2 PICTURE Setup Menu 3 AUDIO Setup Menu 4 OTHERS Setup Menu Remote ONLY MENU SET UP ENGLISH ENGLISH ENGLISH ENGLISH LANGUAGE MENU LANGUAGE ON SCREEN LANGUAGE AUDIO LANGUAGE SUBTITLE USE TO SELECT USE ENTER TO CONFIRM TO EXIT PRESS SET UP ENTER SELECT at the same time 4 3 LB AUTO PICTURE MONITOR TYPE PICTURE SOURCE ON AUDIO SCREEN SAVER FILE TYPE USE TO SELECT USE ENTER TO CONFIRM TO EXIT PRESS S...

Page 185: ...tor type of your TV to play DVD Video recorded with aspect ratio of 16 9 For the multi color system TV When you use a multi color system TV you can change the color system of the System automatically by selecting MULTI options for the monitor type In this case the color system of the System is changed to match to that of the loaded disc regardless of the VIDEO OUT SELECT setting see page 6 Select ...

Page 186: ... is set to PCM ONLY from this System Select one of the following AUTO Normally select this When playing back a disc containing both video and film sources the System automatically changes the processing to match it to the picture type film or video source of the current chapter FILM To play a film source disc VIDEO To play a video source disc ON The pictures on the TV becomes dark when no operatio...

Page 187: ...Select one of the following AV COMPULINK MODE When connecting the System to a JVC s TV with the AV COMPU LINK remote control system select the proper setting Select one of the following For details see AV COMPU LINK remote control system on page 6 PARENTAL LOCK Select this to enter the PARENTAL LOCK submenu See the section that follows AUTO To enjoy powerful sounds with full dynamic range ON Best ...

Page 188: ...hen enter any 4 digit number for your password 10 Finish the setting Remote ONLY MENU SET UP ENGLISH ENGLISH ENGLISH ENGLISH LANGUAGE MENU LANGUAGE ON SCREEN LANGUAGE AUDIO LANGUAGE SUBTITLE USE TO SELECT USE ENTER TO CONFIRM TO EXIT PRESS SET UP ENTER SELECT at the same time ON ON OTHERS RESUME ON SCREEN GUIDE DVD1 PARENTAL LOCK AV COMPULINK MODE USE TO SELECT USE ENTER TO CONFIRM TO EXIT PRESS S...

Page 189: ...vel some discs may not be played back at all When you try to play such a disc the following screen appears on the TV 1 Select TEMPORARY RELEASE then ENTER If you do not play back such a disc select NOT RELEASE then ENTER Then eject the disc 2 Enter your password If you enter a wrong password three times NOT RELEASE is automatically selected In this case press ENTER Then eject the disc AU 4 _ _ _ _...

Page 190: ...e at bit rate of less than 64 kbps This System can recognize the total of 1000 tracks and of 99 groups each group can contain up to 150 tracks Those exceeding the maximum number cannot be recognized Playback order of MP3 WMA tracks may be different from the one you have intended while recording see page 40 If a folder does not include MP3 WMA tracks they are ignored When using an 8 cm disc place i...

Page 191: ...recording with Reverse Mode set to the last tune will be re recorded at the beginning of the reverse side Timer Operations see pages 31 to 32 When using an external component AUX for the playback source set the timer built in the component at the same time Before turning off the power do not forget to prepare the required materials a disc or tape for playback and a recordable tape for recording Wh...

Page 192: ...he tape surface Avoid the following places to store the tape in dusty places in direct sunlight or heat in moist areas on a TV or speaker or near a magnet To keep the best recording and playback sound quality Use a cotton swab moistened with alcohol to clean the heads capstans and pinch rollers Use a head demagnetizer available at electronics and audio shops to demagnetize the heads when the Syste...

Page 193: ...tracks are not played back The inserted disc may include both type of tracks MP3 WMA files and JPEG files In this case you can only play back the files selected by the FILE TYPE setting see page 35 You have changed the FILE TYPE setting after you inserted a disc In this case reload the disc NO AUDIO appears This System cannot play back illegally produced DVD Audio discs LR ONLY appears Some DVD Au...

Page 194: ...KO Korean KOR KS Kashmiri KU Kurdish KY Kirghiz LA Latin LN Lingala LO Laothian LT Lithuanian LV Latvian Lettish MG Malagasy MI Maori MK Macedonian ML Malayalam MN Mongolian MO Moldavian MR Marathi MS Malay MAY MT Maltese MY Burmese NA Nauru NE Nepali NL Dutch NO Norwegian OC Occitan OM Afan Oromo OR Oriya PA Panjabi PL Polish PS Pashto Pushto PT Portuguese QU Quechua RM Rhaeto Romance RN Kirundi ...

Page 195: ...GA Gabon GB United Kingdom GD Grenada GE Georgia GF French Guiana GH Ghana GI Gibraltar GL Greenland GM Gambia GN Guinea GP Guadeloupe GQ Equatorial Guinea GR Greece GS South Georgia and the South Sandwich GT Guatemala GU Guam GW Guinea Bissau GY Guyana HK Hong Kong HM Heard Island and McDonald Islands HN Honduras HR Croatia HT Haiti HU Hungary ID Indonesia IE Ireland IL Israel IN India IO British...

Page 196: ...Grenadines VE Venezuela VG Virgin Islands British VI Virgin Islands U S VN Vietnam VU Vanuatu WF Wallis and Futuna Islands WS Samoa YE Yemen YT Mayotte YU Yugoslavia ZA South Africa ZM Zambia ZR Zaire ZW Zimbabwe DVD OPTICAL DIGITAL OUT Signals While playing some DVDs digital signals may be emitted at 20 bits or 24 bits at their original bit rate through the DVD OPTICAL DIGITAL OUT terminal if the...

Page 197: ...nge 10 cm cone x 1 Impedance 4 Ω Dimensions approx 145 mm x 230 mm x 191 mm W H D Mass approx 1 8 kg each Supplied Accessories See page 3 General Power requirement AC 240 V 50 Hz Power consumption 65 W at operation 1 5 W on standby Dimensions approx 170 mm x 230 mm x 311 mm W H D Mass approx 4 8 kg Parts Index Refer to the pages to see how to use the buttons and controls TAPE SLEEP A STANDBY CLOCK...

Page 198: ...0504AIMMDWJEM EN UX P450 MICRO COMPONENT SYSTEM 2004 VICTOR COMPANY OF JAPAN LIMITED VICTOR COMPANY OF JAPAN LIMITED ...

Reviews: