background image


5


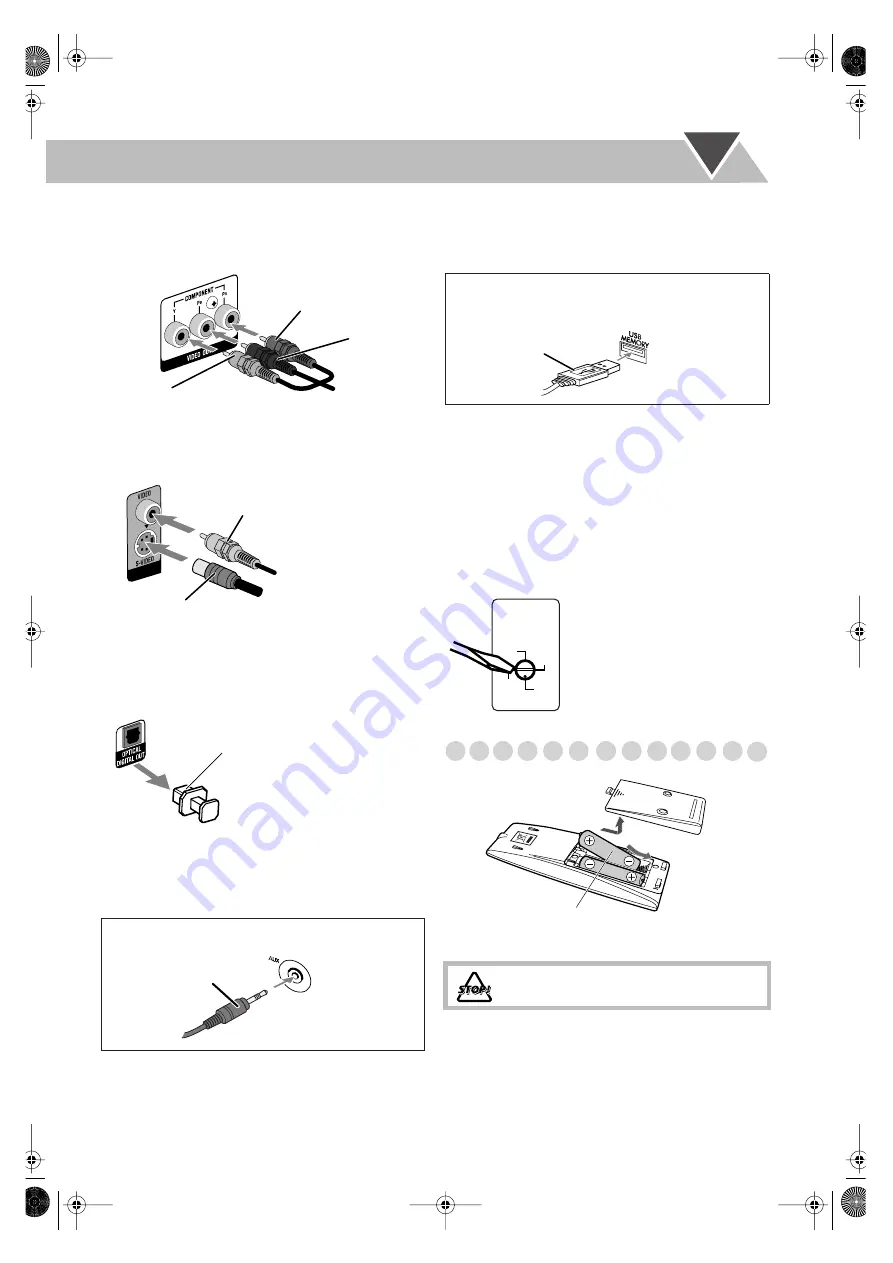
 TV/monitor


Connect the COMPONENT (for UX-G60 only), 
S-VIDEO, or VIDEO jacks which you want to use.


• To select progressive scanning mode (see page 14), use 

COMPONENT jacks.

• After connecting a TV, select the proper video signal mode 

according to the connection method. See “Changing the 
Scanning Mode” on page 14.

@


 Digital audio component


• Set “DIGITAL AUDIO OUTPUT” in the “AUDIO” menu 

correctly according to the connected digital audio 
equipment (see page 36). If the setting is incorrect, loud 
noise may be generated causing damage to the speakers.

• By using QP Link (Quick Portable Link), you can easily 

start playing back a portable audio device on this unit. See 
page 11 for details.

• If an external device is not equipped with a stereo mini plug 

audio output, use a plug adaptor to convert the stereo mini 
plug to the corresponding plug of the audio output.

• You can connect a USB mass storage class device such as a 

USB flash memory device, hard disk drive, multimedia card 
reader, etc. to this System. See pages 10 and 38 for details.

• If you press USB MEMORY 

3


, the System detects the 

USB mass storage class device and the control screen 
appears on the TV screen. See page 26 for details.


Before plugging in the System
(except for Hong Kong region and Australia)


Set the correct voltage for your area with the voltage selector 
on the rear.


Preparing the remote control


• Dispose of batteries in the proper manner, according to 

federal, state, and local regulations.


When using the remote control


Point the top of the remote control toward the remote sensor 
as directly as possible. If you operate it from a diagonal 
position, the operating range (approx. 5 m) may be shorter.


When connecting a portable audio device (AUX)

Green

Blue

Red

Component video cord
(not supplied)

S-Video cord (not supplied)

Composite video cord (supplied)

Protective cap

Stereo mini plug

(not supplied)

At the front 
panel


When connecting a USB mass storage class device
(for UX-G60 only)


DO NOT recharge, short, disassemble, heat 
the battery or dispose of it in a fire.

USB cable

(not supplied)

At the front 
panel

110V

127V

220V

230V

-240V

VOLTAGE

SELECTOR

Use a screwdriver to set the voltage 
selector to the same voltage as 
where you are plugging in the unit. 
(See also the back cover page.)

R6(SUM-3)/AA(15F)

UX-G60[U]_2.book Page 5 Tuesday, February 7, 2006 5:16 PM

Summary of Contents for CA-UXG55

Page 1: ...STEM UX G60 Consists of CA UXG60 and SP UXG63 UX G55 Consists of CA UXG55 and SP UXG55 INSTRUCTIONS SUPER VIDEO SUPER VIDEO UX G60 UX G55 GVT0169 006A US UN UB UG UX A UW Cover U fm Page 1 Friday February 10 2006 9 55 AM ...

Page 2: ...tion openings or holes If the ventilation openings or holes are blocked by a newspaper or cloth etc the heat may not be able to get out Do not place any naked flame sources such as lighted candles on the apparatus When discarding batteries environmental problems must be considered and local rules or laws governing the disposal of these batteries must be followed strictly Do not expose this apparat...

Page 3: ...12 Adjusting the Volume 12 Adjusting the Sound 12 Creating 3 dimensional Sound Field 3D Phonic 13 Presetting Automatic DVD Video Sound Increase Level 13 Adjusting the Audio Input Level 13 Changing the Display Brightness 14 Changing the Scanning Mode 14 Changing the Picture Tone 14 Setting the Clock 15 Turning Off the Power Automatically 15 Unique DVD VCD Operations 16 Selecting the Audio Track 16 ...

Page 4: ...tions Learning More about This System and Troubleshooting but not in the same section explaining the operations indicates that the content has some information DVD Logo is a trademark of DVD Format Logo Licensing Corporation registered in the US Japan and other countries Caution for DualDisc playback The Non DVD side of a DualDisc does not comply with the Compact Disc Digital Audio standard Theref...

Page 5: ...The illustration below is UX G60 Pull down the cover until you hear a clicking sound From the portable audio device See page 5 From the headphones See page 7 110V 127V 220V 230V 240V VOLTAGE SELECTOR From the input of TV monitor See page 5 From the digital input of digital audio component See page 5 To a wall outlet Plug in the AC power cord only after all connections are completed If the wall out...

Page 6: ... LFE signals in DVD multi channel discs Before plugging the unit to the main supply make sure that the powered subwoofer is turned off Extend it so that you can obtain the best reception FM antenna supplied AM loop antenna supplied AM loop antenna supplied Keep it connected FM outdoor antenna not supplied Vinyl covered wire not supplied Extend it horizontally DO NOT connect more than one speaker t...

Page 7: ...ystem detects the USB mass storage class device and the control screen appears on the TV screen See page 26 for details Before plugging in the System except for Hong Kong region and Australia Set the correct voltage for your area with the voltage selector on the rear Preparing the remote control Dispose of batteries in the proper manner according to federal state and local regulations When using t...

Page 8: ...selecting TAPE TAPE appears w B S P Browsable Still Picture indicator Lights when Browsable Still Pictures are detected while playing a DVD Audio disc e AHB PRO indicator Lights when Active Hyper Bass Pro is activated r BONUS indicator Lights when a DVD Audio disc with a bonus group is detected t USB indicator Lights when USB MEMORY is selected as the source y Playback mode indicators PRGM lights ...

Page 9: ... SVCDVD MIC V MASK C VOICE L BANDIII AM F TAPE DVD CD FM AM AUX TAPE 1 GROUP TITLE SKIP FM PLAY MODE 4 1 8 7 SHIFT 2 ENTER SET MENU PL RETURN TOP MENU PG QP LINK 3 UX G60 UX G55 GROUP TITLE Number buttons Remote control In this manual operations using the remote control are mainly explained however you can use the buttons and controls on the main unit if they have the same or similar name and mark...

Page 10: ...manually press either button If the FM station has poor reception The MONO indicator lights on the display Reception will improve though stereo effect is lost Monaural reception To restore the stereo effect press the button again the MONO indicator disappears To preset the stations You can preset 30 FM and 15 AM stations 1 Tune in to a station you want to preset You can also store the monaural rec...

Page 11: ...ber 15 press 10 1 then 5 To select preset number 30 press 10 3 then 0 MONO MP3 1 PL PG WMA RND PRGR 3DPHONIC B S P BONUS ST TA NEWSINFO AHB PRO A STBY 1 2 3 S TURBO SLEEP PRGM QPLink USB SVCDVD MIC V MASK C VOICE L BANDIII AM FM REC REC ENTER SET 1 4 7 10 2 5 8 3 6 9 10 0 ENTER SET MONO MP3 1 PL PG WMA RND PRGR 3DPHONIC B S P BONUS ST TA NEWSINFO AHB PRO A STBY 1 2 3 S TURBO SLEEP PRGM QPLink USB ...

Page 12: ...while Resume is activated press 7 twice To cancel Resume see RESUME on page 36 When operating the System the on screen guide icon see the following table appears on the TV To select a title group While playing a disc file You can select a title group directly by pressing a number button after pressing GROUP TITLE except for DVD VR disc Group name appears for MP3 or WMA playback To select a chapter...

Page 13: ...s the following While listening to another source Changes the source to AUX automatically If you change from AUX to another source QP Link will be canceled While the System is on standby Turns on the System and activates the AUX source automatically except when the display is turned off While QP Link plays back the device Examples To select number 5 press 5 To select number 10 press 10 To select n...

Page 14: ... of the bass sound is clearly maintained regardless of how you set the volume Active Hyper Bass Pro When Sound Turbo II is turned on AHB Pro setting cannot be changed SOUND TURBO VOLUME 3D PHONIC Remote control Main unit SOUND TURBO AUDIO VOL A STANDBY SLEEP ENTER SET AHB PRO DISPLAY CLOCK TIMER BASS TREBLE VFP DVD AUX LEVEL DIMMER SCAN MODE UX G60 NTSC PAL UX G55 SHIFT FADE MUTING 3D PHONIC CANCE...

Page 15: ...TION Suitable for action movies and sports programs DRAMA Creates natural and warm sound Enjoy movies in a relaxed mood THEATER Enjoy sound effects like in a major theater Remote ONLY BASS TREBLE BASS TREBLE AUDIO VOL TV VOL Canceled BASS TREBLE BASS TREBLE AUDIO VOL TV VOL Canceled 4 3D PHONIC while holding 3D PHONIC ACTION 3D PHONIC DRAMA 3D PHONIC THEATER 3D PHONIC OFF NORMAL Original recording...

Page 16: ...al PAL TV PAL PRG 2 Select for a progressive PAL TV Select to enjoy a progressive scanned picture with a progressive PAL TV NTSC Select for a conventional NTSC TV NTSC PRG 2 Select for a progressive NTSC TV Select to enjoy a progressive scanned picture with a progressive NTSC TV Remote ONLY 1 DIMMER DIM ON AUTO DIM DIM OFF while holding Canceled Remote ONLY INFO SCAN MODE 9 PAL PRG PAL NTSC PRG NT...

Page 17: ...y stops the A STBY indicator starts flashing If no operation is done for about 3 minutes while the indicator is flashing the System turns off standby automatically Sleep Timer You can set the shut off time so that you can go to bed without turning it off yourself 1 Specify the time in minutes 2 Wait until the set time disappears To check the time remaining until the shut off time press SLEEP while...

Page 18: ... 4 audio channels SVCD usually uses these 4 channels to record two 2 channel recordings ST1 ST2 The following discs files can be played back only with UX G60 DVD Audio WMA ASF DivX Ultra Files in a USB mass storage class device ANGLE ENTER SET SLOW AUDIO MPX ZOOM 8 7 PAGE SUBTITLE UX G60 SUBTITLE UX G55 SHIFT DVD CD 3 C VOICE Remote control Number buttons ST1 ST2 ST To listen to normal stereo 2 ch...

Page 19: ...ill pictures B S P they are usually shown automatically during playback You can also select the page using the on screen bar see page 22 Playing Back Bonus Group This function is available only for UX G60 For DVD Audio only Some DVD Audio discs have a special group called bonus group whose contents are not open to the public To playback a bonus group you have to enter the specific key number a kin...

Page 20: ... for DVD Video To resume normal playback press DVD CD 3 To replay the previous scenes One Touch Replay This function is only used while playing DVD Video DVD VR While playing back Zoom 1 While playing back 2 Move the zoomed in position To cancel Zoom press ZOOM while holding SHIFT repeatedly until ZOOM OFF appears on the TV To pause To resume normal playback While playing Still picture playback st...

Page 21: ...rage class device Remote control 8 SHIFT CANCEL DVD CD 3 FM PLAY MODE 4 7 REPEAT A B REPEAT USB MEMORY 3 ZOOM ENTER SET MENU PL TOP MENU PG ON SCREEN 1 Number buttons Main unit 4 7 0 DVD CD 8 USB MEMORY 8 The illustration above is UX G60 To enter the numbers directly Examples To enter number 5 press 5 To enter number 10 press 10 To enter number 15 press 10 1 then 5 To enter number 30 press 10 3 th...

Page 22: ... To pause To stop To release press DVD CD 3 To erase the last track file To erase the entire program To add another track file to the program Repeat step 2 DVD CD GROUP TITLE SKIP TV CH TV CH In the programmed order In the reverse order CANCEL 0 while holding CANCEL 0 while holding 2 sec FM PLAY MODE PROGRAM RANDOM Canceled Playback starts in random order Random Play ends when the entire disc has ...

Page 23: ...isc tray so that no one can eject the loaded disc This is possible only while the System is on standby While the disc tray is closed To cancel the prohibition repeat the same procedure UNLOCKED appears on the display REP CHAP 2 Repeats the current chapter REP TTL Repeats the current title REP TRK 2 Repeats the current track REP GRP Repeats the current group REP PG Repeats the current program REP A...

Page 24: ...G 1 MPEG 2 ASF 1 DivX TOTAL1 25 58 CHAP 23 FILE TIME 00 00 58 2 1 3 USB 1 On screen Bar Information 1 Disc type 2 Playback information Indication Meanings Dolby D LPCM Audio format 3 2 1ch 2 0 0 ch Channel number Current title Current chapter Current group Current track Time indications 3 Operation modes Indication Meanings Playback Forward Reverse search Forward Reverse slow motion Pause Stop 4 F...

Page 25: ...3 DVD VIDEO TITLE 2 TIME OFF CHAP 1 3 1 3 1 1 TIME 0 00 58 CHAP 3 Dolby D 3 2 1ch DVD VIDEO TITLE 2 TIME 0 00 58 CHAP 3 Dolby D 3 2 1ch 2 disappears OFF 1 3 1 3 1 3 TIME TITLE 14 TOTAL1 25 58 CHAP 23 DVD VIDEO TITLE 2 TIME OFF CHAP 1 3 1 3 1 1 TIME 0 00 58 CHAP 3 Dolby D 3 2 1ch ENTER SET 1 3 1 3 1 3 TOTAL1 25 58 CHAP 23 TITLE 2 1 3 1 3 1 1 TOTAL 1 01 58 CHAP 3 ENGLISH TV CH TV CH 1 3 1 3 1 3 TITL...

Page 26: ...ire on screen bar 2 Select or 3 Display the pop up window A B Repeats a desired portion see below TITLE 1 Repeats the current title GROUP Repeats the current group ALL Repeats the disc except for DVD or program CHAPTER 2 Repeats the current chapter TRACK 2 Repeats the current track OFF Cancels Repeat Play A B Repeat starts The selected portion plays repeatedly Before pressing ENTER SET you can sea...

Page 27: ... then 0 To select chapter track 15 press 1 then 5 To select chapter track 30 press 3 then 0 The System starts playing the searched chapter or track 0 1 4 7 2 5 8 3 6 9 ENTER SET PAGE 1 5 OFF 1 3 TIME TRACK DVD AUDIO GROUP 14 TIME 0 00 58 TRACK 23 1 5 PAGE 1 LPCM 2 0 0ch 1 3 P 14 TIME 0 00 58 TRACK 23 3 5 PAGE 3 TV CH TV CH ENTER SET To select the Program List To select the Play List To remove the ...

Page 28: ... 3 Group list 4 Track information ID3 Tag Version 1 0 only for MP3 and WMA 5 Current track 6 Repeat Play setting 7 Elapsed playing time of the current track except for JPEG 8 Operation mode icon 9 Current track number total number of tracks in the current group total number of tracks on the loaded disc 0 Highlight bar Track list If files of different types MP3 WMA JPEG MPEG 1 MPEG 2 ASF and DivX a...

Page 29: ... press ZOOM while holding SHIFT repeatedly until ZOOM OFF appears on the TV For JPEG The selected track still picture is displayed until you change it Press one of the buttons depending on the current source Slide show playback starts Each track still picture is shown on the screen for about 3 seconds then changes one after another For the other files Playback starts with the selected track Pressi...

Page 30: ...SB MEMORY 8 UX G60 FM AM UX G55 PUSH OPEN 0 REC TAPE FM AM AUX UX G60 AUX UX G55 Remote control Main unit TAPE 7 DVD CD 3 FM AM AUX UX G60 AUX UX G55 USB MEMORY 3 UX G60 FM AM UX G55 The illustration above is UX G60 IMPORTANT It may be unlawful to record or playback copyrighted material without the consent of the copyright owner To stop recording INFO With the tape side facing outside Push Insert ...

Page 31: ...ange the disc if necessary On the main unit The System automatically creates 4 second blanks between the tunes recorded on the tapes To record a Live disc It will not be desirable to put 4 second blank portions between the tunes recorded on the tape To record the entire tracks without any interruption recorded pause playback press DVD CD 3 or USB MEMORY 3 1 then 8 before pressing REC To record Pro...

Page 32: ...ophone 6 Adjust the MIC VOLUME and VOLUME SHIFT KARAOKE AUDIO MPX RESERVE TAPE DVD CD 3 ECHO FM AM AUX USB MEMORY 3 KEY KEY 7 MIC VOLUME 7 DVD CD 8 USB MEMORY 8 REC TAPE FM AM AUX VOLUME Remote control Main unit MIC jack The illustration above is UX G60 NOTE This function is not available for UX G55 IMPORTANT Always set MIC VOLUME to MIN when connecting or disconnecting the microphone DO NOT keep ...

Page 33: ...ixing while playing any source By pressing REC you can record your singing along except when the playing source is TAPE 1 Turn MIC VOLUME to MIN 2 Connect the microphone not supplied to the MIC jack 3 Start playing the source FM AM DVD CD USB MEM TAPE or AUX 4 Sing into the microphone 5 Adjust the MIC VOLUME and VOLUME You can apply echo to your voice While playing a disc you can also adjust Key C...

Page 34: ...layback During playback 1 Select a title group 2 Select a chapter track Examples To select preset number 5 press 5 To select preset number 10 press 10 To select preset number 15 press 10 1 then 5 To select preset number 30 press 10 3 then 0 Remote ONLY DVD CD SET UP RESERVE No 1 2 3 4 5 Tr Chap Gr Tt while holding On the TV screen 1 4 7 10 2 5 8 3 6 9 10 0 To remove the unwanted track To add anoth...

Page 35: ...PE DISC USB MEM or AUX 4 For TUNER FM and TUNER AM Select a preset channel For DISC Select the title group number then the chapter track number For USB MEM Select the group number then the track file number Daily Timer initial settings when shipped from the factory DAILY 1 ON Time 6 00 OFF Time 8 00 Source TUNER FM 1 Volume level DAILY 2 ON Time 7 00 OFF Time 9 00 Source TUNER FM 1 Volume level DA...

Page 36: ...ion or starts playing the loaded disc with the specified chapter or track and sets the volume level gradually to the preset level after about 30 seconds While Daily Timer is working the timer indicator and timer number indicator 1 2 3 flash on the display When the off time comes The System stops playback and turns off on standby automatically The timer setting remains in memory until you change it...

Page 37: ...or wide screen televisions 16 9 16 9 MULTI Wide television screen For a wide screen 16 9 TV 4 3 LB 4 3 MULTI LB Letter Box conversion For a conventional 4 3 TV Displays a wide screen picture to fit the width of the TV screen keeping the aspect ratio 4 3 PS 4 3 MULTI PS Pan Scan conversion For a conventional 4 3 TV The picture is zoomed in to fill the screen vertically and the left and right sides ...

Page 38: ...D RANGE COMPRESSION Set this item to listen to DVD Video recorded in Dolby Digital format at low or middle volume AUTO You can enjoy powerful playback sound with full dynamic range ON Select this when you want to fully apply the compression effect to make the sound at lower volume clear useful at midnight OTHERS menu Item Contents RESUME You can select Resume ON The System resumes playback from th...

Page 39: ...ng equipment You cannot use reverse slow motion Program Play or Random Play For MP3 or WMA for UX G60 only playback MP3 WMA discs require a longer readout time than regular CDs It depends on the complexity of the group file configuration Some MP3 WMA files cannot be played back and will be skipped This results from their recording processes and conditions This System can play only a disc of ISO 96...

Page 40: ... the following types of files in a USB mass storage class device maximum data transfer rate 2 Mbps Music MP3 WMA Picture JPEG Movie MPEG 1 MPEG 2 ASF DivX maximum frame rate of 30 fps for progressive You cannot playback a file larger than 2 Gigabyte When playing a file which has a large transfer rate frames or sounds may be dropped during playback This System cannot recognize a USB mass storage cl...

Page 41: ...nd the leader tape first to ensure that the recording will be made without any music part lost If you start recording with no cassette inserted NO REC appears on the display If a protected tape has been inserted NO REC appears You cannot open or close the disc tray while recording a disc Synchronized Recording Synchronized recording does not function on the file format of MPEG 1 MPEG 2 ASF and Div...

Page 42: ...d exposure to direct sunlight extreme temperature and moisture To clean the disc Wipe the disc with a soft cloth in a straight line from center to edge Handling cassette tapes If the tape is loose in its cassette take up the slack by inserting a pencil in one of the reels and rotate it If the tape is loose it may get stretched cut or caught in the cassette Be careful not to touch the tape surface ...

Page 43: ...u have changed the FILE TYPE setting after the System read the disc or the USB mass storage class device In this case reload the disc or disconnect the USB mass storage class device and connect it again NO AUDIO appears This System cannot playback illegally produced DVD Audio discs LR ONLY appears Some DVD Audio discs prohibit downmixed output When you playback such a disc this System plays back t...

Page 44: ...ri KU Kurdish KY Kirghiz LA Latin LN Lingala LO Laothian LT Lithuanian LV Latvian Lettish MG Malagasy MI Maori MK Macedonian ML Malayalam MN Mongolian MO Moldavian MR Marathi MS Malay MAY MT Maltese MY Burmese NA Nauru NE Nepali NL Dutch NO Norwegian OC Occitan OM Afan Oromo OR Oriya PA Panjabi PL Polish PS Pashto Pushto PT Portuguese QU Quechua RM Rhaeto Romance RN Kirundi RO Rumanian RW Kinyarwa...

Page 45: ...16 bit Linear PCM DVD Audio 1 with 48 96 192 kHz 16 20 24 bit Linear PCM 48 kHz 16 bit Linear PCM with 44 1 88 2 176 4 kHz 16 20 24 bit Linear PCM 44 1 kHz 16 bit Linear PCM with Dolby Digital Dolby Digital bitstream 48 kHz 16 bit Linear PCM with DTS DTS bitstream 48 kHz 16 bit Linear PCM DVD R RW ROM in DVD VR format with 48 kHz 16 20 24 bit Linear PCM 48 kHz 16 bit Linear PCM 2 with Dolby Digita...

Page 46: ... cm cone x 1 Woofer 13 5 cm cone x 1 Impedance 6 Ω Dimensions approx 166 mm x 250 mm x 232 mm W H D Mass approx 2 8 kg each SP UXG55 for UX G55 Speaker units 10 cm cone x 1 Impedance 6 Ω Dimensions approx 145 mm x 250 mm x 200 mm W H D Mass approx 2 kg each Supplied Accessories See page 3 Design and specifications are subject to change without notice Manufactured under license from Dolby Laborator...

Page 47: ... 14 SET UP w 35 SHIFT s 10 11 13 14 15 17 18 21 27 31 32 33 34 43 SLEEP 2 15 SLOW 9 9 9 9 u 18 SOUND TURBO II d 12 SUBTITLE i 17 TAPE v 7 TOP MENU PG p 11 25 TV CH 9 9 9 9 q 43 TV VOL Q 43 TV VIDEO k 43 USB MEMORY 3 3 3 3 UX G60 e 7 10 27 28 29 31 VFP z 14 ZOOM 6 18 27 Button Page STANDBY lamp 8 7 7 7 7 7 0 10 21 0 0 0 0 10 21 3D PHONIC 13 AUX UX G55 7 AUX jack 5 Cassette holder 9 28 Display 3 6 D...

Page 48: ...a Australia and U K CAUTION for mains AC line BEFORE PLUGGING IN do check that your mains AC line voltage corresponds with the position of the voltage selector switch provided on the outside of this equipment and if different reset the voltage selector switch to prevent from a damage or risk of fire electric shock The illustration above is UX G60 except for Hong Kong region and Australia Cover U f...

Reviews: