background image

37

3

Select track.

4

Select a destination group.

5

Select the new track number in the destination group 
for the target track.

6

Start moving.

“EDITING” appears on the display. The message goes off as 
the editing result is stored.

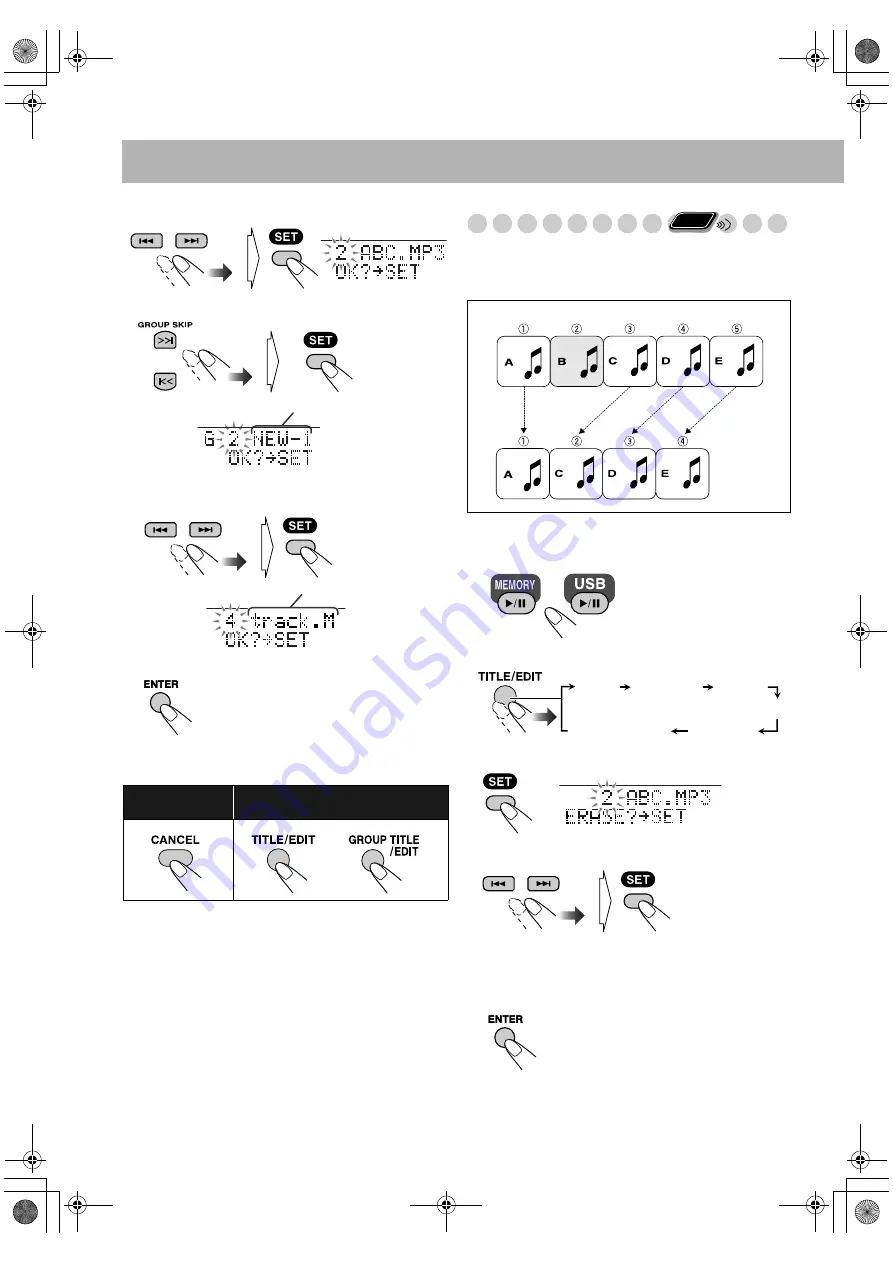
Erasing the Tracks (ERASE)

You can erase tracks on the built-in memory or USB device.
• Once tracks are erased, you cannot restore them.

Example: Erasing the track “B.”

1

Select a desired source.

2

Select “ERASE.”

3

Confirm your selection.

4

Select the tracks you want to erase.

• You can select up to 15 tracks by repeating this step. 

When you select a 16th track, “MEMORY FULL” 
appears on the display.

5

Confirm your selection.

To go back to 
previous step:

To quit editing:

Group title

Track title

or

Remote
ONLY

USB
device

Built-in 
memory

TITLE

FORM GR

ERASE

MOVE

FORMAT

Canceled

UX-DM9[B].book  Page 37  Friday, July 20, 2007  2:18 PM

Summary of Contents for CA-UXDM9DB

Page 1: ...MICRO COMPONENT SYSTEM UX DM9DB Consists of CA UXDM9DB and SP UXDM8 INSTRUCTIONS GVT0225 001A B UX DM9 B book Page 1 Friday July 20 2007 2 18 PM ...

Page 2: ...hed on when it is unattended unless it is specifically stated that it is designed for unattended operation or has a standby mode Switch off using the switch on the equipment and make sure that your family know how to do this Special arrangements may need to be made for infirm or handicapped people DON T use equipment such as personal stereos or radios so that you are distracted from the requiremen...

Page 3: ...BE SURE to replace the fuse only with an identical approved type as originally fitted If nonetheless the mains plug is cut off ensure to remove the fuse and dispose of the plug immediately to avoid a possible shock hazard by inadvertent connection to the mains supply If this product is not supplied fitted with a mains plug then follow the instructions given below IMPORTANT DO NOT make any connecti...

Page 4: ... this waste in accordance with national legislation Business users If you wish to dispose of this product please visit our web page www jvc europe com to obtain information about the take back of the product Other Countries outside the European Union If you wish to dispose of this product please do so in accordance with applicable national legislation or other rules in your country for the treatme...

Page 5: ...d notes are explained later in the sections Learning More about This System and Troubleshooting but not in the same section explaining the operations indicates that the content has some information Playable Disc File Types In addition to the above discs files this System can play back audio data recorded on CD Extra and CD Text The following discs cannot be played back R RW DVD ROM DVD RAM CD I CD...

Page 6: ...back Operations 21 Programming the Playing Order Program Play 21 Playing at Random Random Play 23 Playing a Selected Group Group Play 23 Playing at Random in a Selected Group Group Random Play 24 Playing Repeatedly Repeat Play 24 Search for a Track or Group by Title Title Search 25 Prohibiting Disc Ejection Child Lock 25 Recording Operations 26 Before You Start Recording 26 Recording from a Disc 2...

Page 7: ...a x1 Core filter x1 AM loop antenna x1 Power cord x1 Remote control x1 Speaker cords x2 Batteries x2 Front panel From the external equipment See page 12 From the USB device See page 9 From the headphones See page 7 To a wall outlet See page 5 Plug in the power cord only after all connections have been completed From the iPod See page 11 Rear panel From AM FM antenna See page 5 From the speakers Se...

Page 8: ...speaker to each terminal DO NOT push or pull the speakers as this will damage the foot spacers at the bottom of the speakers Left speaker Transparent Press and hold Release Insert Transparent with black stripe Transparent Right speaker Insert Press and hold Release Transparent with black stripe DAB antenna supplied Extend the wire so that you can receive your desired ensembles Active antenna not s...

Page 9: ...e the cutout of the core filter as shown in the illustration 3 Close the core filter until it clicks shut Note Do not damage the power cord by applying excessive force when winding Preparing the Remote Control If the range or effectiveness of the remote control decreases replace both batteries When using the remote control Point the top of the remote control toward the remote sensor as directly as...

Page 10: ...pages 27 29 and 41 7 Radio reception indicators ST See page 8 TUNED See page 18 8 Sound mode indicator See page 13 9 K2 indicator Lights when CD MEMORY or USB is selected as a source This means the K2 Technology which improves the digital sound quality is activated p DAB band indicators See page 18 q Enhanced Other Networks indicators See page 17 for FM and page 20 for DAB w Playback mode indicato...

Page 11: ...e the buttons and controls on the main unit if they have the same or similar name and marks 1 2 1 3 REPEAT 3 PLAY FM MODE 4 7 2 SET QP LINK USB MODE GROUP SELECT GROUP SKIP Number buttons Remote control The STANDBY lamp on the main unit lights in red A small amount of power is always consumed even while on standby For private listening Connect a pair of headphones to the PHONES jack on the main un...

Page 12: ... can preset 30 FM and 15 AM stations 1 Tune in to a station you want to preset You can also store the monaural reception mode for FM preset stations if it is selected 2 Activate the preset number entry mode Finish the following process while the indication on the display is flashing 3 Select a preset number for the station you store 4 Store the station To tune in to a preset station 1 Select the b...

Page 13: ...ect a USB device Always set the volume to minimum level when connecting or disconnecting external equipment You can connect a USB device such as a USB flash memory Digital Audio Player Portable HDD etc to this System You cannot connect a computer to the USB memory terminal of the System You cannot connect a memory device through a USB hub or a multimedia card reader Connect the USB device directly...

Page 14: ...his function is not available for some digital audio player To locate a track directly You can select a track directly and start playback MSC Only suitable for USB mass storage class MSC device You can record edit and move the track to the USB mass storage class device AUTO Suitable for USB mass storage class MSC device and media transfer protocol MTP device The System detects the device type MSC ...

Page 15: ... damage to the connector part Do not touch or hit the iPod terminal pins or connector pins It might cause damage to the connector part If an incompatible iPod type is connected the iPod may not be operated from the System To enable the operation before connecting the iPod switch the charge mode to OFF see To turn on off the charge mode on page 12 Sound distortion may occur when playing back audio ...

Page 16: ...e audio output To select AUX as the source To activate QP Link When QP Link is activated playing back the external equipment connected to the AUX jack performs the following While listening to another source Change the source to AUX automatically If you change from AUX to another source QP Link will be canceled While the System is on standby Turn on the System and change the source to AUX automati...

Page 17: ... To adjust the treble To select the sound mode You can select from 3 types of the sound mode Remote control Main unit To restore the volume press again or adjust the volume level VOLUME Remote control Main unit REPEAT SLEEP AHB PRO SET DISP CHARA FADE MUTING DIMMER CANCEL 4 SOUND MODE CLOCK TIMER A STANDBY BASS TREBLE VOLUME Remote ONLY SOUND 1 Produces a sound in natural ambience SOUND 2 Produces...

Page 18: ...MEMORY 8 and USB 8 DIMMER 2 Dims the display more than DIMMER 1 and turns off the illumination lights around the CD 8 MEMORY 8 and USB 8 DISPLAY ON Turns on the clock indication on the display DISPLAY OFF Turns off the clock indication on the display Remote ONLY DIMMER 2 DIMMER 1 DIMMER OFF Canceled DISPLAY ON DISPLAY OFF LEVEL 1 Select this if the sound on LEVEL 2 is too loud This setting is reco...

Page 19: ...5 Not displayed while iPod or USB is selected as a source or while USB device is not detected Turning Off the Power Automatically Auto Standby This function is available only for CD built in memory USB iPod and AUX When Auto Standby is in use the A STBY indicator lights on the display When the playback stops the A STBY indicator starts flashing If no operation is performed while the indicator is f...

Page 20: ...UND appears on the display and selected station is shown If no program is found NOT FOUND appears on the display To stop searching press PTY SEARCH To continue searching after it stops on an unwanted station Press PTY SEARCH again PS Program Service Shows commonly known station names PTY Program Type Shows types of broadcast programs RT Radio Text Shows text messages that the station sends Enhance...

Page 21: ...anceled News News Affairs Topical program expanding or enlarging upon the news debate or analysis Info Programs the purpose of which is to impart advice in the widest sense Sport Programs concerned with any aspect of sports Educate Educational programs Drama All radio plays and serials Culture Programs concerning any aspect of national or regional culture including language theater etc Science Pro...

Page 22: ...found by the ensemble scanning To choose from all the ensembles see To tune in to all the ensembles on page 19 3 Select a service either primary or secondary you want to listen to When you reach the last first service of an ensemble you can also skip to the next previous ensemble by pressing x 4 It may take some time to change ensembles When the signal is strong enough the TUNED indicator lights o...

Page 23: ...using an active antenna see page 4 While on standby You cannot change this setting when the display is turned off see page 14 Presetting Services You can preset 30 services 1 Tune in to an ensemble then select a service you want to preset 2 Activate the preset number entry mode 3 Select a preset number for the service you store 4 Store the service You can only preset primary services If you select...

Page 24: ... Choice Automatically PTY Standby Reception function allows the System to temporarily switch to a DAB service broadcasting a program of your choice TA News or Info This function works while listening to a service providing the required signals While listening to a DAB service select the program type Service label NO SIGNAL will appear if no signal is sent PTY The broadcast program type is displaye...

Page 25: ...ring 99 tracks PROGRAM FULL appears on the display and the track will not be programmed 4 Start playback 7 4 0 CD 8 USB 8 MEMORY REC MEMORY 8 REPEAT 7 SET ENTER CANCEL 4 PLAY FM MODE MEMORY 6 CD 6 USB 6 TITLE SEARCH REPEAT GROUP SKIP Remote control Main unit Number buttons Remote ONLY INFO To enter the numbers directly Examples To enter number 5 press 5 To enter number 10 press 10 To enter number ...

Page 26: ... 3 above 5 Activate Program Play 6 Start playback To check the programmed contents Before or after playback To modify the program Before or after playback To exit from Program Play Before or after playback Appears only when MEMORY or USB is selected as a source Program number PROGRAM RANDOM GROUP RANDOM GROUP Canceled Number of the programmed tracks Group number of the track last programmed Track ...

Page 27: ...lay a selected group on the built in memory or USB device You cannot use this function for CD 1 Before starting playback activate Group Play 2 Start playback Playback starts in the current group Group Play finishes when all the tracks in the group are played back 3 Select a desired group To exit from Group Play Before or after playback To skip a track To stop Remote ONLY INFO PROGRAM RANDOM GROUP ...

Page 28: ...ing Repeatedly Repeat Play You can repeat playback While playing or before playback Appears only while playing back an MP3 WMA WAV track from the disc To skip a track To stop Remote ONLY INFO PROGRAM RANDOM GROUP RANDOM GROUP Canceled USB device Built in memory PROGRAM RANDOM GROUP RANDOM GROUP Canceled REPEAT TRACK Repeats the current track The indicator lights REPEAT GROUP Repeats the current gr...

Page 29: ...n the display Prohibiting Disc Ejection Child Lock You can lock the disc tray so that no one can eject the loaded disc This is possible only while the System is on standby While the system is on standby To cancel the prohibition repeat the same procedure UNLOCKED appears on the display TRACK T SEARCH Search for a track by title The SEARCH indicator lights GROUP T SEARCH Search for a group by title...

Page 30: ...B device the tracks are moved to the USB device and the tracks on the built in memory are deleted When you record the tracks from an iPod or a portable audio device the System starts synchronized recording with the incoming sound signals When no sound signal comes from an iPod or a portable audio device for 30 seconds the System stops recording automatically and adds a 2 second blank to the end of...

Page 31: ...ime is calculated using the current Recording Mode When you check the available remaining time for recording while MEMORY or USB is selected the time is calculated using the SP REC mode Recording from a Disc You can record tracks in digital recording from a CD onto the built in memory or USB device Do not vibrate the System while recording editing tracks Take care especially while WRITING is shown...

Page 32: ...5 Select the group to record tracks into When you make a new group for the tracks 1 Select FORM GR mode 2 Make a new group The first new group you make is displayed as the 2nd group because the root of the target device is recognized as the 1st group You can enter the title of the new group in this step See Entering Titles on page 35 3 Start recording When you select an existing group to record tr...

Page 33: ...ack When you want to record tracks from external equipment 1 Connect the external equipment See Playing Back External Equipment on page 12 2 Select AUX as a source See To select AUX as the source on page 12 2 Select a Recording Mode See page 27 for the details of each mode 3 Select a Marking Mode 4 Select the recording device To record onto built in memory To record onto USB device on the main uni...

Page 34: ...ng the source only for iPod or external equipment When the sound signal comes into the System recording starts automatically When the incoming signal from external equipment is too weak recording does not start In this case increase the volume on the external equipment When recording does not start you can start recording manually by pressing MEMORY 6 or USB 6 When no signal is detected for 30 sec...

Page 35: ...back When moving a track from USB device When moving a track from built in memory 2 Select a track to move 3 Select the target device 4 Confirm the selection 5 Select the group to move the track into When you make a new group 1 Select FORM GR mode 2 Make a new group The first new group you make is displayed as the 2nd group because the root of the target device is recognized as the 1st group You c...

Page 36: ...B device When moving a group from built in memory 2 Activate Group Play and select a group to transfer See Playing a Selected Group Group Play on page 23 3 Select the target device to move the group onto 4 Start moving When the transfer starts MOVE START appears and movement process is shown by on the display After the progress indication become 100 WRITING flashes on the display When WRITING goes...

Page 37: ...acks When you select an existing group 1 Select a desired group See also page 10 2 Start moving the programmed tracks When you want to move the tracks into the root group G1 MUSIC of the target device When the transfer starts MOVE START appears and the progress is shown by on the display After the progress indication become 100 WRITING flashes on the display When WRITING goes off the transfer is c...

Page 38: ...roup title 1 Enter the group title editing mode 2 Select a group You cannot edit the title for the root group G1 MUSIC 3 Display the title editing screen 4 Enter a title See Entering Titles on page 35 5 Finish the procedure To quit title editing To edit the next track group REPEAT SET ENTER CANCEL 4 7 GROUP SKIP MEMORY 3 8 TITLE EDIT GROUP TITLE EDIT USB 3 8 DISP CHARA Remote control Number button...

Page 39: ...s See Available Characters below You can also enter a space at the end of a title by pressing 10 To quit title entry The entered titles are not stored Available Characters For built in memory you can use the following symbols for the track title and group title For USB device they can be displayed but cannot be used Remote ONLY Track number or group number Character entry position Available charac...

Page 40: ...a new group 4 Enter a title of the new group See Entering Titles on page 35 5 Store the title EDITING appears on the display The message goes off as the group is stored Moving a Track MOVE You can move a track to another group in the built in memory Example Moving the track B in the 1st group to the 2nd group 1 Start playing back a track you want to move in the built in memory 2 Select MOVE Remote...

Page 41: ...cks are erased you cannot restore them Example Erasing the track B 1 Select a desired source 2 Select ERASE 3 Confirm your selection 4 Select the tracks you want to erase You can select up to 15 tracks by repeating this step When you select a 16th track MEMORY FULL appears on the display 5 Confirm your selection To go back to previous step To quit editing Group title Track title or Remote ONLY USB...

Page 42: ...2 Select ERASE GR 3 Confirm your selection 4 Select the group you want to erase When you want to erase an empty group select a group while playback is stopped 5 Start erasing EDITING appears on the display The message goes off when erasing is finished To go back to previous step To quit editing or Remote ONLY INFO Group 1 Group 3 Group 2 Group 2 Group 1 USB device Built in memory To go back to pre...

Page 43: ...Example Erasing all tracks 1 Select a desired source 2 Select FORMAT 3 Confirm your selection 4 5 Confirm the erasing 6 Start erasing EDITING appears on the display The message goes off when formatting is finished Remote ONLY All tracks are erased Blank USB device Built in memory TITLE FORM GR ERASE MOVE FORMAT TITLE FORM GR ERASE GR FORMAT Canceled or Canceled To go back to previous step To quit ...

Page 44: ...ction REPEAT SET CANCEL 4 STANDBY ON CLOCK TIMER ENTER HQ SP EP Remote control When you want to activate several timers leave a gap of 6 minutes or more between the end time of the first timer and the start time of the second timer If the gap is less than 6 minutes the second timer does not work How Recording Timer works When Recording Timer has been set the indicator REC indicator and timer numbe...

Page 45: ...roup named TIMER is made automatically and the recordings are stored as tracks in the group You cannot select other groups for storage To cancel Recording Timer In step 2 on page 40 select the timer number you want to cancel then press CANCEL Even when you cancel Recording Timer the setting remains stored To activate Recording Timer again In step 2 on page 40 select the timer number you want to ac...

Page 46: ...an also use the number buttons to select the preset number When you want to play back a disc built in memory or USB device Select the group number then the track number of the desired track When the loaded disc is an audio CD simply select the track number then press SET 5 Adjust the playback volume You can also use the number buttons to adjust the playback volume 6 Turn off the System To cancel P...

Page 47: ...ger than 2 GB This System cannot recognize a USB device whose rating is other than 5 V and does not exceed 500 mA This System may not play back some USB devices This System may not play back some files even though their formats are listed above It takes longer to start up a USB device larger than 1 GB For MP3 WMA WAV playback MP3 WMA WAV discs require a longer readout time than regular CDs It depe...

Page 48: ...rogram is deleted and Program Play is canceled Turning off the System Ejecting a disc Only for Program Play of the discs Disconnecting a USB device Only for the Program Play of the USB device When you change the source to iPod the program for the USB device is deleted Playing at Random Random Play You cannot play tracks of different sources at random When you turn off the System or disconnect the ...

Page 49: ... track number correctly while setting a timer the currently selected station service or the first track will be played when the timer is activated When Playback Timer works the volume increases gradually to the volume you have set Maintenance To get the best performance of the System keep your discs and mechanism clean Handling discs Remove the disc from its case by holding it at the edge while pr...

Page 50: ... USB device is write protected CANNOT PLAY The file is unplayable CANNOT REC While in Random Play or Group Random Play you cannot move tracks between built in memory and USB device You cannot record tracks from an iPod to a USB device CANNOT REC CHANGE MSC Change the USB connection mode to MSC see page 10 CANNOT REC MTP DEVICE You cannot record on the connected USB device CANNOT REC NORMAL ONLY Yo...

Page 51: ...ble cause and Solutions DRM ERROR Playback of this track is not allowed For example the license is invalid the playable times exceed the limit etc DRM FILE You cannot play back a track with DRM while the USB connection mode is MSC see page 10 DRM FILE EXIST You cannot delete the track with DRM You cannot move the track with DRM to the built in memory FORMAT ERROR You cannot initialize the built in...

Page 52: ...the USB mass storage class device The iPod does not play but CONNECT appears on the display sThe iPod battery is low or exhausted Charge the iPod battery Recording Operations Unable to record into the built in memory or USB device sThe capacity of the built in memory or USB device is full Erase some tracks sThere have been 999 tracks on the built in memory USB device or group you want to record in...

Page 53: ...8 kbps at SP REC 192 kbps at HQ REC USB section USB type USB Ver 2 0 Full Speed Connection type MTP MSC File system FAT16 FAT32 Playable file MP3 WMA WAV format Recording format MP3 format Recording bit rate 64 kbps at EP REC 128 kbps at SP REC 192 kbps at HQ REC USB output power 5 V 500 mA iPod section iPod output power 5 V 500 mA General Power requirement AC 230 V 50 Hz Power consumption 30 W at...

Page 54: ...39 PLAY FM MODE p 8 21 24 PTY SEARCH g 16 20 QP LINK u 12 REC SPEED r 28 REPEAT l 24 SET s 8 14 15 19 22 25 28 30 31 33 34 36 42 SLEEP w 15 SOUND MODE y 13 STANDBY ON o 7 41 42 TA News Info l 17 20 TITLE EDIT 5 34 39 TITLE SEARCH h 25 USB 6 j 7 9 10 22 24 30 32 37 39 USB MODE u 10 VOLUME b 7 13 Button Page 3 7 7 7 10 12 21 23 27 29 32 x 9 8 10 12 18 21 24 31 4 8 8 10 12 18 21 22 31 0 9 25 USB memo...

Reviews: