background image

14

4

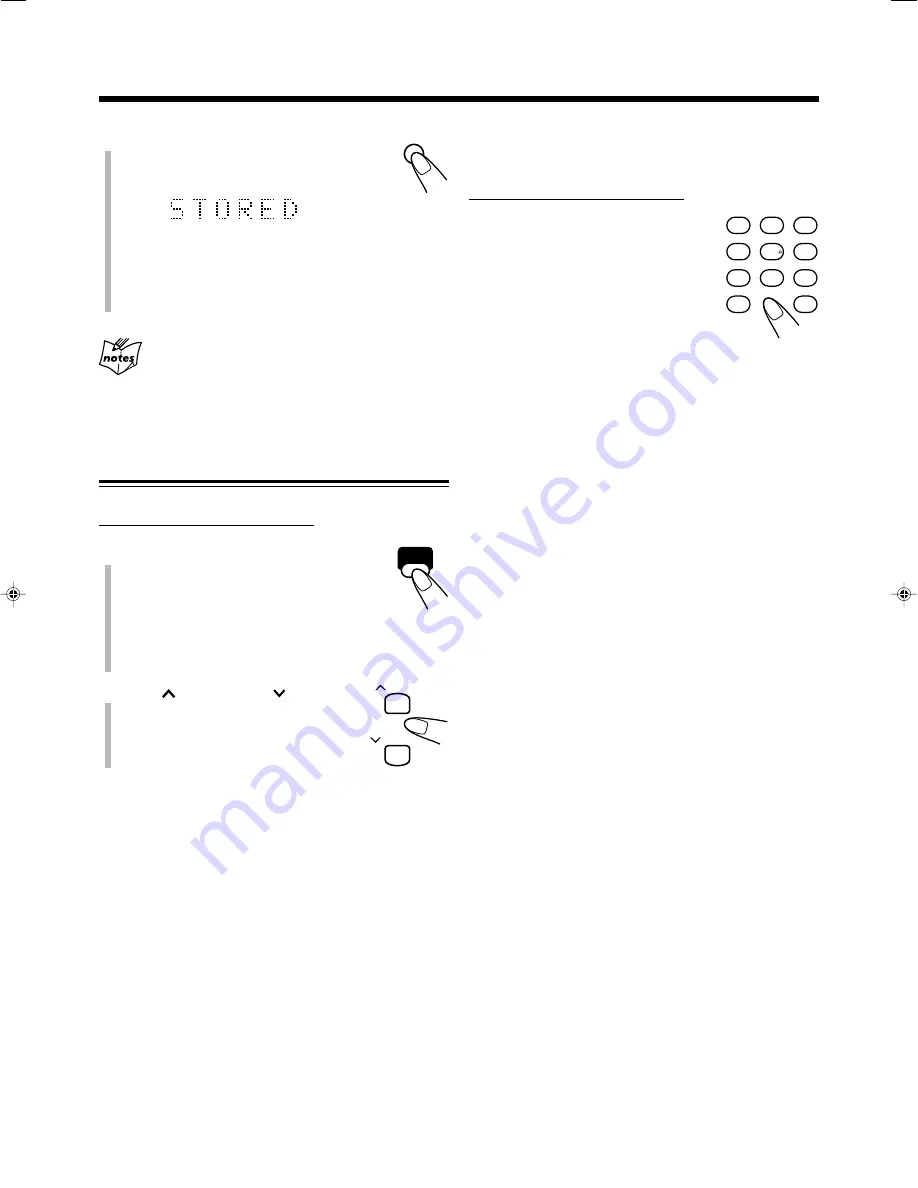
Press SET again.

“STORED” appears on the display for a
while.

The tuned station in step 

1

 is stored in the preset number

selected in step 

3

.

• Storing a new station on an already assigned number

erases the previously stored one.

When you unplug the AC power cord or if a power
failure occurs

The FM and AM (MW) preset stations will be erased in a day. If this
happens, preset the stations again.

Tuning in to a Preset Station

On the remote control ONLY:

1

Press FM/AM to select either “FM”
or “AM.”

The unit automatically turns on and tunes in to
the previously received station—either FM or
AM (MW).
• Each time you press the button, the band alternates

between FM and AM (MW)

.

2

Press 

 DISC UP or   DISC

DOWN to select a preset number.

SET

FM/AM

DISC UP

 DISC DOWN

To tune in to a preset station directly using the number
buttons

On the remote control ONLY:

Pressing the number button(s) allows you
to select the preset number you want.
Ex.: For preset number 5, press 5.

For preset number 15, press +10,

then 5.

For preset number 20, press +10,

then 10.

For preset number 30, press +10,

+10, then 10.

1

3

2

4

6

5

7

9

8

10

+10

13_14UX_B70[B].p65

03.4.15, 8:14 PM

14

Summary of Contents for CA-UXB70

Page 1: ...UME FM AM TAPE PHONES CD CD1 CD2 CD3 CD4 CD5 5 CD CHANGER PLAY EXCHANGE 5 CD STANDBY ON DISPLAY CLOCK TIMER SLEEP TREBLE DISC UP DISC DOWN BASS CANCEL SET 3 8 CD 2 3 TAPE FM AM AUX REPEAT AHB PRO REV MODE REC CD REC MODE PLAY MODE 1 3 2 4 6 5 7 9 8 10 10 RM SUXB70R REMOTE CONTROL DIMMER VOLUME FM MODE A STANDBY PTY SEARCH PTY SELECT RDS DISPLAY TA News Info ...

Page 2: ... screws covers or cabinet 2 Do not expose this appliance to rain or moisture IMPORTANT FOR LASER PRODUCTS REPRODUCTION OF LABELS 1 CLASSIFICATION LABEL ON EXTERIOR SURFACE 2 WARNING LABEL INSIDE THE UNIT 1 CLASS 1 LASER PRODUCT 2 CAUTION Invisible laser radiation when open and interlock failed or defeated Avoid direct exposure to beam 3 CAUTION Do not open the top cover There are no user serviceab...

Page 3: ...equipment switched on when it is unattended unless it is specifically stated that it is designed for unattended operation or has a standby mode Switch off using the switch on the equipment and make sure that your family know how to do this Special arrangements may need to be made for infirm or handicapped people DON T use equipment such as personal stereos or radios so that you are distracted from...

Page 4: ...or similar names or marks unless mentioned otherwise Basic and common information that is the same for many functions is grouped in one place and is not repeated for each procedure For instance we do not repeat the information about turning on off the unit setting the volume changing the sound effects and others which are explained in the section Basic and Common Operations on pages 9 to 12 The fo...

Page 5: ...DS 15 Changing the RDS Information 15 Searching for Programs by PTY Codes PTY Search 15 Switching Temporarily to a Program Type of Your Choice 16 Playing Back Discs on the 5 CD Changer 17 Loading Discs 17 Playing Back All the Entire Discs Continuous Play 18 Basic Disc Operations 18 Programing the Track Playing Order Program Play 19 Playing at Random Random Play 20 Repeating Tracks or Discs Repeat ...

Page 6: ...n 10 18 24 26 Pressing this button also turns on the unit p TAPE button 10 22 23 Pressing this button also turns on the unit q Disc eject buttons 10 17 18 CD10 CD20 CD30 CD40 and CD50 Pressing one of these buttons also turns on the unit and opens the corresponding disc tray w Disc trays compartment 17 e PHONES jack 11 r REV MODE reverse mode button 22 23 t AHB PRO Active Hyper Bass Pro button 11 y...

Page 7: ...21 PRGM program RANDOM and Repeat mode CD ALL A B 4 TAPE indicator 22 indicator 22 5 Tape operation indicators 22 23 2 3 tape direction and reverse mode 6 REC recording indicator 23 26 7 AUTO STANDBY indicator 10 8 AHB PRO Active Hyper Bass Pro indicator 11 9 FM mode indicators 13 STEREO and MONO 0 Timer indicators timer 9 27 28 SLEEP sleep timer 29 DAILY daily timer 9 27 28 REC recording timer 9 ...

Page 8: ...2 BASS button 12 3 Multi operation buttons DISC UP and DISC DOWN 4 7 and 4 SET button 13 14 21 5 Source buttons 3 8 CD 2 3 TAPE FM AM and AUX Pressing one of these buttons also turns on the unit 6 REV MODE button 22 23 7 PLAY MODE button 19 20 8 RDS operation buttons 15 16 PTY SEARCH PTY SELECT 9 RDS DISPLAY and TA News Info 9 A STANDBY auto standby button 10 p STANDBY ON button 10 28 q DISPLAY bu...

Page 9: ... antenna 3 Fasten it up in a position which gives you the best reception then attach it to the wall etc About the supplied FM antenna The FM antenna supplied with this unit can be used as a temporary measure If reception is poor you can connect an outdoor FM antenna FM antenna supplied To connect an outdoor FM antenna Before connecting it disconnect the supplied FM antenna Outdoor FM antenna not s...

Page 10: ...ting Speakers To connect speakers You can connect the speakers using the speaker cords 1 If the cords are covered with insulation remove a short section of insulation at the end of each cord by twisting and pulling it off 2 Hold the clamp of the speaker terminal 3 Insert the end of the speaker cord into the terminal Match the polarity of the speaker terminals ª to ª and to 4 Release your finger fr...

Page 11: ...nt and AUX DVD jacks by using audio cords not supplied NOW you are ready to plug in the unit and any other connected equipment IMPORTANT Be sure to check that all connections have been made before plugging in the power cord Putting the Batteries into the Remote Control Insert the batteries R6 SUM 3 AA 15F into the remote control by matching the polarity and on the batteries with the and marking on...

Page 12: ...it is turned on On the remote control ONLY Press DISPLAY The clock indication appears on the display To return to the normal display press DISPLAY again To change the clock 1 Make sure the timer indicator and the timer mode indicator DAILY or REC are not lit on the display If they are lit press and hold CLOCK TIMER until they go off 2 Press CLOCK TIMER repeatedly until the unit enters the clock se...

Page 13: ...urning On the Power To turn on the unit press STANDBY ON or on the unit The STANDBY ON lamp on the unit lights green When you press the source button 3 8 CD 2 3 TAPE FM AM and AUX or AUX DVD on the unit the unit automatically turns on and starts playback if the source is ready Pressing one of the disc eject buttons CD10 CD50 also turns on the unit See page 17 Pressing 0 tape eject also turns on th...

Page 14: ...me level can be adjusted between VOLUME MIN and VOLUME 1 VOLUME 40 VOLUME MAX The volume level has no effect on recording On the remote control To increase the volume press VOLUME To decrease the volume press VOLUME When you press and hold either button you can change the volume level continuously On the unit To increase the volume turn the VOLUME control clockwise To decrease the volume turn the ...

Page 15: ...ecrease the level On the unit 1 Press BASS to adjust the bass level or press TREBLE to adjust the treble level 2 Press UP to increase the level or press 4 DOWN to decrease the level Changing the Display Brightness You can change the display brightness only while the unit is turned on On the remote control ONLY Press DIMMER while the unit is turned on Each time you press the button the display brig...

Page 16: ...play Reception will improve To restore the stereo effect press FM MODE again so that the MONO indicator goes off In stereo mode you can hear stereo sound when a stereo program is broadcast Presetting Stations You can preset 30 FM and 15 AM MW stations manually In some cases test frequencies have been already stored for the tuner since the factory examined the tuner preset function before shipment ...

Page 17: ...l ONLY 1 Press FM AM to select either FM or AM The unit automatically turns on and tunes in to the previously received station either FM or AM MW Each time you press the button the band alternates between FM and AM MW 2 Press DISC UP or DISC DOWN to select a preset number SET FM AM DISC UP DISC DOWN To tune in to a preset station directly using the number buttons On the remote control ONLY Pressin...

Page 18: ...ers for example A may represent accented A s like Á Â Ã À Ä and Å Searching for Programs by PTY Codes PTY Search One of the advantages of RDS is that you can locate a particular kind of program by specifying the PTY codes For details on the PTY codes see Additional Information on page 32 To search for a program using the PTY codes REMEMBER you must preset FM RDS stations to use the PTY codes If no...

Page 19: ...ting the program you have selected The unit continues tuning in to the current station When a station starts broadcasting the program you have selected the unit automatically switches to the station The received PTY code on the display starts flashing When the program is over the unit goes back to the previously tuned station but the function still remains activated CASE 2 If there is a station br...

Page 20: ...rdable and CD RWs CD ReWritable can be played only if they are already finalized Usually you can play back your original CD Rs or CD RWs recorded in music CD format However sometimes they may not play depending on their characteristics or recording conditions Before playing CD Rs or CD RWs read their instructions or cautions carefully Some CD Rs or CD RWs may not play on this unit because of their...

Page 21: ...re loaded on the disc trays they are played in the following sequence Ex When playback is started from the CD 2 tray CD 2 CD 3 CD 4 CD 5 CD 1 then stops If no disc is on the disc tray 5 CD Changer skips that tray To start Continuous Play while a source other than CD is selected On the unit ONLY 1 Press DISC SELECT while listening to a source other than CD The following indication appears on the di...

Page 22: ...rectly using the number buttons On the remote control ONLY Pressing the number button s allows you to start playing the track number on the current disc Ex For track number 5 press 5 For track number 15 press 10 then 5 For track number 20 press 10 then 10 For track number 30 press 10 10 then 10 Programing the Track Playing Order Program Play You can arrange the order in which the tracks play befor...

Page 23: ...3 2 4 6 5 7 9 8 10 10 CD PRGM 1 2 3 4 5 Track number Total playing time In the Program Play mode you cannot open the disc trays regardless of the source currently selected In this case change the source to the CD player then press PLAY MODE while playback is stopped before opening a disc tray If you try to program a 33rd track MEMORY FULL will appear on the display When NO PROGRAM appears on the d...

Page 24: ...Play mode before or after play press PLAY MODE once or twice so that the unit enters another disc playback mode Continuous Play or Program Play The RANDOM indicator goes off Turning off the unit also cancels Random Play and changes the disc playback mode to Continuous Play Repeating Tracks or Discs Repeat Play You can repeat each track each disc or all discs in the 5 CD Changer as many times as yo...

Page 25: ...is locked The loaded discs are also locked See page 21 If you try to eject a locked cassette LOCKED appears to inform you that the Cassette Lock is in use To cancel the prohibition and unlock the cassette repeat the above procedure UNLOCKED appears on the display for a while and the loaded cassette is unlocked Playing Back a Tape You can play back type I tapes 1 Insert a cassette into the cassette...

Page 26: ...remove these tabs To re record on a protected tape cover the holes with adhesive tape Recording Adhesive tape Recording on a Tape 1 Insert a recordable cassette into the cassette compartment with the exposed part of the tape facing left See also page 22 2 Check the recording direction for the tape If the tape direction is not correct press 2 3 TAPE twice then 7 to change the tape direction If you ...

Page 27: ...t the disc number you want to record On the remote control Press DISC UP or DISC DOWN On the unit Press DISC SELECT repeatedly REC 4 Press CD REC MODE on the remote control to select 1 CD Each time you press the button the recording mode changes as follows 5 Press REC while 1 CD still remains on the display The REC indicator lights up on the display and recording starts Make sure to press the butt...

Page 28: ...s the Repeat Play mode All Discs Synchronized Recording 1 Insert a recordable cassette into the cassette compartment with the exposed part of the tape facing left 2 Load discs into the 5 CD Changer If the current playing source is not the CD player press 3 8 CD then 7 before going to the next step You can make a program see page 19 or select the Random Play mode see page 20 if you want In this cas...

Page 29: ...e first track of the selected disc is recorded the first track of the next disc will be recorded First Track Recording will stop after all the first tracks on the loaded discs are recorded Both the 5 CD changer and the cassette deck stop automatically To stop while recording press 7 The tape stops after 4 seconds To remove the cassette press 0 on the unit You cannot exchange a disc while recording...

Page 30: ...ther turned on or in standby mode How the timer actually works When the on time comes the unit automatically turns on the timer indicator flashes just before the on time and continues flashing while the timer is operating Then when the off time comes the unit automatically turns off standby The timer setting remains in memory until you change it When the DAILY indicator is lit on the display the t...

Page 31: ...ve selected CD PROGRAM in step 5 Do not press DISPLAY while the unit is in standby mode to turn off the clock indication DISPLAY OFF otherwise the program contents is cleared and playback starts in the Continuous Play mode when the timer on time comes 4 Press DISC UP or DISC DOWN to select the timer mode the Daily Timer or the Recording Timer and the source to play then press CLOCK TIMER Each time...

Page 32: ...he specified length of time passes On the remote control ONLY 1 Press SLEEP The SLEEP indicator lights up on the display SLEEP 10 appears on the display for a while Each time you press the button the length of time changes as follows 2 Wait for about 5 seconds after specifying the length of time To check the remaining time until shut off time press SLEEP once The remaining time until shut off time...

Page 33: ...ent warping Be careful not to scratch the surface of the disc when placing it back in its case Avoid exposure to direct sunlight temperature extremes and moisture To clean the disc Wipe the disc with a soft cloth in a straight line from center to edge DO NOT use any solvent such as conventional record cleaner spray thinner or benzine to clean the disc Handling cassette tapes If the tape is loose i...

Page 34: ...n The Disc Lock function is in use The disc is upside down The Cassette Lock function is in use Small tabs on the back of the cassette are removed The built in microprocessor has malfunctioned due to external electrical interference The path between the remote control and the remote sensor on the unit is blocked The batteries are exhausted You are using the remote control too far from the unit Act...

Page 35: ...ading etc CHILDREN Programs targeted at a young audience SOCIAL Programs about sociology history geography psychology and society RELIGION Religious programs PHONE IN Involving members of the public expressing their views either by phone or at a public forum TRAVEL Travel information Additional Information LEISURE Programs about recreational activities JAZZ Jazz music COUNTRY Songs which originate...

Page 36: ...VICTOR COMPANY OF JAPAN LIMITED U M UX B70 MICRO COMPONENT SYSTEM 2003 VICTOR COMPANY OF JAPAN LIMITED EN 0503MWMMDWJEM ...

Reviews: